

Why Everyone is Obsessed with This Genius (and Easy) Food Board Hack
There is something inherently magical about gathering around a table where the food isn’t just served, but presented as an experience. For years, I struggled with the traditional dinner party format—balancing heavy plates, rushing back and forth to the kitchen, and missing the actual conversation. Then, the ‘Everything Board’ hack changed my life. It’s not just about cheese and crackers anymore; it’s about taking high-quality, comforting dishes and arranging them in a way that feels abundant, accessible, and effortlessly chic.
The obsession with this hack comes from its versatility. Imagine a massive, rustic wooden board featuring everything from a steaming bowl of vibrant soup to charred skewers and delicate shortbread. It’s a sensory explosion that invites guests to graze, linger, and discover new flavor combinations at their own pace. It turns a meal into a centerpiece and a conversation starter, making even a Tuesday night feel like a gala event in the heart of your own home.
How to make creamy asparagus soup

Why we love this
This soup is like a liquid embrace of springtime, offering a silky-smooth texture that feels incredibly indulgent without being overly heavy. The earthy, slightly nutty notes of fresh asparagus are brightened by a hint of lemon, creating a profile that is both sophisticated and comforting. As you lift the spoon, the delicate aroma of sautéed leeks and garlic wafts up, promising a refreshing yet soul-warming start to any meal. It is the vibrant green hue that truly steals the show on your food board, providing a pop of color that looks as fresh as it tastes.
Ingredients
- 2 lbs fresh asparagus, woody ends trimmed
- 1 large leek, white and light green parts sliced
- 2 cloves garlic, minced
- 4 cups vegetable or chicken broth
- 1/2 cup heavy cream
- 1 tbsp olive oil
- 1 tbsp lemon juice
- Salt and black pepper to taste
- Fresh chives for garnish
How to make it
- Begin by prepping your asparagus: cut the tips off and set them aside for a garnish, then chop the remaining stalks into 1-inch pieces.
- In a large heavy-bottomed pot, heat the olive oil over medium heat. Add the sliced leeks and sauté for about 5 minutes until they are soft and translucent, but not browned.
- Stir in the minced garlic and cook for 1 minute until fragrant, then add the chopped asparagus stalks and a pinch of salt.
- Pour in the broth, bringing the mixture to a gentle boil before reducing the heat to low. Let it simmer for 15-20 minutes until the asparagus is very tender.
- While the soup simmers, quickly blanch the reserved asparagus tips in boiling water for 2 minutes, then plunge them into ice water to keep them bright green.
- Once the soup base is ready, use an immersion blender (or transfer to a standard blender in batches) and process until completely smooth and velvety.
- Stir in the heavy cream and lemon juice. Heat through gently on low, seasoning with more salt and pepper as needed. Serve in small bowls on your board, topped with the blanched tips and chives.
How to bake lemon sugar cookies

Why we love this
There is nothing quite like the scent of citrus-infused sugar baking in a warm oven to make a house feel like a home. These lemon sugar cookies are the perfect balance of a soft, pillowy interior and a slightly crisp, crystalline edge that crumbles beautifully with every bite. The zingy brightness of fresh lemon zest cuts through the buttery sweetness, leaving a refreshing aftertaste that cleanses the palate. They add a whimsical, sunny element to your food board, looking absolutely stunning when nestled against savory elements or fresh fruit.
Ingredients
- 2 3/4 cups all-purpose flour
- 1 tsp baking soda
- 1/2 tsp baking powder
- 1 cup unsalted butter, softened
- 1 1/2 cups white granulated sugar
- 1 egg
- 1 tsp vanilla extract
- 2 tbsp fresh lemon zest
- 3 tbsp fresh lemon juice
- Extra sugar for rolling
How to make it
- Preheat your oven to 350°F (175°C) and line two large baking sheets with parchment paper or silicone mats.
- In a medium bowl, whisk together the flour, baking soda, and baking powder until well combined and set aside.
- In a large stand mixer bowl, cream together the softened butter and 1.5 cups of sugar on medium-high speed for about 3-4 minutes until the mixture is light, fluffy, and pale.
- Beat in the egg, vanilla extract, lemon juice, and lemon zest. Ensure you scrape down the sides of the bowl to incorporate all the citrus oils from the zest.
- Gradually add the dry ingredients to the wet ingredients on low speed, mixing just until the flour streaks disappear—do not overmix, or the cookies will be tough.
- Scoop rounded tablespoons of dough, roll them into neat balls, and then roll each ball in a small bowl of extra sugar until evenly coated.
- Place the balls on the baking sheets about 2 inches apart and bake for 8 to 10 minutes. The edges should be just barely golden; the centers will look slightly soft but will firm up as they cool.
- Let them rest on the baking sheet for 5 minutes before transferring to a wire rack to cool completely.
How to roast honey glazed carrots

Why we love this
Roasting carrots transforms them from a humble root vegetable into a candy-like delicacy that glitters under the dining room lights. The high heat of the oven caramelizes the natural sugars, while the honey glaze creates a sticky, golden coating that clings to every crevice. When you bite into them, you experience a delightful contrast between the charred, slightly chewy exterior and the tender, meltingly soft middle. Topped with a sprinkle of fresh thyme, they provide an aromatic, herbaceous finish that balances the intense sweetness perfectly.
Ingredients
- 1 lb slender whole carrots, peeled and tops trimmed
- 2 tbsp honey
- 1 tbsp olive oil
- 1 tbsp melted butter
- 1/2 tsp salt
- 1/4 tsp cracked black pepper
- 1 tsp fresh thyme leaves
How to make it
- Preheat your oven to 400°F (200°C). If your carrots are very thick, slice them in half lengthwise so they all cook at the same rate.
- In a small bowl, whisk together the honey, olive oil, melted butter, salt, and pepper until the glaze is emulsified.
- Place the carrots on a large rimmed baking sheet and pour the honey mixture over them. Use your hands or a spatula to toss them thoroughly, ensuring every carrot is well-coated.
- Spread the carrots out into a single layer—crowding the pan will cause them to steam rather than roast and caramelize.
- Roast in the oven for 20-25 minutes. Halfway through the cooking time, use tongs to turn the carrots over to ensure even browning.
- The carrots are done when they are fork-tender and show deep golden-brown charred spots on the edges.
- Remove from the oven and immediately sprinkle with fresh thyme leaves. Serve warm on the board for a rustic, elegant touch.
How to sear garlic butter salmon
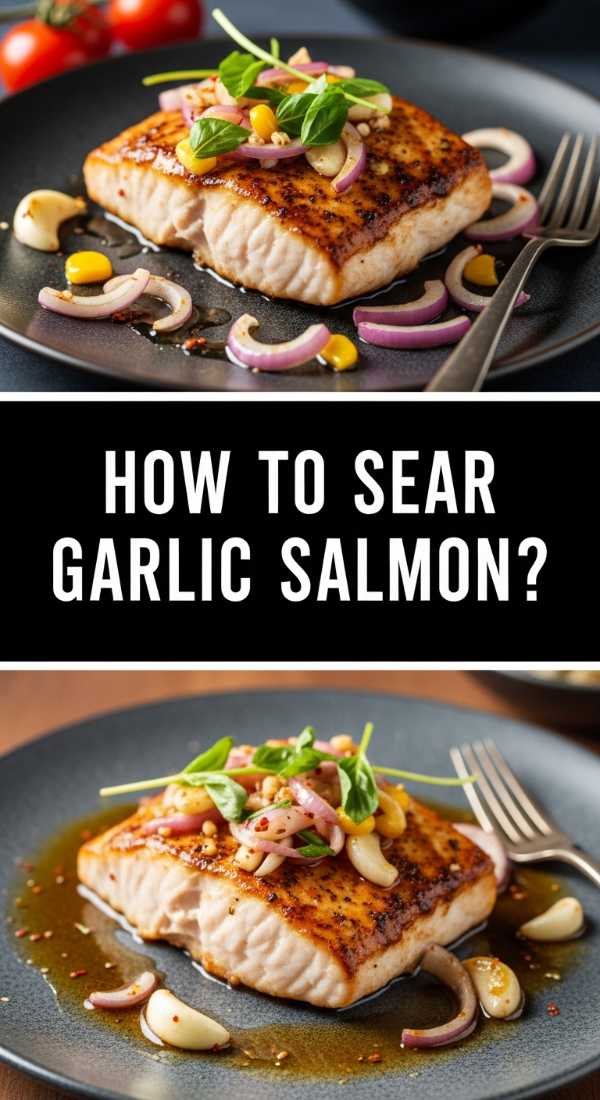
Why we love this
There is an undeniable luxury to perfectly seared salmon, with its copper-colored, crispy skin and succulent, pink flakes that practically melt in your mouth. The addition of a rich garlic butter sauce elevates the fish, infusing it with a savory depth that is punctuated by the brightness of fresh lemon juice. As the butter foams in the pan, it takes on a nutty aroma that fills the kitchen, signaling a meal that is both healthy and decadent. It acts as the protein powerhouse of your board, looking incredibly impressive when served as individual portions or a single large fillet.
Ingredients
- 2 large salmon fillets (6 oz each)
- 2 tbsp unsalted butter
- 3 cloves garlic, smashed and minced
- 1 tbsp olive oil
- 1/2 lemon, sliced into rounds
- Salt and pepper to taste
- Fresh parsley for garnish
How to make it
- Pat the salmon fillets completely dry with paper towels; moisture is the enemy of a good sear and will prevent the skin from getting crispy.
- Season both sides of the fish generously with salt and black pepper.
- Heat the olive oil in a heavy stainless steel or cast-iron skillet over medium-high heat until the oil is shimmering and just starting to smoke.
- Place the salmon fillets in the pan, skin-side down. Press down lightly with a spatula for the first 30 seconds to ensure the skin makes full contact with the heat.
- Sear undisturbed for 4-5 minutes until the skin is crispy and releases easily from the pan. Flip the fillets carefully.
- Immediately add the butter and minced garlic to the pan. As the butter melts and foams, tilt the pan and use a spoon to continuously baste the salmon with the garlic butter for another 2-3 minutes.
- Add the lemon slices to the pan during the last minute of cooking to warm them through and release their juices.
- Remove from heat when the internal temperature reaches 125-130°F for medium-rare. Garnish with parsley and serve immediately.
How to prepare fresh pesto pasta
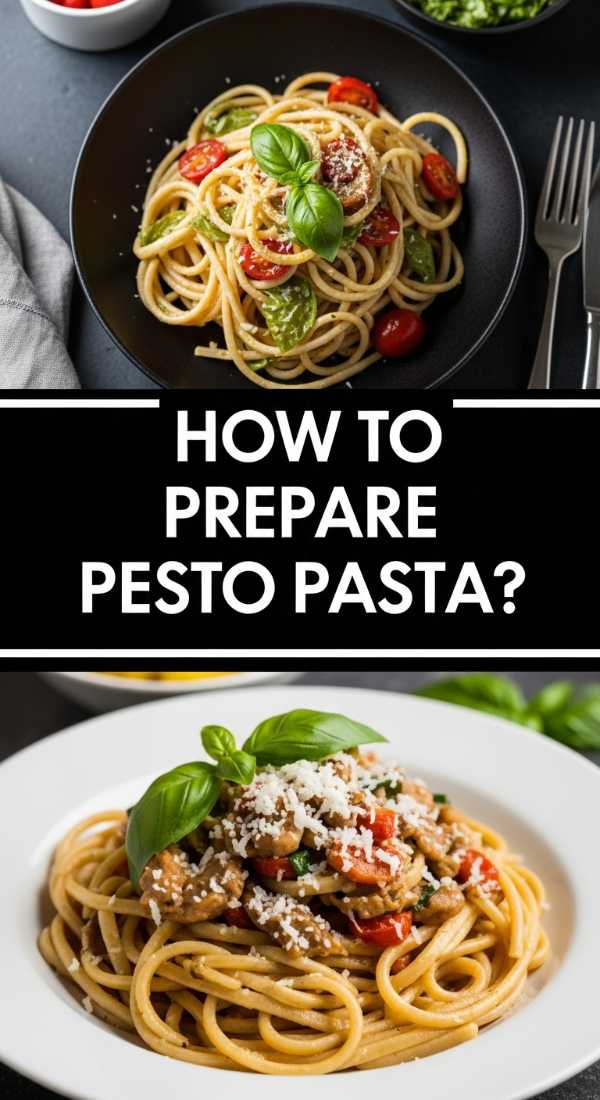
Why we love this
Fresh pesto pasta is a celebration of the garden, bringing a punchy, herbaceous explosion of flavor that feels like summer in a bowl. The vibrant green sauce, made from bruised basil leaves and sharp parmesan, clings to the ridges of the pasta, ensuring that every mouthful is balanced and rich. The crunch of toasted pine nuts adds a subtle texture that contrasts beautifully with the ‘al dente’ bite of the noodles. It’s a versatile dish that can be served warm or at room temperature, making it a stress-free addition to any communal food board.
Ingredients
- 12 oz pasta (trofie, fusilli, or gemelli work best)
- 2 cups packed fresh basil leaves
- 1/2 cup freshly grated Parmesan cheese
- 1/3 cup pine nuts, lightly toasted
- 2 cloves garlic
- 1/2 cup extra virgin olive oil
- Salt and pepper to taste
- Reserved pasta water
How to make it
- Bring a large pot of heavily salted water to a rolling boil. Cook your chosen pasta according to the package directions until it is ‘al dente’.
- While the pasta cooks, prepare the pesto. In a food processor, pulse the basil, toasted pine nuts, and garlic until coarsely chopped.
- With the processor running on low, slowly drizzle in the olive oil in a steady stream until the sauce is smooth and emulsified.
- Transfer the pesto to a large bowl and stir in the grated Parmesan cheese by hand. Season with salt and pepper.
- Before draining the pasta, reserve about 1/2 cup of the starchy pasta water—this is the secret to a silky sauce.
- Drain the pasta and immediately toss it with the pesto in the large bowl. If the sauce seems too thick, add the reserved pasta water one tablespoon at a time until it reaches a creamy consistency.
- Serve on the board garnished with extra parmesan and a few small basil leaves for a fresh, professional look.
How to mix strawberry spritz mocktails

Why we love this
A strawberry spritz mocktail is the ultimate refreshing beverage, offering a sparkling, effervescent quality that dances on the tongue. The deep red hue of the muddled strawberries creates a stunning visual against the clear, bubbling soda, while the scent of fresh mint adds a cool, aromatic layer. It’s a drink that feels celebratory and special, providing all the sophisticated flair of a cocktail without the alcohol. Served in chilled glasses on your board, it offers a sweet, fruity contrast to the savory elements of your spread.
Ingredients
- 1 cup fresh strawberries, hulled and sliced
- 1 tbsp honey or agave syrup
- 1 tbsp fresh lime juice
- Fresh mint leaves
- Sparkling mineral water or club soda
- Ice cubes
- Extra strawberries for garnish
How to make it
- In a small pitcher or a sturdy cocktail shaker, combine the sliced strawberries, honey, and lime juice.
- Use a muddler (or the back of a wooden spoon) to crush the strawberries thoroughly until they release all their juices and form a thick pulp.
- Add a handful of fresh mint leaves to the mixture and clap them between your hands first to release the essential oils, then muddle very gently so as not to tear them into small bits.
- Strain the mixture through a fine-mesh sieve into a clean container if you prefer a clear drink, or leave the pulp in for a more rustic, textured mocktail.
- Fill glasses with plenty of ice. Pour about 2-3 tablespoons of the strawberry base into each glass.
- Top with chilled sparkling water and stir gently with a long spoon to combine the layers without losing the carbonation.
- Garnish each glass with a whole strawberry and a sprig of mint before placing them onto your food board.
How to grill tropical chicken skewers

Why we love this
These skewers bring a taste of the islands to your table, combining the smoky charred flavor of grilled chicken with the explosive sweetness of warm pineapple. The marinade, infused with ginger and soy, seeps into the meat, ensuring that every bite is juicy and packed with a savory-sweet punch. As the pineapple grills, its sugars caramelize into a deep gold, providing a soft, jammy texture that complements the firm, golden-brown chicken. They are perfect ‘finger food’ for a board, allowing guests to grab a skewer and enjoy the harmony of flavors while they mingle.
Ingredients
- 1.5 lbs chicken breast, cut into 1-inch cubes
- 1 fresh pineapple, cut into chunks
- 2 bell peppers (red and green), cut into squares
- 1/4 cup soy sauce
- 2 tbsp brown sugar
- 1 tbsp grated fresh ginger
- 1 tbsp sesame oil
- Wooden or metal skewers
How to make it
- If using wooden skewers, soak them in water for at least 30 minutes to prevent them from burning on the grill.
- In a large bowl, whisk together the soy sauce, brown sugar, grated ginger, and sesame oil to create the marinade.
- Add the chicken cubes to the marinade, tossing well to coat. Cover and refrigerate for at least 30 minutes (or up to 4 hours) to allow the flavors to penetrate the meat.
- Preheat your grill or grill pan to medium-high heat and lightly oil the grates.
- Thread the skewers, alternating between a piece of marinated chicken, a chunk of pineapple, and a square of bell pepper until the skewer is full.
- Place the skewers on the grill. Cook for about 5-6 minutes per side, for a total of 12-15 minutes.
- Look for clear juices in the chicken and distinct grill marks on the pineapple. Use a brush to apply any remaining marinade during the last 2 minutes of grilling for an extra glaze.
- Remove from the heat and let rest for 3 minutes before serving to keep the chicken juicy.
How to serve fresh mango salsa

Why we love this
Mango salsa is a riot of color and flavor, offering a tropical twist that wakes up the entire palate. The buttery softness of ripe mangoes is offset by the crisp crunch of red onions and the sharp, clean bite of fresh cilantro. A hint of jalapeño provides a slow-building heat that is immediately cooled by the fruit’s natural sweetness and a generous squeeze of lime juice. It’s an incredibly versatile condiment that can be scooped up with chips, spooned over the salmon, or enjoyed as a refreshing side salad on its own.
Ingredients
- 2 ripe mangoes, peeled and finely diced
- 1/2 red onion, finely chopped
- 1/2 cup fresh cilantro, chopped
- 1 jalapeño, seeded and minced
- Juice of 1 large lime
- 1/4 tsp salt
- 1/2 tsp chili flakes (optional)
How to make it
- Start by dicing your mangoes into uniform 1/4-inch cubes. The smaller and more consistent the dice, the better the flavors will meld in each bite.
- In a medium glass bowl, combine the diced mango, finely chopped red onion, and minced jalapeño.
- Add the fresh cilantro. Be sure to use the tender stems as well as the leaves, as they hold a tremendous amount of flavor.
- Drizzle the fresh lime juice over the mixture and sprinkle with salt and optional chili flakes for an extra kick.
- Toss everything together gently with a spoon so as not to mash the delicate mango pieces.
- For the best flavor, cover the bowl and let it sit in the refrigerator for at least 20-30 minutes. This allows the lime juice to ‘cook’ the onions slightly and draw out the sweetness of the mango.
- Serve in a bright ceramic bowl in the center of your board, surrounded by salty tortilla chips or sliced cucumbers.
How to bake lavender shortbread cookies

Why we love this
Lavender shortbread is the height of culinary elegance, offering a crumbly, buttery texture that dissolves effortlessly on the tongue. The floral notes of the lavender are subtle and sophisticated, providing a fragrant backdrop to the rich, creamy flavor of high-quality butter. It’s a cookie that feels intentional and artisanal, perfect for pairing with a cup of tea or a light mocktail at the end of a grazing session. Their pale, golden appearance and the tiny flecks of purple herb make them a visually stunning addition to any food display.
Ingredients
- 2 cups all-purpose flour
- 1 cup unsalted butter, softened
- 1/2 cup powdered sugar
- 1 tbsp dried culinary lavender
- 1/2 tsp vanilla extract
- 1/4 tsp salt
How to make it
- In a small bowl, use your fingers to rub the dried culinary lavender into the powdered sugar. This technique bruises the lavender and releases its essential oils directly into the sugar for maximum flavor.
- In a large bowl, cream the softened butter and the lavender-infused sugar together until smooth and creamy.
- Stir in the vanilla extract and salt.
- Gradually add the flour to the butter mixture. Mix on low speed until a soft dough forms—it might look a bit crumbly at first, but keep mixing until it clumps together.
- Turn the dough out onto a piece of plastic wrap and shape it into a log about 2 inches in diameter. Wrap tightly and refrigerate for at least 1 hour; this is crucial to prevent the cookies from spreading too much.
- Preheat your oven to 325°F (160°C). Slice the chilled log into 1/2-inch thick rounds.
- Place the rounds on a parchment-lined baking sheet and bake for 15-18 minutes. You want them to be set and firm, but they should remain pale with only the faintest hint of gold on the bottom.
- Let them cool completely on the pan to ensure they reach that signature shortbread snap.
How to cook garden veggie soup

Why we love this
Garden veggie soup is the ultimate comfort food, a hearty bowl brimming with the textures and flavors of a thriving vegetable patch. Every spoonful offers a different combination—tender carrots, savory zucchini, and nutrient-dense kale all swimming in a rich, herb-infused broth. The aroma is deeply savory, reminiscent of a slow-simmered Sunday dinner, while the bright colors of the vegetables make it a feast for the eyes. It provides a grounding, wholesome element to your food board, offering a warm and filling option that appeals to everyone at the table.
Ingredients
- 1 onion, diced
- 2 carrots, sliced into coins
- 2 stalks celery, chopped
- 1 zucchini, diced
- 2 cups chopped kale or spinach
- 1 can (14 oz) diced tomatoes
- 6 cups vegetable broth
- 2 cloves garlic, minced
- 1 tsp dried oregano
- 1 tbsp olive oil
- Salt and pepper to taste
How to make it
- Heat the olive oil in a large soup pot or Dutch oven over medium heat.
- Add the onion, carrots, and celery. Sauté for about 8 minutes, stirring occasionally, until the vegetables begin to soften and the onions become translucent.
- Stir in the minced garlic and dried oregano, cooking for another minute until the fragrance fills the air.
- Add the diced zucchini and the can of tomatoes (with their juices). Stir well to combine the ingredients.
- Pour in the vegetable broth and bring the soup to a boil. Once boiling, reduce the heat to low and cover the pot.
- Simmer for 20 minutes to allow the flavors to meld and the carrots to become perfectly tender.
- Stir in the chopped kale or spinach during the last 5 minutes of cooking—they only need a short time to wilt and turn a vibrant green.
- Season generously with salt and black pepper. Serve in small mugs or ramekins on your board for easy sipping and dipping.
Conclusion
Creating an ‘Everything Board’ is more than just a culinary trend; it’s a way to simplify hosting while maximizing the joy of eating. By combining these ten diverse recipes—from the zesty lemon cookies to the savory garlic butter salmon—you create a landscape of flavor that caters to every craving. This hack removes the pressure of formal plating and replaces it with a relaxed, communal atmosphere where the food truly takes center stage. So, grab your largest wooden board, pick a few of these recipes, and get ready to see why everyone is so obsessed!
Frequently Asked Questions
Can I prepare these dishes in advance? Yes! Most of the elements, like the cookies and the mango salsa, can be made a day ahead. The soups can also be prepared early and simply reheated before serving.
What kind of board should I use? A large wooden cutting board or a clean slate slab works best. If you don’t have one big enough, you can even line your dining table with brown parchment paper and arrange the food directly on it for a rustic ‘grazing table’ look.
How do I keep the warm dishes hot? Use small insulated bowls for the soups and keep the skewers and salmon covered with foil until the very moment you are ready to serve. The beauty of a board is that many of these items still taste wonderful at room temperature.