
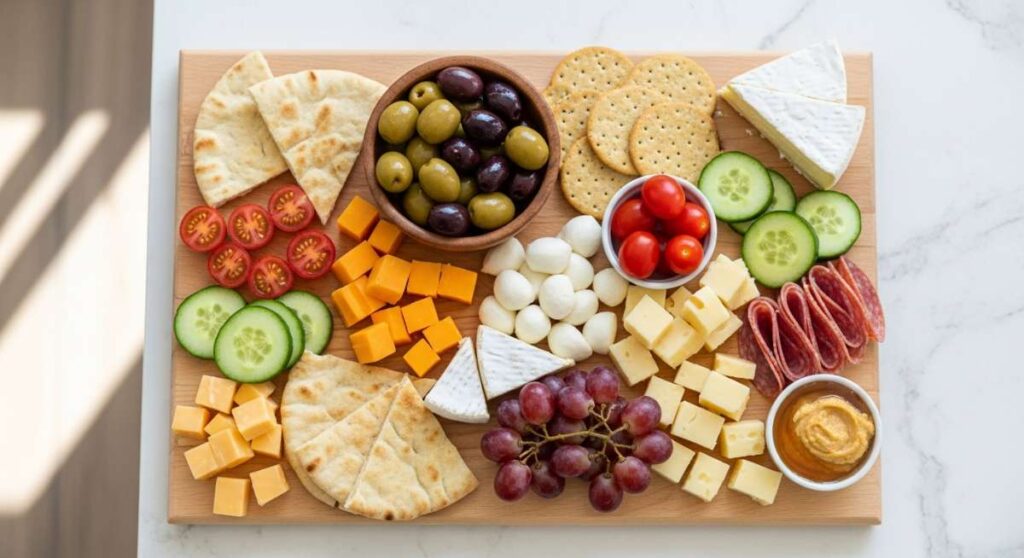
The Ultimate Simple Food Board That’s Taking Over Your Feed
There is something inherently magical about a table filled with small, beautiful plates that invite everyone to linger just a little bit longer. I remember the first time I set out a sprawling spread for my closest friends; the sunlight was filtering through the kitchen window, hitting the vibrant greens and golden crusts of various homemade treats. It wasn’t just a meal; it was a conversation starter, a sensory experience that turned a simple Sunday afternoon into a memory we still talk about today. This is the heart of the ‘Simple Food Board’ trend—it’s about intentionality, beauty, and the joy of sharing something handmade.
You’ve likely seen these boards dancing across your social media feeds: shimmering salmon, perfectly layered tea sandwiches, and rustic crackers that look too good to eat. But here’s the secret—they are much easier to assemble than they look. By focusing on high-quality ingredients and a few key techniques, you can curate a board that looks like it was plucked straight from a professional stylist’s studio. Let’s dive into the core components that will make your board the star of the season.
How to bake lemon salmon?

Why we love this
This salmon is the absolute centerpiece of any grazing board, offering a vibrant pop of color and a melt-in-your-mouth texture that is simply divine. When the heat of the oven hits the fresh citrus, it releases an intoxicating aroma that fills the kitchen with sunshine and zest. The flakes are incredibly tender, dripping with a buttery, herb-infused glaze that balances the richness of the fish with a bright, acidic finish. It’s the kind of dish that feels luxurious yet light, leaving your guests reaching for ‘just one more’ forkful of that flaky, pink goodness.
Ingredients
- 1 lb fresh Atlantic salmon fillet (center cut)
- 2 large organic lemons (sliced into thin rounds)
- 3 tbsp unsalted butter, melted
- 2 cloves garlic, minced
- 1 tbsp fresh dill, chopped
- Kosher salt and cracked black pepper to taste
How to make it
- Preheat your oven to 400°F (200°C) and line a shallow baking sheet with parchment paper to prevent sticking and ensure even heat distribution.
- Pat the salmon fillet completely dry with paper towels; removing excess moisture is crucial for achieving a firm, flaky texture rather than a mushy one.
- Place the fillet on the prepared sheet and season generously with salt and pepper. Whisk together the melted butter, minced garlic, and fresh dill in a small bowl.
- Brush the butter mixture evenly over the top and sides of the salmon, ensuring every inch is coated in flavor.
- Arrange the lemon slices across the top of the fillet in an overlapping pattern, creating a beautiful citrus scale effect.
- Bake for 12-15 minutes. You are looking for the internal temperature to reach 145°F, or for the thickest part of the fish to flake easily when pressed with a fork. The lemons should look softened and slightly caramelized around the edges.
How to make sourdough crackers?

Why we love this
There is nothing more satisfying than the rhythmic ‘snap’ of a perfectly baked sourdough cracker. These crackers carry a deep, complex tang that only fermented dough can provide, toasted to a beautiful golden brown that glows under the kitchen lights. Topped with a dusting of flaky sea salt and perhaps a hint of dried rosemary, they offer a rustic, artisanal feel to your board. Every bite provides a crunch that resonates, followed by a savory finish that acts as the perfect vehicle for creamy cheeses or herb-infused dips.
Ingredients
- 1 cup sourdough discard (unfed)
- 1/4 cup all-purpose flour
- 2 tbsp unsalted butter, melted
- 1 tsp dried rosemary or thyme
- 1/2 tsp flaky sea salt (for topping)
- 1/2 tsp garlic powder
How to make it
- Preheat your oven to 325°F (165°C). In a medium mixing bowl, combine the sourdough discard, melted butter, flour, and herbs until a smooth, pliable dough forms.
- Prepare a large sheet of parchment paper the size of your baking pan. Place the dough in the center and cover with a second sheet of parchment.
- Using a rolling pin, roll the dough as thin as humanly possible—ideally 1/16th of an inch. Evenness is key here; if parts are thicker, they will remain chewy while the edges burn.
- Peel off the top layer of parchment. Use a fork to ‘dock’ the dough by pricking it all over; this prevents the crackers from puffing up like pita bread.
- Sprinkle the surface evenly with flaky sea salt. Use a pizza cutter to score the dough into 1-inch squares or diamonds, but do not separate them yet.
- Bake for 20-25 minutes. Watch the edges closely; you want a uniform golden brown. Once crisp, remove from the oven and let cool completely on a wire rack before breaking along the scored lines.
How to prep tea sandwiches?

Why we love this
Tea sandwiches are the epitome of elegance, bringing a sense of nostalgia and refinement to your food board. We love the delicate balance of soft, pillowy bread against the crisp, cool crunch of thinly sliced cucumbers and the velvet smoothness of herb-flecked cream cheese. There’s something so dainty and intentional about these crustless bites; they encourage slow grazing and conversation. The subtle aroma of fresh mint and chives provides a garden-fresh finish that makes these sandwiches feel incredibly sophisticated and light.
Ingredients
- 8 slices of thin white or whole wheat Pullman bread
- 4 oz cream cheese, softened
- 1/2 English cucumber, sliced paper-thin
- 1 tbsp fresh chives, finely chopped
- 1 tsp lemon zest
- Pinch of white pepper
How to make it
- In a small bowl, whip the softened cream cheese with the lemon zest, chopped chives, and a pinch of white pepper until the mixture is light and airy.
- Lay out the bread slices in pairs. Spread a thin, even layer of the cream cheese mixture onto every slice of bread, reaching all the way to the very edges to seal in moisture.
- Layer the cucumber slices onto half of the bread slices. For a professional look, overlap them slightly like shingles.
- Close the sandwiches with the remaining bread slices. Using a very sharp serrated knife, carefully trim off the crusts from all four sides of each sandwich.
- Wipe your knife blade between each cut to ensure clean, white edges. Slice each sandwich into three narrow rectangles or four small triangles.
- Keep the sandwiches covered with a damp paper towel until the moment you serve them to prevent the bread from drying out.
How to bake lemon cake?
Why we love this
A slice of lemon cake is like a concentrated burst of afternoon light. The crumb is incredibly moist and dense, yet it feels airy on the tongue, releasing a perfume of citrus oil and vanilla with every bite. We love the way the tart lemon glaze seeps into the warm cake, creating a slightly sugary crust that contrasts beautifully with the soft interior. It provides a sweet, zesty counterpoint to the savory elements of the board, acting as a refreshing palate cleanser that leaves you feeling invigorated and satisfied.
Ingredients
- 1 1/2 cups all-purpose flour
- 1 cup granulated sugar
- 1/2 cup unsalted butter, softened
- 2 large eggs
- 1/2 cup whole milk
- 2 tbsp fresh lemon juice
- 2 tbsp lemon zest
- 1 tsp baking powder
- 1/2 tsp salt
How to make it
- Preheat your oven to 350°F (175°C) and grease a standard loaf pan or an 8-inch round cake tin. Line the bottom with parchment for easy removal.
- In a large bowl, cream together the softened butter and granulated sugar for at least 3-5 minutes until the mixture is pale yellow and very fluffy. This aeration is vital for a light cake.
- Add the eggs one at a time, beating well after each addition. Stir in the lemon zest and lemon juice.
- In a separate bowl, whisk the flour, baking powder, and salt. Gradually add the dry ingredients to the wet ingredients, alternating with the milk. Start and end with the flour mixture.
- Fold the batter gently with a spatula just until combined—do not overmix, or the cake will be tough.
- Pour the batter into the prepared pan and bake for 45-55 minutes. Check for doneness by inserting a wooden skewer into the center; it should come out clean or with a few moist crumbs. Let the cake cool in the pan for 10 minutes before transferring to a wire rack to glaze.
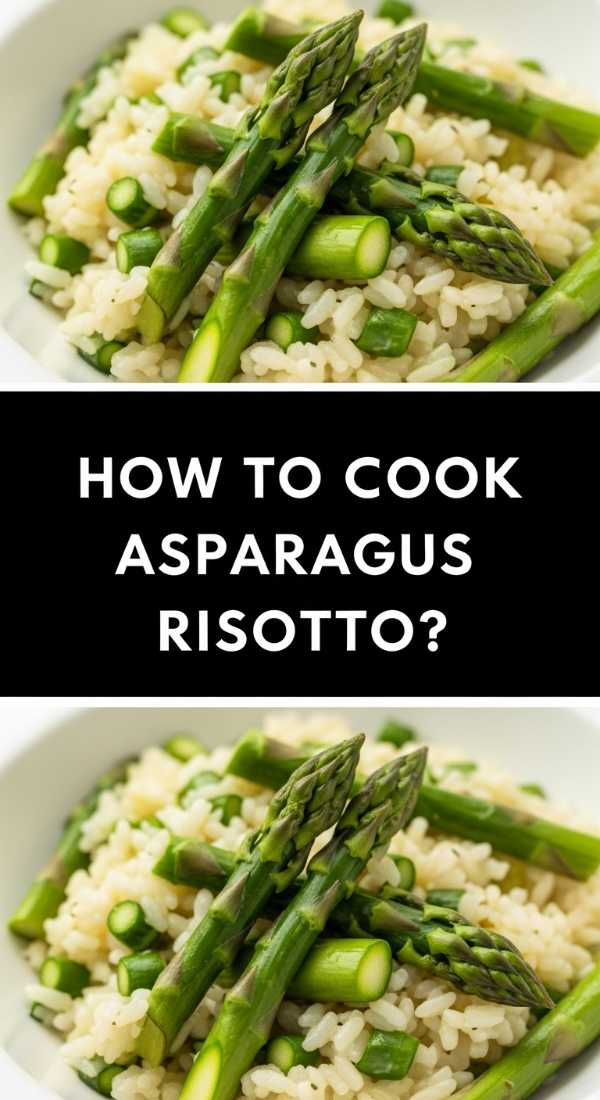
How to cook asparagus risotto?

Why we love this
Asparagus risotto is the ultimate comfort food for a spring-themed board. We adore the ‘all’onda’ (wavy) texture—where the rice is creamy and fluid, not stiff or sticky. The vibrant green of the asparagus tips provides a stunning visual contrast against the pearly white Arborio rice. Each spoonful is a masterclass in texture: the firmness of the grain, the silkiness of the parmesan-laden sauce, and the tender-crisp snap of the seasonal asparagus. It smells like a garden in bloom, enriched with the savory depth of high-quality vegetable stock.
Ingredients
- 1 cup Arborio or Carnaroli rice
- 1 bunch thin asparagus, trimmed and cut into 1-inch pieces
- 4 cups vegetable broth, kept warm on the stove
- 1/2 cup dry white wine (like Pinot Grigio)
- 2 shallots, finely minced
- 1/2 cup freshly grated Parmesan cheese
- 2 tbsp unsalted butter
- 1 tbsp olive oil
How to make it
- Blanch the asparagus pieces in boiling water for 2 minutes, then immediately plunge them into an ice bath to lock in the bright green color. Drain and set aside.
- In a wide, heavy-bottomed pan, heat the olive oil and 1 tablespoon of butter over medium heat. Sauté the minced shallots until translucent but not browned (about 3 minutes).
- Add the rice to the pan and ‘toast’ it for 2 minutes, stirring constantly. You should hear the grains clicking and see the edges turn translucent. This step ensures the rice holds its shape.
- Pour in the white wine and stir until it is completely absorbed. This deglazes the pan and adds essential acidity.
- Begin adding the warm broth one ladleful at a time. Stir frequently; the agitation of the rice grains is what releases the starch to create the creamy sauce. Wait until each ladle is almost absorbed before adding the next.
- Continue this process for 18-20 minutes until the rice is ‘al dente’. Stir in the blanched asparagus, the remaining tablespoon of butter, and the Parmesan cheese. Cover for 2 minutes to let the flavors meld before serving warm.
How to saute spring peas?

Why we love this
Spring peas are tiny jewels of sweetness that bring a youthful, fresh energy to your food board. Sautéed quickly in a hot pan, they retain a satisfying pop when bitten into, releasing a grassy, sugary flavor that is the hallmark of the season. We love pairing them with fresh mint and a hint of lemon, which elevates their natural sweetness into something truly extraordinary. The aroma of butter and shallots mingling with the steam from the peas is enough to make anyone’s mouth water, providing a light and nutritious side that complements almost anything.
Ingredients
- 2 cups fresh or frozen sweet peas
- 1 tbsp unsalted butter
- 1 small shallot, finely diced
- 1 tbsp fresh mint, julienned
- 1 tsp lemon zest
- Salt and pepper to taste
How to make it
- If using fresh peas, shell them just before cooking. If using frozen, do not thaw them; cooking them from frozen helps maintain their bright green color and firm texture.
- Heat a medium skillet over medium-high heat and melt the butter until it begins to foam.
- Add the diced shallots and sauté for 1-2 minutes until they are soft and fragrant. Do not let them brown, as this will overpower the delicate peas.
- Toss the peas into the skillet. Sauté quickly for 3-5 minutes, tossing the pan frequently. You want the peas to be heated through and slightly softened, but they should still be vibrant green and ‘snappy’.
- Remove the pan from the heat immediately. Stir in the fresh mint and lemon zest. The residual heat will release the oils from the mint without wilting it into a dull brown.
- Season with a pinch of salt and cracked pepper and serve immediately in a small decorative bowl on your board.
How to make chicken bowls?

Why we love this
Chicken bowls offer a hearty, customizable element that makes the food board feel like a complete, balanced meal. We love the contrast of warm, grilled chicken thighs—charred to perfection on the outside and juicy on the inside—against a bed of fluffy grains and crisp, raw vegetables. The aroma of charred poultry seasoned with garlic and oregano is deeply comforting. These bowls are a playground for textures, from the crunch of radishes to the creaminess of a drizzle of tahini or yogurt sauce, ensuring every bite is a new adventure.
Ingredients
- 1 lb boneless, skinless chicken thighs
- 2 cups cooked quinoa or farro
- 1 cup cherry tomatoes, halved
- 1 cucumber, diced
- 1/2 red onion, thinly sliced
- 2 tbsp olive oil
- 1 tsp dried oregano
- 1 clove garlic, minced
- Juice of half a lemon
How to make it
- In a large bowl, whisk together the olive oil, lemon juice, minced garlic, oregano, salt, and pepper. Add the chicken thighs and toss to coat; let marinate for at least 30 minutes.
- Heat a grill pan or cast-iron skillet over medium-high heat. Place the chicken in the pan and sear for 6-7 minutes per side. Do not move them too early; you want a deep, caramelized crust to form.
- Once the internal temperature reaches 165°F (74°C), remove the chicken and let it rest on a cutting board for 5 minutes. This allows the juices to redistribute, ensuring the meat stays moist.
- Slice the chicken into 1/2-inch strips.
- To assemble the bowls for the board, start with a base of cooked grains in small individual ramekins or one large shallow dish.
- Arrange the sliced chicken, halved tomatoes, diced cucumbers, and red onions in neat sections over the grains. This ‘deconstructed’ look is visually stunning and allows guests to mix their own perfect bite.
How to make strawberry tart?

Why we love this
A strawberry tart is the crown jewel of any dessert spread, looking like it came straight from a Parisian pâtisserie. We love the structural integrity of the buttery, shortbread-like crust combined with the silky, vanilla-flecked pastry cream. The star, of course, is the layer of glazed strawberries, glowing like rubies and smelling like a summer field. It’s a dessert that manages to be rich and decadent while remaining light and fruit-forward, providing a spectacular finale to your grazing experience.
Ingredients
- 1 pre-baked 9-inch tart shell (pâte sucrée)
- 1 cup whole milk
- 3 egg yolks
- 1/4 cup granulated sugar
- 2 tbsp cornstarch
- 1 tsp vanilla bean paste
- 1 lb fresh strawberries, hulled and sliced
- 1/4 cup apricot preserves (for the glaze)
How to make it
- To make the pastry cream: Whisk egg yolks, sugar, and cornstarch in a bowl until pale. In a saucepan, bring milk and vanilla paste to a simmer.
- Slowly pour half of the hot milk into the egg mixture, whisking constantly to temper the eggs so they don’t scramble. Pour the mixture back into the saucepan.
- Cook over medium heat, whisking vigorously, until the mixture thickens into a heavy custard. Remove from heat, stir in a knob of butter, and press plastic wrap directly onto the surface to prevent a skin from forming. Chill for 2 hours.
- Once the pastry cream is cold, spread it evenly into the bottom of your pre-baked tart shell.
- Arrange the strawberry slices in concentric circles starting from the outer edge, overlapping them slightly for a floral effect.
- Heat the apricot preserves with a splash of water in the microwave for 20 seconds. Strain through a sieve and brush the warm glaze over the strawberries. This provides that professional shine and keeps the fruit fresh.
How to make discard pancakes?

Why we love this
These are not your average pancakes; they are a fluffy, tangy revelation that breathes new life into your sourdough starter. We love the airy, bubbly texture that results from the chemical reaction between the acidic discard and the baking soda. The kitchen fills with the scent of toasted butter and sourdough, creating a cozy, ‘weekend morning’ atmosphere. Topped with a drizzle of maple syrup or a dollop of salted butter, they are a rustic addition to the board that feels both nostalgic and chef-driven.
Ingredients
- 1 cup sourdough discard (room temperature)
- 1 cup all-purpose flour
- 1 cup milk
- 1 large egg
- 2 tbsp melted butter
- 1 tbsp sugar
- 1 tsp baking soda
- 1/2 tsp salt
How to make it
- In a large mixing bowl, whisk together the sourdough discard, egg, milk, and melted butter until well combined and smooth.
- In a separate smaller bowl, whisk the flour, sugar, salt, and baking soda.
- Gently fold the dry ingredients into the wet mixture. Use a light hand; overmixing will deflate the air bubbles and result in flat pancakes. The batter should be slightly lumpy.
- Preheat a griddle or large non-stick skillet over medium heat. Lightly grease with butter.
- Ladle about 1/4 cup of batter onto the griddle for each pancake. Cook until you see bubbles forming on the surface and the edges look set and dry (about 2-3 minutes).
- Flip carefully with a wide spatula and cook the other side for another 1-2 minutes until golden brown. Serve in a stack on your board, perhaps with a small pitcher of warm syrup on the side.
How to make egg sandwiches?
[IMAGE_10]
Why we love this
An egg sandwich done right is a thing of beauty, offering a luxurious, creamy texture that feels incredibly indulgent. We love the combination of jammy, soft-boiled yolks and a zesty chive mayonnaise nestled inside a toasted, buttery brioche bun. It’s a sensory delight—the warmth of the bread against the cool, seasoned egg salad. The addition of fresh greens or micro-radish adds a peppery bite that cuts through the richness, making these sandwiches a sophisticated and filling addition to your board.
Ingredients
- 6 large eggs
- 1/4 cup high-quality mayonnaise
- 1 tbsp Dijon mustard
- 2 tbsp fresh chives, snipped
- 4 mini brioche buns or croissants
- Salt and smoked paprika to taste
- Handful of arugula
How to make it
- Carefully lower the eggs into a pot of boiling water. For ‘jammy’ yolks, boil for exactly 7 minutes. For hard-boiled, go for 9-10 minutes.
- Immediately transfer the eggs to an ice bath for at least 5 minutes. This stops the cooking process and makes them much easier to peel.
- Peel the eggs and chop them into 1/2-inch chunks. You want some texture, so don’t mash them into a paste.
- In a bowl, mix the mayonnaise, Dijon mustard, chives, salt, and a pinch of smoked paprika. Gently fold in the chopped eggs.
- Slice your brioche buns in half and lightly toast them in a pan with a little butter until the interiors are golden and crisp.
- Place a few leaves of arugula on the bottom bun, top with a generous scoop of the egg mixture, and close the sandwich. Secure with a cocktail pick if needed for the board presentation.
The Art of the Simple Board
Creating a viral-worthy food board isn’t about perfection; it’s about the harmony of flavors, colors, and textures. When you take the time to bake your own crackers or whisk a homemade pastry cream, that love translates into every bite. Your guests will feel the warmth and effort you put into the spread, turning a simple meal into an unforgettable event. So, grab your largest platter, pick a few of these recipes, and start building your own masterpiece. Don’t forget to take a photo before everyone digs in—your feed (and your stomach) will thank you!