
From Porch to Paradise: Creative Ways to Refresh Your Exterior Space
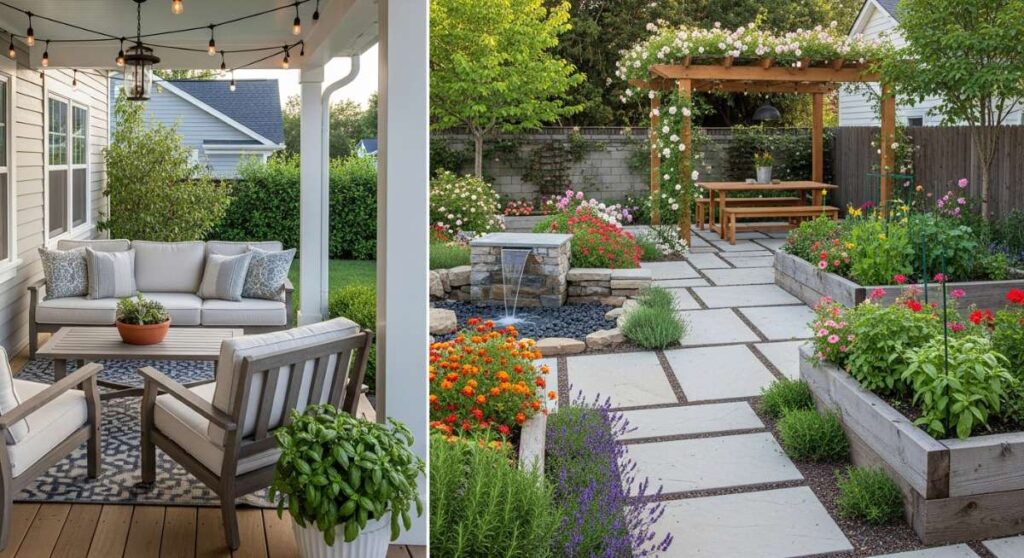
There is a specific kind of magic that happens when you step through your back door and feel the immediate embrace of a space that truly reflects your soul. For so many of us, our outdoor areas become an afterthought, a patch of grass or a concrete slab that exists merely as a transition between the car and the kitchen. But what if your porch was your sanctuary? What if your backyard felt less like a chore and more like a private resort where the coffee tastes better and the sunsets feel longer?
Refreshing your exterior isn’t just about curb appeal or property value—though those are lovely perks. It’s about creating a lifestyle that prioritizes breathing room. Whether you have a sprawling acre or a tiny urban balcony, the potential for a ‘paradise’ transformation is hidden right beneath the surface. In this guide, we’re diving into everything from the structural to the whimsical, proving that a little DIY spirit and some thoughtful design can turn any mundane exterior into a breathtaking retreat.
How to Design a Modern Rock Garden for Low Maintenance Curb Appeal

Why we love this
There is a grounded, meditative quality to a modern rock garden that traditional flower beds simply can’t replicate. Imagine the striking contrast of smooth, charcoal-grey river stones against the architectural silhouette of a bright green agave or a structural yucca. The visual weight of the boulders provides a sense of permanent, year-round beauty that doesn’t wilt when the summer heat peaks, and the rhythmic sound of rain hitting the stones creates a sensory experience that is incredibly calming. It is the ultimate solution for those who want a high-end, designer look without the constant cycle of weeding and watering.
Essential Elements:
- Various sizes of river rocks or crushed basalt
- Large accent boulders (focal points)
- Heavy-duty landscape fabric
- Steel or aluminum edging
- Drought-tolerant plants (succulents, ornamental grasses)
- Solar-powered spotlighting
How to make it
- Begin by clearing the designated area of all grass and weeds, digging down about 3 to 4 inches to ensure you have a clean slate and room for the stone depth.
- Lay down a high-quality, heavy-duty weed barrier or landscape fabric over the entire area, securing it with galvanized staples to prevent any future growth from peeking through your clean design.
- Install your metal edging along the perimeter to create a sharp, defined boundary that keeps the rocks from migrating into your lawn or driveway.
- Position your large accent boulders first; bury the bottom third of each boulder in the ground to make them look like they have naturally emerged from the earth rather than just sitting on top.
- Cut ‘X’ shapes into the fabric where you wish to plant your greenery, tucking the plants into the soil and ensuring they are level with the ground.
- Spread your primary rock mulch (the smaller stones) evenly across the fabric at a depth of 2 inches, using a rake to smooth the surface until the fabric is completely hidden and the texture looks uniform.
How to Plan a Rectangular Backyard for Maximum Family Fun

Why we love this
A rectangular backyard often feels like a bowling alley, but with the right zoning, it becomes a multi-functional masterpiece where every square inch serves a purpose. We love the way ‘rooms’ can be carved out of a flat lawn to provide a dedicated space for energetic play, quiet lounging, and al fresco dining all at once. There’s a beautiful flow that happens when you move from the plush texture of a play-ready lawn to the hardscape of a dining area, framed by the scent of jasmine or honeysuckle growing along the fence line, creating a cohesive family hub that feels expansive yet intimate.
Essential Elements:
- Zoning map (drawn to scale)
- Hardscaping materials (pavers or gravel)
- Privacy screening (hedges or slats)
- Multi-purpose furniture
- Outdoor lighting (string lights or lanterns)
- Play equipment or a designated ‘flex’ lawn
How to make it
- Start by measuring your yard’s dimensions and sketching a bird’s-eye view, dividing the rectangle into three distinct ‘zones’: Active (play), Social (dining), and Quiet (lounging).
- Define the boundaries of each zone using different floor textures; for instance, use large concrete pavers for the dining area and soft fescue grass for the play zone to provide visual and physical separation.
- Install vertical elements like tall planters or a slatted wooden screen between the zones to break up the long sightlines, which makes the yard feel wider and more interesting.
- Place your largest furniture pieces, like a dining table or sectional, in their respective zones first to ensure there is at least 3 feet of ‘walkway’ space around them for easy movement.
- Add a focal point at the very back of the rectangle, such as a fire pit or a water feature, to draw the eye through the space and make the yard feel more like a journey than a corridor.
- String bistro lights in a zig-zag pattern across the entire length of the yard to unify the zones and provide an even, warm glow that invites the family out long after the sun goes down.
How to Create Lush Flower Beds for a Stunning Front Entrance
Why we love this
There is nothing quite as welcoming as a front entrance framed by a riot of colors and textures that change with the seasons. We adore the way a well-planned flower bed can soften the hard lines of a house, surrounding the porch with the intoxicating aroma of lavender and the delicate, fluttering movement of butterfly-attracting blooms. It creates a ‘living welcome mat’ that delights the senses every time you walk through the front door, offering a tactile softness and a vibrant visual pop that instantly boosts the mood of anyone who visits.
Essential Elements:
- Organic garden soil and compost
- Layered plants (thrillers, fillers, and spillers)
- Mulch (shredded bark or pine needles)
- Edging material (brick or stone)
- Hand trowel and garden fork
- Consistent watering system
How to make it
- Identify the ‘light profile’ of your front entrance (full sun, partial shade, or full shade) to ensure you select plants that will actually thrive in that specific microclimate.
- Prepare the soil by mixing in 3-4 inches of organic compost and tilling it to a depth of about 12 inches, which creates a nutrient-rich, airy environment for roots to expand.
- Apply the ‘Rule of Three’ for depth: place your tallest plants (Thrillers like delphiniums) at the back, mid-height plants (Fillers like petunias) in the middle, and low-growing or trailing plants (Spillers like creeping jenny) at the very front.
- Space the plants according to their mature size, not their current size, to avoid overcrowding and ensure proper air circulation which prevents mildew and disease.
- Dig holes twice as wide as the root ball of each plant, gently loosen the roots, place them in the ground, and firm the soil around them to remove air pockets.
- Apply a 2-inch layer of mulch around the plants, being careful not to touch the stems directly, to retain moisture and keep the roots cool during the heat of the day.
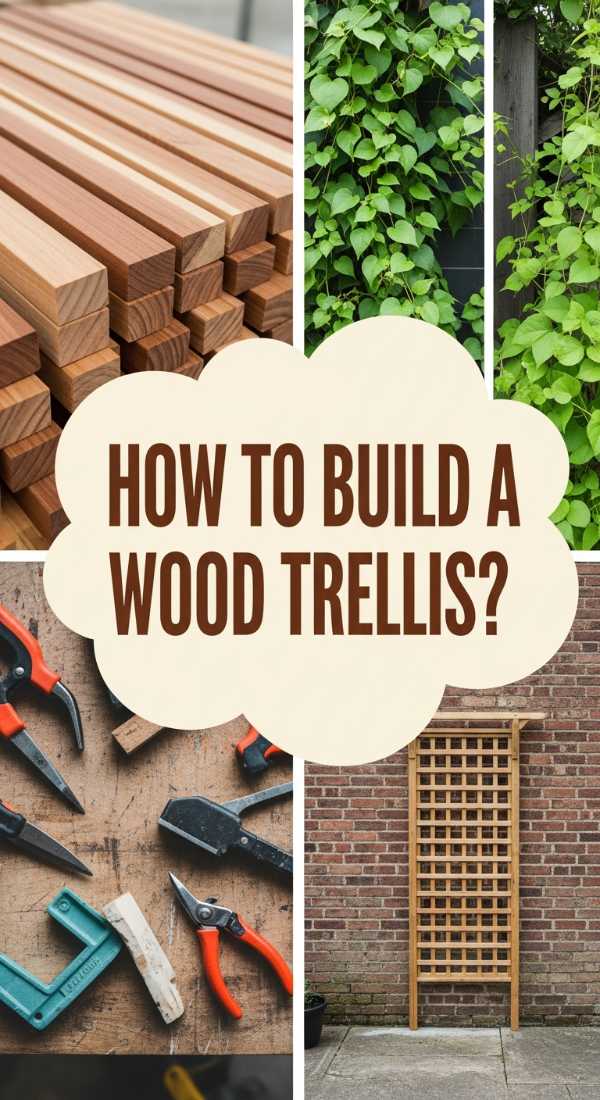
How to Build a Wood Trellis for a Vertical Garden Oasis
Why we love this
A vertical garden brings life up to eye level, transforming a flat, boring wall into a lush tapestry of greenery. We love the architectural elegance of a wood trellis, especially when it is covered in climbing roses or sweet-smelling jasmine that perfumes the air with every breeze. The warmth of the wood provides a natural, organic backdrop that feels both modern and timeless, creating a sense of enclosure and privacy that makes even the smallest patio feel like a hidden garden in the heart of the city.
Essential Elements:
- Cedar or pressure-treated wood lath
- Exterior-grade wood screws
- Drill and driver bits
- Wood stain or sealant
- Climbing plants (clematis, ivy, or jasmine)
- Wall anchors or heavy-duty hooks
How to make it
- Determine the dimensions of your trellis based on the wall space available and cut your vertical support pieces and horizontal cross-slats to size using a miter saw.
- Lay the vertical supports on a flat surface and space them evenly, then begin attaching the horizontal slats using a spacer block to ensure perfectly uniform gaps between each piece.
- Secure each intersection with a single exterior-grade screw, pre-drilling the holes to prevent the thin lath from splitting during assembly.
- Apply a high-quality weather-resistant stain or sealant to the wood to protect it from rot and UV damage, ensuring you get into all the nooks and crannies of the joints.
- Mount the trellis to your wall using spacers (like small blocks of wood) behind the trellis so it sits about an inch off the wall, allowing air to circulate and the vines to wrap around the slats.
- Plant your climbers at the base of the trellis and gently weave the initial stems through the bottom slats, using soft garden twine to secure them until they begin to climb on their own.
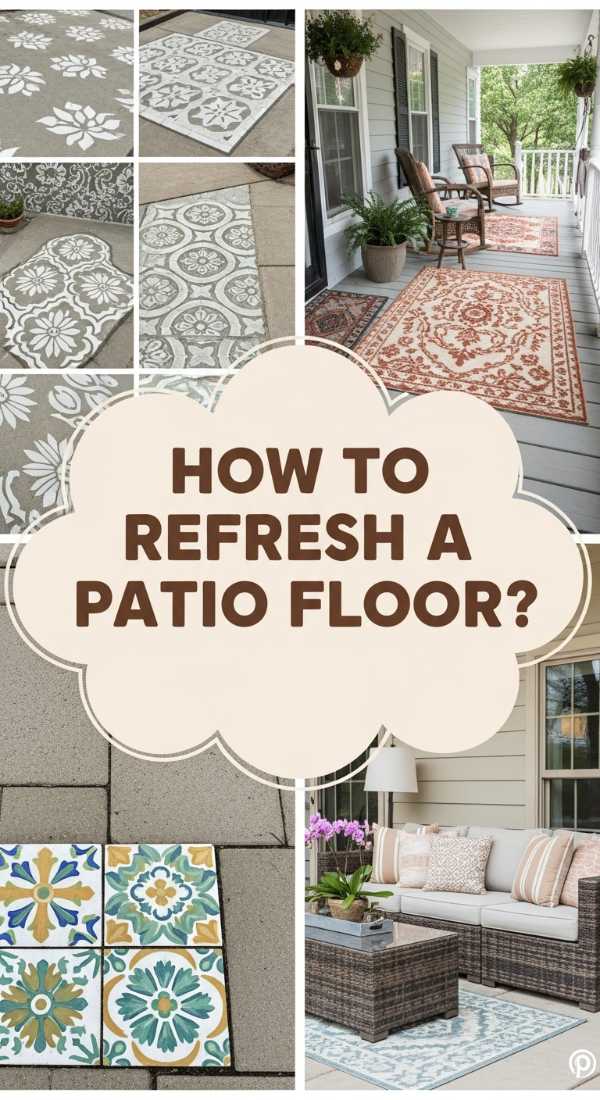
How to Refresh a Patio Floor for an Affordable Backyard Glow Up

Why we love this
The floor is the largest surface area of your outdoor space, and refreshing it can completely redefine the aesthetic of your backyard without the cost of a full renovation. We love the transformative power of a fresh coat of porch paint or a chic stencil pattern that mimics expensive Mediterranean tiles. It feels like laying down a giant outdoor rug that never gets wet or moldy, providing a clean, crisp foundation that makes your furniture pop and gives the entire area a polished, ‘finished’ look that feels incredibly high-end for a fraction of the price.
Essential Elements:
- Concrete cleaner or degreaser
- Pressure washer
- Exterior porch and patio paint
- Large-scale floor stencil
- Small foam roller and tray
- Outdoor-grade clear sealant
How to make it
- Thoroughly clean the concrete or wood surface using a pressure washer and a specialized degreaser to remove every bit of dirt, oil, and loose old paint, as a clean surface is critical for adhesion.
- Apply a base coat of high-quality exterior porch paint in your chosen primary color using a long-handled roller, ensuring even coverage and letting it dry completely for 24 hours.
- Position your stencil in the most visible corner or the center of the patio and secure it with painter’s tape to prevent it from shifting while you work.
- Load your foam roller with a small amount of the accent paint color and ‘off-load’ the excess onto a paper towel; the roller should be almost dry to the touch to prevent paint from bleeding under the stencil.
- Lightly roll over the stencil with multiple thin layers rather than one heavy one, checking for crisp edges as you lift and reposition the stencil across the floor.
- Once the entire floor is stenciled and dry, apply two coats of a clear, slip-resistant outdoor sealer to protect your artwork from foot traffic and weather elements.
How to Style a Nostalgic Teen Room for the Ultimate Retro Vibe

Why we love this
Stepping into a retro-styled room feels like a warm hug from a simpler time, blending the vibrant energy of the 70s and 80s with modern comfort. We love the tactile mix of textures—think plush shag rugs, smooth velvet pillows, and the cool glow of a neon sign. It creates a space that is not just a bedroom, but a personality-filled sanctuary where every object has a story, from the crackle of a vinyl record to the soft, diffused light of a lava lamp, making it the ultimate hangout spot for creative expression and nostalgic dreaming.
Essential Elements:
- Vintage-inspired posters and wall art
- Record player and vinyl collection
- Macramé or beaded curtains
- Neon lighting or LED strips
- Funky textures (faux fur, velvet, corduroy)
- Retro-colored paint (mustard, sage, or terracotta)
How to make it
- Select a ‘hero’ era as your design foundation, such as the mid-century 70s or the neon-soaked 80s, to keep the color palette cohesive and prevent the room from feeling cluttered.
- Paint a focal wall in a warm, muted tone like terracotta or mustard yellow, or apply a peel-and-stick wallpaper with a bold geometric pattern to instantly set the retro mood.
- Layer your lighting by adding a mix of ‘vibe’ lights; place a neon sign above the bed, a lava lamp on the desk, and warm LED strips behind the headboard to create a soft, multi-dimensional glow.
- Incorporate ‘touchable’ textiles by adding a thick shag rug to the floor and a variety of throw pillows in contrasting fabrics like corduroy and velvet to create a cozy, ‘sunken-den’ feeling.
- Create a dedicated ‘analog corner’ with a vintage record player and a display rack for vinyl, which provides both a visual focal point and a screen-free way to enjoy music.
- Finish the look by curating a gallery wall of thrifted frames, old concert posters, and Polaroids, ensuring they are arranged in a slightly asymmetrical way for that authentic, lived-in feel.
How to Construct a Rustic Grill Station for Summer Outdoor Cooking
Why we love this
A dedicated grill station turns a simple barbecue into a professional culinary experience, right in your own backyard. We love the rugged, earthy feel of a stone or timber station that smells faintly of cedar and woodsmoke even before the grill is lit. It provides a generous prep surface where you can feel the warmth of the sun while you chop vegetables, and the convenience of having every tool at your fingertips makes the process of outdoor cooking feel like a relaxed, rhythmic dance rather than a frantic trip back and forth to the kitchen.
Essential Elements:
- Weather-resistant cabinetry or wood frame
- Stone or stainless steel countertop
- Built-in grill or a custom cutout for a kettle grill
- Outdoor-rated hooks and storage bins
- Heat-resistant barrier or insulation
- Cedar planks or stone veneer for siding
How to make it
- Build a sturdy frame using pressure-treated 2x4s, ensuring the height is comfortable for cooking (typically 36 inches) and the width allows for at least 2 feet of prep space on either side of the grill.
- Measure your specific grill model carefully and create a cutout in the frame, ensuring you leave the required clearance for ventilation and heat safety as specified by the manufacturer.
- Clad the exterior of the frame in cedar planks or a lightweight stone veneer, using exterior-grade adhesive and nails to create a rustic, built-in appearance that blends with your landscaping.
- Install a durable, non-porous countertop like polished concrete or stainless steel, ensuring it is slightly sloped or has a drip edge to prevent water from pooling during rain.
- Attach heavy-duty ‘S’ hooks to the side of the station to hold your tongs, spatulas, and grill brushes, and install a magnetic strip for easy access to prep knives.
- Treat all wood surfaces with a food-safe outdoor sealant and conduct a ‘test fire’ of the grill to ensure there is no excessive heat transfer to the surrounding frame before your first big cookout.
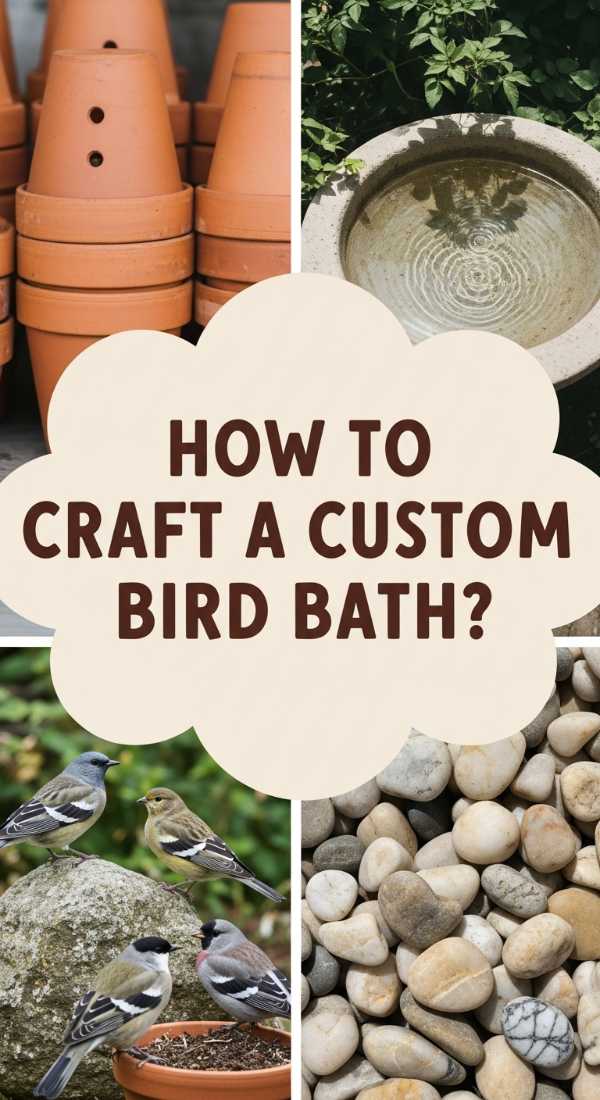
How to Craft a Custom Bird Bath for a Peaceful Garden Sanctuary
Why we love this
There is a profound sense of peace that comes from watching birds splash and play in a water feature you built with your own hands. We love the combination of still, shimmering water against the rough texture of stone or terracotta, creating a miniature oasis that invites nature right to your window. The sound of water and the sight of local wildlife create a ‘living garden’ that feels connected to the world around it, offering a moment of quiet reflection in the midst of a busy day.
Essential Elements:
- Large terracotta saucers or a shallow stone basin
- A sturdy base (an old pillar, stacked stones, or a wooden stump)
- Non-toxic waterproof sealant
- Decorative pebbles or sea glass
- Solar-powered fountain pump (optional)
- Outdoor-grade epoxy or adhesive
How to make it
- Select a base that is at least 18-24 inches tall to keep the birds safe from ground predators, ensuring it is level and firmly planted in a shaded spot in your garden.
- If using terracotta, apply a non-toxic waterproof sealant to the inside of the saucer to prevent the porous material from absorbing all the water and cracking over time.
- Secure the saucer to the top of your base using a generous amount of outdoor-grade epoxy, pressing down firmly and allowing it to cure for a full 48 hours before adding water.
- Place a few large, flat stones in the center of the bath so they break the surface of the water; this gives birds a safe place to land and gauge the depth before hopping in.
- Add a small solar-powered ‘bubbler’ or fountain pump to the center to keep the water moving, which prevents mosquitoes from breeding and attracts more birds with the sound of splashing.
- Fill with fresh, clean water and commit to scrubbing the basin once a week with a stiff brush to keep the sanctuary healthy and inviting for your feathered visitors.
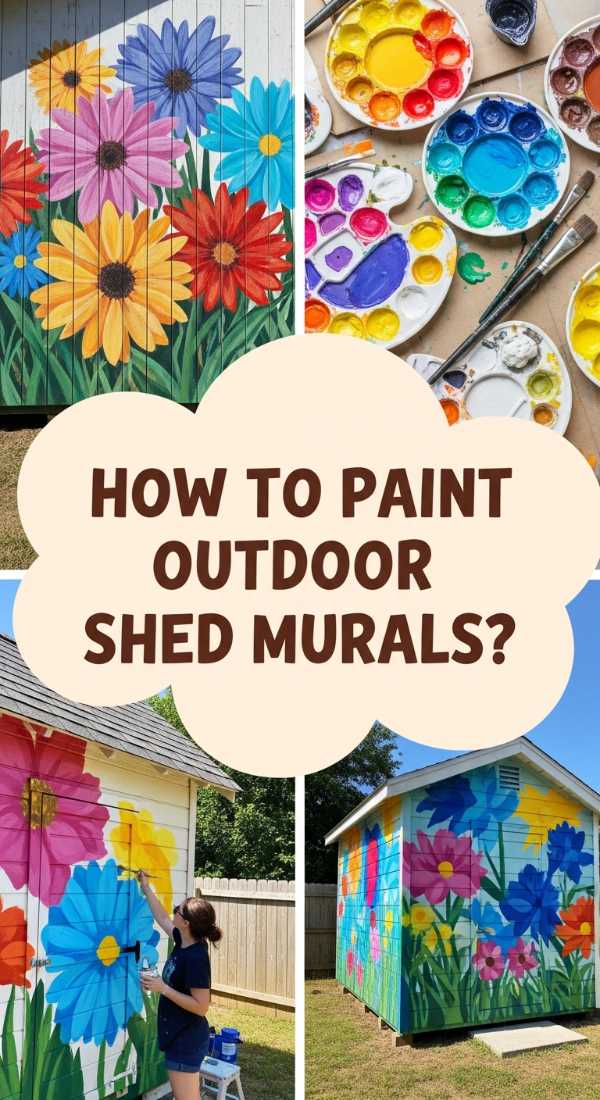
How to Paint Outdoor Shed Murals for a Vibrant Backyard Statement

Why we love this
An outdoor shed is usually a utilitarian eyesore, but a mural turns it into a giant canvas that radiates personality and joy. We love how a bold, colorful design—whether it’s oversized botanical leaves or a whimsical landscape—can make a shed disappear into the garden or stand out as a stunning piece of modern art. It’s a chance to play with scale and color in a way that feels fearless, turning a backyard storage unit into the ultimate conversation starter that brings a smile to your face every time you look out the window.
Essential Elements:
- Exterior primer and high-quality outdoor latex paints
- A variety of brushes and rollers
- Painter’s tape and drop cloths
- A chalk pencil for sketching
- UV-resistant clear topcoat
- A ladder or scaffolding
How to make it
- Clean the exterior walls of the shed to remove dust, spiderwebs, and peeling paint, then apply a high-adhesion exterior primer to create a smooth, blank canvas for your art.
- Sketch your design onto the shed using a piece of chalk or a light pencil; chalk is ideal because it can be easily wiped away with a damp cloth if you need to adjust your proportions.
- Start by painting the largest areas of color (the background) using a roller, working from the top of the shed down to the bottom to catch any drips as you go.
- Once the background is dry, use smaller brushes to fill in the details of your mural, layering colors to create depth and using bold outlines if you want a more graphic, modern look.
- Step back frequently to view the mural from across the yard, ensuring the composition looks balanced and the colors are as vibrant as you intended from a distance.
- Protect your masterpiece from fading and peeling by applying two coats of a UV-resistant clear exterior topcoat once the paint has cured for at least 48 hours.
How to Achieve Realistic Pantry Organization for a Stress Free Kitchen
[IMAGE_10]
Why we love this
Walking into a perfectly organized pantry feels like a deep, cleansing breath for the brain. We love the visual harmony of uniform glass jars filled with colorful grains, pastas, and spices, which turns mundane grocery items into a beautiful display. It’s not just about aesthetics; it’s about the incredible ease of knowing exactly what you have at a glance, eliminating the frustration of ‘lost’ cans at the back of the shelf and making meal prep feel like a streamlined, joyful process rather than a treasure hunt.
Essential Elements:
- Airtight glass or BPA-free plastic canisters
- Matching labels (minimalist or handwritten)
- Tiered shelf risers for cans
- Woven or wire baskets for ‘like’ items
- A turntable (Lazy Susan) for oils and vinegars
- Inventory list or chalkboard
How to make it
- Empty your entire pantry completely and wipe down the shelves, discarding any expired items and donating anything that is still good but you know you won’t use.
- Group your remaining items into logical categories such as ‘Baking,’ ‘Breakfast,’ ‘Snacks,’ and ‘Dinner Grains’ to determine how much space and what type of containers each category needs.
- Decant dry goods like flour, sugar, pasta, and cereal into airtight clear containers; this keeps food fresher longer and creates a uniform, ‘clean’ visual line on your shelves.
- Apply consistent labels to the front of every container at the same height, ensuring the text is easy to read so that every family member knows exactly where items belong.
- Utilize vertical space by adding tiered risers for canned goods and a Lazy Susan in the corner for tall bottles, which ensures that nothing ever gets buried in the back again.
- Place the items you use most frequently at eye level and keep heavy or bulk items on the bottom shelf, maintaining a ‘one-in, one-out’ rule to keep the system working long-term.
Conclusion
Refreshing your exterior—and those vital transitional spaces like the pantry or the teen room—is more than just a weekend project; it’s an investment in your daily happiness. By taking the time to layer textures, organize your essentials, and add a splash of creative color, you turn a house into a sanctuary. Whether you start with a simple bird bath or tackle a full patio stencil, remember that the goal is to create a space that makes you want to linger a little longer, breathe a little deeper, and enjoy the beauty of the world right outside your door.
Frequently Asked Questions
How often should I reseal my outdoor wood projects? Typically, cedar or pressure-treated wood should be resealed every 1-2 years depending on your climate and sun exposure. Is rock garden maintenance really zero work? Not quite zero, but very low! You may need to blow out fallen leaves once a month and occasionally pull a stray weed that manages to sprout in the dust between rocks. What is the best paint for an outdoor mural? Use high-quality exterior latex paint. It is designed to expand and contract with temperature changes and resists fading from UV rays.