
Why This Easy Snack Board Hack Is Guaranteed to Go Viral
There is something inherently magical about the moment your guests walk into the kitchen and see a sprawling, colorful snack board waiting for them. It’s more than just food; it’s an invitation to gather, to linger, and to share stories over a variety of textures and flavors. For years, I struggled with the ‘perfect’ party appetizer, often spending hours in the kitchen missing the actual party. That all changed when I discovered the art of the viral snack board hack—a method that looks like a million bucks but takes almost zero actual cooking.
We’ve all seen those mesmerizing videos on social media where a simple platter transforms into a work of art in seconds. The secret isn’t a culinary degree; it’s all about the assembly and the visual rhythm of the board. By focusing on a few key techniques, like the salami rose or the ‘rule of thirds’ for cheese placement, you can create a centerpiece that is as photogenic as it is delicious. This approach takes the stress out of entertaining and replaces it with pure, creative joy.
In this guide, I’m breaking down the exact steps to help you master the simple food board that is currently taking the internet by storm. Whether you are hosting a cozy movie night or a festive holiday bash, these hacks will ensure your board is the star of the show. Let’s dive into the sensory details and professional tips that make this snack board truly unforgettable.
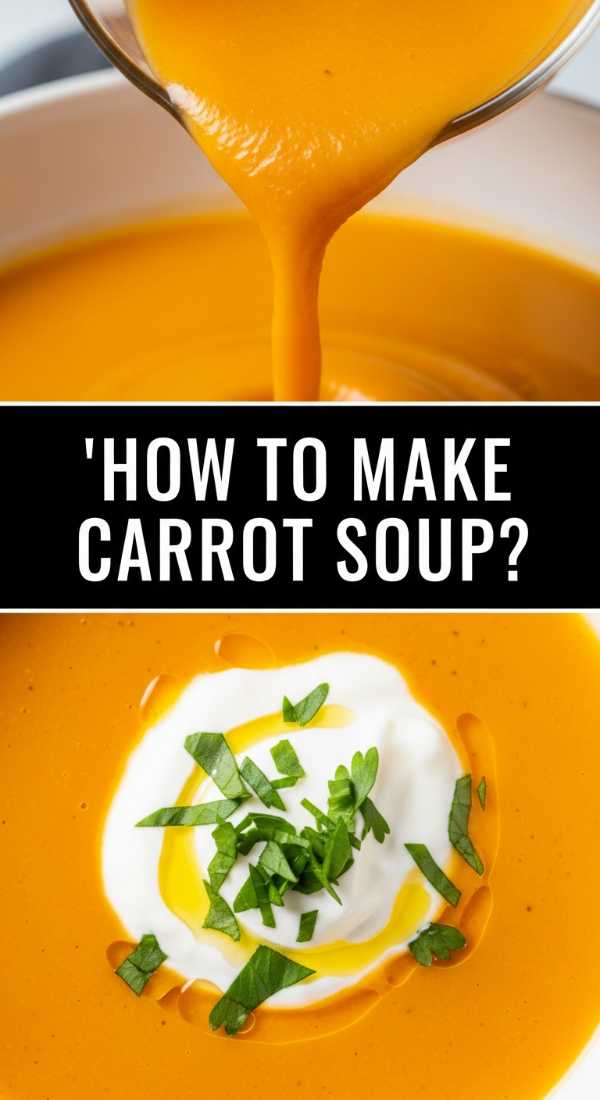
How to Master the Perfect Honey Swirl?

Why we love this
There is nothing quite as decadent as the golden, viscous ribbon of local wildflower honey cascading over a wedge of sharp, crystalline cheddar. The aroma is floral and sweet, cutting through the savory richness of the dairy with a brightness that awakens the palate. When you hit that perfect swirl, the texture is silky and smooth, providing a luscious mouthfeel that binds the crunch of a cracker with the creaminess of the cheese. It’s a sensory experience that feels like a warm hug on a plate, making every bite feel curated and intentional.
Ingredients
- 1 jar of high-quality organic wildflower honey
- 1 block of aged sharp white cheddar
- Optional: A pinch of flaky sea salt or red pepper flakes
How to make it
- Ensure your honey is at room temperature; if it has crystallized, place the jar in a warm water bath for 5-10 minutes until it flows smoothly like liquid silk.
- Position your cheese block on the board first, creating a flat ‘landing pad’ surface if you are pouring directly on top.
- Using a wooden honey dipper or a narrow spoon, submerge the tool into the honey and lift it slowly to create a continuous, thin stream.
- Move your hand in a slow, rhythmic figure-eight motion across the cheese or into a small ramekin, keeping the stream consistent to avoid blobs.
- Immediately garnish with a tiny pinch of flaky sea salt to catch the light and add a professional, shimmering finish that highlights the amber tones of the honey.
How to Pick the Best Cheese Mix?

Why we love this
The secret to a viral board is the harmony of textures, and nothing achieves this better than a thoughtful cheese selection. Imagine biting into a cloud-like, buttery triple-cream brie that melts instantly, followed by the firm, nutty bite of an aged Manchego. The contrast between the pungent, earthy notes of a blue cheese and the mild, milky sweetness of fresh mozzarella creates a symphony of flavor. This variety ensures that every guest finds something they love, while the visual mix of rinds and colors adds an organic, rustic beauty to your layout.
Ingredients
- 1 soft cheese (Brie or Camembert)
- 1 hard cheese (Parmesan or Aged Gouda)
- 1 semi-soft cheese (Havarti or Fontina)
- 1 goat or blue cheese for a tang factor
How to make it
- Visit your local deli and look for cheeses with varying milk sources (cow, goat, sheep) to ensure a wide spectrum of flavor profiles.
- Remove all cheeses from the refrigerator at least 45 to 60 minutes before serving; this is crucial as it allows the fats to soften, releasing the full aroma and complexity of the cheese.
- Leave soft cheeses whole to maintain their creamy interior, but pre-slice harder cheeses into triangles or cubes to make them easier for guests to grab.
- Check the rinds: if a cheese has an ash or bloomy rind, keep it intact as it adds a beautiful textural contrast and professional aesthetic.
- Place the largest wedges first at opposite ends of the board to act as ‘anchors’ for the rest of your ingredients.
How to Fold Salami into Roses?
Why we love this
The salami rose is the ultimate ‘viral’ trick that looks incredibly difficult but is secretly the easiest way to add height and drama to your board. These meat blossoms are dense, salty, and visually stunning, mimicking the delicate layers of a flower with the rustic, savory appeal of cured Italian meats. As you pull a slice away, the aroma of garlic and peppercorns is released, and the texture is perfectly thin, offering a satisfying chew that pairs beautifully with crunchy elements. It’s a guaranteed conversation starter that elevates a simple snack to a gourmet experience.
Ingredients
- 1-2 packs of thinly sliced Genoa or Milano salami (must be circular)
- A small wine glass or champagne flute with a thin rim
How to make it
- Select a glass with a rim diameter that matches the size of your salami slices; a standard wine glass works best for medium slices.
- Take your first slice of salami and fold it halfway over the rim of the glass, pressing down firmly so it stays in place.
- Add the second slice, overlapping the first by about 50%, and continue this process all the way around the rim.
- Repeat with 3-4 more layers of salami, staggering the slices so they look like petals and pressing them tightly against the glass.
- Invert the glass onto your board, hold it for three seconds to let the meat settle, and then gently lift the glass to reveal a perfectly formed, sturdy meat rose.
How to Balance Sweet and Salty?
Why we love this
The most addictive snack boards are those that play with the ‘bliss point’—that perfect intersection of sugar, salt, and fat. By layering dark chocolate shards next to briny olives or candied pecans next to salty prosciutto, you create a flavor profile that keeps people coming back for more. We love this because it keeps the palate excited; just as your taste buds get accustomed to the salt, a burst of sweetness from a dried apricot or a honey-glazed nut cleanses the palate. It’s a vibrant, multi-dimensional way to eat that feels both indulgent and sophisticated.
Ingredients
- Sea salt crackers or pretzels
- Dark chocolate squares or cacao nibs
- Candied walnuts or honey-roasted almonds
- Dried fruits like figs or apricots
How to make it
- Divide your board mentally into ‘flavor zones’ but allow them to bleed into each other slightly for a natural look.
- Place your saltiest items (like prosciutto and olives) first, as these will dictate where you need a ‘sweet’ counter-balance.
- Nestle sweet items directly adjacent to the salty ones; for example, place the chocolate chunks right next to the salted almonds.
- Add a ‘bridge’ ingredient like a fruit spread or chutney that contains both sweet and acidic notes to tie the two extremes together.
- Taste as you go: a professional tip is to take a bite of a cracker and a piece of chocolate together to ensure neither is overpowering the other.
How to Style Your Board Like a Pro?
Why we love this
Professional styling is what separates a pile of food from a viral masterpiece. It’s about creating a ‘flow’ that leads the eye across the board, using colors and shapes to tell a story. We love this technique because it’s a form of edible meditation; placing each grape cluster and sprig of rosemary feels like painting. The resulting board is a lush, overflowing cornucopia that feels generous and abundant. It’s the visual equivalent of a warm welcome, signaling to your guests that they are in for a special treat where every detail has been considered.
Ingredients
- Fresh rosemary and thyme sprigs
- Small clusters of grapes or berries
- Miniature ramekins or small bowls
- A large wooden or marble serving board
How to make it
- Start with your ‘anchors’—the bowls for dips and the largest blocks of cheese—and place them in a triangular pattern to create balance.
- Create ‘rivers’ of crackers or bread slices that curve around the bowls, avoiding straight lines which look too rigid and artificial.
- Fill the large gaps with your secondary items like meats and fruits, ensuring you distribute colors evenly so one side isn’t all brown and the other all red.
- The ‘Golden Rule’: Use small items like nuts, seeds, or berries to fill every single tiny hole on the board until you can’t see the wood underneath.
- Finish by tucking fresh herbs under the edges of the cheese or meat; this adds a ‘just-picked’ look and a wonderful herbaceous fragrance.
How to Choose the Right Platter?
Why we love this
The foundation of your board sets the entire mood for your gathering. A rustic, reclaimed wood board with deep grains and imperfections brings a cozy, farmhouse vibe that makes people feel instantly relaxed. Conversely, a cool, sleek marble slab adds an air of modern elegance and keeps temperature-sensitive items like cheese and charcuterie chilled for longer. We love this choice because it’s the frame for your artwork; the right backdrop makes the colors of the berries and the textures of the meats pop, turning your snack board into a genuine centerpiece.
Ingredients
- A wooden board (walnut or acacia)
- OR a marble slab
- OR a slate board for a dark, dramatic contrast
How to make it
- Select a size that matches your guest count; a board that is too large will look sparse, while one that is too small will feel cluttered and messy.
- If using wood, ensure it is food-grade and has been treated with mineral oil to prevent it from absorbing odors from strong cheeses.
- For a ‘cool’ aesthetic, place your marble slab in the fridge for 20 minutes before assembling to help maintain the integrity of the soft cheeses and chocolates.
- Consider the height: if your table is flat, use a board with ‘feet’ or a pedestal to create levels and visual interest in your room’s landscape.
- Always wipe the surface with a damp cloth and dry it thoroughly before adding food to ensure there is no dust or residue from storage.
How to Add the Perfect Crunch?
Why we love this
Crunch is the essential structural element of a snack board. It provides the base for all your toppings and offers a satisfying auditory and tactile snap that breaks up the softness of the cheeses. We love the variety of a ‘crunch mix’—the toasted, nutty aroma of a baguette slice, the buttery flake of a water cracker, and the hard, salty snap of a pretzel stick. This element is what makes the board interactive; it’s the vehicle for the perfect bite, allowing guests to build their own flavor combinations with every single crunch.
Ingredients
- Artisan sourdough baguette
- Multigrain crackers
- Pita chips or sea salt pretzels
- Marcona almonds
How to make it
- Slice your baguette into 1/2 inch rounds; for extra crunch, brush with olive oil and toast in a 350°F oven for 5-7 minutes until golden brown.
- Fan your crackers out in a ‘shingle’ pattern along the curves of your bowls to make them easy to grab without toppling the whole row.
- Mix textures: include one very hard item (like a breadstick) and one very light item (like a wafer) to provide different mouthfeels.
- Keep your crackers away from ‘wet’ items like cut fruit or pickles to ensure they stay crisp and don’t become soggy during the party.
- If the board will be sitting out for more than two hours, keep a ‘refill’ basket of crackers nearby to replace any that have been polished off.
How to Use Herbs for a Pop of Color?

Why we love this
Herbs are the ‘jewelry’ of your snack board. They provide a vibrant, emerald-green contrast to the earthy tones of meats and cheeses, making the entire board look fresh and alive. The scent of bruised rosemary or mint wafting up from the platter adds a layer of aromatherapy to the dining experience, making it feel more like an outdoor garden party. We love this hack because it’s the most affordable way to make a board look expensive and professional; it fills the gaps with organic shapes that soften the edges of the display.
Ingredients
- Fresh rosemary sprigs
- Fresh thyme or oregano
- Mint leaves (for fruit-heavy boards)
- Edible flowers (pansies or nasturtiums)
How to make it
- Wash your herbs in cold water and pat them completely dry with a paper towel; moisture is the enemy of a long-lasting board display.
- Tuck longer sprigs of rosemary under the corners of large cheese blocks so they ‘peek’ out, adding a 3D effect to the platter.
- Use smaller thyme leaves to sprinkle over soft cheeses like goat cheese or brie to add immediate visual texture and a hint of woodsy flavor.
- If using mint, keep it near the fruit and chocolate sections to signal to guests that those flavors pair well together.
- Pro tip: lightly slap the herbs against your palm before placing them on the board to release their essential oils and maximize the fragrance.
How to Prep Your Fruit for Max Freshness?
Why we love this
Fruit provides the essential acidity and moisture needed to cut through the heavy fats of a charcuterie board. There is nothing like the snap of a cold, crisp grape or the juicy explosion of a ripe blackberry to refresh the palate between bites of salty prosciutto. We love the vibrant jewel tones—deep purples, bright reds, and soft greens—that fruit brings to the table. It makes the board feel balanced and healthy, offering a natural sweetness that is far more complex than processed sugar, and it looks absolutely stunning in photos.
Ingredients
- Red and green seedless grapes
- Fresh raspberries and blackberries
- Sliced apples or pears
- Pomegranate seeds for a ‘sparkle’ effect
How to make it
- Keep grapes on the vine but cut them into ‘mini-clusters’ of 3-5 grapes so guests can easily pick up a portion without tugging at a large bunch.
- If using apples or pears, slice them just before serving and toss them in a small bowl with a teaspoon of lemon juice to prevent browning (oxidation).
- Place berries in small piles or inside hollowed-out citrus halves to keep them contained and prevent their juices from staining the cheeses.
- For a professional look, slice a pomegranate in half and place one half face-up on the board, then scatter loose seeds over the top of brie or hummus.
- Ensure all fruit is chilled until the very last second; the temperature contrast between cold fruit and room-temperature cheese is delightful.
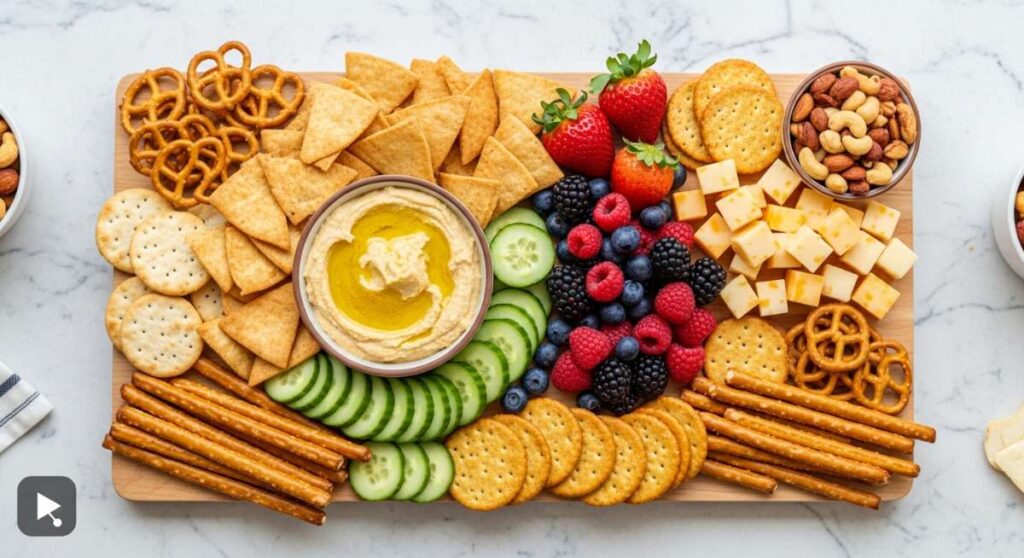
How to Make Your Dips Stand Out?
[IMAGE_10]
Why we love this
Dips are the ‘anchors’ of flavor on a board, providing a creamy or zesty landing spot for your crackers and veggies. Whether it’s a smoky roasted red pepper hummus, a tangy balsamic glaze, or a rich spinach artichoke spread, dips add a layer of complexity that binds the other ingredients together. We love the way a well-garnished dip looks—a pool of olive oil, a sprinkle of za’atar, or a swirl of pesto makes even a store-bought dip look like it came from a high-end bistro. It adds depth and encourages guests to dip, dunk, and play with their food.
Ingredients
- Hummus or Baba Ganoush
- Fig jam or apricot preserves
- Olive oil and balsamic vinegar
- Garnishes: Paprika, pine nuts, or fresh parsley
How to make it
- Transfer store-bought dips from their plastic containers into ceramic or glass ramekins; never leave them in the original packaging.
- Use the back of a spoon to create a ‘well’ or a deep swirl in the top of the dip to hold garnishes and oils.
- Pour a teaspoon of high-quality extra virgin olive oil into the well and sprinkle with a contrasting spice like smoked paprika or sumac.
- Place a small spreader or spoon in each bowl so guests don’t have to use their fingers or double-dip their crackers.
- Position the dip bowls first on the board (the ‘Rule of Three’) to create a structural triangle that guides the arrangement of everything else.
The Final Touch for Viral Success
Building the ultimate snack board is an act of love and a celebration of simple ingredients. By following these easy hacks—from the salami rose to the perfect honey swirl—you’ve created more than just a meal; you’ve created an experience that people will want to photograph, share, and most importantly, eat! Remember, there are no mistakes in board building, only ‘happy accidents’ that can be covered with a well-placed sprig of rosemary. So, grab your platter, unleash your creativity, and get ready for your snack board to go absolutely viral!