
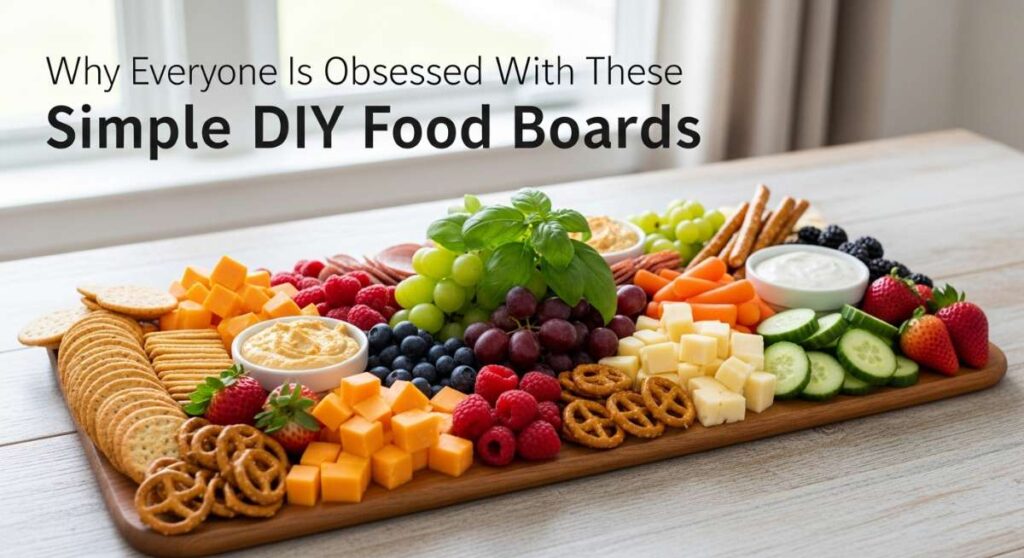
Why Everyone is Obsessed With These Simple DIY Food Boards
There is something undeniably magical about the moment you set a beautifully arranged food board in the center of a table. It’s more than just a meal; it’s an invitation to linger, to share stories, and to connect over colors and textures that feel like a feast for the soul. In a world that often feels rushed and digital, these boards bring us back to the tactile joy of picking up a crisp nacho or a juicy skewer, turning a regular Tuesday night into a celebration of togetherness.
I remember the first time I traded my individual dinner plates for a massive wooden board piled high with seasonal goodies. The atmosphere in the room shifted instantly. Instead of everyone staring at their own portions, hands were reaching, eyes were bright, and the conversation flowed as freely as the lemon-infused dressing. This trend isn’t just about the aesthetics—though they are stunning—it’s about the warmth and simplicity of communal eating that we’ve all been craving lately.
How to make crunchy nachos?
Why we love this
There is nothing quite like the auditory satisfaction of that first loud crunch when you dive into a mountain of perfectly toasted nachos. We love this because it combines the earthy, toasted scent of corn with the rich, molten aroma of bubbling cheddar and Monterey Jack. Each bite offers a symphony of textures: the sharp snap of the chip, the velvety smoothness of the cheese, and the cool, refreshing burst of lime-kissed pico de gallo, creating a comforting experience that feels like a warm hug for your taste buds.
Ingredients
- Restaurant-style corn tortilla chips
- 2 cups shredded sharp cheddar cheese
- 1 cup shredded Monterey Jack
- 1 can black beans, drained and rinsed
- 1 large jalapeño, thinly sliced
- 1/2 cup pickled red onions
- Fresh cilantro and lime wedges
- Sour cream and guacamole for serving
How to make it
- Preheat your oven to 400°F (200°C) and line a large, heavy-duty baking sheet with parchment paper to ensure even heat distribution and easy cleanup.
- Lay your tortilla chips in a single, slightly overlapping layer; avoid stacking them too deep, as this prevents the bottom chips from getting soggy and ensures every chip gets its fair share of cheese.
- Distribute the black beans and sliced jalapeños evenly over the chips, then sprinkle the combined cheeses generously, making sure to hit the edges of the board for that coveted crispy cheese skirt.
- Bake for 8 to 10 minutes, watching closely for the visual cue of the cheese being fully melted and just beginning to bubble and brown at the edges, which signals a perfect caramelized flavor.
- Remove from the oven and immediately top with the pickled onions and fresh cilantro while the cheese is still molten, serving with side bowls of sour cream and guacamole for a temperature contrast.
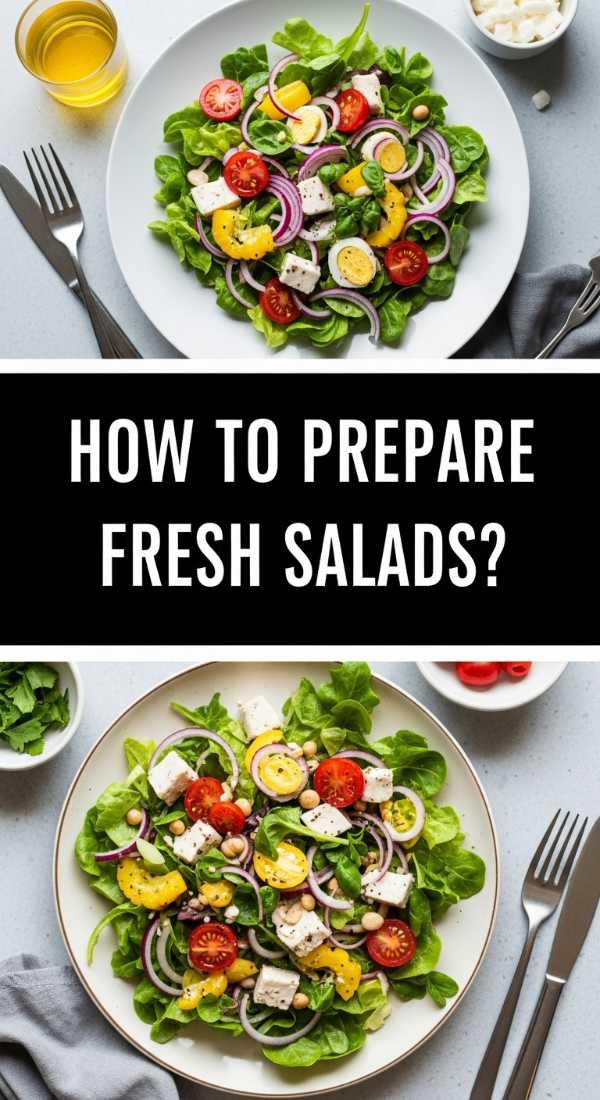
How to prepare fresh salads?

Why we love this
A fresh salad board is a vibrant celebration of the seasons, offering a crisp, hydrating crunch that leaves you feeling energized and light. We adore the way the peppery bite of arugula mingles with the sweet, floral notes of honey-glazed nuts and the creamy, tangy finish of crumbled goat cheese. It’s a sensory journey where the scent of freshly torn basil and the bright acidity of a vinaigrette awaken your palate, making every forkful feel like a crisp morning in a flourishing garden.
Ingredients
- 4 cups mixed baby greens (arugula, spinach, and kale)
- 1 cup sliced strawberries or heirloom tomatoes
- 1 cucumber, thinly sliced into ribbons
- 1/2 cup candied pecans or walnuts
- 4 oz crumbled feta or goat cheese
- Homemade balsamic or lemon-tahini dressing
How to make it
- Begin by washing your greens in ice-cold water and using a salad spinner to remove every drop of moisture; dry leaves are crucial for the dressing to adhere properly rather than sliding off.
- Arrange the greens on a wide, shallow platter, fluffing them up to create volume and a soft, inviting base for the heavier toppings.
- Use a vegetable peeler to create long, elegant cucumber ribbons, which add a sophisticated texture and catch the dressing in their folds, and scatter them across the greens.
- Place your fruit or tomatoes in clusters rather than a uniform layer to create visual “interest points” on your board, then sprinkle the cheese and nuts over the top for a final layer of richness.
- Drizzle the dressing in a slow, zig-zag motion just before serving, or provide small ceramic ramekins of different dressings so guests can customize their own flavor profiles.
How to cook spring salmon?

Why we love this
Spring salmon is the ultimate centerpiece for a sophisticated yet simple food board, prized for its buttery, flake-apart texture and its delicate, oceanic sweetness. When seared correctly, the skin becomes as crisp as a cracker, providing a stunning contrast to the tender, pink meat that melts on the tongue. Infused with the scent of fresh dill and bright lemon zest, this dish feels like the essence of luxury, offering a rich source of omega-3s that satisfies both the appetite and the health-conscious mind.
Ingredients
- 4 salmon fillets (6 oz each), skin-on
- 2 tablespoons high-smoke point oil (like avocado oil)
- 2 tablespoons unsalted butter
- 3 cloves garlic, smashed
- Fresh dill, parsley, and lemon slices
- Flaky sea salt and cracked black pepper
How to make it
- Pat the salmon fillets extremely dry with paper towels on both sides; any remaining moisture will create steam instead of a sear, preventing that golden-brown crust from forming.
- Season the flesh side generously with salt and pepper, then heat your cast-iron skillet over medium-high heat until the oil is shimmering and just starting to wisps a tiny bit of smoke.
- Place the salmon skin-side down in the pan, pressing gently with a spatula for 10 seconds to ensure the skin makes full contact with the heat; cook undisturbed for about 5 minutes until the skin is crispy and the color has changed halfway up the side of the fillet.
- Flip the fillets carefully and add the butter, smashed garlic, and fresh herbs to the pan, allowing the butter to foam and brown slightly.
- Tilt the pan and use a large spoon to baste the hot, herb-infused butter over the salmon for another 2 to 3 minutes, or until the internal temperature reaches 125°F (52°C) for a perfect medium-rare.
How to steam soft dumplings?

Why we love this
There is a profound sense of comfort in the gentle clouds of steam that rise when you open a bamboo basket filled with soft, translucent dumplings. We love the way the thin, elastic dough gives way to a savory, ginger-spiked filling that releases a burst of warm, aromatic broth with every bite. It is a delicate balance of textures—chewy, succulent, and smooth—that encourages mindful eating and makes for an incredibly interactive and fun addition to any shared food board.
Ingredients
- 1 pack of high-quality frozen or fresh dumplings
- Large cabbage leaves or parchment paper rounds
- 2 tablespoons soy sauce
- 1 tablespoon rice vinegar
- 1 teaspoon chili oil or sesame oil
- Freshly sliced scallions for garnish
How to make it
- Fill a wide wok or a large pot with about two inches of water and bring it to a steady, rolling boil over medium-high heat.
- Line your bamboo steamer baskets with cabbage leaves or perforated parchment paper; this is a vital step to prevent the delicate dough from sticking and tearing when you try to lift them.
- Arrange the dumplings in the basket, leaving at least half an inch of space between each one to allow the steam to circulate freely and prevent them from fusing together.
- Place the steamer over the boiling water, cover with the lid, and steam for 8 to 10 minutes; the dumplings are done when the wrappers look slightly translucent and feel firm but elastic to the touch.
- While they steam, whisk together your soy sauce, vinegar, and chili oil in a small bowl, then serve the dumplings directly in the basket on your board for a rustic, authentic presentation.
How to roast spring veggies?

Why we love this
Roasting transforms humble spring vegetables into caramelized gems that are bursting with concentrated sweetness and earthy depth. We love the charred, slightly bitter edges of asparagus paired with the tender, honey-like core of a roasted baby carrot. The aroma of garlic and thyme wafting from the oven creates an atmosphere of home-cooked warmth, while the vibrant greens and oranges make the board look like a masterpiece of natural beauty and wholesome nutrition.
Ingredients
- 1 bunch thin asparagus, woody ends trimmed
- 1 bunch baby carrots with tops partially attached
- 1 cup snap peas
- 3 tablespoons extra virgin olive oil
- 1 tablespoon honey or maple syrup
- Fresh thyme sprigs and lemon zest
How to make it
- Preheat your oven to 425°F (220°C); a high temperature is essential to achieve that beautiful browning on the outside without overcooking the tender interiors of spring vegetables.
- Toss the asparagus and carrots in a large bowl with olive oil, honey, salt, and pepper until every inch is lightly coated, which helps conduct heat and encourages caramelization.
- Spread the vegetables in a single layer on a preheated baking sheet (the sizzle when they hit the pan is a great sign!) and roast for 12 to 15 minutes.
- Add the snap peas during the last 5 minutes of roasting; they require less time to maintain their vibrant green color and signature “snap” texture.
- Remove when the carrots can be easily pierced with a fork and the asparagus tips are slightly crispy, then finish with a flurry of fresh lemon zest and thyme before piling them onto your board.
How to decorate cherry cakes?

Why we love this
Cherry cakes are the crown jewels of a dessert board, offering a whimsical and nostalgic charm that appeals to the inner child in everyone. We love the contrast between the moist, almond-scented crumb and the tart, jammy explosion of roasted cherries nestled within. Decorating them is a creative joy, where the scent of vanilla icing and the glossy sheen of fresh fruit create a visual and olfactory treat that promises a sweet, lingering finish to any gathering.
Ingredients
- 1 dozen mini vanilla or almond sponge cakes
- 1 cup fresh cherries, pitted and halved
- 1 cup heavy whipping cream
- 2 tablespoons powdered sugar
- Fresh mint leaves for a pop of color
- Optional: Dusting of cocoa powder or gold leaf
How to make it
- Ensure your mini cakes are completely cool before you begin decorating; any residual heat will cause your whipped cream to melt and slide off the sides.
- Whip the heavy cream and powdered sugar in a chilled bowl until you reach stiff peaks, meaning the cream holds its shape firmly when the whisk is lifted.
- Use a piping bag with a star tip to create a small, elegant swirl on top of each cake, or use a spoon for a more rustic, “cloud-like” dollop that feels cozy and homemade.
- Gently press a fresh cherry half into the center of the cream, allowing some of the natural juices to bleed slightly into the white cream for a beautiful marble effect.
- Finish with a tiny sprig of mint and a light dusting of powdered sugar, then arrange them in a cluster on your board, surrounded by extra loose cherries for a bountiful look.
How to bake soft pretzels?
Why we love this
The scent of baking pretzels is one of the most intoxicating aromas in the kitchen, reminiscent of cozy fairs and bustling bakeries. We love the unique, chewy pull of the dough and that deep, mahogany crust that can only be achieved through a traditional soda bath. Sprinkled with coarse salt, these warm, doughy twists offer a satisfyingly salty bite that pairs perfectly with tangy mustards or creamy cheese dips, making them a crowd-favorite staple for any snack board.
Ingredients
- 1 package active dry yeast
- 1.5 cups warm water (110°F)
- 4 cups all-purpose flour
- 1 tablespoon sugar
- 1/2 cup baking soda (for the water bath)
- 1 egg, beaten (for egg wash)
- Coarse sea salt or pretzel salt
How to make it
- Dissolve the yeast and sugar in warm water and let it sit for about 5 minutes until it becomes frothy, indicating the yeast is active and ready to make your dough rise.
- Mix in the flour and knead the dough for 5 to 7 minutes until it is smooth and elastic; if the dough is too sticky, add a tablespoon of flour at a time until it clears the sides of the bowl.
- Let the dough rise in a warm spot for an hour, then punch it down and divide into equal pieces, rolling each into a long rope and twisting into the classic pretzel shape.
- Boil a large pot of water with the baking soda and drop each pretzel in for exactly 30 seconds; this alkaline bath is the “secret” to the dark, shiny crust and distinct pretzel flavor.
- Place on a lined tray, brush with egg wash for a glossy finish, sprinkle with salt, and bake at 425°F (220°C) for 12 to 15 minutes until they are a deep, golden brown.
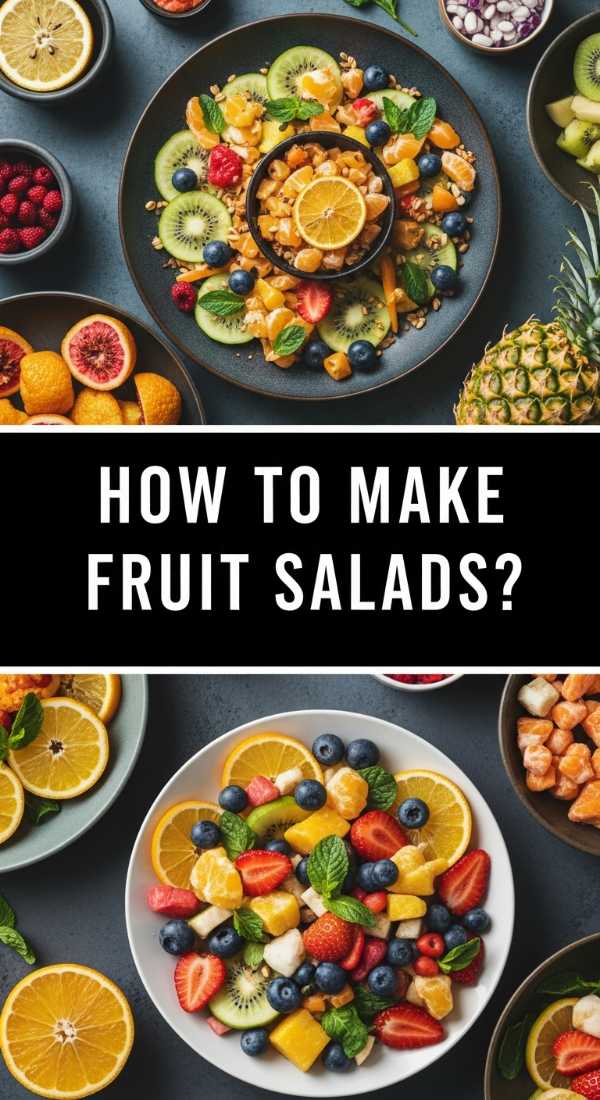
How to make fruit salads?

Why we love this
A well-crafted fruit salad board is like a rainbow on a platter, offering a refreshing explosion of natural juices and varied sweetness. We love the way the cool, crisp texture of melon balances the soft, floral notes of ripe mango and the tart pop of blueberries. It’s a sensory delight that smells like a tropical breeze, providing a healthy, hydrating, and visually stunning option that cleanses the palate and brings a sense of vitality to the table.
Ingredients
- 1/2 watermelon or cantaloupe, cubed
- 2 mangos, sliced into spears
- 1 pint blueberries or blackberries
- 2 kiwis, peeled and sliced into rounds
- Juice of 1 lime and 1 tablespoon honey
- Fresh mint and a pinch of chili-lime seasoning (optional)
How to make it
- Select fruit that is ripe but still firm; overripe fruit will release too much juice and turn the board into a puddle, while underripe fruit lacks the necessary sweetness.
- Cut your larger fruits like melon and mango into uniform shapes—either cubes or spears—to make them easy for guests to pick up with tongs or skewers.
- Whisk together the lime juice and honey to create a light glaze; this not only adds a zesty brightness but also helps prevent fruits like apples or bananas (if using) from oxidizing and turning brown.
- Arrange the fruit by color to create a gradient or “rainbow” effect, which is highly photogenic and makes the board look professionally styled.
- Garnish with a generous handful of fresh mint leaves and a light sprinkle of chili-lime seasoning if you want to add a sophisticated, savory kick to the sweet fruit.
How to grill chicken skewers?
Why we love this
There is an primal, irresistible appeal to food cooked over an open flame, and chicken skewers are the perfect example of smoky, charred perfection. We love the way the high heat seals in the juices, leaving the meat tender and succulent while the exterior develops a savory, caramelized crust. The aroma of sizzling spices and woodsmoke is enough to draw anyone to the table, making these skewers a protein-packed highlight that is as fun to eat as it is delicious.
Ingredients
- 1.5 lbs chicken thighs, cut into 1-inch chunks
- 1/4 cup olive oil
- 3 tablespoons lemon juice
- 2 teaspoons smoked paprika and 1 teaspoon cumin
- Wooden or metal skewers
- Tzatziki or garlic yogurt for dipping
How to make it
- If using wooden skewers, soak them in water for at least 30 minutes prior to grilling to prevent them from catching fire or splintering under the high heat.
- Marinate the chicken chunks in the oil, lemon juice, and spices for at least 2 hours (or overnight) to allow the acid to tenderize the fibers and the flavors to penetrate deep into the meat.
- Thread the chicken onto the skewers, leaving a tiny bit of space between each piece; overcrowding the skewer will cause the chicken to steam rather than grill, resulting in a rubbery texture.
- Preheat your grill to medium-high (about 400°F) and oil the grates to prevent sticking; grill the skewers for 10 to 12 minutes, turning every 3 minutes.
- Look for the visual cue of dark grill marks and an internal temperature of 165°F (74°C), then let them rest for 5 minutes before placing them on the board to keep the juices locked in.
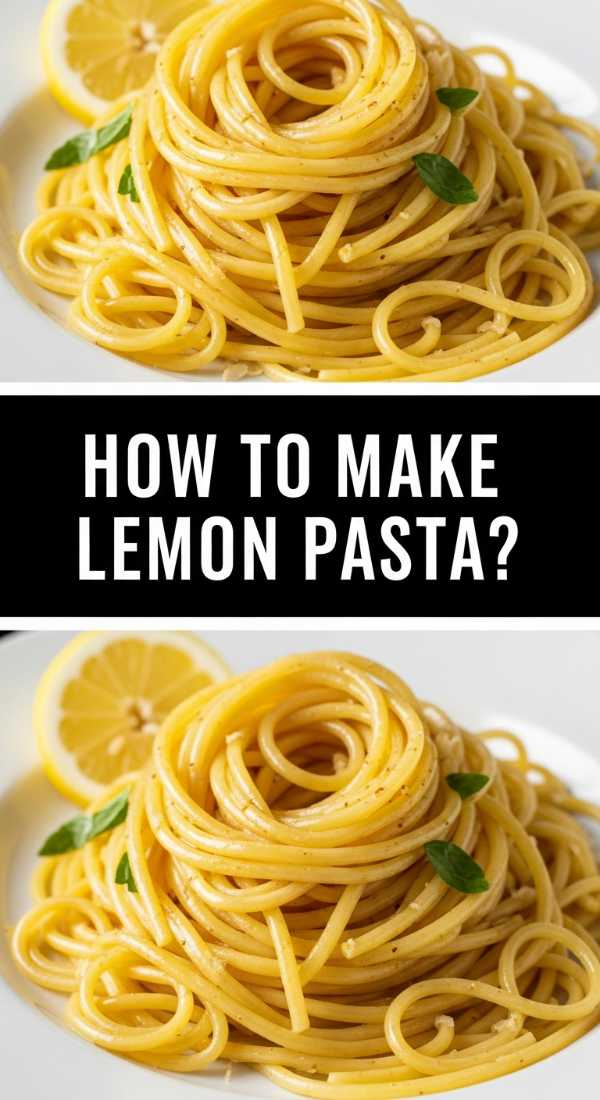
How to make lemon pasta?
[IMAGE_10]
Why we love this
Lemon pasta is the epitome of effortless elegance, offering a bright, citrusy zing that cuts through the richness of butter and parmesan. We love the way the silky sauce coats every strand of al dente pasta, creating a smooth, luxurious mouthfeel that is punctuated by the fresh aroma of lemon zest and cracked black pepper. It is a dish that feels sophisticated enough for a dinner party but simple enough for a cozy night in, bringing a taste of the Italian coastline to your board.
Ingredients
- 1 lb spaghetti or linguine
- 1/2 cup high-quality extra virgin olive oil
- 2 large lemons (zest and juice)
- 1 cup freshly grated Parmesan cheese
- 1/2 cup pasta water (reserved)
- Fresh parsley and red pepper flakes
How to make it
- Boil your pasta in a large pot of heavily salted water—it should taste like the sea—and cook until it is ‘al dente,’ or firm to the bite, as it will continue to cook slightly in the sauce.
- Before draining, reserve at least 1 cup of the starchy pasta water; this liquid gold is the secret to creating a cohesive, velvety sauce that clings to the noodles.
- In a large skillet over low heat, combine the olive oil, lemon juice, and half of the lemon zest, whisking gently to emulsify the flavors without burning the delicate oil.
- Add the hot pasta directly to the skillet along with the Parmesan and half of the reserved pasta water, tossing vigorously with tongs until the cheese melts into a creamy glaze.
- Adjust the consistency with more pasta water if needed, then finish with the remaining zest, fresh parsley, and a pinch of red pepper flakes before swirling into nests on your board.
Why Simple Food Boards are Here to Stay
As we wrap up our journey through these ten delicious DIY board ideas, it’s clear that the “board” trend is far more than a passing fad. It’s a movement toward a more relaxed, communal, and creative way of sharing our lives. Whether you’re piling up crunchy nachos for a game night or arranging delicate cherry cakes for a baby shower, you’re creating an experience that nourishes more than just the body. So, grab your favorite platter, gather your ingredients, and let your creativity run wild—your guests (and your appetite) will thank you!