

The Ultimate Guide to Making That Viral Butter Board (And Better Alternatives!)
We have all seen it—the hypnotic swirl of softened butter spread across a wooden board, topped with vibrant herbs, flaky sea salt, and drizzles of honey. The butter board took the internet by storm, promising a tactile and communal dining experience that felt both rustic and indulgent. It tapped into our deep-seated love for shared appetizers and the simple joy of high-quality ingredients presented with artistic flair. But as the trend evolved, many of us started asking: what else can we create that offers this same level of ‘wow’ factor while providing even more lasting beauty and utility in our lives?
While a butter board is a fleeting joy, there are ways to channel that same creative energy into projects that transform our homes and gardens into permanent hosting havens. Whether you are looking to host the perfect alfresco dinner or want to create a space that inspires the next generation of artists, the ‘viral’ mindset is really about making life more beautiful and intentional. In this guide, we are looking beyond the bread and butter to explore lifestyle ‘boards’ and spaces that will have your guests—and your soul—feeling completely nourished.
How to Plant Effortless Perennials for Lasting Garden Beauty

Why we love this
There is something profoundly soul-soothing about watching the first green shoots of a perennial garden break through the thawing soil in early spring. We love the way the air carries the scent of fresh mulch and damp earth, signaling a renewal that requires little more than a bit of initial intention and care. Imagine walking through your backyard and seeing a tapestry of deep purples, fiery oranges, and soft whites that return year after year, growing more robust and beautiful with every season. It creates a living sanctuary where the rustle of leaves and the gentle hum of visiting bees provide a natural soundtrack to your morning coffee.
Essential Elements:
- Native perennial seedlings (e.g., Coneflowers, Hostas, or Lavender)
- High-quality organic compost
- Hardwood mulch
- Long-handled spade and hand trowel
- Slow-release organic fertilizer
How to make it
- Identify the sun exposure of your garden bed by monitoring it for a full day; select plants that match the light levels (Full Sun vs. Part Shade).
- Prepare the planting site by removing all weeds and grass, then turn the soil to a depth of about 12 inches to ensure adequate aeration for new roots.
- Mix in a 3-inch layer of organic compost to the native soil to improve drainage and nutrient density, which is critical for long-term perennial health.
- Dig a hole twice as wide as the plant’s root ball and just as deep, ensuring the crown of the plant sits level with the surrounding soil.
- Gently loosen the roots of the plant if they are pot-bound, place it in the hole, and backfill with soil, tamping down firmly to eliminate air pockets.
- Water deeply immediately after planting and apply a 2-inch layer of mulch around the base, taking care not to let the mulch touch the plant stems directly.
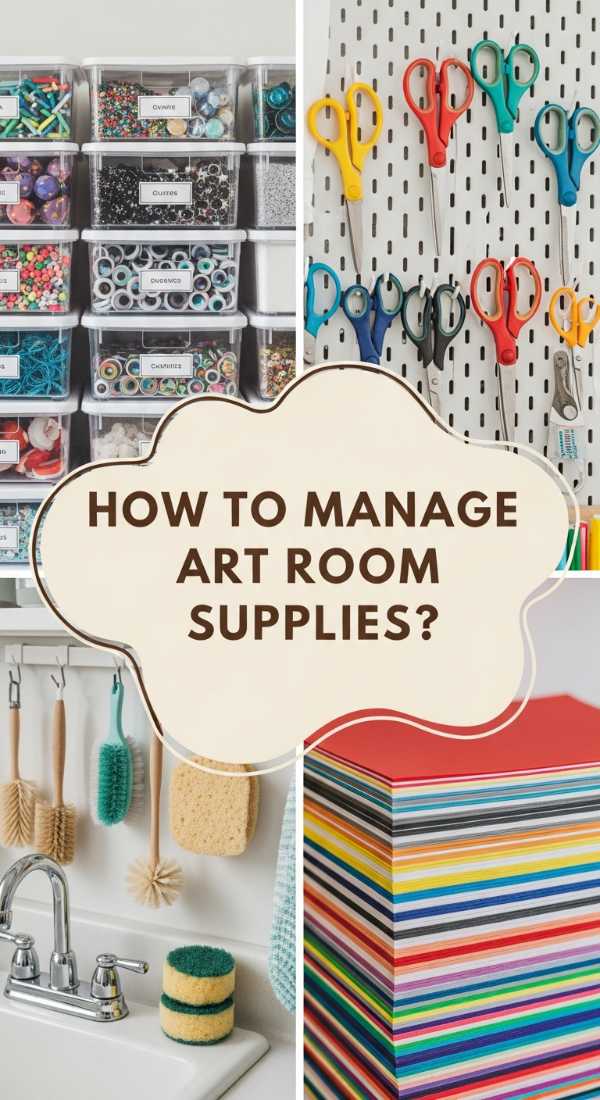
How to Organize Creative Learning Spaces for Inspired Young Artists

Why we love this
The sight of a perfectly organized art station, with rows of colored pencils arranged like a rainbow and jars of clean brushes standing ready, is enough to ignite the imagination of any child. We love how a dedicated space validates a young artist’s work, giving them a physical ‘board’ of creativity where they feel empowered to experiment and make a mess. There is a specific, wonderful aroma of cedar shavings and fresh paper that fills these zones, creating a sensory anchor that tells the brain it is time to create. It transforms a corner of the home into a vibrant hub of innovation and quiet focus.
Essential Elements:
- Adjustable-height table or desk
- Transparent storage bins and pegboards
- Natural light source or daylight-spectrum LED lamp
- Washable rugs or floor mats
- Rotating art display wire or gallery frames
How to make it
- Select a low-traffic area of the home with plenty of natural light, as shadows can interfere with color perception during painting and drawing.
- Install a wall-mounted pegboard to keep frequently used tools like scissors, tape, and rulers at eye level and within easy reach of small hands.
- Categorize art supplies into transparent bins—grouping by medium such as ‘wet’ (paints, glues) and ‘dry’ (crayons, markers)—to make cleanup intuitive.
- Position a comfortable, ergonomic chair that allows the child’s feet to touch the floor or a footrest, promoting better focus and longer creative sessions.
- Dedicate a ‘drying station’ using a simple wire rack or clothesline to ensure that wet masterpieces don’t smudge while they set.
How to Build Rustic Cooking Zones for Affordable Summer Parties
Why we love this
Nothing says ‘summer’ quite like the crackle of an open flame and the savory, mouth-watering aroma of charred wood and grilled vegetables. We love rustic cooking zones because they move the heart of the home outdoors, allowing the host to be part of the conversation rather than stuck in the kitchen. The texture of rough-hewn stone combined with the warmth of a fire creates an inviting atmosphere that feels like an upscale campsite. It is a place where stories are told over the sizzle of the grate, and the smoky air adds a layer of seasoning to every dish that no indoor stove can replicate.
Essential Elements:
- Heat-resistant fire bricks or pavers
- Steel grill grate or tripod cooker
- Level gravel or sand base
- Cast iron cookware
- Weather-proof prep table
How to make it
- Choose a flat area at least 10 feet away from any structures or low-hanging trees to ensure safety and proper smoke ventilation.
- Clear the ground of all flammable debris and dig a shallow pit, filling it with 2 inches of leveled sand or pea gravel to create a stable, fire-proof foundation.
- Lay your fire bricks in a circular or rectangular pattern, using a level to ensure each tier is even to prevent the structure from shifting under heat.
- Stack the bricks at least three layers high, leaving small gaps in the first layer to allow oxygen to flow into the base of the fire.
- Place a heavy-duty steel grate over the top or set up a tripod; test the stability by placing a cold cast iron skillet on it before lighting a fire.
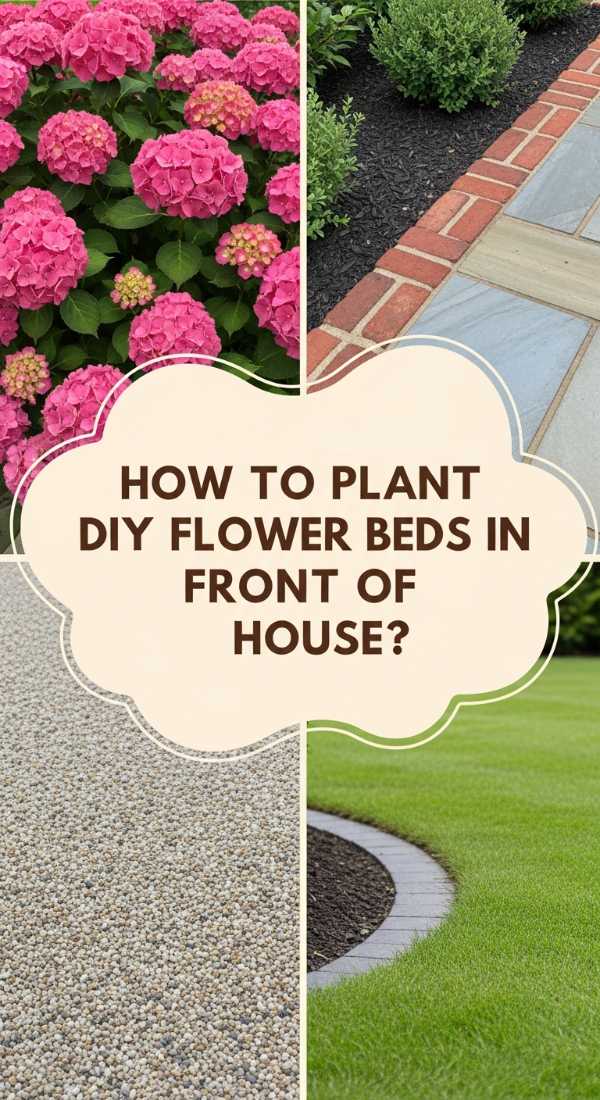
How to Create Curb Appeal for the Perfect Neighborhood Welcome
Why we love this
First impressions are powerful, and there is a unique satisfaction in pulling into a driveway that feels like a warm embrace. We love the crisp contrast of a freshly painted front door against lush greenery and the way a well-lit path guides guests toward a night of hospitality. The scent of blooming jasmine or sweet alyssum near the entryway creates an immediate sensory ‘hello’ that lingers in the mind. It is about more than just aesthetics; it is about signaling that the home inside is a place of care, order, and genuine welcome for everyone who passes by.
Essential Elements:
- Statement front door paint color
- Symmetrical planter pots
- Low-voltage path lighting
- Updated house numbers and hardware
- Freshly mulched garden beds
How to make it
- Deep clean the exterior by power washing siding and scrubbing the porch floor to remove the dulling effects of winter grime and pollen.
- Select a bold yet complementary paint color for the front door, applying a high-quality exterior semi-gloss for a durable and sophisticated finish.
- Flank the entryway with two large, identical planters filled with a mix of ‘thriller, filler, and spiller’ plants for a balanced, professional look.
- Install LED path lights along the walkway, spacing them evenly to create a safe, glowing transit from the street to the porch.
- Swap out dated brass hardware for modern matte black or brushed nickel house numbers and a matching handle-set to instantly modernize the facade.
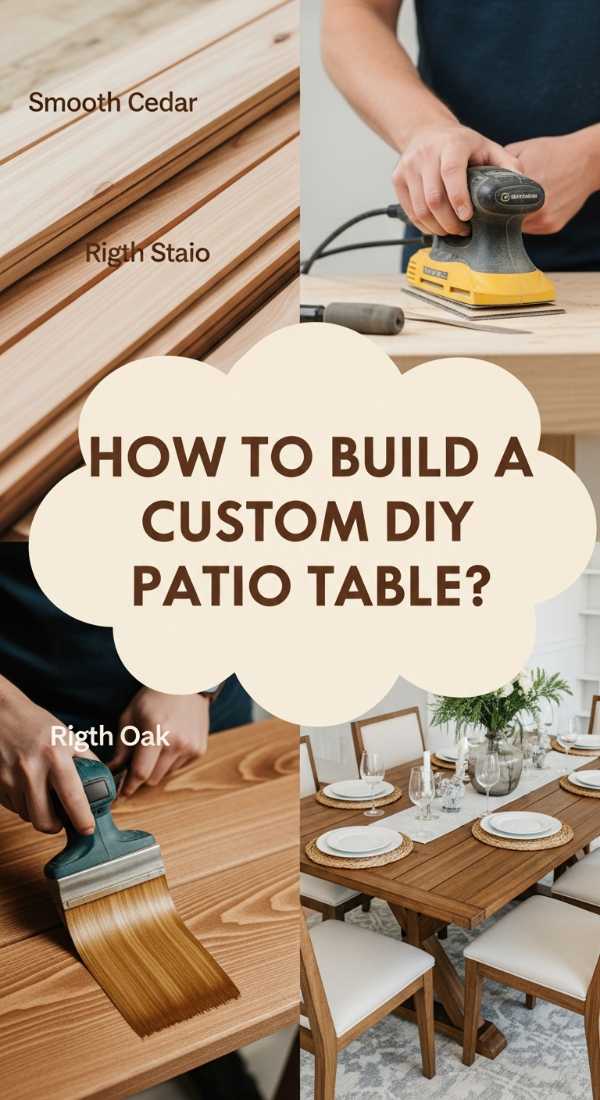
How to Construct Outdoor Dining Sets for Cozy Alfresco Dinners
Why we love this
Eating outdoors transforms a standard meal into an event, where the cool evening breeze and the soft glow of candlelight replace the hum of the refrigerator. We love the tactile feel of a solid wood table under our fingers—sturdy, warm, and built to withstand years of laughter and spilled wine. There is a specific magic in the sound of glasses clinking against a wooden surface while crickets begin their nightly chorus in the background. It creates a ‘viral’ dining moment every single night, turning the simple act of dinner into a vacation-like experience in your own backyard.
Essential Elements:
- Pressure-treated lumber or cedar boards
- Galvanized or stainless steel outdoor screws
- Wood glue (exterior grade)
- Power drill and miter saw
- Outdoor-grade wood sealant or stain
How to make it
- Measure your outdoor space to determine the optimal table length, ensuring at least 3 feet of clearance on all sides for chairs and movement.
- Construct the table base using 4×4 posts for legs, connected by 2×4 aprons with pocket-hole joinery for a clean, professional appearance without visible screws.
- Cut the tabletop planks from 2×6 cedar boards, leaving a 1/8-inch gap between each board to allow for wood expansion and water drainage.
- Secure the tabletop to the base from underneath using Z-clips or figure-eight fasteners, which allows the wood to move with seasonal humidity changes.
- Sand the entire set starting with 80-grit sandpaper and moving up to 150-grit until the surface is smooth to the touch and free of splinters.
- Apply two coats of a UV-rated outdoor sealant, allowing 24 hours of drying time between coats to protect the wood from graying and water damage.
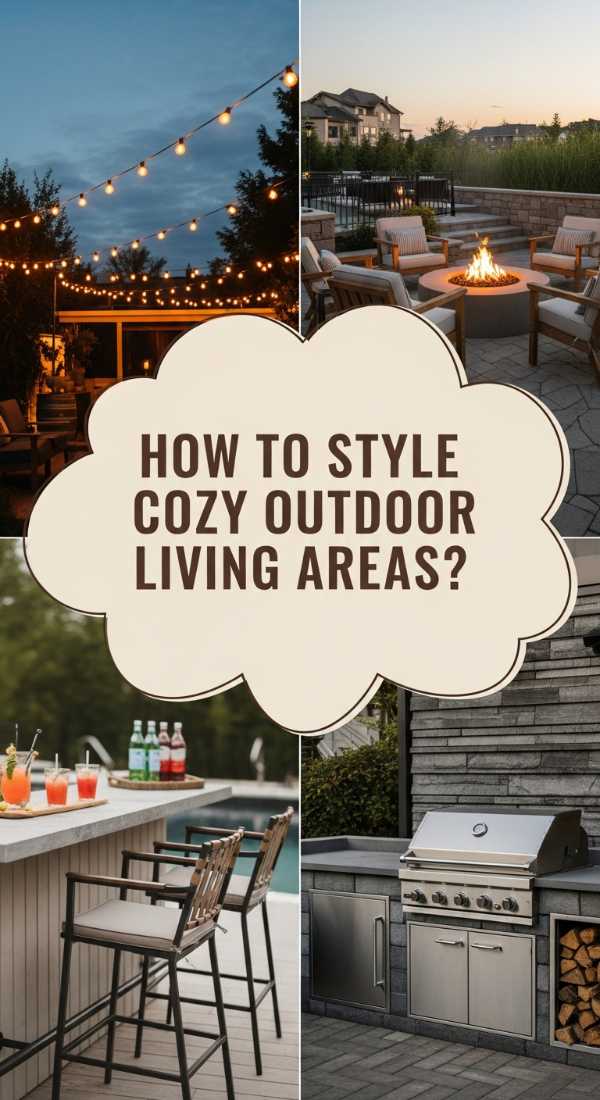
How to Arrange Backyard Entertainment Hubs for Fun Family Hangouts

Why we love this
The ultimate backyard hub is a magnet for connection, pulling people away from their screens and into the fresh air. We love how a thoughtfully arranged seating area, centered around a focal point like a projector screen or a fire pit, creates a ‘living room’ without walls. The texture of outdoor rugs underfoot and the cozy weight of weather-resistant blankets make the space feel intimate and protected. It is the setting for movie nights under the stars and marathon board game sessions, where the environment itself encourages everyone to slow down and stay just a little bit longer.
Essential Elements:
- Weather-resistant sectional or Adirondack chairs
- Outdoor area rug (Polypropylene)
- Ambient string lighting (Edison bulbs)
- Portable projector and screen
- Hidden storage for cushions and blankets
How to make it
- Define the ‘zone’ by laying down a large outdoor rug; this anchors the furniture and makes the space feel like a distinct outdoor room.
- Arrange seating in a semi-circle or U-shape to encourage conversation, ensuring every seat has a clear view of the central entertainment feature.
- String commercial-grade bistro lights overhead in a ‘zigzag’ pattern to provide soft, even illumination that doesn’t wash out a projector screen.
- Position a portable projector on a stable side table and hang a white blackout cloth or specialized screen against a flat wall or fence.
- Incorporate ‘side zones’ like a small drink station or a basket of blankets to ensure guests have everything they need within arm’s reach.
How to Plant Perennial Border Gardens for Constant Seasonal Beauty
Why we love this
A perennial border is like a living frame for your property, providing a shifting kaleidoscope of color that changes from month to month. We love the visual depth created by layering different heights—the tall, swaying grasses in the back meeting the mid-sized blooms and the low-growing groundcovers. It provides a sense of privacy and enclosure that feels natural rather than restrictive. Walking alongside a border in mid-summer, with the fragrance of lilies and the sight of butterflies darting between stems, is a masterclass in the quiet beauty of a well-planned landscape.
Essential Elements:
- Selection of plants with varying bloom times
- Edging material (stone, metal, or plastic)
- Soaker hoses for consistent irrigation
- Trowel and garden fork
- Cardboard for ‘no-dig’ bed expansion
How to make it
- Sketch a ‘bloom calendar’ before buying plants to ensure you have something flowering in spring, summer, and fall for constant visual interest.
- Lay out the border shape using a garden hose to create soft, organic curves; avoid straight lines for a more natural, expansive feeling.
- Group plants in ‘drifts’ of three or five rather than single specimens to create a high-impact, professional aesthetic that mimics nature.
- Place the tallest plants (delphiniums, ornamental grasses) at the back and the shortest (creeping thyme, sedum) at the very front edge.
- Install a soaker hose beneath the mulch layer to deliver water directly to the roots, which reduces evaporation and prevents leaf fungus.
How to Organize Color Centered Classrooms for Productive Student Projects

Why we love this
A classroom organized by color isn’t just visually stunning; it is a powerful tool for cognitive clarity and emotional regulation. We love the way a ‘blue zone’ can instantly signal a place for quiet reading, while a ‘yellow zone’ pumps energy into a collaborative brainstorming corner. The sight of neatly sorted supplies in matching primary colors reduces ‘visual noise,’ allowing students to focus on the task at hand rather than the clutter. It creates an environment that feels both professional and playful, where every object has a clear home and a clear purpose.
Essential Elements:
- Color-coded storage bins and labels
- Zoned floor rugs in different hues
- Visual schedule with color cues
- Open shelving units
- Neutral background walls to make colors pop
How to make it
- Divide the room into functional zones (Reading, Making, Meeting) and assign a primary color to each zone to help students navigate the space.
- Use a consistent labeling system that combines words with color-coded stickers, making it easy for even non-readers to return items to the correct bin.
- Limit the color palette to three or four main hues to prevent sensory overload; use neutral whites or greys for larger furniture pieces.
- Organize shared supplies—like markers, paper, and scissors—into ‘community tubs’ that can be easily moved to different desks as needed.
- Introduce ‘color-coded’ folders for student work (e.g., Green for Science, Red for Math) to streamline the transition between subjects and projects.
How to Setup Smoker Cooking Areas for Delicious Outdoor Feasts
Why we love this
Smoking meat is an art form that rewards patience with deep, complex flavors and a tenderness that melts in the mouth. We love the slow-motion ritual of a smoker setup—the blue wisps of hickory smoke, the ritual of checking the internal temperature, and the anticipation that builds over many hours. There is a primal satisfaction in the smell of wood-fired cooking that draws neighbors from blocks away. It is the ultimate ‘food board’ alternative, where the board is a massive cutting block piled high with brisket, ribs, and smoked sea salt.
Essential Elements:
- Offset smoker or pellet grill
- Dry-aged hardwood (Oak, Hickory, or Fruitwood)
- Wireless dual-probe thermometer
- Steel prep table and magnetic tool strip
- Heavy-duty apron and heat-resistant gloves
How to make it
- Position the smoker in a location protected from heavy wind, as gusts can cause unpredictable temperature fluctuations that ruin the meat’s ‘bark.’
- Set up a dedicated prep station nearby with a stainless steel surface that is easy to sanitize after handling raw meats and heavy spice rubs.
- Store your wood in a dry, elevated rack to ensure it burns cleanly; ‘green’ or damp wood will produce bitter, creosote-heavy smoke.
- Install a magnetic tool strip on the side of your prep table to keep tongs, mops, and temperature probes organized and off the ground.
- Ensure you have a 5-foot safety clearance around the smoker and keep a dedicated ash bucket and fire extinguisher within reach at all times.
How to Craft Modern Wood Furniture for Stylish Porch Living
[IMAGE_10]
Why we love this
Modern wood furniture brings a sense of ‘expensive minimalist’ chic to the outdoors, blending organic warmth with sharp, architectural lines. We love the contrast of a deep espresso stain against the bright green of a manicured lawn or the way a sleek bench looks under a minimalist porch light. There is a rhythmic, meditative quality to the sanding and oiling process, where you can feel the grain of the wood transform under your hands. It is about creating pieces that don’t just occupy space, but define the character of your home’s outdoor personality.
Essential Elements:
- Hardwoods like White Oak or Teak
- Pocket-hole jig or biscuit joiner
- Clamps (various sizes)
- Random orbital sander
- High-quality Tung oil or outdoor varnish
How to make it
- Select ‘straight-grain’ lumber to achieve the clean, modern look characteristic of contemporary furniture design.
- Use hidden joinery techniques, such as pocket holes or biscuits, so that no screw heads are visible on the finished exterior surfaces.
- Maintain sharp 90-degree angles on all cuts; even a slight deviation will prevent the ‘clean line’ aesthetic that defines modern style.
- Sand through the grits meticulously (80, 120, 180, 220) to achieve a glass-like finish that highlights the natural beauty of the wood grain.
- Apply a high-quality oil finish with a lint-free cloth, rubbing it into the wood to provide deep protection rather than just a surface film.
- Wipe off all excess oil after 15 minutes to prevent a tacky buildup, and allow the piece to cure for 48 hours before exposing it to the elements.
Conclusion: Embracing the Lifestyle Beyond the Board
While the viral butter board may have been our entry point into the world of aesthetic living, it is clear that the real magic happens when we apply that same creativity to the spaces we inhabit. Whether you are planting a perennial border that will bloom for decades or building a dining set for a lifetime of family dinners, these projects offer a return on investment that far outlasts any social media trend. Lifestyle isn’t just about what we eat; it is about the environment we cultivate and the intentionality we bring to every corner of our homes. So, take that inspiration, grab your tools or your trowel, and start building the life you want to live—one beautiful project at a time.
Frequently Asked Questions
Q: Is it expensive to start a perennial garden?
A: While the upfront cost of perennial plants is higher than annuals, they are actually a much better investment because they return year after year, saving you money in the long run.
Q: Can I build furniture even if I’ve never used a saw?
A: Absolutely! Many rustic projects are very beginner-friendly. Start with basic designs and always prioritize safety by wearing goggles and reading your tool manuals.
Q: What is the best wood for outdoor furniture?
A: Cedar, Teak, and White Oak are excellent choices because they have natural oils that resist rot and insect damage, making them perfect for the elements.
Q: How do I keep my outdoor cooking zone safe?
A: Always keep your cooking area at least 10 feet away from your home, keep a fire extinguisher nearby, and ensure the ground is leveled with non-flammable material like stone or gravel.