
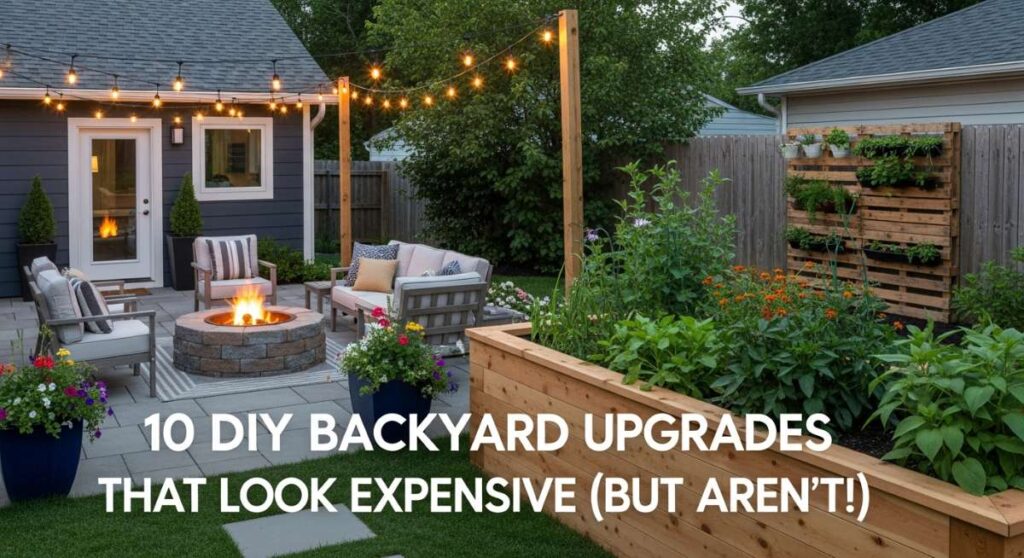
10 DIY Backyard Upgrades That Look Expensive (But Aren’t!)
There is a specific kind of magic that happens when the sun begins to dip below the horizon, casting a warm, golden glow over your own little patch of the world. For years, I looked at my backyard and saw only a list of expensive chores I couldn’t afford—a sea of patchy grass and a shed that had seen better days. I used to think that creating a sanctuary required a professional crew and a five-figure budget, but I’ve learned that the most soulful spaces are the ones we build with our own two hands, one Saturday afternoon at a time.
Today, my backyard is my favorite ‘room’ in the house. It’s where the air smells of blooming jasmine and damp earth, where the sound of the wind through the ornamental grasses acts as a natural soundtrack to my morning coffee. You don’t need a massive bank account to create a high-end look; you just need a bit of vision, a few pallets, and the willingness to get your hands a little dirty. Let’s dive into these ten upgrades that will turn your outdoor space into a viral-worthy retreat without breaking the bank.
How to Design Dreamy Front Yard Landscaping for Instant Curb Appeal
Why we love this
There is nothing quite like the feeling of pulling into your driveway and being greeted by a lush, layered landscape that feels like a warm embrace. This approach focuses on the interplay of textures—the soft, silvery foliage of lamb’s ear against the structural sharpness of boxwood hedges. On a warm evening, the scent of lavender and rosemary wafts toward the porch, creating a sensory experience that feels incredibly high-end. It’s about creating a visual story that makes your home feel established, cared for, and utterly timeless.
Essential Elements:
- Layered perennials (various heights)
- Dark mulch for contrast
- Natural stone edging
- Low-voltage path lighting
- A focal point tree or large shrub
How to make it
- Begin by defining your ‘anchor’ points; choose a small ornamental tree like a Japanese Maple or a Flowering Dogwood and plant it slightly off-center to create a professional, asymmetrical balance.
- Edge your garden beds using a sharp spade to cut a deep ‘V’ trench, or lay down natural cobblestones; this crisp line is the secret to an expensive ‘pro-landscaped’ look.
- Layer your plants from back to front, placing the tallest shrubs against the house and tapering down to ground covers like creeping phlox at the edge; ensure you space them according to their mature width to avoid a cluttered look.
- Apply a 3-inch layer of dark brown or black wood mulch; this not only suppresses weeds but provides a high-contrast backdrop that makes the green foliage pop vibrantly.
- Install solar-powered warm-white spotlights at the base of your anchor tree, angling the beam upward to highlight the bark texture and branch structure at night.
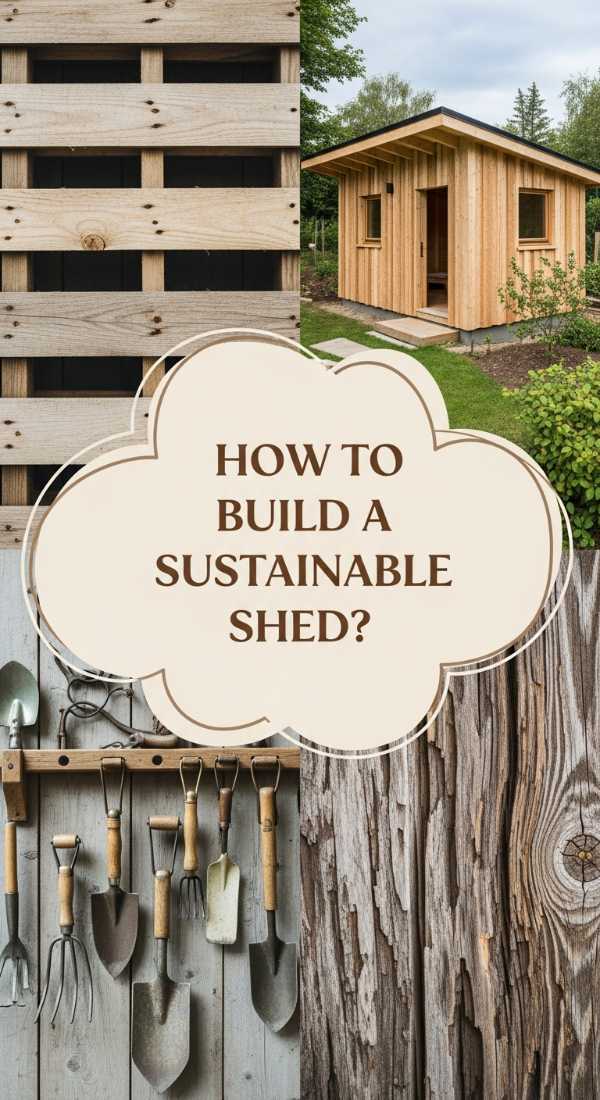
How to Build a Sustainable Garden Shed for Organized Storage

Why we love this
A well-organized shed is more than just storage; it’s a dedicated hub for creativity and growth. Imagine stepping into a space that smells faintly of cedar and dried herbs, where every rake and trowel has a designated home on a shimmering galvanized pegboard. The aesthetic is clean, purposeful, and sustainable, utilizing reclaimed materials that tell a story. It turns a cluttered corner of the yard into a charming focal point that looks like a boutique garden cottage rather than a plastic storage bin.
Essential Elements:
- Reclaimed timber or FSC-certified wood
- Corrugated metal roofing
- Pegboard organization system
- Solar-powered interior lighting
- Weather-resistant exterior stain
How to make it
- Level your site thoroughly by digging out the topsoil and laying a 4-inch base of compacted gravel to ensure proper drainage and prevent wood rot.
- Construct a sturdy floor frame using pressure-treated 2x4s, spaced 16 inches on center, and top with exterior-grade plywood for a solid foundation.
- Frame your walls on the ground before raising them; use a spirit level to ensure every corner is perfectly plumb, which is critical for a shed that looks professionally built.
- Install reclaimed windows or a skylight to invite natural light; seal all edges with high-quality exterior caulk to prevent moisture infiltration and drafts.
- Finish the exterior with a high-pigment, eco-friendly stain in a sophisticated charcoal or forest green, which masks the look of DIY joinery and provides a high-end designer finish.
How to Choose Natural Mud Kitchen Accessories for Creative Outdoor Play
![]()
Why we love this
There is a primal joy in the ‘messy play’ of a mud kitchen, where children become little alchemists mixing ‘soups’ of rainwater and fallen petals. By choosing natural materials—stainless steel, smooth river stones, and hand-carved wood—you elevate this play area from a plastic eyesore to a rustic, beautiful installation. The clinking of metal whisks against steel bowls and the cool, tactile sensation of damp clay provide a rich sensory experience that fosters deep focus and endless imaginative play in the fresh air.
Essential Elements:
- Stainless steel bowls and pots
- Wooden spoons and spatulas
- Woven seagrass baskets for storage
- Dried botanicals (lavender, pinecones)
- A functional water dispenser or pump
How to make it
- Source your ‘hardware’ from thrift stores; look for heavy-duty stainless steel or cast iron pieces that can withstand the elements and provide a satisfying weight for small hands.
- Treat wooden accessories with a food-safe mineral oil or beeswax finish; this protects the wood from cracking during sun exposure while maintaining a natural, matte look.
- Arrange the accessories on a low wooden counter or shelf, grouping items by ‘type’—place all stirring tools in a ceramic crock and all ‘ingredients’ like pebbles or acorns in matching baskets.
- Integrate a water source, such as a large glass beverage dispenser with a metal spigot, which allows kids to practice fine motor skills while managing their own ‘ingredients.’
- Add a vertical element by installing small brass hooks along the backboard of the play area to hang ladles and colanders, mimicking the organization of a professional chef’s kitchen.
How to Transform Upcycled Pallets for the Ultimate Backyard Workspace
Why we love this
The industrial-chic vibe of a pallet-based workspace is both rugged and incredibly functional, offering a gritty, ‘lived-in’ elegance. There is a deep satisfaction in seeing the rough, sun-bleached grain of the wood transformed into a sturdy potting bench or a laptop station. The air around the workspace is often filled with the earthy scent of potting soil and the hum of insects, making it a meditative spot to tackle projects or enjoy a remote workday under the shade of a nearby tree.
Essential Elements:
- Heat-treated (HT) pallets
- Heavy-duty casters (wheels)
- Sandpaper (various grits)
- Exterior polyurethane finish
- Galvanized metal work surface
How to make it
- Search for pallets marked with the ‘HT’ stamp, indicating they were heat-treated rather than chemically treated, making them safe for home and garden use.
- Deconstruct the pallets carefully using a pry bar, then sand every surface starting with 60-grit and finishing with 120-grit until the wood feels smooth to the touch and the grain is visible.
- Build a box-frame base for the legs to ensure stability, then screw the pallet slats across the top to create a rustic, planked work surface.
- Attach a sheet of galvanized steel to one half of the top surface using construction adhesive; this provides a durable, easy-to-clean area for messy tasks like repotting plants.
- Apply three coats of spar urethane, which contains UV blockers; this prevents the wood from graying and protects it from rain, giving the final piece a professional, glossy sheen.
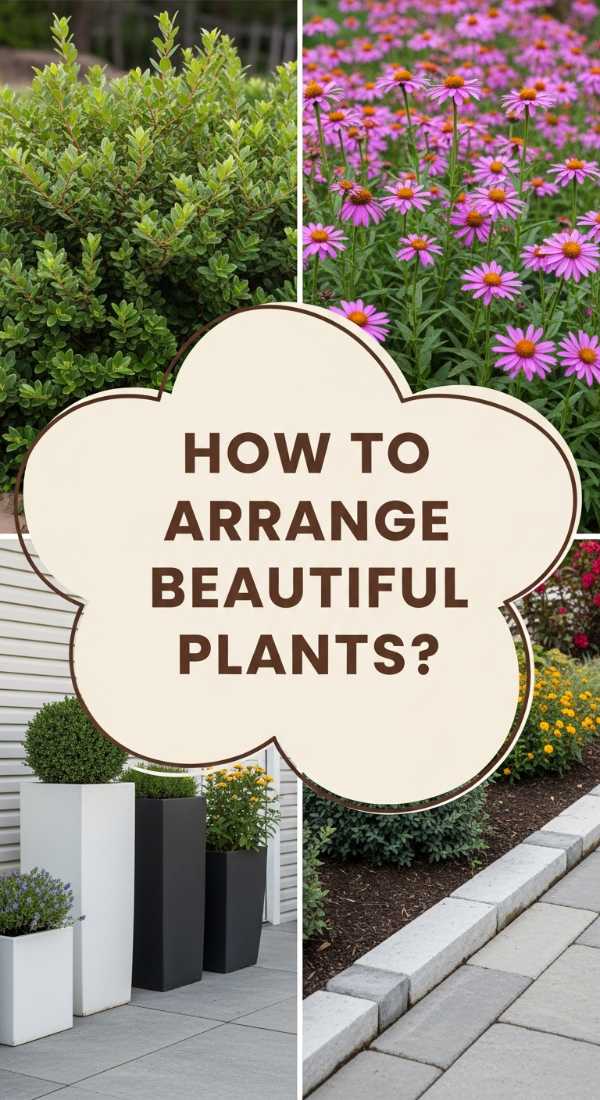
How to Arrange Beautiful Plants for a Low Maintenance Front Yard
Why we love this
A low-maintenance yard shouldn’t look like a desert; it should look like a curated, effortless meadow. We love the soft movement of ornamental grasses like Pennisetum as they catch the afternoon breeze, and the bold, architectural lines of succulents that require almost no attention. This design style creates a serene, minimalist atmosphere where the beauty lies in the subtle color palette of sage greens, dusty blues, and sandy tans, allowing you to spend more time enjoying the view and less time weeding it.
Essential Elements:
- Native drought-resistant plants
- Ornamental grasses for movement
- Structural succulents or agaves
- Permeable gravel or river rock
- Landscape fabric (weed barrier)
How to make it
- Map out your planting zones based on sun exposure, placing ‘thriller’ plants (tall, eye-catching species) in the center and ‘spillers’ (low-growing trailers) near the edges of walkways.
- Excavate the top 2 inches of soil and lay down a heavy-duty, professional-grade landscape fabric to prevent weed growth for years to come.
- Cut ‘X’ shapes into the fabric to plant your selections, ensuring you mix different foliage textures—pair the feathery fronds of a fern with the waxy, broad leaves of a Hosta for visual depth.
- Cover the entire area with 2 inches of pea gravel or decomposed granite; the neutral stone color creates a clean, sophisticated ‘scandi-garden’ aesthetic that holds heat and moisture.
- Group plants with similar water needs together (hydro-zoning); this ensures that your low-maintenance plants don’t get over-watered by nearby thirstier species, keeping the garden healthy.
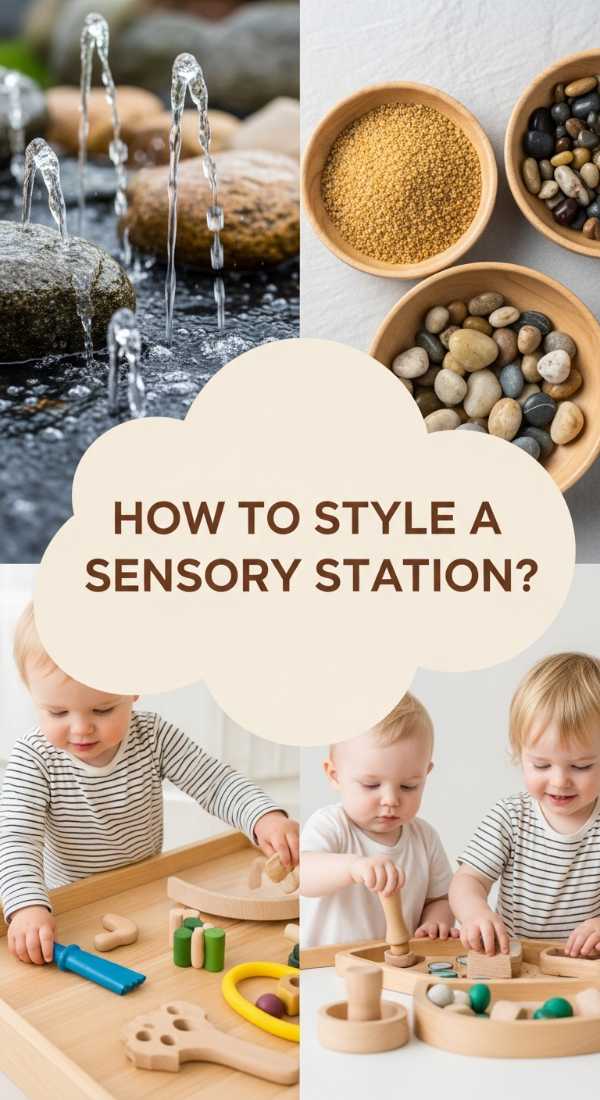
How to Style a Playful Sensory Station for Happy Toddlers
Why we love this
A sensory station is a playground for the soul, a place where the boundaries between learning and play disappear into a cloud of bubbles and sand. The sound of water trickling through bamboo pipes and the sight of colorful translucent beads catching the sunlight create a mesmerizing environment. It’s a dedicated corner of the backyard that looks like a high-end Montessori installation, encouraging toddlers to explore textures—the roughness of bark, the silkiness of water, and the coolness of polished glass gems.
Essential Elements:
- Multi-level bins or basins
- Kinetic sand or polished river stones
- Water-safe scoops and funnels
- Floating elements (cork, rubber ducks)
- Child-safe herbs for scent (mint, lemon balm)
How to make it
- Build a simple wooden frame at ‘toddler height’ (usually 18-24 inches) to hold two or three plastic bins; use cedar wood as it is naturally rot-resistant and safe for kids.
- Fill each bin with a different medium: one with filtered water, one with dry play sand, and one with a ‘hidden treasure’ mix of smooth river rocks and large glass pebbles.
- Introduce scent by planting a small pot of peppermint or chocolate mint right next to the station; kids can rub the leaves to release the aroma as they play.
- Add ‘tools’ that encourage different types of movement, such as turkey basters for water suction, silicone molds for sand shaping, and wooden tongs for fine-motor rock sorting.
- Change the ‘theme’ monthly—add blue food coloring and plastic sea creatures to the water bin in July, or dried corn and small pumpkins in October—to keep the station feeling new and exciting.
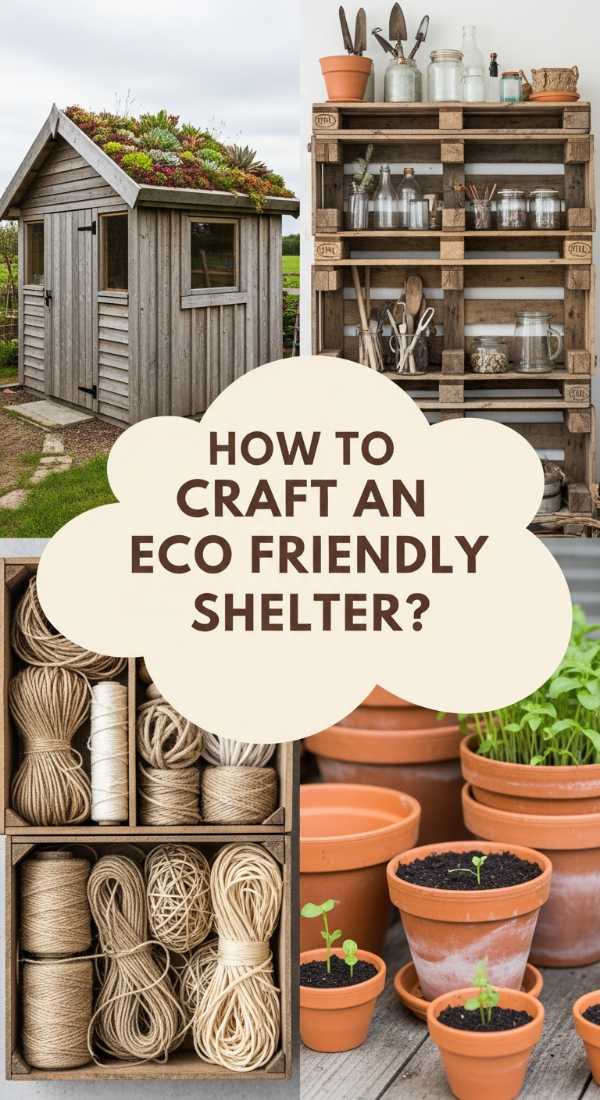
How to Craft an Eco Friendly Shelter for Your Garden Tools
Why we love this
There is something deeply satisfying about giving your tools a home that respects the environment. This eco-friendly shelter uses natural textures and clever design to protect your investment while blending seamlessly into the greenery. The sight of a green roof covered in succulents or moss atop a small wooden tool hutch is an instant conversation starter. It feels like a secret garden feature, smelling of damp earth and cedar, providing a quiet, organized sanctuary for the very things that help your garden thrive.
Essential Elements:
- Untreated cedar or redwood
- Sedum mat for a ‘living roof’
- Natural linseed oil finish
- Magnetic tool strips
- Recycled rubber floor mat
How to make it
- Design a lean-to structure with a sloped roof to ensure water runoff; use cedar planks which contain natural oils that repel insects and resist decay without harsh chemicals.
- Construct a shallow ‘tray’ for the roof area, line it with a pond liner, and fill it with a lightweight growing medium specifically designed for green roofs.
- Plant a variety of sedums or hardy mosses in the roof tray; these plants are incredibly resilient and provide natural insulation while absorbing CO2.
- Install a heavy-duty magnetic strip along the interior back wall; this allows you to ‘snap’ metal trowels and shears into place, keeping them off the floor and easily accessible.
- Seal the exterior with raw linseed oil or hemp oil; apply in thin coats and allow to dry in the sun for a beautiful, golden-amber finish that is 100% non-toxic.
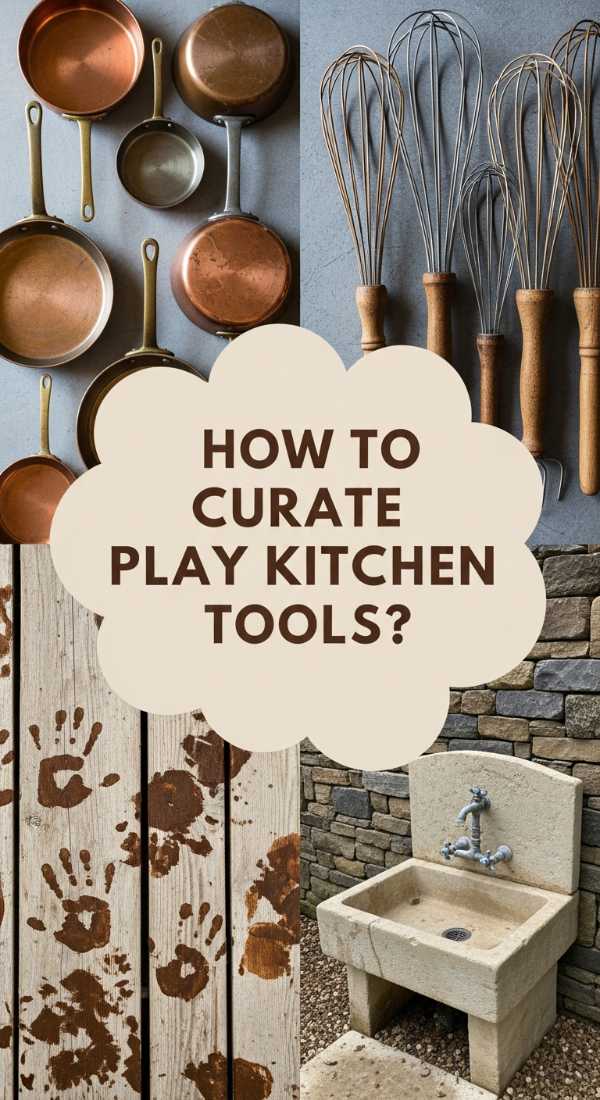
How to Curate Rustic Play Kitchen Tools for Endless Messy Fun
Why we love this
Ditching the bright plastic for rustic, ‘real-world’ tools transforms an outdoor play area into a charming vintage scene. We love the weighted clink of an old brass bell used as a dinner gong and the weathered patina of a galvanized steel bucket. These tools feel significant in a child’s hand, offering a more grounding and authentic experience. The visual appeal is undeniable—it looks like a scene from a high-end lifestyle magazine, but it’s actually a hard-wearing, durable space for the messiest of ‘mud pies.’
Essential Elements:
- Antique hand-crank whisks
- Galvanized steel buckets and jugs
- Cast iron muffin tins
- Enamelware plates and cups
- Woven willow baskets
How to make it
- Scour flea markets for enamelware—white with a blue rim is a classic look that never goes out of style and is virtually indestructible in an outdoor setting.
- Check all vintage metal items for sharp edges or rust; use a wire brush to remove rust and seal with a clear, matte outdoor spray paint to keep them safe for little hands.
- Organize the tools on open wooden shelving, using different sized willow baskets to group ‘categories’ like baking tins, stirring spoons, and serving plates.
- Hang a vintage dinner triangle or a small brass bell nearby; this adds an auditory element to the play and gives the ‘kitchen’ a central focal point.
- Create a ‘spice rack’ using small mason jars filled with natural elements like dried flower petals, pine needles, and crushed eggshells for ‘seasoning’ the mud creations.
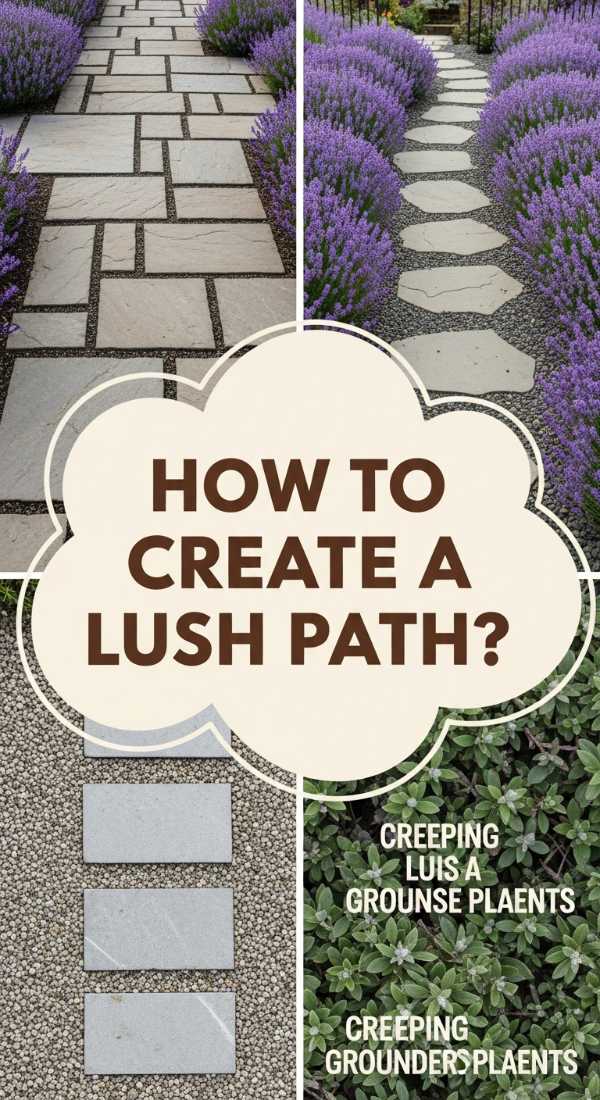
How to Create a Lush Path for a Welcoming Home Entrance
Why we love this
A path is more than a way to get from the street to the door; it is a journey that sets the tone for your entire home. A lush, winding path made of irregular flagstones surrounded by creeping thyme feels like a walk through an English cottage garden. As you step, the faint, sweet scent of crushed thyme rises to meet you, and the visual of green moss nestled in the stone crevices suggests a home that is settled and serene. It’s a high-impact upgrade that adds immediate romantic appeal and value.
Essential Elements:
- Irregular flagstone or slate pavers
- Creeping Thyme or Irish Moss
- Fine-grain leveling sand
- Landscape edging (hidden)
- Solar-powered lantern stakes
How to make it
- Layout your path using a garden hose to create soft, organic curves rather than rigid straight lines; this makes the entrance feel more inviting and ‘designed.’
- Dig out the path to a depth of 4 inches, lay down 2 inches of crushed stone, and then 1 inch of leveling sand, tamping it down until it is perfectly flat.
- Place your flagstones like a puzzle, leaving 2-3 inch gaps between them; use a rubber mallet to tap them into the sand until they don’t wiggle when stepped on.
- Fill the gaps with a high-quality potting mix and plant small plugs of Creeping Thyme; this plant is ‘step-able’ and will spread to create a lush, living grout.
- Line the path with vintage-style copper lanterns on stakes, spaced every 3-4 feet, to illuminate the walkway and highlight the texture of the stones at night.
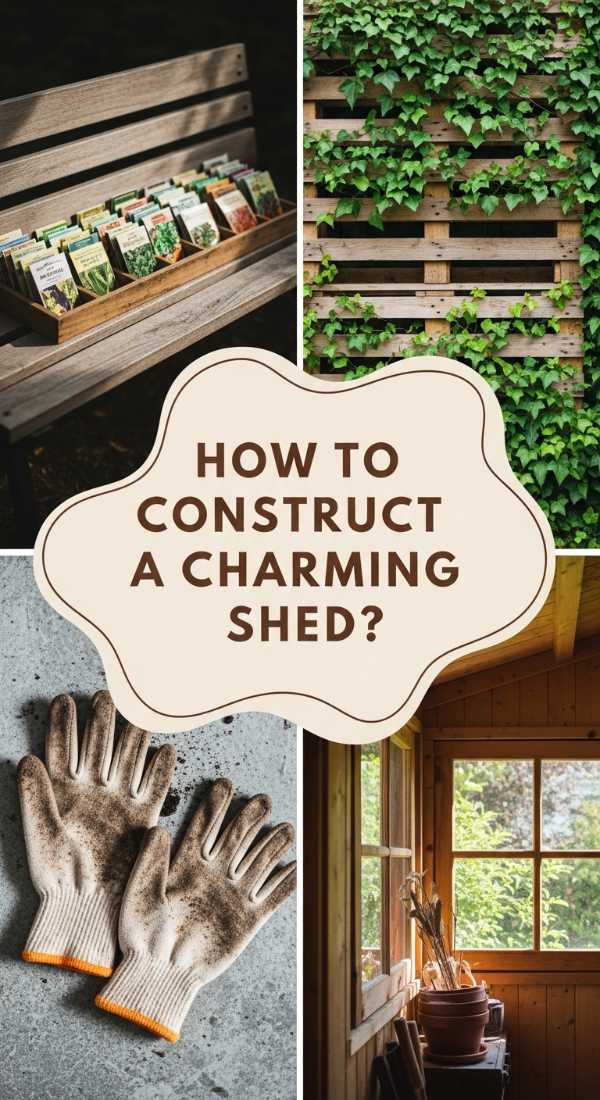
How to Construct a Charming Pallet Shed for Your New Garden Hobby
[IMAGE_10]
Why we love this
There is a unique charm in the ‘patchwork’ beauty of a pallet shed—it feels cottage-core, resourceful, and incredibly cozy. We love how the varied tones of the wood create a natural mosaic that blends into the surrounding trees. It provides a dedicated space for your hobby, whether it’s potting seedlings, painting, or woodworking. When the sun filters through the slats, it creates a striped pattern of light and shadow on the floor, making the shed feel like a secret hideaway where time slows down and creativity thrives.
Essential Elements:
- 8-10 uniform-sized pallets
- 4×4 pressure-treated corner posts
- Polycarbonate roof panels (for light)
- Vintage door hardware
- Outdoor string lights
How to make it
- Secure four 4×4 posts into the ground using post-hole diggers and quick-set concrete; ensure they are perfectly square to form the skeleton of your shed.
- Attach full pallets directly to the posts to serve as your walls; use heavy-duty lag bolts to ensure the structure can handle wind and the weight of the roof.
- Install a simple rafters system using 2x4s and top with clear polycarbonate panels; this allows light to flood the space, making it feel much larger and more high-end than it is.
- Sand the exterior pallets and paint them in a creamy off-white or a soft ‘duck egg’ blue to give the structure a unified, ‘shabby-chic’ boutique look.
- Decorate the interior with a strand of warm-toned Edison bulbs and a small workbench made from the leftover pallet wood to complete your custom hobby sanctuary.
Creating Your Outdoor Sanctuary
Transforming your backyard doesn’t require a lottery win; it requires a little bit of sweat equity and the courage to try something new. Each of these projects adds a layer of character and luxury to your home, proving that style is about creativity, not just cost. Whether you start with a simple lush path or take on the challenge of a pallet shed, the goal is to create a space that reflects your soul and invites you to slow down. So, grab your gloves, pick a project, and start building the retreat you deserve.