
DIY or Die: How to Turn Your Boring Living Room Into a Pinterest Paradise
We’ve all been there: staring at that one corner of the living room that just feels… flat. You scroll through Pinterest for hours, pinning floor-to-ceiling libraries and sun-drenched patios, feeling like those dreams are locked behind a massive price tag or a professional contractor’s phone number. But I’m here to tell you that your home is a canvas, and you are the artist. There is an incredible, soul-filling magic that happens when you stop waiting for ‘someday’ and start picking up a hammer or a paintbrush yourself. It’s about more than just aesthetics; it’s about reclaiming your space and infusing it with your own heartbeat.
In this guide, we’re going beyond the living room walls to embrace a full-lifestyle DIY transformation. Whether you’re looking to boost your curb appeal or create a backyard sanctuary that smells of cedar and fresh blooms, these projects are designed to be approachable yet high-impact. We’re talking about textures that invite you to touch, scents that calm the mind, and visual layouts that make you exhale the moment you walk through the door. Let’s roll up our sleeves and turn that ‘boring’ reality into a Pinterest-worthy paradise, one project at a time.
How to Design Stunning Front Yard Flower Beds for Professional Curb Appeal
Why we love this
There is nothing quite like the intoxicating aroma of damp cedar mulch and blooming jasmine greeting you after a long day. This project is a feast for the senses, offering a visual symphony of tiered colors and rich, velvety textures that make your home feel like a high-end estate. The way the soft petals of hydrangeas contrast against the sharp, architectural lines of boxwoods creates a satisfying balance that is as refreshing to look at as a cool drink on a summer afternoon. It’s the ultimate ‘welcome home’ dish for the eyes, served with a side of pure neighborhood envy.
Essential Elements:
- Pressure-treated landscape timbers or natural stone edging
- Premium dark hardwood mulch
- A mix of ‘thriller, filler, and spiller’ plants (e.g., Lavender, Hostas, Creeping Phlox)
- Slow-release organic fertilizer
- Landscaping fabric and garden staples
How to make it
- Begin by marking your bed perimeter using a garden hose to create natural, flowing curves; avoid harsh straight lines for a more professional, organic look.
- Remove all grass and weeds within the marked area using a sharp spade, ensuring you dig at least 3 inches deep to clear out root systems.
- Lay down heavy-duty landscape fabric, overlapping edges by 6 inches, and secure it with garden staples to prevent future weed intrusion.
- Position your largest ‘thriller’ plants (like ornamental grasses or tall shrubs) toward the back or center, keeping them in their nursery pots first to visualize the height.
- Surround the tall plants with ‘fillers’ like mounding perennials, ensuring you leave at least 12-18 inches of space between them to allow for future growth.
- Place ‘spillers’ or groundcovers at the very front edge so they can gracefully tumble over your stone or wood edging as they mature.
- Once satisfied with the layout, dig holes twice as wide as the root balls, mix in a handful of organic fertilizer, and plant each specimen at the same depth it was in the pot.
- Apply a generous 3-inch layer of dark mulch across the entire bed, keeping it an inch away from the base of plant stems to prevent rot, and water deeply until the soil is saturated.
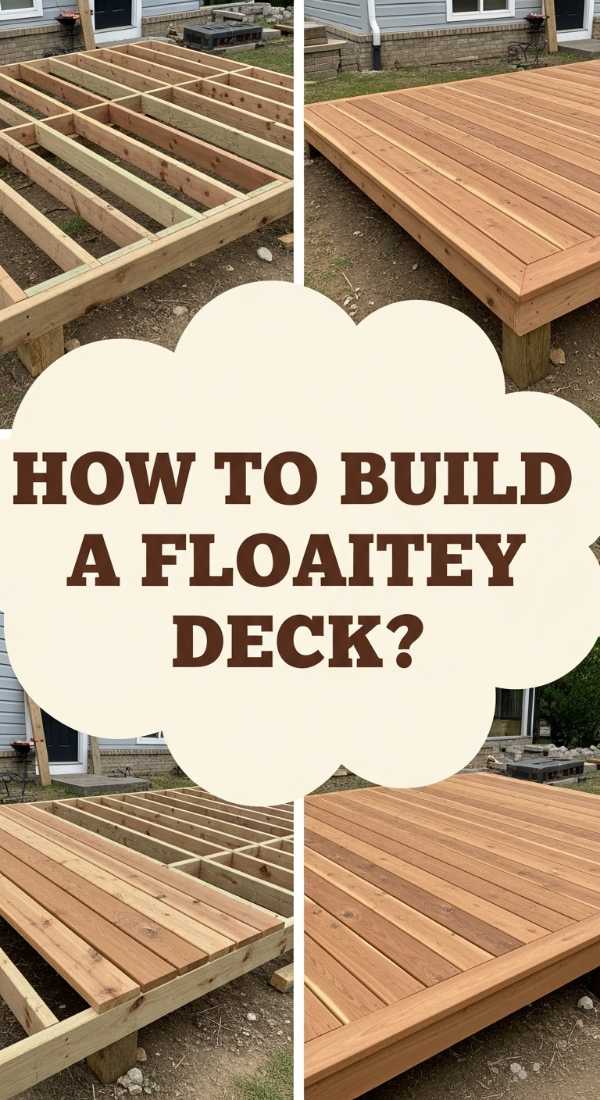
How to Build a Floating Deck for the Ultimate Backyard Retreat

Why we love this
Imagine the scent of raw, sun-warmed cedar wafting through the air as you step onto a platform that feels like your own private island. This floating deck offers a tactile experience unlike any other—smooth wood grains underfoot and a sturdy, grounded feeling that invites you to linger with a glass of wine at sunset. It’s a low-profile architectural masterpiece that transforms a patch of grass into a sophisticated lounge, providing a crisp, clean stage for your outdoor furniture to truly shine. It feels indulgent, modern, and perfectly serene.
Essential Elements:
- Pressure-treated 2×6 joists and 4×4 deck blocks
- Premium cedar or composite decking boards
- 3-inch exterior-grade deck screws
- Level, gravel, and weed barrier
- Miter saw and power drill
How to make it
- Clear a level area of ground and lay down a weed barrier topped with a thin layer of leveled pea gravel to ensure proper drainage under the deck.
- Set your concrete deck blocks in a rectangular grid, spaced no more than 4 to 5 feet apart, using a long straight board and a spirit level to ensure every block is perfectly height-aligned.
- Construct the outer frame using 2×6 pressure-treated lumber, checking for squareness by measuring diagonally from corner to corner until both measurements are identical.
- Install interior joists every 16 inches on center, securing them with joist hangers or heavy-duty deck screws for maximum structural integrity.
- Begin laying your cedar decking boards starting from the most visible edge, using a 1/8-inch spacer (or a large nail) between boards to allow for wood expansion and water drainage.
- Drive two screws into each joist per board, ensuring the screw heads are slightly countersunk for a smooth, snag-free surface.
- Trim any overhanging board edges with a circular saw for a perfectly flush, professional finish along the perimeter.
- Apply a high-quality UV-protectant sealer or stain once the wood has had a few days to ‘breathe,’ ensuring the rich honey tones of the wood are preserved against the elements.
How to Install Rock Landscaping for a Sustainable Garden Aesthetic
Why we love this
There is a profound, meditative quality to the sound of crunching river rock underfoot and the sight of sun-bleached stones nestled against deep green succulents. This rock landscaping project brings a rugged, desert-chic elegance to your yard that feels both timeless and incredibly modern. The cool, smooth texture of the stones provides a stark, beautiful contrast to the soft, feathery movements of ornamental grasses. It’s a low-maintenance ‘dish’ of earthy tones and organic shapes that stays ‘fresh’ all year round without a single drop of water.
Essential Elements:
- Large landscape boulders for focal points
- 1-3 inch river rocks or Mexican beach pebbles
- Commercial-grade weed barrier
- Steel or heavy-duty plastic edging
- Shovel and metal rake
How to make it
- Excavate the area to a depth of 3-4 inches, removing all vegetation and ensuring a slight slope away from any house foundations to manage water runoff.
- Install steel edging along the perimeter to create a crisp ‘crust’ that keeps the rocks from migrating into your lawn over time.
- Lay down the highest-quality weed barrier available, securing it with twice the recommended number of staples to ensure the heavy rocks don’t shift the fabric.
- Position your large ‘focal point’ boulders first; bury the bottom third of each boulder in the ground to make them look like they’ve naturally emerged from the earth.
- Pour your smaller river rocks or pebbles around the boulders, using a metal rake to spread them evenly to a depth of at least 2-3 inches for full coverage.
- Incorporate ‘pockets’ for drought-tolerant plants by cutting an ‘X’ in the fabric, digging a small hole, and planting succulents or grasses directly into the soil.
- Use a garden hose to wash the dust off the rocks once installed; this ‘reveals’ the true vibrant colors and hidden textures of the stone.
- Check the depth and evenness by walking over the area; if you can see the fabric, add another half-inch of rock to ensure a lush, dense aesthetic.
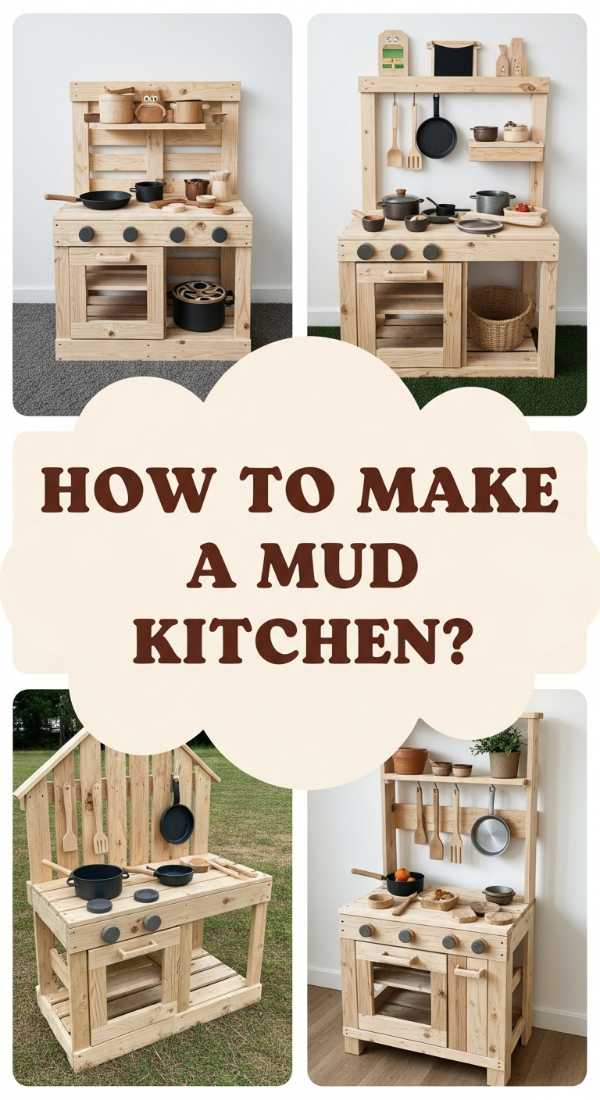
How to Craft a Pallet Mud Kitchen for Endless Outdoor Play

Why we love this
This project is a nostalgic trip back to the tactile joys of childhood, smelling of pine wood and the earthy scent of garden soil. A mud kitchen is the ultimate sensory playground, where the ‘menu’ consists of mud pies and flower petal soups, fostering creativity in a way digital screens never could. The rustic, reclaimed wood texture gives it a charming ‘farmhouse’ vibe that looks beautiful in a backyard, while the sound of clinking metal pots and happy laughter creates an atmosphere of pure, unadulterated joy. It’s functional art for the little ones.
Essential Elements:
- Two heat-treated (HT) wooden pallets
- Stainless steel mixing bowls (for the sinks)
- Old kitchen faucets or knobs
- Outdoor-rated wood screws and hooks
- Sandpaper and non-toxic exterior paint or sealer
How to make it
- Select pallets marked with ‘HT’ (Heat Treated) to ensure they are safe for children and free of harmful chemicals found in chemically treated wood.
- Disassemble one pallet to harvest individual boards, while keeping the second pallet mostly intact to serve as the main vertical backboard and frame.
- Sand every inch of the wood with 60-grit followed by 120-grit sandpaper until the surface is buttery smooth to prevent splinters during vigorous play.
- Build a simple rectangular table frame at a height comfortable for your child (usually 20-24 inches) and secure it to the vertical backboard pallet.
- Using a jigsaw, cut circular holes in the countertop that are slightly smaller than the lip of your stainless steel bowls so they ‘drop in’ securely as sinks.
- Attach old faucets, drawer pulls, or wooden discs to the backboard to act as ‘stove knobs’ and ‘taps,’ providing mechanical feedback for little hands.
- Install a lower shelf using your harvested pallet boards to store ‘cookware’ like old pots, pans, and wooden spoons.
- Finish the entire piece with a clear, non-toxic outdoor sealer or a vibrant pop of exterior milk paint to protect the wood from the inevitable water and mud splatters.
How to Design a Planter Privacy Wall for a Secluded Patio Experience

Why we love this
There is a unique sense of peace that comes from being enveloped by a wall of living, breathing greenery. This privacy wall project is like a giant, fragrant hug for your patio, blocking out the noise of the world and replacing it with the gentle rustle of leaves and the scent of sweet herbs. The vertical texture of the wood slats combined with the cascading vines creates a lush, layered look that feels like a high-end boutique hotel. It’s about creating a ‘secret garden’ vibe where you can finally sip your morning coffee in total, beautiful seclusion.
Essential Elements:
- 4×4 pressure-treated posts and 2×4 cedar slats
- Large rectangular wooden planter boxes
- Climbing plants like Clematis or Star Jasmine
- Heavy-duty landscape liner
- Level, drill, and deck screws
How to make it
- Secure two 4×4 posts vertically into the ground or directly onto your deck, ensuring they are perfectly plumb and spaced the width of your planter boxes.
- Build or purchase heavy-duty planter boxes to sit at the base of these posts, lining them with plastic to protect the wood from constant moisture.
- Install 2×4 horizontal cedar slats between the posts, leaving a 1-2 inch gap between each slat to allow wind to pass through while still providing visual privacy.
- Fill the planter boxes with a high-quality potting mix enriched with perlite for drainage and compost for long-term nutrient release.
- Plant fast-growing climbers like Star Jasmine or Honeysuckle at the base of the wall, gently weaving the initial tendrils into the lower slats.
- Use small U-shaped garden staples or twine to ‘train’ the plants upward, ensuring they spread horizontally across the slats for maximum coverage.
- Add a few ‘filler’ plants like variegated ivy or trailing petunias at the front of the planter to create a multi-dimensional, overflowing ‘spill’ effect.
- Install a simple drip irrigation line hidden behind the slats to ensure your ‘living wall’ stays vibrant and lush even during the heat of mid-summer.
How to Decorate with Rustic Birdhouses for a Charming Garden Atmosphere
Why we love this
Adding rustic birdhouses is like seasoning a dish with the perfect pinch of salt—it brings everything to life. These charming structures add a whimsical, storybook texture to your garden, inviting the cheerful morning song of bluebirds and wrens into your daily routine. The sight of weathered wood and mossy roofs nestled among the branches creates a feeling of timelessness and connection to nature. It’s an effortless way to add height and character to your landscaping, turning a simple yard into a bustling, vibrant sanctuary that feels lived-in and loved.
Essential Elements:
- Assorted wooden birdhouses (new or vintage)
- Copper or wooden mounting poles
- Outdoor acrylic paint or wood stain
- Dried moss and twine for ‘aged’ detailing
- Galvanized mounting brackets
How to make it
- If using new birdhouses, ‘age’ them by applying a diluted grey wood stain or a light white-wash to mimic the look of years spent in the sun and rain.
- Ensure each house has proper drainage holes in the bottom and ventilation slits near the top to keep your feathered ‘tenants’ cool and dry.
- Choose strategic locations: mount houses 5-10 feet off the ground in areas that are relatively quiet but still visible from your favorite window.
- Group birdhouses in ‘clusters’ of three at varying heights to create a more impactful visual vignette rather than scattering them randomly.
- Use copper poles for a sleek, modern-rustic look, or cedar 4×4 posts for a more traditional farmhouse aesthetic, ensuring they are buried at least 2 feet deep.
- Hot glue small patches of preserved sheet moss to the roofs and around the entrance holes to give them an immediate, ‘enchanted forest’ character.
- Ensure the entrance hole size matches the specific birds you want to attract (e.g., 1.5 inches for Eastern Bluebirds) to prevent larger predatory birds from entering.
- Clean out the houses each autumn after nesting season is over to keep the ‘homes’ healthy and ready for the next spring’s arrivals.
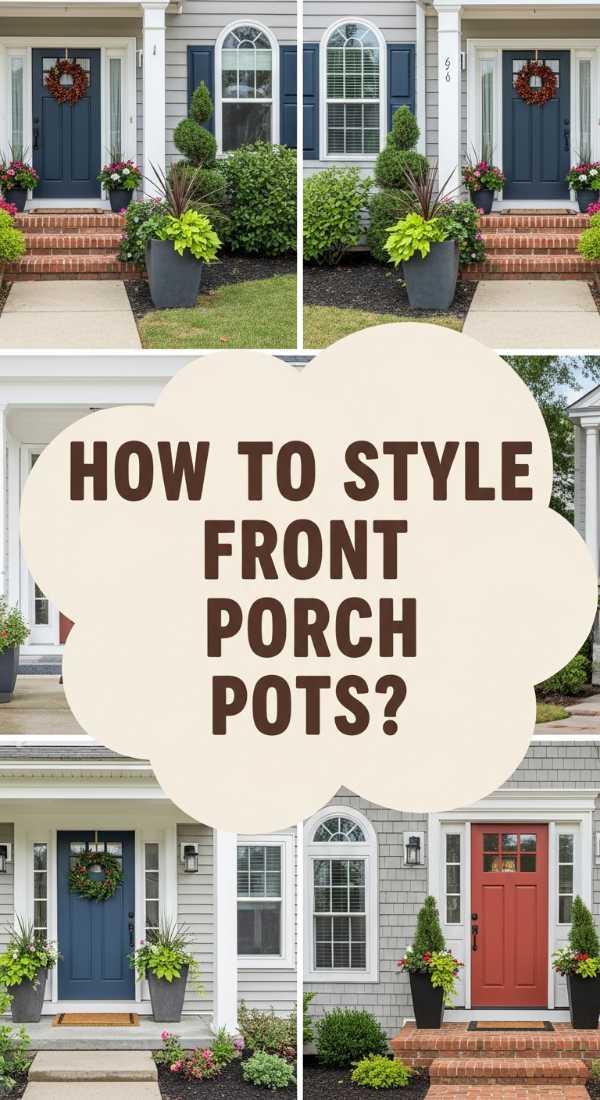
How to Arrange Front Porch Flower Pots for an Inviting Entrance

Why we love this
A well-arranged front porch is the ‘appetizer’ of your home, setting the tone for everything that lies inside. We love the vibrant, punchy colors of geraniums mixed with the cool, silvery leaves of dusty miller, all held together by the earthy aroma of fresh potting soil. The varying heights and textures of different pots—ceramic, terracotta, and galvanized metal—create a rich, curated look that feels welcoming and intentional. It’s a quick-fix transformation that brings immediate life and ‘soul’ to your entryway, making every arrival feel like a special occasion.
Essential Elements:
- A collection of 3-5 pots in varying heights and sizes
- High-quality potting soil with moisture-retaining crystals
- ‘Thriller’ plants (e.g., Fountain Grass or Canna Lilies)
- ‘Filler’ plants (e.g., Marigolds or Lantana)
- ‘Spiller’ plants (e.g., Sweet Potato Vine or Bacopa)
How to make it
- Select a ‘hero’ pot—the largest and most ornate—to serve as the anchor of your arrangement, usually placed closest to the door.
- Group your pots in odd numbers (3 or 5) and vary the materials or colors while keeping a common ‘thread,’ like a similar rim style or color palette.
- Fill the pots with a premium potting mix, leaving about 2 inches of ‘headroom’ at the top to allow for easy watering without overflow.
- Apply the ‘Thriller, Filler, Spiller’ rule: place your tallest, most dramatic plant in the center or back of each pot to create height.
- Tuck your ‘fillers’—colorful, mounding flowers—around the central plant to hide the soil and provide a dense middle layer of texture.
- Place your ‘spillers’ at the edges, angling them slightly outward so they can gracefully drape down the sides of the containers.
- Deadhead (remove) spent blooms weekly; this ‘pro tip’ encourages the plants to put energy into new flowers rather than seed production, keeping the pots lush all season.
- Water until liquid drains out the bottom holes, ensuring the root systems are fully hydrated, especially for pots located in high-sun or windy areas.
How to Achieve Realistic Pantry Organization for a Seamless Kitchen Flow
Why we love this
There is a deep, soul-soothing satisfaction in the ‘click’ of an airtight lid and the visual rhythm of perfectly aligned glass jars. This project is about more than just cleaning; it’s about creating a kitchen flow that feels like a choreographed dance. The aroma of dried herbs, the tactile smoothness of glass, and the clarity of seeing exactly what you have at a glance makes cooking feel less like a chore and more like a creative outlet. It’s the ultimate ‘functional beauty’ dish, served with a side of daily peace of mind.
Essential Elements:
- Uniform glass jars with bamboo or metal lids
- Clear acrylic bins for ‘like’ items
- A high-quality label maker or vinyl decals
- Tiered ‘stadium’ shelving for canned goods
- Lazy Susans for oils and vinegars
How to make it
- Empty your entire pantry completely; you cannot organize what you cannot see, and this ‘blank slate’ approach is essential for a professional result.
- Discard expired items and donate unopened goods you know you won’t use to create as much ‘breathing room’ as possible.
- Decant ‘dry’ goods (flour, sugar, pasta, cereal) into uniform glass jars; this removes ‘visual noise’ and keeps food fresh significantly longer.
- Categorize items into ‘zones’ based on usage: a ‘baking zone,’ a ‘breakfast zone,’ and a ‘dinner prep zone’ to minimize movement while cooking.
- Use clear acrylic bins for ‘snack’ items or awkward packaging, grouping similar items together so you can see when stock is running low.
- Apply clear, minimalist labels at eye level on every jar and bin; this ensures every family member knows exactly where things ‘live.’
- Install a Lazy Susan in the corners or for tall bottles like oils and vinegars, allowing you to access items in the back with a simple spin.
- Maintain the system by ‘front-facing’ your items (labels out) every time you bring home groceries, treating your pantry like a high-end boutique.
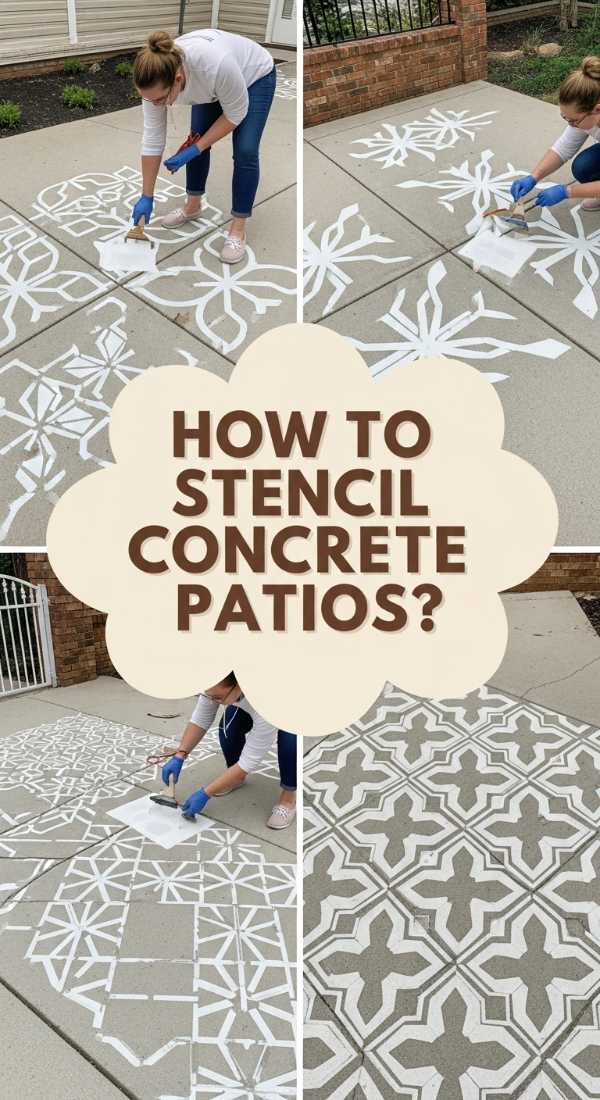
How to Apply a Concrete Stencil for a High End Patio Look
Why we love this
This project is pure magic—it’s the art of turning a dull, grey concrete slab into a high-end, ’tiled’ masterpiece without the cost of a mason. We love the crisp, clean lines and the sophisticated texture it adds to an outdoor space, making it feel like an extension of your indoor living room. The transformation is incredibly satisfying to the touch and the eye, offering a ‘designer’ look that feels expensive and permanent. It provides a chic, patterned backdrop for your patio furniture, turning a basic backyard into a Mediterranean-inspired escape.
Essential Elements:
- Large-scale floor stencil (e.g., Moroccan or geometric pattern)
- Exterior-grade concrete paint (base color and accent color)
- High-density foam rollers and painter’s tape
- Concrete cleaner/degreaser and a stiff brush
- Outdoor clear-coat sealer
How to make it
- Deep clean the concrete using a professional-grade degreaser and a pressure washer; any dirt or oil will prevent the paint from bonding properly.
- Apply two coats of your base color (the ‘grout’ color) across the entire surface using a long-handled roller, allowing at least 24 hours of dry time between coats.
- Secure your stencil in a corner or the center of the patio (depending on the pattern’s layout) using heavy-duty painter’s tape to prevent shifting.
- Load a high-density foam roller with very little accent paint—the ‘dry brush’ technique is crucial here to prevent paint from bleeding under the stencil.
- Lightly dab or roll over the stencil, building up color slowly rather than applying one thick coat; this ensures the crispest possible lines.
- Carefully lift the stencil and realign it using the built-in registration marks, repeating the process across the entire surface like a giant puzzle.
- Use a small artist’s brush to touch up any minor bleeds or missed spots once the main stenciling is complete.
- Once fully dry (usually 48 hours), apply two coats of a clear, slip-resistant outdoor sealer to protect your ’tile’ from UV rays, rain, and foot traffic.
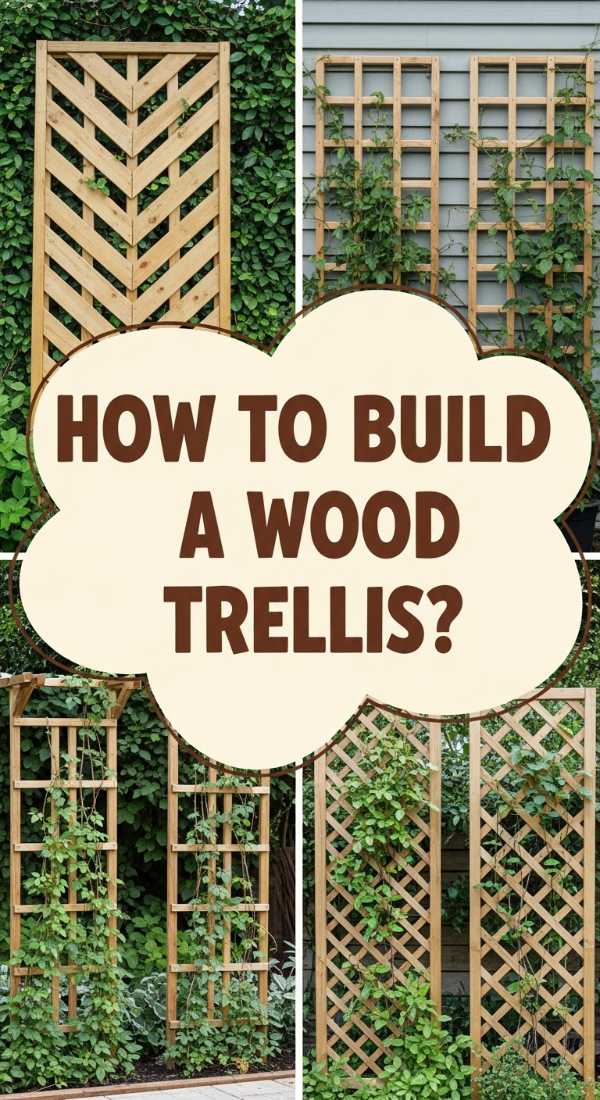
How to Construct a DIY Wood Trellis for Vertical Garden Beauty
[IMAGE_10]
Why we love this
Vertical gardening is like adding a new dimension to your home, and this wood trellis is the perfect architectural ‘spice.’ We love the raw, woody scent of the cedar lath and the way it provides a sturdy skeleton for delicate vines to climb. As the plants grow, the trellis becomes a living tapestry of emerald green and pops of floral color, offering a soft, organic texture that breaks up the flat planes of a wall or fence. It feels elevated and sophisticated, turning a simple garden bed into a ‘Pinterest Paradise’ focal point.
Essential Elements:
- 1×2 cedar lath strips
- Exterior-grade wood glue
- Brad nailer and 1-inch galvanized nails
- Outdoor wood stain or sealer
- Measuring tape and a square
How to make it
- Determine the desired height and width of your trellis, then cut two long vertical ‘rails’ and several horizontal ‘rungs’ from your cedar lath.
- Lay the vertical rails parallel on a flat surface and use a square to ensure your first horizontal rung is perfectly 90 degrees to the rails.
- Apply a small bead of waterproof wood glue at each joint, then secure with two brad nails to prevent the thin wood from splitting.
- Space your rungs every 6-8 inches, using a spacer block for perfect consistency, until you reach the top of the vertical rails.
- For a ‘lattice’ look, add a second layer of lath strips diagonally over the first, creating a diamond pattern that is both beautiful and structurally sound.
- Sand any rough edges and apply a coat of exterior stain or a clear UV-protectant to ensure the cedar ages gracefully into a beautiful silvery-grey or stays its rich honey color.
- Mount the trellis to your wall or fence using 1-inch spacers; this gap is vital as it allows the vines to wrap around the wood and ensures air circulation.
- Plant a ‘climber’ like Clematis, English Ivy, or climbing roses at the base and gently tie the main stems to the trellis using soft garden twine to start their upward journey.
The Final Touch: Your Home, Your Masterpiece
Transforming your home isn’t just about the ‘after’ photo; it’s about the feeling of pride every time you look at something you built with your own two hands. Whether it’s the organized pantry that saves you five minutes every morning or the floating deck where you’ll host your next summer BBQ, these projects add a layer of ‘you’ to your space that no store-bought decor ever could. Remember, the ‘Pinterest Paradise’ isn’t a destination—it’s the creative journey you take to get there. So keep building, keep planting, and most importantly, keep making your space a reflection of the beautiful life you live.