
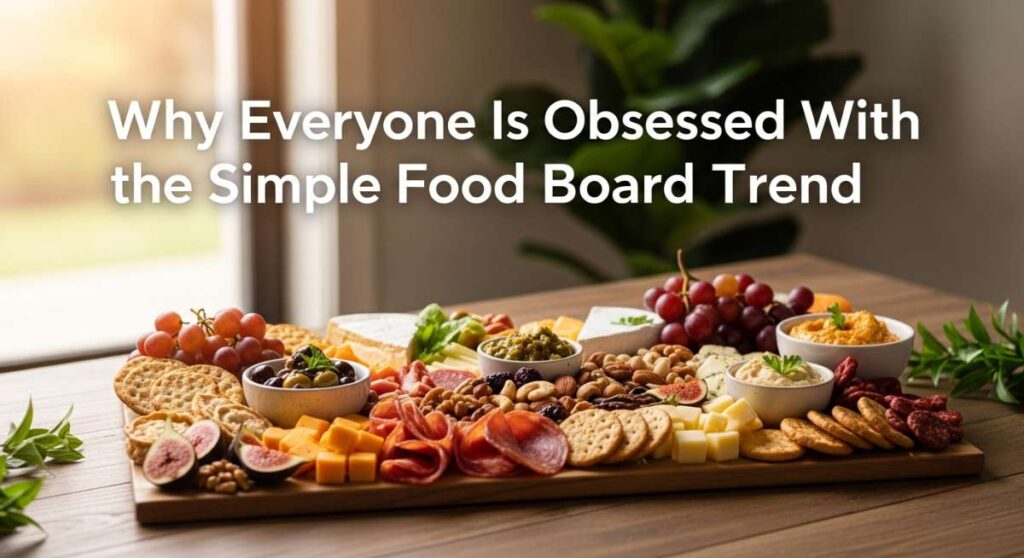
Have you ever felt that mid-week slump where the thought of cooking a complex meal feels like climbing a mountain? I’ve been there more times than I can count, staring at a fridge full of ingredients but lacking the energy to follow a twenty-step recipe. That’s exactly why the ‘Simple Food Board’ trend has taken over our social feeds—and my kitchen. It’s a return to basics that doesn’t sacrifice flavor or aesthetics, turning everyday meal prep into a colorful, tactile experience that feels more like an art project than a chore.
There is something deeply satisfying about seeing all your components laid out—vibrant greens, perfectly seared proteins, and hearty grains—ready to be assembled or enjoyed as-is. It’s about the ritual of the prep and the joy of the assembly. Whether you’re feeding a busy family or just trying to survive your 9-to-5 with your sanity intact, these boards are the ultimate hack for eating well without the stress. Let’s dive into how we can master this trend together, one bowl at a time.
How to prep chicken bowls?
Why we love this
There is nothing quite like the aroma of herb-marinated chicken hitting a hot skillet, filling the kitchen with a savory, comforting scent that promises a delicious meal. When done right, the chicken is incredibly succulent with a golden-brown, slightly crispy exterior that yields to a tender, juicy center. The texture provides a perfect contrast to crisp cucumbers or fluffy quinoa, making every bite a balanced symphony of savory notes and refreshing finishes. It’s the ultimate versatile protein that anchors a board with its reliable, satisfying presence.
Ingredients
- 2 lbs boneless, skinless chicken breasts or thighs
- 3 tbsp olive oil
- 2 cloves garlic, minced
- 1 tsp dried oregano
- 1/2 tsp smoked paprika
- Salt and cracked black pepper to taste
- Lemon wedges for finishing
How to make it
- Begin by patting the chicken completely dry with paper towels; this is the secret to achieving that professional-grade golden crust. Slice the meat into even, bite-sized cubes or thin strips to ensure uniform cooking.
- In a large glass bowl, whisk together the olive oil, minced garlic, oregano, paprika, salt, and pepper. Toss the chicken in the marinade, ensuring every piece is coated, and let it sit for at least 20 minutes (or up to 4 hours in the fridge) to allow the flavors to penetrate the fibers.
- Heat a heavy-bottomed cast-iron skillet or non-stick pan over medium-high heat. You’ll know it’s ready when a drop of water sizzles and evaporates instantly. Add a small splash of oil if needed.
- Place the chicken in the pan in a single layer, being careful not to overcrowd, which leads to steaming rather than searing. Let it cook undisturbed for 4-5 minutes until a deep golden crust forms on the bottom.
- Flip the pieces and cook for another 3-4 minutes. Use an instant-read thermometer to check for an internal temperature of 165°F (74°C). Remove from heat immediately and let the meat rest for 5 minutes before serving to keep the juices locked in.
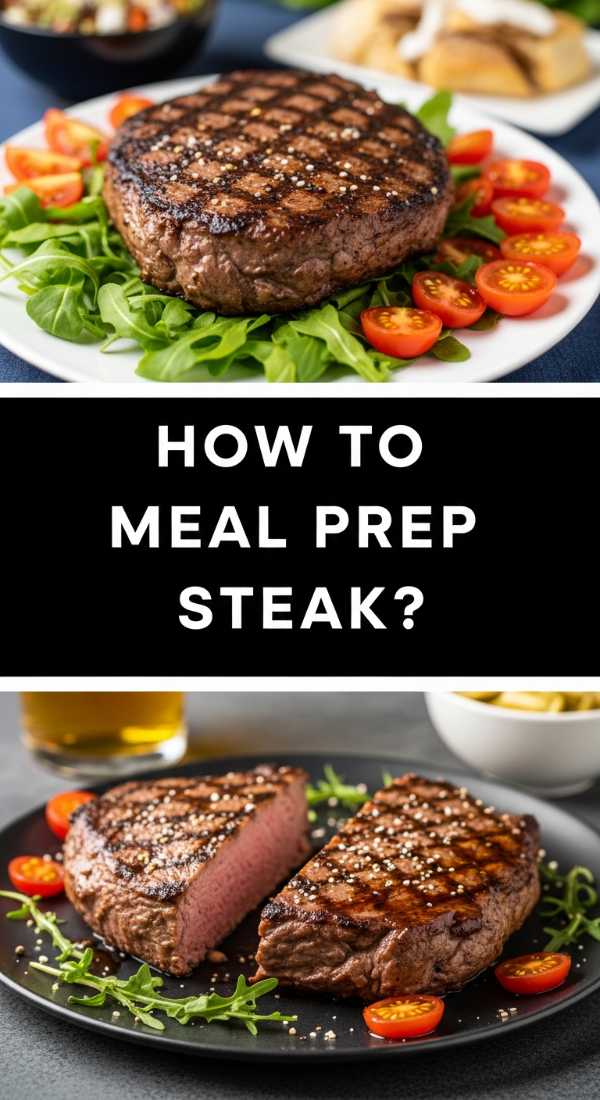
How to meal prep steak?

Why we love this
Steak brings an undeniable sense of luxury and deep, earthy umami to a food board that feels truly indulgent. The rich, buttery texture of a well-rested steak, sliced thinly against the grain, melts in your mouth and pairs beautifully with pungent sauces like chimichurri or a simple balsamic glaze. The scent of seared beef and browned butter is enough to make anyone’s mouth water, offering a hearty, grounding element to your meal prep that keeps you feeling full and energized throughout the most demanding days.
Ingredients
- 1.5 lbs Flank steak or Sirloin
- 2 tbsp high-smoke point oil (avocado or canola)
- 2 tbsp unsalted butter
- 3 sprigs fresh rosemary or thyme
- Coarse sea salt and cracked peppercorns
How to make it
- Remove the steak from the refrigerator at least 30-45 minutes before cooking to bring it to room temperature; this ensures the center cooks evenly without the outside burning. Generously season both sides with coarse salt and pepper.
- Place a heavy skillet over high heat until it is wispy with smoke. Add the oil, swirling to coat the bottom. Lay the steak away from you to avoid oil splashes.
- For a medium-rare finish, sear the steak for 3-4 minutes per side. During the last 2 minutes of cooking, drop the butter and herbs into the pan. Use a spoon to continuously baste the steak with the foaming, herb-infused butter.
- Look for a dark, mahogany-colored crust. Once the internal temperature hits 130°F for medium-rare, transfer the steak to a cutting board.
- This is the most critical step: let the steak rest for a full 10 minutes. This allows the muscle fibers to relax and reabsorb the juices. Slice thinly against the grain for maximum tenderness.
How to make veggie bowls?

Why we love this
Veggie bowls are a celebration of color and crunch, offering a vibrant landscape of textures that range from the creamy softness of roasted sweet potatoes to the snappy bite of fresh radishes. The aroma of roasting root vegetables—sweet, caramelized, and slightly smoky—is incredibly inviting and makes the kitchen feel like a cozy sanctuary. These boards allow the natural sweetness of the produce to shine, providing a light yet deeply satisfying meal that feels like a gift to your body, leaving you refreshed rather than weighed down.
Ingredients
- 1 large sweet potato, cubed
- 1 head of broccoli, cut into florets
- 1 cup chickpeas, drained and patted dry
- 2 cups kale or spinach
- 1/4 cup tahini for dressing
- Olive oil, salt, and cumin
How to make it
- Preheat your oven to 400°F (200°C). On a large sheet pan, toss the sweet potato cubes and chickpeas with olive oil, salt, and a generous dusting of cumin. Spread them out so they aren’t touching to ensure they crisp up rather than steam.
- Roast for 15 minutes, then add the broccoli florets to the same pan, drizzling them with a bit more oil. Roast for another 15-20 minutes until the potatoes are fork-tender and the broccoli edges are charred and crispy.
- While the vegetables roast, prepare the base by massaging the kale with a teaspoon of olive oil and a pinch of salt. This breaks down the tough fibers, making the leaves tender and easier to digest.
- Create a simple tahini dressing by whisking tahini with a squeeze of lemon juice and a splash of warm water until it reaches a pourable, creamy consistency.
- Assemble by layering the roasted gems over the softened greens, drizzling the dressing in a zig-zag pattern for that perfect visual appeal.
How to cook healthy lunches?
Why we love this
Healthy lunches shouldn’t feel like a compromise; they should be the highlight of your afternoon. The beauty of a well-balanced lunch board lies in the harmony of different food groups—crispy textures, healthy fats, and lean proteins—all working together to stabilize your energy. The smell of fresh herbs mixed with a zesty vinaigrette awakens the senses, while the variety of colors ensures you’re getting a wide spectrum of nutrients. It’s about creating a plate that is as pleasing to the eye as it is to the palate, turning a quick break into a mindful dining experience.
Ingredients
- 1/2 cup cooked farro or brown rice
- 4 oz lean protein (tofu, turkey, or egg)
- 1/2 avocado, sliced
- Handful of cherry tomatoes
- Handful of shredded carrots
- Lemon-tahini or vinaigrette dressing
How to make it
- Start with a base of complex carbohydrates. If using farro, simmer it in vegetable broth instead of water to infuse it with extra savory depth. Cook until ‘al dente’—firm to the bite but fully cooked.
- Prepare your protein using minimal oil. If using tofu, press it for 15 minutes to remove excess moisture, then sear in a pan until the edges are golden and crispy.
- Prep your raw components by halving the cherry tomatoes and thinly slicing the avocado. Squeeze a little lemon over the avocado immediately to prevent oxidation and keep it looking bright green.
- Use a wide, shallow bowl or a wooden board to arrange the components in distinct sections. This ‘deconstructed’ look is key to the trend and allows you to control the ratio of every bite.
- Drizzle your dressing only right before eating, or keep it in a small ramekin in the center of the board for dipping, ensuring the fresh vegetables stay crisp.
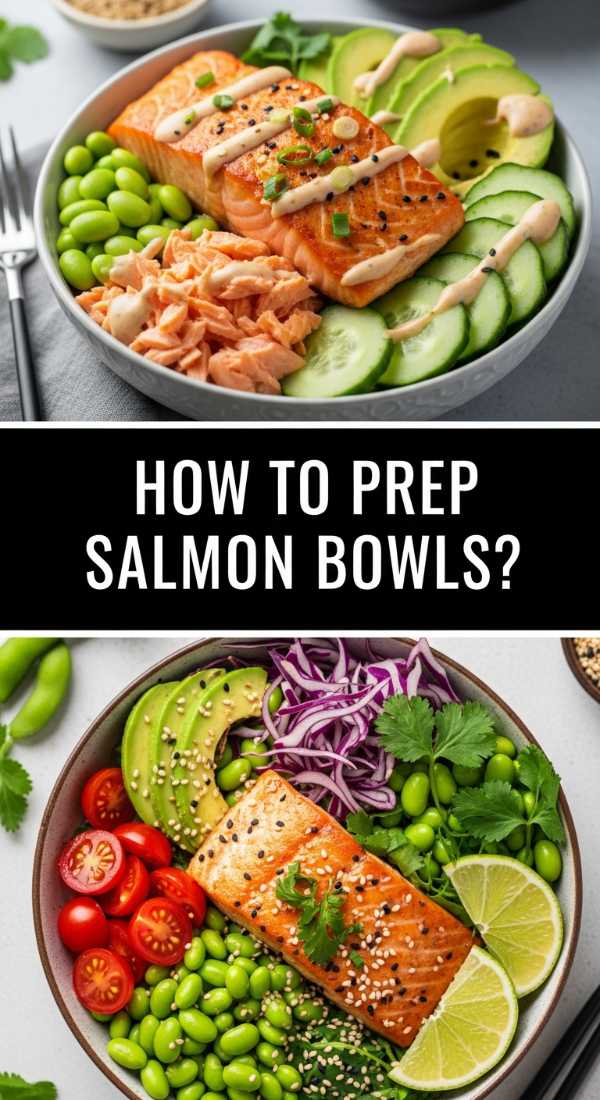
How to prep salmon bowls?
Why we love this
Salmon is the crown jewel of food boards, offering a rich, silken texture and a beautiful coral hue that looks stunning against green garnishes. When pan-seared, the skin becomes incredibly salty and crackling-crisp, providing a delightful contrast to the tender, flaky meat that falls apart at the touch of a fork. The scent of citrus and fresh dill paired with the fatty richness of the fish creates an aroma that is both sophisticated and incredibly appetizing, making a simple weekday lunch feel like a high-end bistro meal.
Ingredients
- 2 salmon fillets (6 oz each)
- 1 tbsp honey
- 1 tbsp soy sauce
- 1 tsp grated ginger
- Fresh dill and lemon slices
- Asparagus spears for the side
How to make it
- Whisk together the honey, soy sauce, and grated ginger to create a simple glaze. Brush this over the flesh side of the salmon, letting it marinate for just 10 minutes.
- Place a non-stick skillet over medium heat. Add a teaspoon of oil. Place the salmon skin-side down first. Use a spatula to press down firmly on the fillet for the first 30 seconds; this prevents the skin from curling and ensures maximum contact for a crispy finish.
- Cook skin-side down for about 5-6 minutes. You will see the color of the fish change from opaque to pale pink starting from the bottom and moving upward.
- Carefully flip the fillet and cook for only 1-2 more minutes. The honey in the glaze will caramelize quickly, so watch closely to prevent burning.
- Remove the salmon when the center is still slightly translucent (medium-rare to medium). Serve alongside steamed asparagus and a pile of fresh dill for a bright, herbaceous finish.
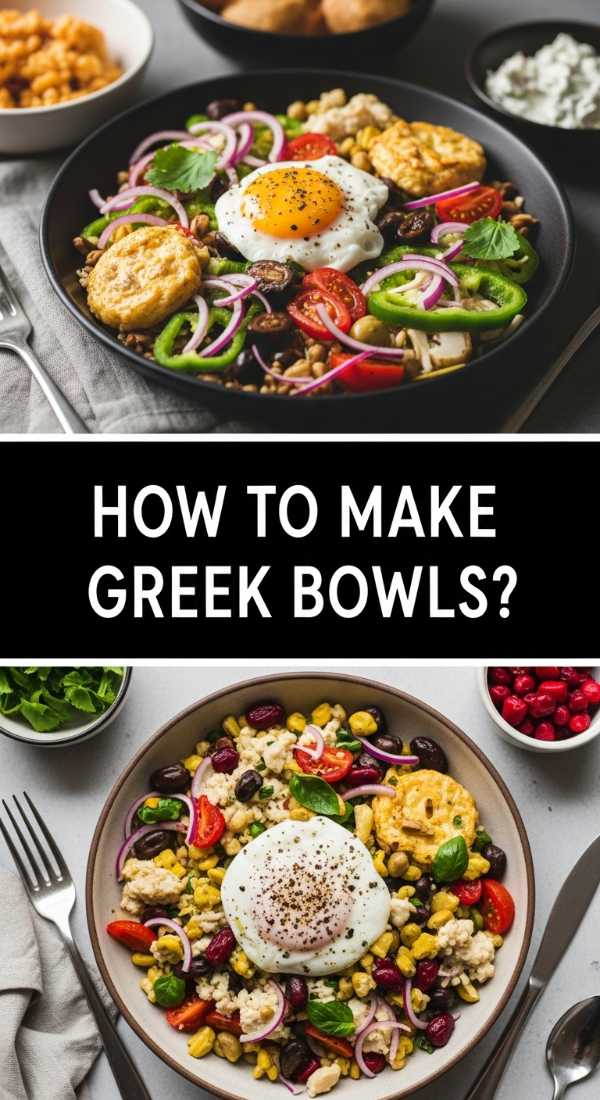
How to make Greek bowls?
Why we love this
Greek-style boards are a riot of Mediterranean flavors—salty, tangy, and incredibly fresh. The combination of briny Kalamata olives, creamy crumbled feta, and the sharp crunch of red onions creates a flavor profile that is endlessly exciting. The aroma of dried oregano and fresh lemon zest transports you to a seaside tavern, while the cooling sensation of a cucumber-yogurt tzatziki provides the perfect creamy element to tie everything together. It’s a light, zesty, and incredibly social way to eat that feels like a summer holiday on a plate.
Ingredients
- 1 cup cooked quinoa or bulgur
- 1 cup cherry tomatoes, halved
- 1 cucumber, diced
- 1/4 cup red onion, thinly sliced
- 1/2 cup feta cheese, crumbled
- 1/2 cup Kalamata olives
- Homemade Tzatziki (Greek yogurt, cucumber, garlic)
How to make it
- Cook your grain of choice (quinoa works beautifully here) and let it cool to room temperature. Fluff it with a fork and toss with a squeeze of lemon and a pinch of dried oregano.
- Prepare the ‘Greek Salad’ component by mixing the tomatoes, cucumber, and red onion in a small bowl with a dash of red wine vinegar and olive oil. Letting this sit for 10 minutes allows the onion to mellow and the juices to mingle.
- Make the tzatziki: Grate half a cucumber and squeeze out every drop of liquid using a clean kitchen towel. Stir the dry cucumber pulp into thick Greek yogurt with minced garlic and a pinch of salt.
- Arrange the grain in the center of your board and surround it with the salad, olives, and a generous pile of feta.
- Dollop the tzatziki on the side and garnish with fresh parsley. The key is the assembly; keep the wet ingredients slightly separated from the grains until you’re ready to dive in.
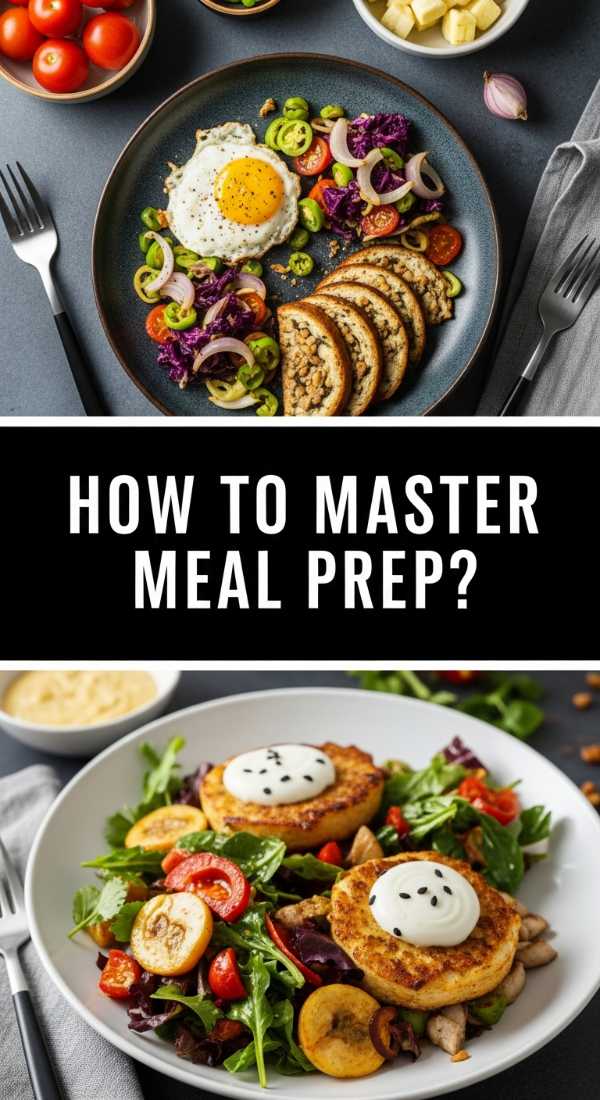
How to master meal prep?
Why we love this
Mastering meal prep isn’t just about food; it’s about reclaiming your time and reducing decision fatigue. There is a profound sense of calm that comes from opening a fridge stocked with prepped containers, knowing that a nutritious, beautiful meal is only minutes away. The sight of organized, colorful stacks of glass containers is incredibly satisfying, representing a commitment to your own well-being. It’s the ultimate form of self-care that smells like efficiency and tastes like success, allowing you to breeze through your week with ease.
Ingredients
- Bulk proteins (Chicken, Beef, or Beans)
- 3-4 types of seasonal vegetables
- Large batch of grains (Rice, Quinoa, or Farro)
- 2-3 signature sauces (Pesto, Tahini, Vinaigrette)
- Quality glass storage containers
How to make it
- Dedicate a 2-hour window on a Sunday for ‘Batch Cooking.’ Start with the items that take the longest, such as roasting root vegetables and simmering grains on the stovetop.
- While the oven and stove are busy, chop all your raw vegetables for the week. Store these in airtight containers with a damp paper towel to keep them crisp and vibrant.
- Cook your proteins in large batches using neutral seasoning (salt, pepper, garlic). This allows you to change the flavor profile later in the week with different sauces.
- Portion out your ‘Board Bases’ into containers, but keep the sauces in separate small jars. Adding sauce too early is the number one cause of soggy meal prep.
- Label your containers with the date. Use a ‘First In, First Out’ system in your fridge to ensure everything stays fresh and nothing goes to waste.
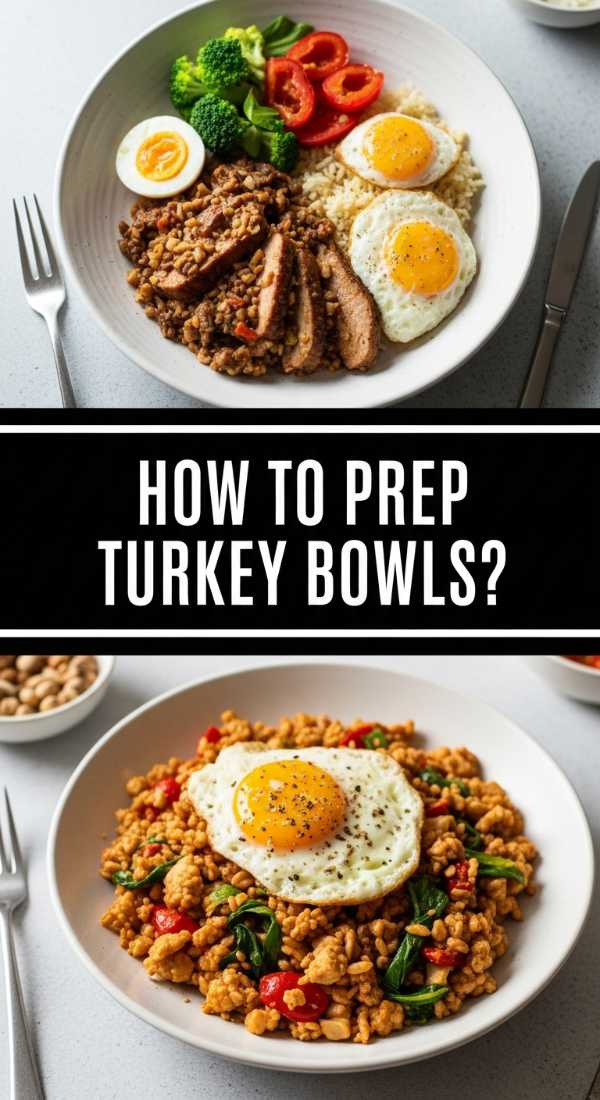
How to prep turkey bowls?

Why we love this
Ground turkey is a lean, clean canvas that absorbs spices beautifully, making it an excellent choice for a healthy food board. When sautéed with garlic and onions, it develops a savory, comforting aroma that feels substantial without being heavy. The texture is light and slightly crumbly, making it perfect for mixing into bowls or scooping up with bell pepper slices. It’s a budget-friendly, high-protein option that provides a gentle, satisfying base for bold toppings like spicy salsa or pickled jalapeños.
Ingredients
- 1 lb lean ground turkey
- 1 small onion, finely diced
- 2 tsp chili powder
- 1 tsp ground cumin
- Bell peppers and corn for garnish
- Black beans, rinsed
How to make it
- Heat a large skillet over medium-high heat with a teaspoon of olive oil. Add the diced onion and sauté for 3-4 minutes until translucent and slightly sweet.
- Add the ground turkey to the pan. Use a wooden spoon to break the meat into small crumbles as it cooks. This ensures an even texture and prevents large, dry chunks from forming.
- Once the turkey is no longer pink, sprinkle the chili powder, cumin, salt, and pepper over the meat. Stir well and add a splash of water or chicken broth (about 2 tablespoons). This creates a light ‘sauce’ that keeps the turkey moist.
- Lower the heat and let it simmer for 3 minutes until the liquid has reduced and the spices are fully integrated.
- Serve on a board alongside black beans, charred corn, and sliced bell peppers for a Southwestern-inspired meal that is as nutritious as it is flavorful.
How to prep shrimp bowls?
Why we love this
Shrimp brings a snap and a pop of sweetness to the food board trend that is hard to beat. Their quick cooking time and elegant appearance make them a favorite for busy weeknights when you still want something that feels ‘fancy.’ The aroma of garlic, lemon, and butter sizzling in a pan is iconic, immediately signaling a delicious meal. With their firm, meaty texture and light, oceanic flavor, they pair perfectly with zesty slaws and avocado, offering a refreshing and sophisticated protein choice that feels like a coastal getaway.
Ingredients
- 1 lb large shrimp, peeled and deveined
- 3 cloves garlic, smashed
- 1/2 tsp red pepper flakes
- 2 tbsp olive oil
- Zest of 1 lemon
- Fresh cilantro for garnish
How to make it
- Ensure your shrimp are completely thawed and patted dry. Moisture is the enemy of a good sear; if they are wet, they will steam and become rubbery.
- In a bowl, toss the shrimp with olive oil, smashed garlic, red pepper flakes, and a pinch of salt. Let them marinate for 10 minutes while you prep your bowl bases.
- Heat a skillet over medium-high heat. Once hot, add the shrimp in a single layer. Do not move them for at least 90 seconds. You want to see them turn pink and opaque about halfway up the sides.
- Flip the shrimp and cook for another 60-90 seconds. They are done when they form a ‘C’ shape. If they tightly curl into an ‘O’, they are overcooked!
- Remove from the pan immediately and toss with fresh lemon zest and chopped cilantro. The residual heat will release the oils in the zest, creating an incredible fragrance.
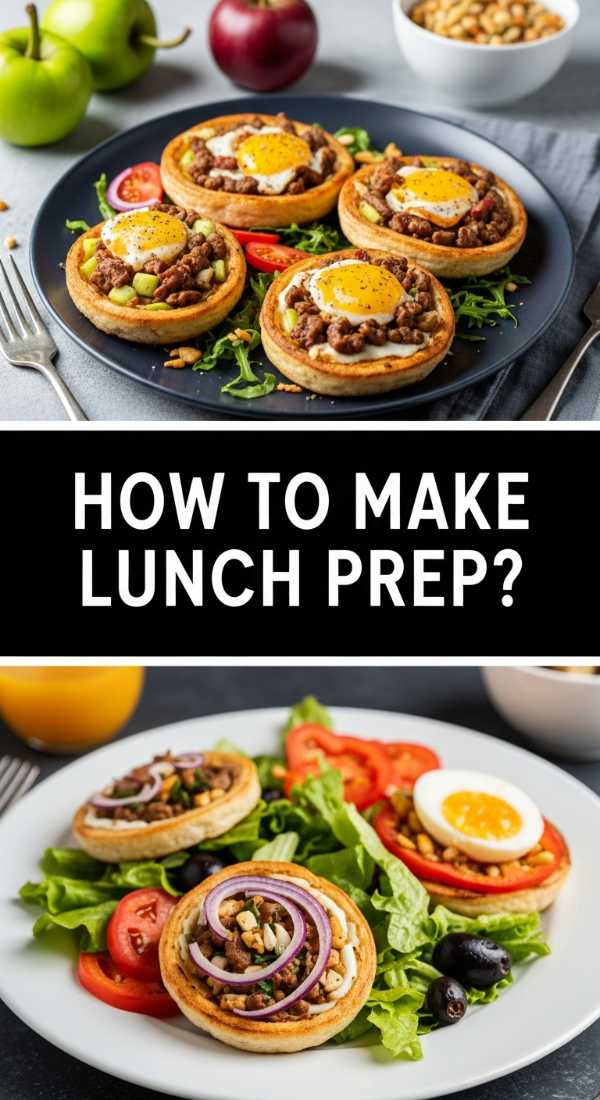
How to make lunch prep?
[IMAGE_10]
Why we love this
Lunch prep is the ultimate gift to your future self, turning the frantic ‘what’s for lunch’ scramble into a moment of intentionality. The sight of a perfectly assembled lunch board—neatly arranged rows of almonds, cheese, hard-boiled eggs, and fruit—is visually calming and incredibly appetizing. The mix of sweet, salty, and savory scents creates an enticing variety that keeps your palate engaged. It’s a tactile, snack-focused way of eating that makes the workday feel a little more playful and a lot more delicious.
Ingredients
- 2 hard-boiled eggs
- 1/2 cup grapes or berries
- A handful of raw almonds or walnuts
- 2 oz sharp cheddar or goat cheese
- Whole grain crackers or sliced baguette
- Sliced deli meat or smoked salmon
How to make it
- Focus on the ‘Adult Lunchable’ concept. Start by boiling your eggs: place them in cold water, bring to a boil, then turn off the heat and cover for exactly 9 minutes for a perfect creamy yolk. Shock in ice water immediately.
- Wash and thoroughly dry your fruit. Moisture in the container will make crackers soggy, so keeping fruit dry or in separate silicone liners is essential.
- Slice your cheese into uniform cubes or triangles. This adds to the ‘board’ aesthetic and makes it easy to grab and eat while working.
- Layer your crackers or bread in a way that they remain crisp. If you are prepping for several days, keep the crackers in a small separate baggie inside the main container.
- Arrange the components by color. Place the bright red berries next to the white cheese and the green grapes next to the brown nuts. This visual contrast is what makes the food board trend so viral and satisfying to eat.
Final Thoughts on the Food Board Revolution
The magic of the simple food board trend lies in its flexibility and its focus on quality over complexity. It reminds us that eating well doesn’t have to be a performance; it can be a simple, beautiful assembly of the things that nourish us most. By mastering these basic prep techniques, you’re not just making lunch—you’re creating a lifestyle that prioritizes health, aesthetics, and ease. So, grab your favorite board, start prepping, and enjoy the delicious simplicity of eating well.