
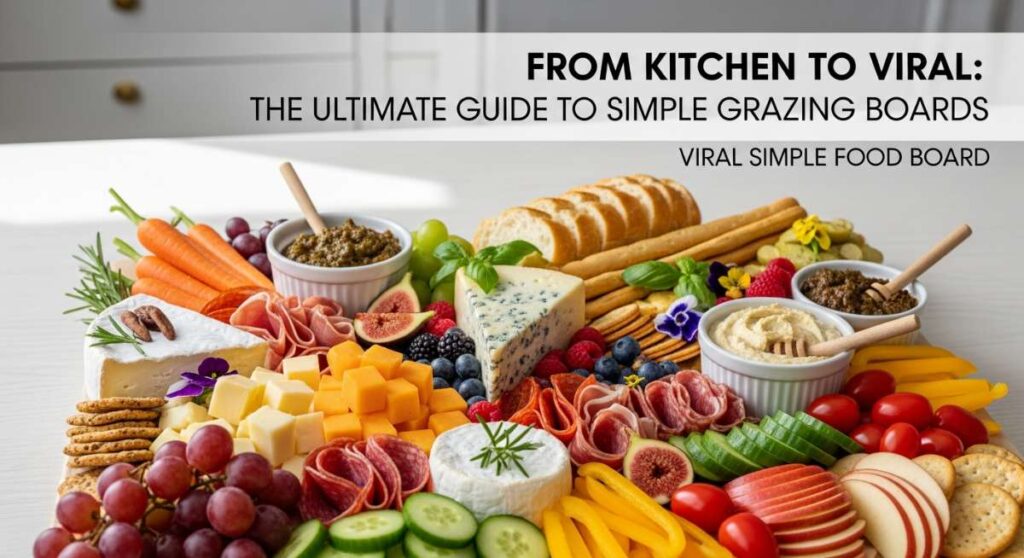
From Kitchen to Viral: The Ultimate Guide to Simple Grazing Boards
There is something inherently magical about the way a simple grazing board brings people together. It’s not just about the food; it’s about the laughter shared over a shared plate, the tactile experience of reaching for a bite-sized treat, and the effortless beauty that makes every guest reach for their phone to capture the moment. In a world that often feels rushed, the grazing board is an invitation to slow down and savor the textures and flavors of carefully prepared homemade dishes.
I remember the first time I hosted a weekend brunch with a sprawling board of savory and sweet delights. The room filled with the scent of toasted sourdough and fresh herbs, and I watched as my friends’ eyes lit up. By elevating classic comfort foods—from crispy seared salmon to warm, spiced banana bread—into a communal display, you transform a standard meal into a viral-worthy event. Let’s dive into the ultimate components that will make your next board the talk of the town.
HOW TO COOK CORNED BEEF?
Why we love this
Corned beef is the epitome of comfort, offering a rich, salty, and deeply savory profile that anchors a grazing board with its presence. We love the way the meat becomes impossibly tender after hours of slow braising, practically falling apart at the touch of a fork. The aroma of peppercorns, mustard seeds, and bay leaves infuses the kitchen, creating an atmosphere of warmth and tradition. It’s a rustic, hearty centerpiece that pairs beautifully with sharp cheeses and crusty breads, providing a melt-in-your-mouth texture that guests will keep coming back for.
Ingredients
- 3-4 lb corned beef brisket with spice packet
- 1 large onion, quartered
- 3 cloves garlic, smashed
- 2 bay leaves
- 4 cups water or beef broth
- 1 tbsp apple cider vinegar
How to make it
- Begin by removing the corned beef from its packaging and rinsing it under cold water to remove excess brine. This ensures the salt level is perfectly balanced.
- Place the brisket into a large Dutch oven or heavy-bottomed pot, fat side up. This allows the fat to render and baste the meat during the long cooking process.
- Add the quartered onion, smashed garlic cloves, and the spice packet that came with the beef. If you want more depth, add the bay leaves and apple cider vinegar now.
- Pour in enough water or beef broth to almost cover the meat. Bring the liquid to a boil over high heat on the stovetop.
- Once boiling, reduce the heat to a very low simmer. Cover the pot tightly with a lid. A gentle simmer is crucial; boiling the meat too hard will make it tough and rubbery.
- Cook for approximately 45 to 50 minutes per pound. You are looking for ‘fork-tender’ doneness, where a fork slides in and out with zero resistance.
- Once finished, remove the pot from the heat and let the meat rest in the liquid for 15-20 minutes. This keeps it juicy. Slice against the grain into thin strips for your board.
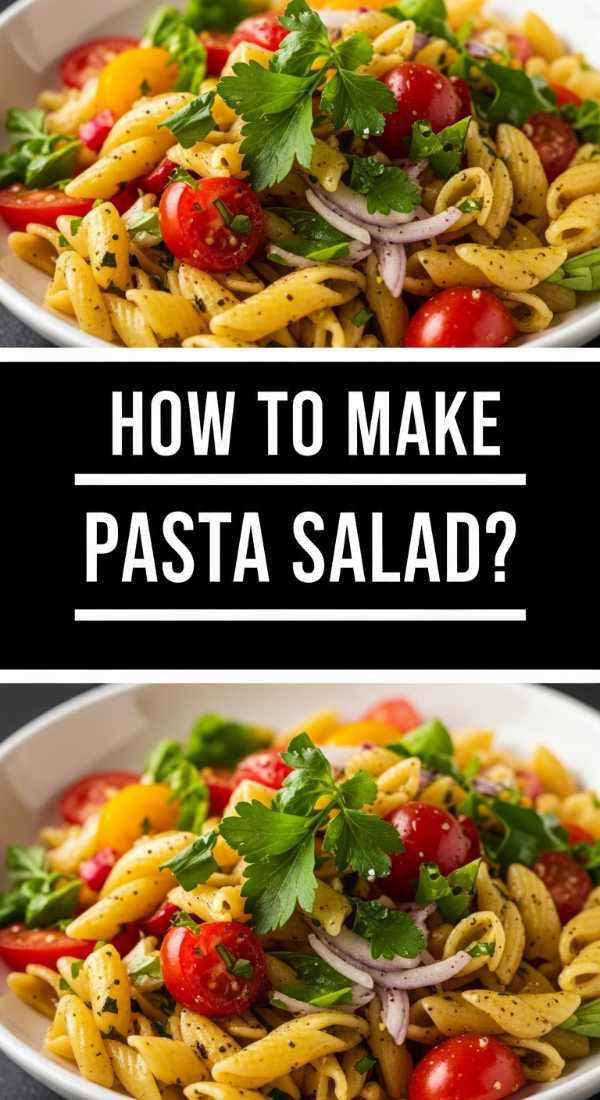
HOW TO MAKE PASTA SALAD?

Why we love this
A vibrant pasta salad is the breath of fresh air every grazing board needs, bringing a pop of color and a zesty tang that cleanses the palate between richer bites. We adore the contrast between the chewy, al dente pasta and the crunch of fresh bell peppers and red onions. The way the vinaigrette seeps into every crevice of the rotini ensures a burst of herbaceous flavor in every mouthful. It’s a versatile, chilled dish that feels both nostalgic and sophisticated, making it a crowd favorite for outdoor gatherings or cozy indoor spreads alike.
Ingredients
- 1 lb rotini or fusilli pasta
- 1 cup cherry tomatoes, halved
- 1 seedless cucumber, diced
- 1/2 cup kalamata olives, sliced
- 1/2 cup feta cheese crumbles
- 1/4 cup red onion, finely minced
- 1 cup Italian vinaigrette dressing
- Fresh parsley and oregano for garnish
How to make it
- Boil a large pot of heavily salted water. Cook the pasta according to the package directions, but aim for ‘al dente’—it should have a slight bite. Overcooked pasta will become mushy once the dressing is added.
- Drain the pasta and immediately rinse it under cold running water. This stops the cooking process and removes excess starch, preventing the noodles from sticking together.
- In a large mixing bowl, combine the cooled pasta with the halved cherry tomatoes, diced cucumbers, olives, and red onions.
- Pour half of the Italian dressing over the mixture and toss gently with large spoons. This initial soak allows the pasta to absorb the flavor.
- Cover the bowl and refrigerate for at least 30 minutes. This chilling period is essential for the flavors to meld together and the textures to set.
- Just before serving on your board, add the remaining dressing and toss again. The pasta tends to drink up the liquid, so this second addition ensures it looks glossy and fresh.
- Top with crumbled feta cheese and a generous sprinkle of freshly chopped herbs for a professional, vibrant finish.
HOW TO BAKE PERFECT COOKIES?

Why we love this
There is nothing quite like the scent of vanilla and caramelizing sugar wafting through the house to signal that something wonderful is happening. Perfect cookies are the soul of a dessert grazing board, offering golden, crisp edges that give way to a soft, gooey, and buttery center. We love the way a high-quality chocolate chip melts into pools of dark cocoa, creating a sensory experience that is both comforting and indulgent. They are the ultimate finger food, inviting guests to grab just ‘one more’ as they enjoy the cozy vibes of your gathering.
Ingredients
- 1 cup unsalted butter, softened
- 3/4 cup granulated sugar
- 3/4 cup brown sugar, packed
- 2 large eggs
- 1 tsp vanilla extract
- 2 1/4 cups all-purpose flour
- 1 tsp baking soda
- 1/2 tsp sea salt
- 2 cups semi-sweet chocolate chips
How to make it
- Preheat your oven to 375°F (190°C). This slightly higher temperature helps create those coveted golden edges while keeping the centers soft.
- In a large bowl, cream together the softened butter, granulated sugar, and brown sugar. Use a hand mixer or stand mixer on medium-high speed until the mixture is pale and fluffy (about 2-3 minutes).
- Add the eggs one at a time, beating well after each addition, then stir in the vanilla extract.
- In a separate bowl, whisk together the flour, baking soda, and salt. Gradually add the dry ingredients to the wet mixture on low speed, mixing only until just combined. Overmixing will lead to tough cookies.
- Fold in the chocolate chips by hand using a spatula to ensure they are evenly distributed without deflating the dough.
- Scoop rounded tablespoons of dough onto ungreased baking sheets, spacing them about 2 inches apart to allow for spreading.
- Bake for 9 to 11 minutes. Look for the edges to be golden brown while the centers still look slightly soft and underdone. They will firm up on the hot pan.
- Let them cool on the baking sheet for 5 minutes before transferring to a wire rack. This prevents them from breaking apart.
HOW TO MAKE CHICKEN PARMESAN?

Why we love this
Chicken Parmesan is a showstopper, bringing an Italian-American flair to your grazing board with its layers of crispy breading, savory marinara, and molten cheese. We love the satisfying crunch of the panko crust followed by the succulent, juicy chicken inside. The aroma of melting mozzarella and sharp parmesan, combined with the fragrance of fresh basil, creates an irresistible draw. It’s a sophisticated comfort food that feels celebratory, especially when served as ‘sliders’ or cut into bite-sized strips that are easy for guests to pick up and enjoy.
Ingredients
- 2 large chicken breasts, halved lengthwise and pounded thin
- 1 cup all-purpose flour
- 2 eggs, beaten
- 1.5 cups panko breadcrumbs
- 1/2 cup grated Parmesan cheese
- 1 tsp dried oregano
- 1 cup marinara sauce
- 1 cup shredded mozzarella cheese
- Vegetable oil for frying
How to make it
- Place the pounded chicken breasts between plastic wrap and use a meat mallet to ensure they are an even 1/2-inch thickness. This ensures uniform cooking.
- Set up a dredging station: one bowl with flour (seasoned with salt and pepper), one with beaten eggs, and one with a mix of panko, parmesan, and oregano.
- Coat each piece of chicken in flour, dip into the egg, and then press firmly into the panko mixture. Ensure every inch is covered for maximum crunch.
- Heat about 1/4 inch of oil in a large skillet over medium-high heat. To test the heat, drop a breadcrumb in; it should sizzle immediately.
- Fry the chicken for 3-4 minutes per side until the crust is a deep golden brown and the internal temperature reaches 165°F. Remove to a paper towel-lined plate.
- Spoon a small amount of marinara onto each chicken piece and top with a generous handful of mozzarella.
- Place under a broiler for 1-2 minutes until the cheese is bubbly and starting to brown in spots. Keep a close eye on it to avoid burning.
- Garnish with fresh basil and let it rest for a few minutes so the cheese sets before slicing into portions for your board.
HOW TO USE SOURDOUGH DISCARD?

Why we love this
Sourdough discard is the secret weapon of the sustainable kitchen, offering a unique tang and depth of flavor that elevated snacks to a gourmet level. We love using it for crackers or flatbreads on a grazing board because it provides a rustic, artisanal touch that store-bought items simply can’t match. The texture is perfectly crisp yet slightly chewy, and the fermented notes pair exquisitely with creamy bries or sharp cheddars. It’s a wonderful way to reduce waste while adding a complex, sourdough-forward aroma to your spread.
Ingredients
- 1 cup sourdough discard (unfed)
- 1/4 cup melted butter
- 1 cup all-purpose flour
- 1/2 tsp sea salt
- 1 tsp dried herbs (like rosemary or thyme)
- Additional salt for topping
How to make it
- In a medium mixing bowl, combine the sourdough discard and melted butter. Whisk until smooth and fully incorporated.
- Stir in the flour, salt, and dried herbs. Mix by hand until a thick, cohesive dough forms. It should be slightly tacky but not stick to your fingers.
- Divide the dough into two balls. Place one ball on a large piece of parchment paper and flatten it with your hand.
- Place another piece of parchment on top and roll the dough out as thin as possible—ideally 1/16th of an inch. Thinness is the key to a viral-worthy, crispy cracker.
- Remove the top layer of parchment. Use a pizza cutter or a sharp knife to score the dough into squares or rectangles. Do not worry about separating them yet.
- Lightly brush the surface with water or a bit more melted butter and sprinkle with extra sea salt.
- Bake in a preheated oven at 350°F (175°C) for 20-25 minutes. You want them to be golden brown and stiff to the touch.
- Allow them to cool completely on the pan; they will continue to crisp up. Once cool, snap them along the score lines and pile them high on your board.
HOW TO SEAR FRESH SALMON?
Why we love this
A perfectly seared piece of salmon is a centerpiece of elegance, offering a sophisticated protein option for a healthy grazing board. We are obsessed with the contrast between the shatteringly crisp, salty skin and the buttery, tender flakes of the pink fish inside. When cooked correctly, the salmon releases a subtle, sweet aroma that isn’t ‘fishy’ but rather fresh and inviting. It adds a pop of vibrant coral color to your display and pairs beautifully with lemon wedges and a dill-infused yogurt dip, making it a true viral favorite.
Ingredients
- 2 salmon fillets (6 oz each), skin-on
- 1 tbsp high-smoke point oil (like avocado or grapeseed)
- 1/2 tsp kosher salt
- 1/4 tsp black pepper
- 1 tbsp unsalted butter
- 2 sprigs of thyme or rosemary
How to make it
- The most important step for a perfect sear is moisture control. Pat the salmon fillets completely dry with paper towels on all sides, especially the skin.
- Season the skin and flesh generously with salt and pepper just before cooking. If you salt too early, the salt will draw out moisture and ruin the sear.
- Heat a stainless steel or cast-iron skillet over medium-high heat. Add the oil and wait until it is shimmering and just starting to wisps of smoke.
- Place the salmon in the pan, skin-side down. Use a flexible spatula to press down firmly on the fillets for 30 seconds to prevent the skin from curling.
- Lower the heat slightly to medium and let the salmon cook undisturbed for about 5-6 minutes. You will see the cooked color creeping up the side of the fillet.
- When the skin is crispy and releases easily from the pan, flip the fillet. Add the butter and herbs to the pan.
- Tilt the pan and spoon the foaming herb butter over the salmon for about 1-2 minutes. This adds incredible flavor and finishes the cooking gently.
- Remove from the pan when the internal temperature is 125-130°F for a perfect medium-rare. Let it rest for 3 minutes before placing on your board.
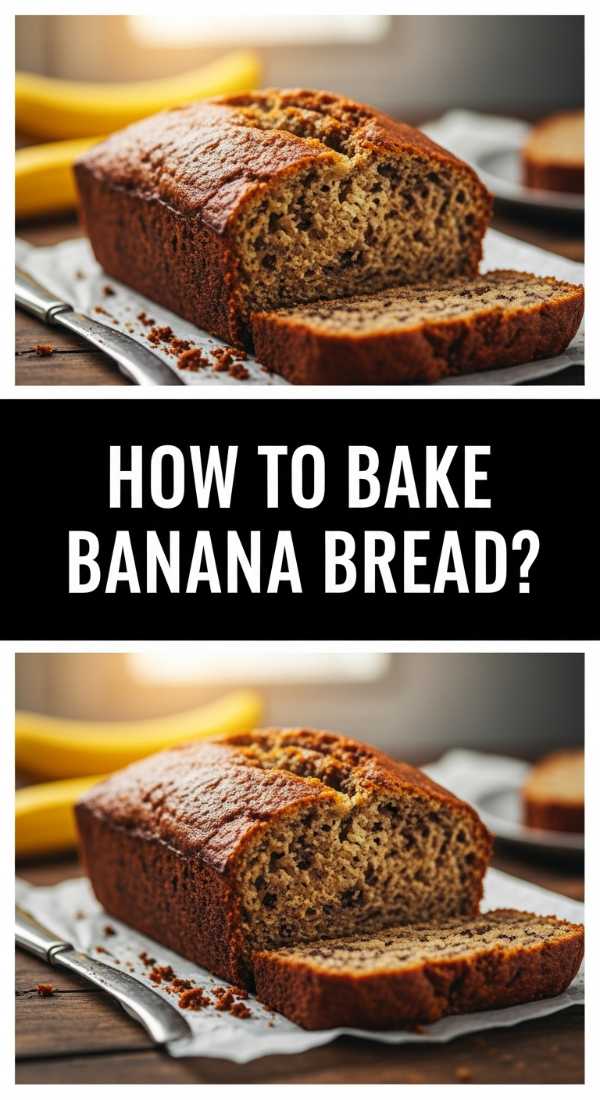
HOW TO BAKE BANANA BREAD?
Why we love this
Banana bread is the ultimate comfort bake, filling your home with the nostalgic scent of cinnamon and caramelized fruit. We love including thick slices of it on a grazing board because it bridges the gap between savory and sweet, acting as a perfect base for a smear of honey butter or a dollop of ricotta. The texture should be dense and moist, with a dark, sugar-crusted top that offers a slight crunch. It’s a rustic, approachable addition that feels incredibly personal and warm, inviting guests to settle in and stay a while.
Ingredients
- 3 very ripe bananas, mashed
- 1/2 cup melted unsalted butter
- 3/4 cup granulated sugar
- 1 egg, beaten
- 1 tsp vanilla extract
- 1.5 cups all-purpose flour
- 1 tsp baking soda
- 1/2 tsp salt
- 1/2 tsp ground cinnamon
How to make it
- Preheat your oven to 350°F (175°C) and grease a 4×8 inch loaf pan thoroughly. You can also line it with parchment paper for easy removal.
- In a large mixing bowl, mash the ripe bananas with a fork until they are mostly smooth with just a few small chunks remaining.
- Stir the melted butter into the mashed bananas until fully combined. Add the sugar, beaten egg, and vanilla extract, whisking until the mixture is uniform.
- In a separate bowl, sift together the flour, baking soda, salt, and cinnamon. Sifting ensures there are no clumps of leavening agent.
- Gently fold the dry ingredients into the wet banana mixture. Use a spatula and stop as soon as you see no more streaks of flour. Overmixing will make the bread rubbery.
- Pour the batter into the prepared loaf pan and smooth the top. You can sprinkle a little extra sugar or cinnamon on top for a ‘viral’ crust look.
- Bake for 50 to 60 minutes. The visual cue is a deep golden brown color and a crack down the center. Use a toothpick to check; it should come out clean.
- Let the bread cool in the pan for 10 minutes, then move to a wire rack. Slice only once completely cool to ensure the slices stay neat for the board.
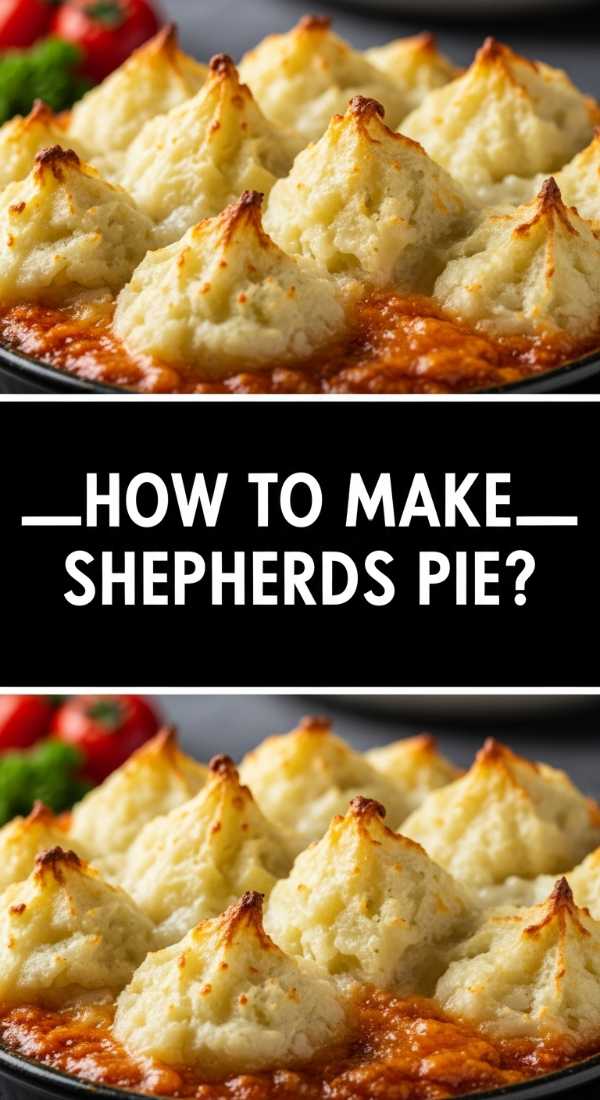
HOW TO MAKE SHEPHERDS PIE?

Why we love this
Shepherd’s Pie is the ‘crown jewel’ of savory comfort, offering a beautiful layered look that is as pleasing to the eye as it is to the stomach. We love the contrast between the rich, herb-flecked meat gravy and the pillowy, golden-peaked mashed potatoes on top. The aroma of simmering lamb (or beef) with onions and rosemary is deeply grounding and appetizing. When served in small individual ramekins or as a rustic ‘scoop-your-own’ section of a board, it provides a warm, hearty element that makes a gathering feel like a true feast.
Ingredients
- 1 lb ground lamb or beef
- 1 onion, diced
- 2 carrots, diced
- 1 cup frozen peas
- 2 tbsp tomato paste
- 1 cup beef broth
- 2 lbs russet potatoes, peeled and boiled
- 4 tbsp butter
- 1/4 cup heavy cream
How to make it
- Start with the potatoes: Boil the peeled chunks in salted water until very soft (about 15 mins). Drain and mash with butter and heavy cream until completely smooth. Season well.
- In a large skillet over medium-high heat, brown the ground meat. Drain any excess fat to prevent the pie from being greasy.
- Add the diced onions and carrots to the skillet. Sauté for 5-7 minutes until the vegetables have softened and are starting to brown.
- Stir in the tomato paste and cook for 1 minute to ‘toast’ the paste, which deepens the flavor. Pour in the beef broth and add the peas.
- Simmer the mixture for 10 minutes until the sauce has thickened into a rich gravy that coats the back of a spoon.
- Transfer the meat mixture to a baking dish or individual ramekins. Top with the mashed potatoes. Use a fork to create ridges and ‘peaks’ on the surface.
- Bake at 400°F (200°C) for 20 minutes, then finish under the broiler for 2-3 minutes to brown the potato peaks.
- Let it stand for 10 minutes before serving. This allows the layers to set so it doesn’t run everywhere when guests take a portion.
HOW TO FLIP FLUFFY PANCAKES?

Why we love this
Fluffy pancakes are the ultimate crowd-pleaser for a brunch-style grazing board, acting as a soft, pillowy canvas for syrups, berries, and creams. We love the sight of a tall stack of golden-brown discs, smelling of malt and sweet butter. The texture is key—it should be light and airy, almost like a cloud, with a slight sweetness that doesn’t overwhelm the toppings. There is a playful, nostalgic joy in flipping pancakes, and they bring a sense of morning celebration to any table setting, making them a viral staple for lifestyle bloggers.
Ingredients
- 1.5 cups all-purpose flour
- 3.5 tsp baking powder
- 1 tsp salt
- 1 tbsp white sugar
- 1.25 cups milk
- 1 egg
- 3 tbsp butter, melted
How to make it
- In a large bowl, sift together the flour, baking powder, salt, and sugar. Sifting is vital for ‘fluffiness’ as it aerates the dry ingredients.
- Make a well in the center and pour in the milk, egg, and melted butter. Mix with a whisk until just combined. A few lumps are perfectly fine—overmixing is the enemy of fluffiness!
- Heat a non-stick griddle or frying pan over medium heat. Lightly grease with a tiny bit of butter or oil.
- Use a 1/4 cup measure to pour the batter onto the griddle. This ensures all your pancakes are the same size, which looks better on a board.
- Wait for the ‘bubble cue’: Watch the surface of the pancake. When bubbles form and start to pop, and the edges look set and matte rather than shiny, it is time to flip.
- Slide a thin spatula underneath and flip in one quick, confident motion. Do not press down on the pancake with the spatula! This squishes out the air you worked so hard to include.
- Cook for another 1-2 minutes until the other side is golden brown.
- Keep the pancakes warm in a low oven (200°F) until you are ready to assemble your board, stacking them neatly to retain heat.
HOW TO BAKE CHEESY LASAGNA?
[IMAGE_10]
Why we love this
Lasagna is a masterpiece of layers, a dish that signifies effort and love, making it a powerful addition to any food spread. We love the symphony of textures: the tender pasta sheets, the creamy ricotta, and the stretchy, browned mozzarella on top. The aroma of slow-cooked ragu and melted cheese is universally beloved and creates an instant feeling of home. When sliced into clean, square portions, it looks stunning on a board, showing off the intricate layers and the vibrant red and white colors that make it a viral sensation every time.
Ingredients
- 12 lasagna noodles, boiled
- 1 lb ground beef or sausage
- 24 oz marinara sauce
- 15 oz ricotta cheese
- 1 egg
- 1/2 cup grated Parmesan
- 4 cups shredded mozzarella cheese
- 1 tbsp Italian seasoning
How to make it
- Cook the lasagna noodles in boiling salted water for 2 minutes less than the package instructions. They should be very firm, as they will finish cooking in the oven.
- In a skillet, brown the meat and drain the fat. Stir in the marinara sauce and Italian seasoning. Let it simmer for 10 minutes to thicken.
- In a medium bowl, whisk together the ricotta cheese, the egg, and half of the Parmesan. The egg acts as a binder, ensuring the cheese layer doesn’t slide out when sliced.
- In a 9×13 inch baking dish, spread a thin layer of meat sauce on the bottom to prevent sticking.
- Layer: 3-4 noodles, 1/3 of the ricotta mixture, 1/3 of the meat sauce, and a generous handful of mozzarella. Repeat these layers three times.
- Top the final layer of noodles with the remaining sauce, mozzarella, and the rest of the Parmesan.
- Cover with foil (tented so it doesn’t touch the cheese) and bake at 375°F (190°C) for 25 minutes. Remove foil and bake for another 15 minutes.
- For the viral golden look, broil for 2-3 minutes at the end. CRITICAL STEP: Let the lasagna rest for at least 15-20 minutes before cutting. This allows the layers to fuse so you get those perfect, clean squares.
Wrapping Up Your Viral Board
Creating a viral-worthy grazing board is about more than just food; it’s about the intention and the craft you put into every dish. From the slow-braised tenderness of corned beef to the perfectly flipped pancake, these recipes provide a foundation of comfort and style. Remember to play with heights, colors, and textures when arranging your board. Use small bowls for sauces, fresh herbs for garnish, and always serve with a smile. Your guests won’t just remember the meal; they’ll remember the way it made them feel.