

The Ultimate Guide to Navigating This Month’s Biggest Viral Trends
Have you ever felt that sudden, magnetic pull to reinvent your surroundings as the seasons begin to shift? There is something incredibly soul-stirring about the way a fresh trend captures our collective imagination, whispering promises of a more intentional, beautiful life. Whether it is the scent of sun-warmed cedar in a garden or the satisfying click of a perfectly organized living space, these viral moments are more than just fleeting hashtags—they are invitations to curate a sanctuary that reflects our deepest comforts and wildest dreams.
This month, we are diving deep into the aesthetics that are currently taking over our feeds and, quite honestly, our hearts. From the rustic charm of outdoor living to the surprising luxury hidden within modern mobile home transformations, we are exploring how to blend functionality with a high-end designer feel. My goal is to help you take these viral inspirations and ground them in your reality, creating spaces that feel as good as they look on a screen. Let’s embark on this journey of transformation together, one thoughtful detail at a time.
How to Design a Simple DIY Outdoor Shower for a Refreshing Backyard Escape
Why we love this
There is an unparalleled sense of liberation that comes with rinsing off under the open sky, feeling the cool mist of water mingle with the warmth of the afternoon sun. The aroma of wet cedar planks and the sound of birds chirping in the distance transform a mundane task into a spa-like ritual that grounds you in nature. It is about creating a sensory escape right in your backyard, where the texture of smooth river stones underfoot and the breeze against your skin remind you of the simple joys of summer living.
Essential Elements:
- Pressure-treated 4×4 cedar posts
- Outdoor-rated shower head and faucet kit
- Cedar or redwood privacy slats
- Drainage gravel or decorative river rocks
- Stainless steel hardware and brackets
- Waterproof sealant
How to make it
- Begin by selecting a level site near an existing outdoor faucet to minimize plumbing complexity; use a 4-foot spirit level to ensure the ground is perfectly flat before proceeding.
- Dig four holes for your support posts, reaching at least 24 inches deep to bypass the frost line, and secure your 4×4 cedar posts with quick-set concrete, ensuring they are perfectly plumb.
- Once the concrete has cured for 24 hours, install horizontal support beams between the posts using heavy-duty stainless steel brackets to form the frame of your privacy enclosure.
- Attach the cedar privacy slats vertically or horizontally, leaving a 1/2-inch gap between each board to allow for airflow and a subtle play of light while maintaining seclusion.
- Mount the outdoor shower kit by securing the riser pipe to the main support post with copper pipe straps, then connect it to your garden hose or permanent water line using a high-quality brass adapter.
- Excavate the floor area to a depth of 4 inches, fill it with a layer of crushed gravel for drainage, and top it with smooth, large-scale river rocks for a comfortable and aesthetically pleasing standing surface.
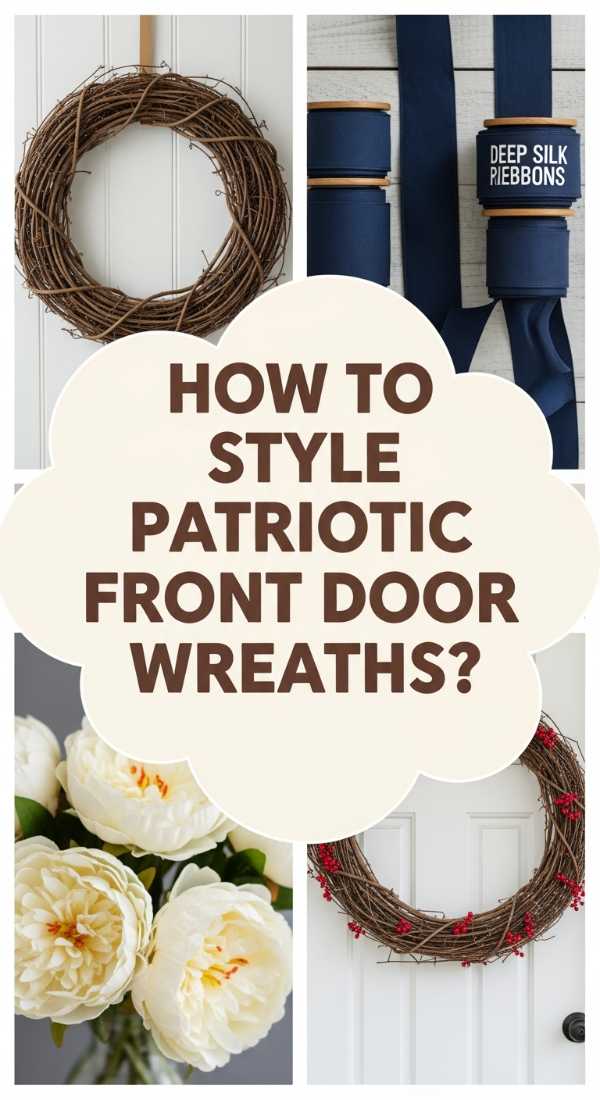
How to Create Patriotic Wreaths for the Front Door to Celebrate in Style

Why we love this
A patriotic wreath is more than just a decoration; it is a warm, textured welcome that hums with a sense of pride and community spirit. We adore the play between crisp navy blues, vibrant crimsons, and the rustic, earthy feel of burlap or grapevine that tethers the design to the home. Every time the wind catches the trailing ribbons, it creates a dynamic, living piece of art that makes your front porch feel festive, inviting, and deeply personal during the height of the summer holiday season.
Essential Elements:
- 18-inch grapevine or wire wreath form
- Wired ribbons in navy, red, and cream stripes
- Artificial white stars or wooden star cutouts
- Faux blue hydrangeas or red geraniums
- Floral wire and hot glue gun
- UV-resistant clear spray
How to make it
- Select your wreath base; a grapevine form provides a rustic, organic feel, while a wire form allows for a fuller, more structured ribbon-heavy look.
- Create a large, multi-looped bow using your wired navy and red ribbons, ensuring the loops are even and the tails are long enough to cascade down the door; secure this to the top or bottom third of the wreath with floral wire.
- Tuck clusters of faux blue hydrangeas into the left side of the wreath, using hot glue to secure the stems deep into the grapevine weave for a secure hold.
- Distribute your white stars across the blue floral section to mimic the flag, using small dabs of hot glue on the back of each star to ensure they won’t shift in high winds.
- Fill the remaining gaps with sprigs of red geraniums or additional ribbon loops, creating a balanced visual weight that draws the eye across the entire circular form.
- Spray the finished wreath with a UV-resistant clear coat to prevent the vibrant reds and blues from fading under the harsh summer sun before hanging it with a sturdy over-the-door hook.
How to Elevate Singlewide Mobile Home Ideas for a Luxurious Modern Lifestyle

Why we love this
There is a unique thrill in shattering expectations, and the modern elevation of singlewide living does exactly that by proving luxury is about curation, not square footage. We love the transformation of narrow spaces into airy, light-filled sanctuaries through the use of high-gloss finishes, floor-to-ceiling windows, and sleek, minimalist lines. It’s the feeling of walking into a space that feels custom-built and expensive, where every inch is optimized for both comfort and a sophisticated, high-end aesthetic that rivals any traditional home.
Essential Elements:
- Luxury Vinyl Plank (LVP) flooring
- Crown molding and baseboard upgrades
- Recessed LED lighting
- Neutral, high-quality paint (matte or eggshell)
- Custom window treatments
- Updated exterior skirting in stone or faux-brick
How to make it
- Start by replacing standard factory flooring with wide-plank Luxury Vinyl Flooring throughout the entire unit to create a seamless, expansive visual flow that mimics high-end hardwood.
- Install substantial 5-inch crown molding and 6-inch baseboards to bridge the gap between walls and ceiling, instantly adding architectural depth and a “custom home” feel to the interior.
- Swap out dated dome lights for recessed LED can lights; space them 4 feet apart to provide even, bright illumination that eliminates dark corners and makes the ceiling feel higher.
- Paint the entire interior in a cohesive, sophisticated neutral like a warm greige or soft white, using a high-quality primer to ensure the color adheres perfectly to the original wall panels.
- Upgrade the exterior by replacing traditional vinyl skirting with stacked stone or faux-brick panels, which provides a grounded, permanent look and significantly increases curb appeal.
- Add custom-length floor-to-ceiling drapes in a linen-blend fabric to soften the hard lines of the windows and add a layer of tactile luxury to the living areas.
How to Use a Rentry Divider for a More Functional and Chic Living Space
Why we love this
The beauty of a well-placed entry divider lies in its ability to define a space without ever making it feel closed off or cramped. It creates a gentle transition from the outside world into the private sanctuary of the home, offering a moment of pause and organization. We love the architectural interest a slat-style or glass-partition divider adds, casting beautiful, elongated shadows across the floor and providing a stylish perch for keys, plants, and the small treasures that make a house feel like a home.
Essential Elements:
- Vertical wood slats or a repurposed vintage screen
- Floor-to-ceiling mounting hardware
- Integrated shelving or hooks
- Wood stain or paint to match existing decor
- Level and drill
- Sandpaper (fine grit)
How to make it
- Measure the height from floor to ceiling precisely at the point where you want the divider; subtract 1/4 inch to allow for easy positioning of the vertical slats.
- Sand each wood slat (usually 2×2 or 1×3 oak or pine) with 220-grit sandpaper until perfectly smooth to the touch, then apply a rich stain or paint to match your home’s trim.
- Mark the floor and ceiling with a chalk line to ensure the divider is perfectly straight and parallel to your entry door.
- Install heavy-duty L-brackets or a hidden track system on both the floor and the ceiling, ensuring they are anchored into joists or using high-quality toggle bolts for stability.
- Position the slats vertically with a 2-inch gap between each, securing them to the brackets; use a spacer block to keep the distance perfectly uniform across the entire width.
- Optional: Add floating shelves between two of the slats at waist height to serve as a “landing pad” for mail and keys, finishing the look with a small potted trailing plant for a touch of life.
How to Choose Pool Stone and Tile Ideas for a Mediterranean Oasis at Home
Why we love this
Stepping onto the cool, tumbled surface of natural stone on a blistering day is a tactile experience that immediately transports you to the sun-drenched coasts of Greece or Italy. We are obsessed with the way cobalt blue mosaic tiles catch the light, turning the water into a shimmering, multifaceted jewel that invites you to dive in. This look is all about the harmony between the organic texture of the stone and the rhythmic, reflective patterns of the tile, creating a backyard retreat that feels timeless and deeply restorative.
Essential Elements:
- Travertine or Limestone pavers
- Glass mosaic water-line tiles in azure or turquoise
- Submersible-grade grout and sealer
- Natural stone coping (bullnose edge)
- Anti-slip surface treatment
- Waterproof membrane
How to make it
- Select your stone coping first; choose a bullnose (rounded) edge in a light-colored travertine to ensure the pool edge is comfortable for sitting and stays cool under the direct sun.
- Apply a high-quality waterproof membrane to the pool beam before laying your tiles to prevent moisture from seeping behind the finish and causing cracks over time.
- Lay the water-line tiles using a thin-set mortar specifically rated for submerged use; ensure the mosaic sheets are perfectly aligned by using 1/16-inch spacers for a professional, seamless look.
- Use a high-contrast grout color—like a crisp white or light silver—to make the blue of the tiles pop, and ensure it is a polymer-modified variety for maximum durability against pool chemicals.
- Install the surrounding stone deck using a dry-set method on a bed of compacted sand and gravel, which allows for slight ground movement without cracking the beautiful pavers.
- Finish by applying a penetrating, breathable sealer to the stone to protect it from chlorine and salt while maintaining its natural, matte texture and slip-resistant properties.
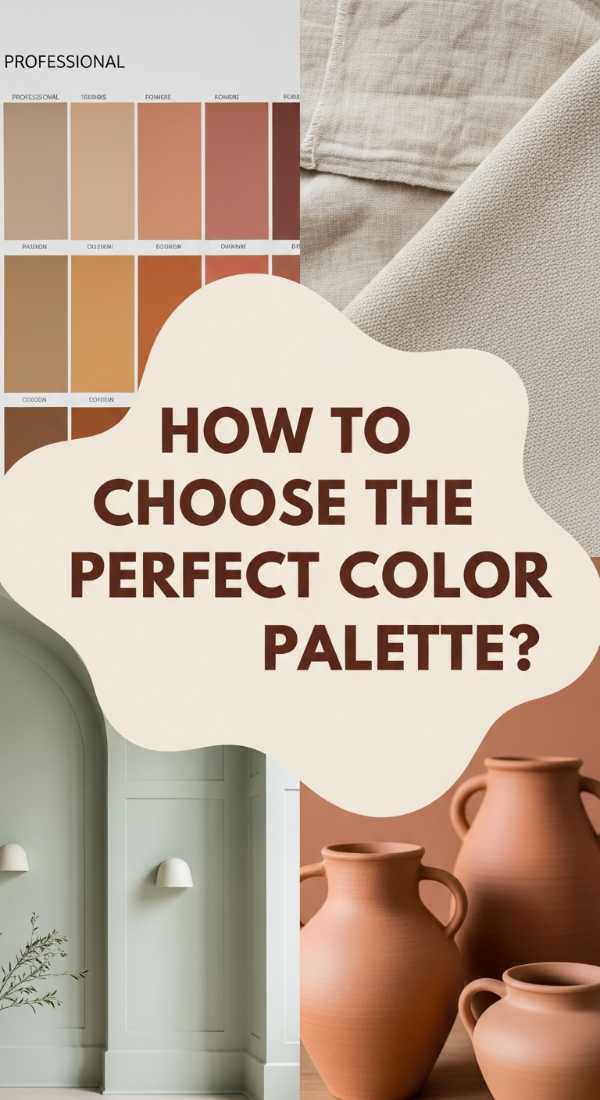
How to Master a Sophisticated Color Palette for a Calming Home Sanctuary

Why we love this
A sophisticated color palette is the secret language of a peaceful home, speaking in hushed tones of sage, sand, and soft charcoal. We love how these colors don’t compete for your attention but instead wrap you in a blanket of calm, allowing the textures of your furniture and the play of natural light to take center stage. It’s the feeling of a long exhale at the end of a busy day, where the walls themselves seem to absorb the stress and noise of the outside world, leaving only serenity behind.
Essential Elements:
- Tonal paint swatches (3-5 shades in one family)
- Matte or flat finish paints
- Natural fiber textiles (linen, wool, jute)
- Warm wood accents
- Black or brass hardware for contrast
- Ambient lighting (warm bulbs)
How to make it
- Identify your “anchor” color—usually a mid-tone neutral like a warm stone or a muted olive—and use it for the largest surfaces like the main walls or the largest piece of upholstery.
- Choose two supporting shades: one slightly lighter (for the ceiling or trim) and one slightly darker (for accent pillows or a small furniture piece) to create a sophisticated monochromatic depth.
- Test your colors by painting 2-foot by 2-foot swatches on multiple walls; observe them at 8:00 AM, 12:00 PM, and 8:00 PM to see how the shifting light changes the undertones.
- Incorporate “living” textures like a chunky wool throw or a raw linen curtain in the same color family to add tactile interest without breaking the calming visual flow of the palette.
- Add a single “grounding” element in a contrasting dark tone—such as a matte black lamp or a dark wood picture frame—to prevent the room from feeling washed out or flat.
- Replace cool-toned light bulbs with “warm white” (2700K) LEDs to ensure that your carefully chosen palette glows with a cozy, inviting amber hue in the evenings.
How to Install Simple DIY Outdoor Shower Ideas for an Eco Friendly Garden

Why we love this
An eco-friendly outdoor shower is a beautiful tribute to the cycle of nature, where every drop of water used to refresh the body goes back to nourish the earth. We adore the clever use of reclaimed materials and the integration of lush, water-loving plants that thrive in the shower’s runoff, creating a vibrant, living ecosystem. It is a design choice that feels good for the soul, combining the raw beauty of weathered wood with the modern ethics of sustainability and conscious living.
Essential Elements:
- Reclaimed wood or bamboo panels
- Solar-powered water heater bag or coil
- Natural drainage basin (rain garden style)
- Low-flow shower head
- Biodegradable soap dish
- Native, moisture-loving plants (like ferns or hibiscus)
How to make it
- Design a “greywater” system by digging a basin 3 feet deep beneath the shower area and filling it with layers of sand, charcoal, and river rocks to naturally filter the water.
- Surround the drainage area with moisture-loving native plants that will act as a natural sponge, absorbing the runoff and turning the shower into a lush garden focal point.
- Build the privacy screen using reclaimed pallet wood or sustainably harvested bamboo, securing the panels with stainless steel screws to prevent rust and staining over time.
- Install a black solar coil on a nearby sunny roof or fence; the sun will naturally heat the water inside the coil, providing a warm rinse without using any electricity or gas.
- Mount a high-pressure, low-flow shower head to conserve water while still providing a satisfying spray, ensuring all plumbing joints are sealed with Teflon tape to prevent leaks.
- Place a simple wooden bench made of rot-resistant black locust or teak inside the enclosure for a convenient place to set organic, biodegradable toiletries.
How to Craft Patriotic Wreaths for the Front Door Using Natural Elements
![]()
Why we love this
There is a quiet, sophisticated elegance in celebrating heritage through the lens of nature, using dried botanicals and organic textures instead of bright plastics. We love the muted, sophisticated tones of dried eucalyptus combined with deep red preserved berries and white statice flowers. This approach to a patriotic wreath feels grounded and artisanal, offering a nod to the red, white, and blue that feels timeless enough to stay on your door from the first bloom of summer through the late harvest.
Essential Elements:
- Dried eucalyptus or bay leaf branches
- Preserved red berries or dried red celosia
- White dried statice or baby’s breath
- Natural jute twine
- Straw or willow wreath form
- Clear matte floral sealant
How to make it
- Start with a willow or straw wreath base for a thick, textured foundation that complements the organic aesthetic of the dried elements.
- Bundle your eucalyptus or bay leaves into small clusters, securing them to the wreath form with jute twine in a clockwise overlapping pattern until the base is completely covered.
- Intersperse the red elements—such as preserved berries or dried red flowers—in three distinct groupings to create a visual “rule of thirds” that feels balanced and professional.
- Tuck small sprigs of white dried statice into the gaps, focusing them near the red clusters to create a subtle, natural representation of the patriotic color scheme.
- Secure any loose stems with a tiny drop of low-temperature hot glue, hiding the glue points beneath the leaves for a completely natural appearance.
- Lightly mist the entire arrangement with a matte floral sealer; this helps prevent the dried elements from becoming brittle and protects the colors from fading in the wind and sun.
How to Transform Singlewide Mobile Home Ideas into a Dream Chef Kitchen

Why we love this
The kitchen is the heart of any home, and transforming a singlewide kitchen into a culinary masterpiece is an exercise in brilliant engineering and chic design. We love the juxtaposition of high-performance stainless steel appliances against custom, soft-close cabinetry that maximizes every vertical inch. The result is a space that feels expansive and professional, where the sizzle of a gourmet meal and the gleam of quartz countertops create an atmosphere of luxury that completely redefines mobile living.
Essential Elements:
- Space-saving high-end appliances
- Quartz or granite countertops
- Under-cabinet LED task lighting
- Custom pantry pull-outs
- Deep stainless steel farmhouse sink
- Modern tile backsplash
How to make it
- Remove the standard overhead cabinets and replace them with custom, extra-tall cabinetry that reaches the ceiling to maximize storage and draw the eye upward, making the room feel larger.
- Reinforce the floor joists beneath the kitchen area before installing heavy quartz or granite countertops to ensure the structure can safely support the additional weight.
- Install a deep, single-basin farmhouse sink and a professional-grade pull-down faucet, which provides both a high-end look and the functionality needed for heavy-duty cooking.
- Add a tile backsplash using a classic subway tile or a modern herringbone pattern; use a laser level to ensure the lines are perfectly straight across the long horizontal run.
- Integrate smart storage solutions like “lazy Susans” in corner cabinets and pull-out spice racks next to the stove to keep the limited counter space clear and organized.
- Wire in LED strip lighting beneath the upper cabinets; this provides essential task lighting for prep work and creates a high-end ambient glow that highlights the new finishes.
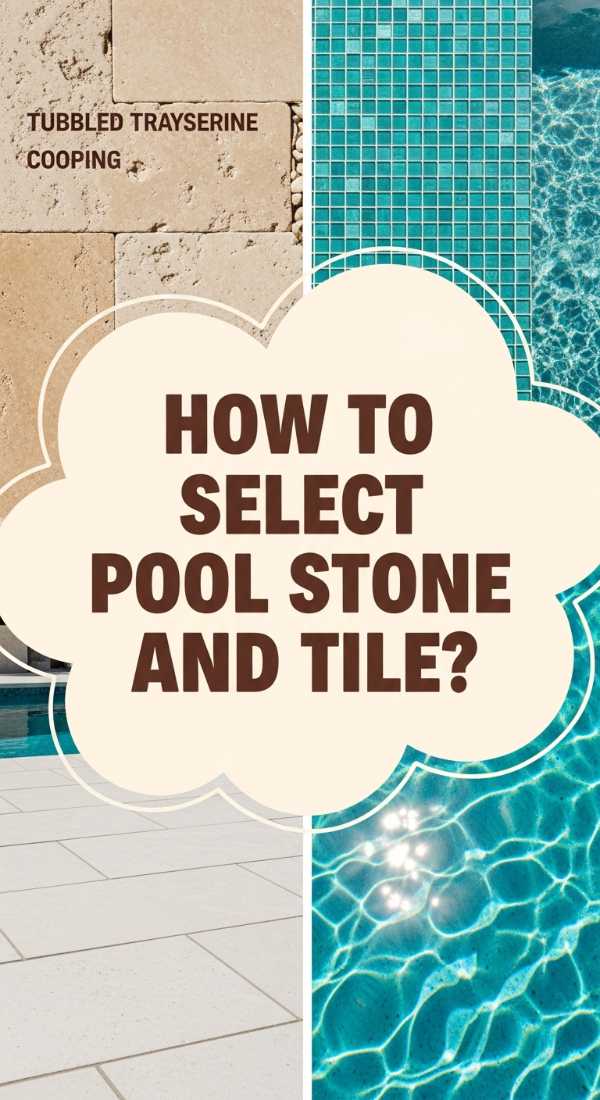
How to Curate Pool Stone and Tile Ideas for the Ultimate Summer Spot
[IMAGE_10]
Why we love this
Curating the perfect pool environment is about finding that magical intersection between safety, durability, and breathtaking beauty. We love the use of textured, non-slip porcelain tiles that mimic the look of rare stone, combined with vibrant mosaic accents that dance under the water’s surface. It’s about creating a destination in your own backyard—a place where the sparkle of the water and the solid, permanent feel of the stonework make every summer day feel like a luxury vacation.
Essential Elements:
- Anti-slip porcelain pool tiles
- Iridescent glass mosaic accents
- Epoxy grout for maximum longevity
- LED pool lighting (color-changing)
- Ledger stone for feature walls
- Professional-grade tile sealer
How to make it
- Begin by selecting a “field tile” for the pool floor that has a high COF (Coefficient of Friction) rating to ensure it remains safe and slip-resistant even when soaking wet.
- Design a feature wall or a “tanning ledge” using textured ledger stone, which adds a rugged, vertical dimension to the water’s edge and creates beautiful shadows.
- Install iridescent glass mosaic tiles along the steps and benches; the light-reflecting properties of glass make these underwater features easier to see while adding a touch of glamour.
- Use a specialized epoxy grout for all tiled surfaces; while more difficult to apply than standard grout, it is virtually waterproof and resistant to staining and chemical erosion.
- Set the tiles using a “back-buttering” technique—applying a layer of thin-set to both the wall and the back of the tile—to ensure a 100% bond and prevent tiles from popping off.
- Finalize the look with color-changing LED lights installed behind the ledger stone feature, allowing you to transform the pool’s mood from a cool blue oasis to a vibrant purple party spot at the touch of a button.
Conclusion: Embracing Your Own Viral Lifestyle
As we’ve explored everything from the rustic serenity of an eco-friendly outdoor shower to the sophisticated heights of a modern mobile kitchen, it’s clear that a “viral” lifestyle isn’t about following every fleeting trend—it’s about finding the ones that resonate with your soul. Whether you are adding a natural patriotic wreath to your door or retiling your pool to create a Mediterranean escape, these projects are about claiming your space and infusing it with beauty and function. Now, take that inspiration, pick your favorite project, and start creating the sanctuary you’ve always dreamed of!