

Ever felt that sudden spark of inspiration while scrolling through your favorite home boards, only to wonder if you could actually pull it off yourself? There is something so deeply satisfying about taking a raw space—whether it is a dusty corner of your studio or a patch of tired lawn—and breathing life into it with your own two hands. Home isn’t just a place where we sleep; it’s a living, breathing canvas that reflects our growth, our peace, and our wildest creative whims.
Today, I am sharing my absolute favorite viral DIY hacks that have transformed my own sanctuary and garden into the dreamy retreats I once only pinned. From the tactile joy of painting smooth river rocks to the structural elegance of modern room dividers, these projects are designed to be approachable yet high-impact. Let’s roll up our sleeves and dive into the textures, colors, and scents that will make your space truly unforgettable.
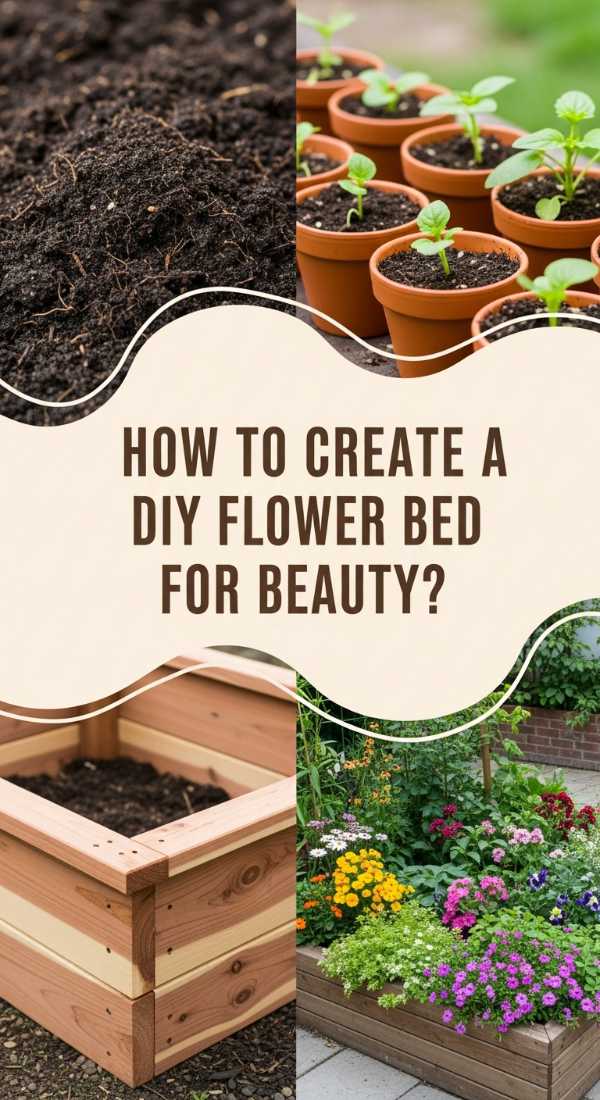
How to Build a Lush DIY Flower Bed for Incredible Curb Appeal
Why we love this
There is nothing quite like the intoxicating fragrance of damp cedar mulch mixed with the sweet, honeyed scent of blooming jasmine as you walk up your driveway. A lush flower bed adds an organic softness to the rigid lines of a house, creating a visual transition that feels welcoming and intentional. The way the morning dew clings to vibrant green leaves and the kaleidoscope of petal textures—from velvety roses to papery zinnias—creates a sensory experience that grounds you the moment you arrive home.
Essential Elements:
- Pressure-treated landscape timbers or natural stone edging
- High-quality garden soil and organic compost mix
- Landscaping fabric for weed suppression
- A mix of perennial shrubs and seasonal annuals
- Natural cedar or hemlock mulch
- Garden spade and level
How to make it
- Begin by marking the perimeter of your bed using a garden hose or spray paint to create fluid, organic curves rather than stiff straight lines.
- Remove the existing grass and weeds within the marked area using a sharp spade, ensuring you dig deep enough to remove the root systems to prevent regrowth.
- Level the ground carefully using a rake and a long level, as a flat foundation prevents soil erosion and water pooling during heavy rains.
- Install your edging material—if using stone, dig a shallow trench so the stones sit slightly below the grass line for a seamless look; if using timber, secure them with galvanized spikes.
- Lay down a layer of breathable landscaping fabric, cutting ‘X’ shapes where you intend to plant your specimens to keep the soil beneath healthy while blocking weeds.
- Mix your garden soil and compost in a 2:1 ratio to provide a nutrient-rich environment, then fill the bed to within two inches of the top edge.
- Arrange your plants while still in their nursery pots to visualize the heights, placing taller shrubs in the back and cascading flowers at the front.
- Dig holes twice as wide as the root balls, gently loosen the roots, and plant them at the same depth they were in the pot, firming the soil around them to remove air pockets.
- Apply a thick 3-inch layer of mulch across the entire bed, taking care not to pile it directly against the stems of the plants to avoid rot.
- Water deeply and immediately with a soft spray nozzle until the soil is saturated but not muddy, encouraging the roots to settle into their new home.
How to Style Black Rentry Dividers for a Modern Studio Vibe

Why we love this
The stark, sophisticated contrast of matte black steel against a light-filled studio creates an architectural rhythm that defines space without closing it off. We love the way light filters through the slats, casting long, dramatic shadows across hardwood floors as the sun sets. The texture is smooth and cool to the touch, providing a sturdy, industrial anchor that makes soft furnishings like velvet sofas or linen curtains pop with newfound vibrancy and modern edge.
Essential Elements:
- Black metal or stained wood Rentry divider panels
- Heavy-duty floor anchors or tension rods
- Clip-on directional spotlights (optional)
- Trailing indoor plants like Pothos or String of Pearls
- Measuring tape and a laser level
How to make it
- Measure the height of your ceiling at three different points to account for any floor slanting, ensuring your divider panels will fit snugly without gaps.
- Clean the floor and ceiling surfaces thoroughly with a degreaser to ensure the mounting hardware or tension pads have maximum grip and stability.
- Position the first panel and use a laser level to ensure it is perfectly vertical, as even a slight tilt will be visually jarring against the straight lines of the room.
- Secure the top and bottom brackets into the ceiling and floor joists using a power drill and appropriate anchors for your surface type (toggle bolts for drywall, masonry screws for concrete).
- If using a multi-panel system, connect the subsequent panels using the provided hinges or interlocking clips, maintaining a consistent 1/4-inch gap for a professional look.
- For a lush vibe, weave the long vines of trailing plants through the slats, allowing the greenery to soften the hard industrial edges of the black frame.
- Attach small, low-profile clip lights to the top rail of the divider to highlight the texture of the metal and create a warm, inviting glow in the evening.
- Test the stability of the unit by giving it a gentle shake; if there is any movement, tighten the tension screws or add additional bracing at the midpoint.
How to Design Dreamy Flower Beds in Front of House for a Magical Entrance

Why we love this
Imagine walking through a haze of purple lavender and soft white hydrangeas every time you come home; it’s like stepping into a storybook. This design focuses on a soft, ethereal aesthetic that uses layered heights to create a sense of depth and mystery. The gentle rustle of ornamental grasses and the sight of butterflies darting between nectar-rich blooms turn a simple front yard into a sanctuary that feels miles away from the busy world outside.
Essential Elements:
- A mix of ‘Evergreen’ structural plants (Boxwood or Holly)
- Soft-colored perennials (Lavender, Peonies, Foxgloves)
- Fine-textured ornamental grasses
- Solar-powered warm-glow path lights
- Decorative river stones or pea gravel for paths
How to make it
- Sketch a multi-layered planting plan on paper first, placing the tallest structural evergreens against the house foundation to hide utilities and provide year-round color.
- Prepare the soil by tilling in aged manure and peat moss to create a light, loamy texture that allows delicate flower roots to spread easily.
- Create a ‘staggered’ planting pattern rather than straight rows; this mimics how plants grow in nature and fills in gaps more effectively for a fuller look.
- Incorporate ‘spillers’ like creeping phlox along the edges of the bed so they can tumble over the border, softening the transition to the walkway.
- Install solar-powered path lights at 45-degree angles toward the most colorful blooms to create a magical, glowing effect during the twilight hours.
- Mulch with a light-colored wood chip or pine straw to keep the look airy and bright, which complements the pastel flower palette perfectly.
- Water the beds using a soaker hose buried just beneath the mulch to ensure water reaches the roots directly without spotting the delicate flower petals.
How to Curate Organic Color Palletes for a Serene Sanctuary

Why we love this
There is a profound psychological shift that happens when you surround yourself with tones found in the natural world—sage greens, soft sands, and muted clays. These colors don’t scream for attention; they whisper, creating a visual stillness that lowers the heart rate and clears the mind. The richness of these pigments comes from their earthy undertones, which change beautifully throughout the day as the natural light shifts from cool blue mornings to golden, amber afternoons.
Essential Elements:
- Swatches of sage, terracotta, ochre, and warm gray
- Natural fiber textiles (linen, wool, jute)
- Matte-finish wall paint or lime wash
- Raw wood accents (oak or walnut)
- Ceramic decor with visible grit and texture
How to make it
- Start with a ‘hero’ neutral color for your largest surfaces, like a soft, sandy beige or a warm off-white, applying a matte or eggshell finish to minimize glare.
- Select a secondary ‘earth’ tone, such as a deep moss green or a dusty terracotta, to use on an accent wall or large pieces of furniture like a velvet armchair.
- Layer in textures that mirror the colors; for example, pair a sage green wall with a chunky wool rug in a cream tone to add physical depth to the visual palette.
- Introduce metallic accents in brushed brass or copper, which mimic the glint of sunlight on water and add warmth without breaking the organic theme.
- Limit your palette to five main shades to prevent the space from feeling cluttered; use a 60-30-10 rule (60% dominant neutral, 30% secondary, 10% accent).
- Incorporate living elements—the vibrant green of a fiddle-leaf fig or the silver-blue of a eucalyptus branch—to act as a bridge between your indoor paint and the outdoor world.
How to Use Green Rentry Dividers for an Indoor Oasis Effect

Why we love this
Bringing the outdoors in is the ultimate luxury, and using green-toned dividers or living walls creates a biophilic embrace that literally cleans the air you breathe. The lush, waxy texture of leaves combined with the deep, forest-green frames creates a nook that feels like a hidden glade in a forest. It’s a cooling, refreshing visual that provides privacy while injecting a surge of life-giving energy into any room, making it the perfect backdrop for a reading chair or a home office.
Essential Elements:
- Modular divider frames painted in ‘Deep Forest’ or ‘Eucalyptus’
- Self-watering vertical planter inserts
- Selection of low-light indoor plants (Ferns, Philodendrons)
- Pebble trays for humidity
- Lecite or high-quality potting mix
How to make it
- Assemble your modular divider frames and apply two coats of an outdoor-grade green paint to protect the structure from the moisture of the plants.
- Install self-watering inserts into the frame slots, ensuring they are level and securely fastened to handle the weight of wet soil and growing foliage.
- Choose a variety of plants with different leaf shapes—wide Monstera leaves for drama and delicate Maidenhair ferns for a soft, wispy texture.
- Fill the planters with a lightweight potting mix containing perlite to ensure proper drainage, which is critical for indoor vertical gardening.
- Arrange the plants so that the more light-hungry species are at the top and the shade-tolerant ferns are tucked into the lower sections.
- Place a hidden pebble tray at the base of the divider to catch any drips and provide a constant source of humidity for the leaves.
- Mist the leaves every morning with filtered water to keep them dust-free and vibrant, enhancing the deep green ‘oasis’ aesthetic.
How to Illustrate Spring Chalkboard Ideas for a Whimsical Entryway

Why we love this
A chalkboard is a living piece of art that changes with your mood and the seasons, offering a nostalgic, tactile charm that digital screens just can’t replicate. We love the dusty, soft texture of pastel chalks against a dark slate background, and the way a hand-drawn wreath of cherry blossoms can instantly brighten a foyer. It’s an invitation for guests to feel the warmth of your home before you even say a word, capturing the fleeting beauty of spring in every chalk stroke.
Essential Elements:
- Large framed chalkboard or chalkboard-painted wall
- Dustless chalk in white and pastel spring tones
- A damp microfiber cloth and a bowl of water
- Chalk markers for fine detailing
- Stencils or a projector (for the artistically shy)
How to make it
- ‘Season’ your chalkboard by rubbing the side of a piece of white chalk over the entire surface and then erasing it; this prevents ‘ghosting’ of your first drawing.
- Wipe the board clean with a damp cloth to create a pristine, dark canvas that will make your colors pop.
- Sketch your main layout lightly with a pencil or thin white chalk, focusing on a central spring quote or a large floral motif.
- Use chalk markers for the crisp outlines of leaves and petals, as they provide a steady line that won’t smudge as easily as traditional chalk.
- Fill in larger areas with standard pastel chalks, using your finger or a dry sponge to smudge and blend colors for a soft, painterly ‘watercolor’ effect.
- Add ‘highlights’ with a sharp white chalk stick to mimic the way sunlight hits a flower, giving your drawing a three-dimensional quality.
- Mist the finished board very lightly with a bit of aerosol hairspray from a distance to ‘set’ the chalk and prevent accidental smudging from coats or bags.
How to Craft Mud Kitchen Rock Food for Imaginative Backyard Play
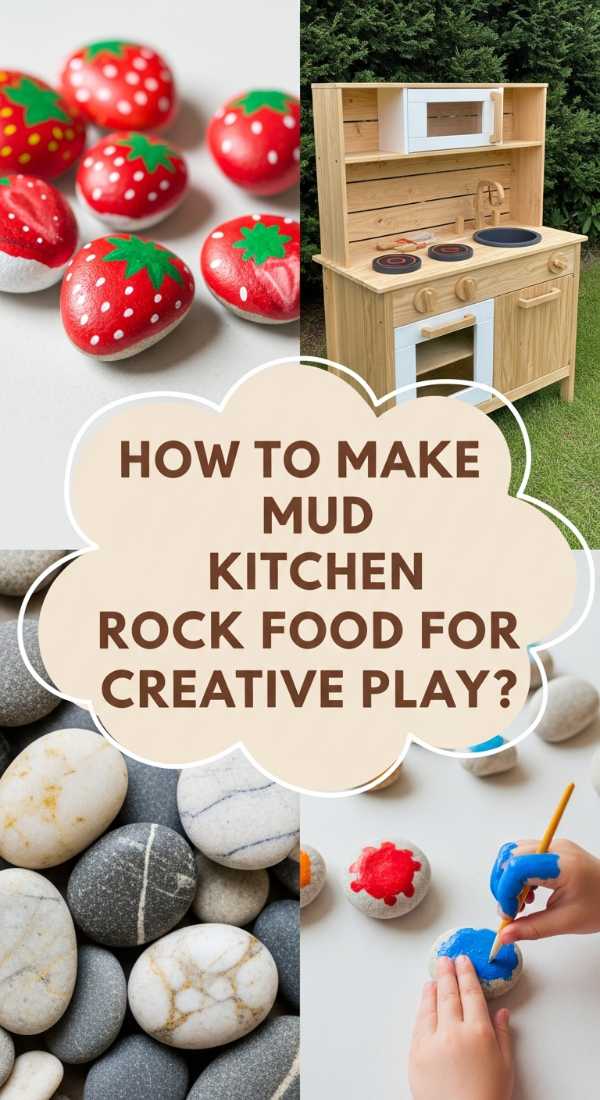
Why we love this
There is something so grounding about the weight of a smooth, sun-warmed river stone in your palm, especially when it’s been transformed into a vibrant ‘strawberry’ or a ‘slice of pizza.’ This project bridges the gap between nature and imagination, providing children (and adults!) with tactile, indestructible toys that encourage outdoor play. The glossy finish of the paint against the raw, earthy texture of the stone makes for a beautiful, colorful mess in the best way possible.
Essential Elements:
- Smooth, flat river stones in various sizes
- Acrylic multi-surface paints (bright, bold colors)
- Fine-point detail brushes and dotting tools
- Outdoor-grade glossy clear sealant
- A tray of sand or a drying rack
How to make it
- Scrub your stones with warm soapy water and a stiff brush to remove any dirt or oils that would prevent the paint from adhering.
- Let the stones dry completely in the sun; any trapped moisture can cause the paint to bubble or peel later.
- Apply a base coat of white primer or gesso to the darker stones to ensure your colors stay vibrant and true to the bottle.
- Paint your food designs—use round stones for tomatoes and burgers, and triangular stones for slices of cake or pizza.
- Wait for the base color to dry completely before using a fine-point brush to add details like seeds on a strawberry or the texture of a crust.
- Apply two thin coats of clear, UV-resistant outdoor sealant over the entire stone, including the bottom, to make them waterproof and durable for mud play.
- Let the stones cure for 48 hours before introducing them to the mud kitchen to ensure the finish is hard and scratch-resistant.
How to Arrange Versatile Rentry Dividers for Better Spatial Flow

Why we love this
Spatial flow is the secret ingredient to a home that feels intuitive and easy to live in, and versatile dividers act as the traffic controllers of your floor plan. We love the flexibility of being able to pivot a screen to hide a messy desk or open it up to let the light through during a party. The physical movement of the panels feels intentional and smooth, allowing you to curate different ‘zones’ within a single room while maintaining a sense of airy, connected openness.
Essential Elements:
- Hinged or 360-degree pivot Rentry divider units
- Furniture sliders for easy repositioning
- A cohesive color palette between divided zones
- Accent rugs to ‘anchor’ the new spaces
How to make it
- Identify the ‘natural paths’ in your room by walking through it and noticing where you naturally turn or stop; your dividers should guide this movement, not block it.
- Place the divider at a 45-degree angle to a corner to create a soft ‘foyer’ effect in a room that opens directly into the living space.
- Use the divider to ‘zoning’ the area—place it behind a sofa to separate a dining area from the lounge, ensuring there is at least 3 feet of walking space around the edges.
- Attach high-quality furniture sliders to the bottom of the divider feet so you can glide the panels into new configurations without scratching your floors.
- Balance the visual weight by placing a tall plant or a floor lamp on the ‘open’ side of the divider to keep the room from feeling lopsided.
- Adjust the angles of the panels throughout the day; keep them tighter for privacy while working, and wider for a communal, social feel in the evening.
How to Harmonize Earthy Color Palletes for a Sustainable Living Space

Why we love this
Sustainability and style go hand-in-hand when you lean into the colors of the earth, utilizing pigments derived from clay, minerals, and plants. This harmony creates a space that feels timeless rather than trendy, evoking the quiet strength of a mountain range or the warmth of a sun-baked field. The tactile experience of linen, reclaimed wood, and stone underfoot, all bathed in these rich, grounding hues, creates a home that nourishes the soul as much as it respects the planet.
Essential Elements:
- Zero-VOC paints in ochre, sienna, and umber
- Reclaimed wood shelving or furniture
- Hemp or organic cotton textiles
- Hand-thrown clay pottery
- Natural light maximization (sheer curtains)
How to make it
- Choose a ‘foundation’ earthy tone like a deep, muted clay for your largest wall, using a breathable lime-wash paint for a velvety, stone-like texture.
- Integrate reclaimed wood elements—the silver-gray of weathered barn wood or the deep amber of old pine—to provide a natural history to the room.
- Layer your textiles using tonal variations; for instance, a dark chocolate brown hemp rug paired with camel-colored linen throw pillows.
- Incorporate hand-made ceramics in their natural ‘bisque’ state to introduce a gritty, organic texture that reflects the colors of the raw earth.
- Swap out plastic or synthetic decor for items made of stone, glass, or metal, which carry a heavier visual and physical ‘weight’ and last a lifetime.
- Maximize natural light by using sheer, unbleached cotton curtains that allow the sun to illuminate the earthy pigments without washing them out.
How to Plan a DIY Flower Bed for Year-Round Garden Joy
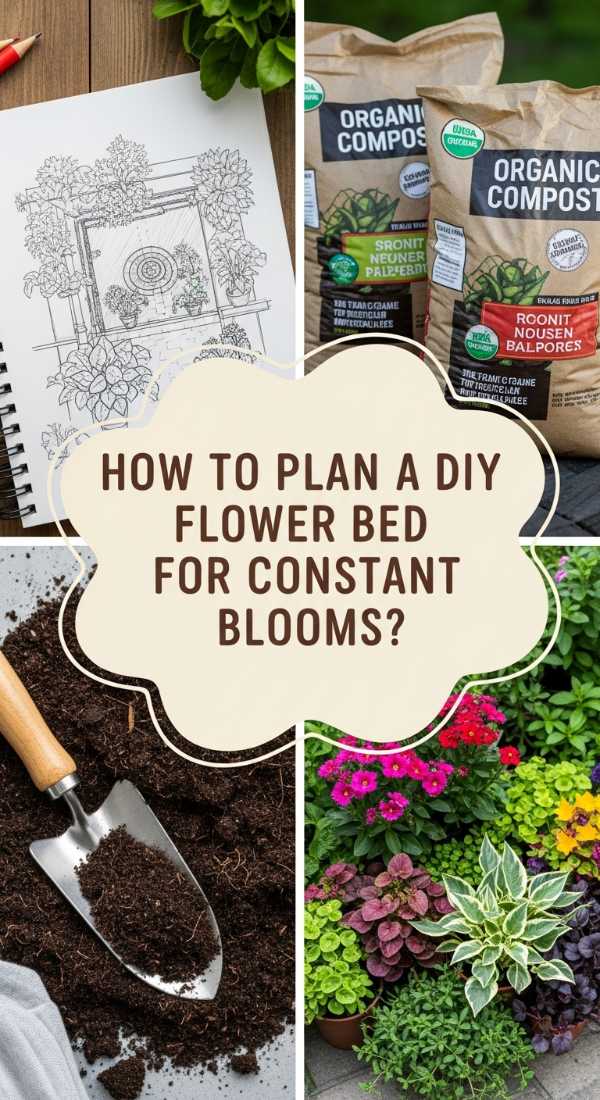
Why we love this
A garden shouldn’t disappear when the summer fades; it should evolve into a skeletal beauty during the winter and a vibrant explosion in the spring. We love the strategic ‘architecture’ of a year-round bed, where the bright red stems of dogwood contrast against the white snow, and the first crocuses poke through the frost. It’s a lesson in patience and planning that rewards you with a changing tapestry of colors and textures every single morning of the year.
Essential Elements:
- Evergreen foundation plants (Yew, Juniper, or Pieris)
- Spring bulbs (Tulips, Daffodils, Snowdrops)
- Summer bloomers (Coneflowers, Black-eyed Susans)
- Autumn interest (Sedum, Ornamental Kale)
- Winter interest (Red Twig Dogwood, Hellebores)
How to make it
- Map your garden bed on a four-season calendar, ensuring that for every month, there is at least one plant providing color, texture, or structural interest.
- Plant your ‘bones’ first—the evergreens—placing them in a triangular formation to provide a green backdrop that stays vibrant even in the dead of winter.
- Layer your spring bulbs deep in the soil during the autumn, placing them between perennials so that as the bulb foliage dies back, the summer plants grow over to hide it.
- Incorporate ‘seed heads’ by choosing plants like Echinacea and leaving the dried stalks up in the winter; they provide a beautiful silhouette and food for birds.
- Use plants with interesting bark, like the peeling texture of a River Birch or the bright stems of a Coral Bark Maple, to add visual ‘heat’ during cold months.
- Apply a fresh layer of dark mulch in late autumn to protect roots from the freeze-thaw cycle and to provide a clean, dark contrast to winter’s muted tones.
- Keep a garden journal to note ‘gaps’ in color throughout the year, allowing you to add specific seasonal plants as you go until the bed is perfectly balanced.
Conclusion: Your Home, Your Masterpiece
Transforming your space isn’t about achieving a magazine-perfect look in a single weekend; it’s about the joy of the process and the small, intentional changes that make a house feel like a home. Whether you’re painting a single rock for a child’s mud kitchen or planning a garden that will bloom for years to come, you’re weaving your own story into the walls and soil around you. Go ahead, start that project you’ve been eyeing—your future, more inspired self will thank you for it.