
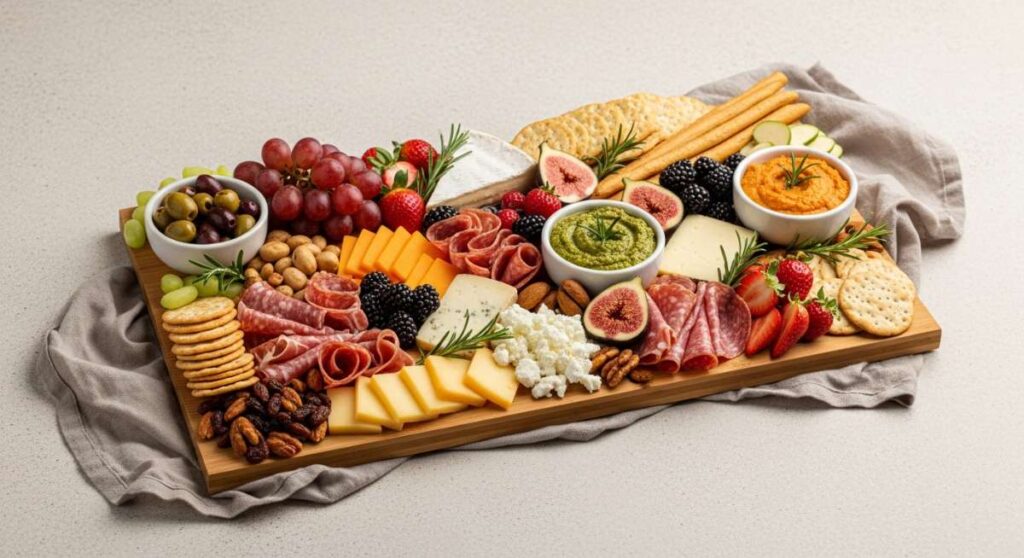
There is something truly magical about the way food brings people together, isn’t there? I remember the first time I hosted a proper dinner party; I was so stressed about every little detail being perfect that I barely spent a moment actually enjoying my guests. But over the years, I’ve learned that the secret to the ultimate gathering isn’t a complex five-course meal—it’s the art of the ‘Simple Food Board.’ It’s about creating a beautiful, communal space where everyone can graze, laugh, and feel right at home.
Today, I’m sharing my viral approach to the ultimate hosting board, featuring ten distinct elements that celebrate the freshness of the season. Whether you’re hosting a breezy backyard lunch or a cozy birthday celebration, these recipes and styling tips are designed to take the pressure off. Let’s dive into how we can turn simple ingredients into a stunning spread that will have your friends talking for weeks!
How to bake spring cookies?

Why we love this
These cookies are like a bite of pure sunshine, combining the zesty brightness of lemon with the delicate, floral sweetness of lavender. When you bite into one, the exterior offers a slight, sugary crunch that gives way to a soft, pillowy center that melts on your tongue. The aroma of fresh citrus filling your kitchen is absolutely intoxicating, setting a cheerful mood even before the first guest arrives. It’s the perfect treat to anchor the sweet corner of your food board, offering a refreshing palate cleanser between savory bites.
Ingredients
- 2 1/2 cups all-purpose flour
- 1 cup unsalted butter, softened
- 1 cup granulated sugar
- 1 large egg
- 2 tablespoons fresh lemon zest
- 1 teaspoon dried culinary lavender, crushed
- 1/2 teaspoon baking soda
- 1/4 teaspoon salt
How to make it
- Begin by preheating your oven to 350°F (175°C) and lining two large baking sheets with parchment paper to ensure an even bake and easy removal.
- In a large mixing bowl, cream together the softened butter and granulated sugar using a stand mixer or hand mixer on medium-high speed for about 3-4 minutes until the mixture is pale, light, and fluffy.
- Add the egg, lemon zest, and crushed lavender, beating until fully incorporated; ensure you scrape down the sides of the bowl to get every bit of flavor evenly distributed.
- In a separate medium bowl, whisk together the flour, baking soda, and salt to remove lumps and aerate the dry ingredients.
- Gradually add the dry ingredients to the wet mixture on low speed, mixing just until a soft dough forms—be careful not to overmix, as this can make the cookies tough.
- Scoop rounded tablespoons of dough, roll them into smooth balls between your palms, and place them 2 inches apart on the prepared sheets.
- Bake for 10-12 minutes, or until the edges are just barely golden brown while the centers still look slightly soft; let them cool on the pan for 5 minutes before transferring to a wire rack.
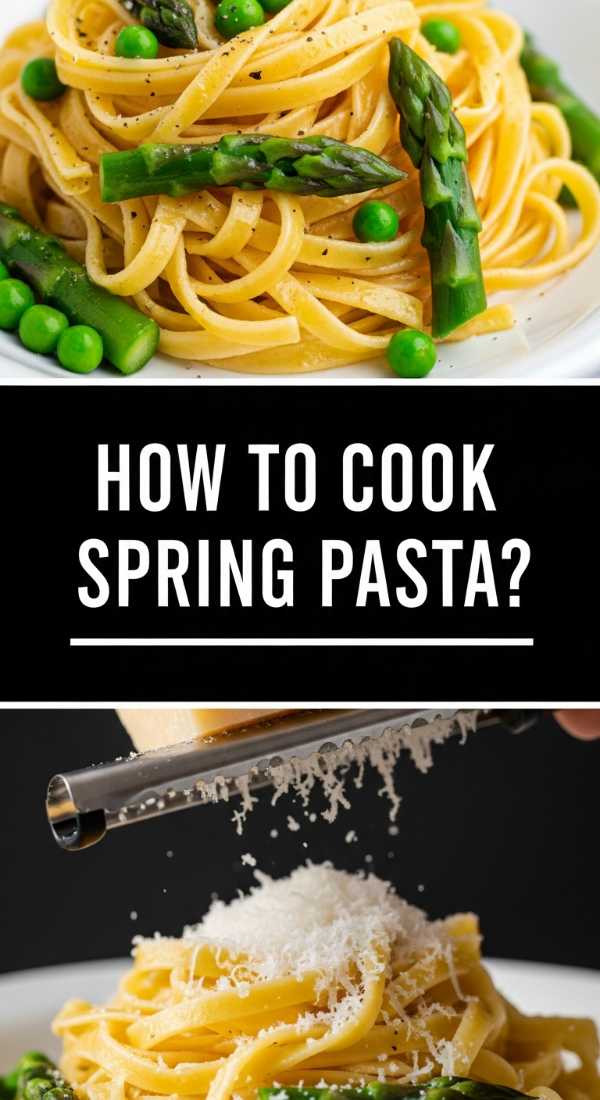
How to cook spring pasta?
Why we love this
Nothing says ‘fresh’ like a light spring pasta tossed with the season’s most vibrant green vegetables and a silky, buttery sauce. The texture of al dente noodles paired with the snap of fresh asparagus and the pop of sweet peas creates a wonderful sensory experience in every mouthful. As the steam rises from the bowl, you’ll catch notes of nutty parmesan and sharp garlic, making it an irresistible addition to any communal board. It’s a dish that feels sophisticated yet remains incredibly approachable for any home cook looking to impress.
Ingredients
- 1 lb linguine or fettuccine
- 1 bunch thin asparagus, trimmed and cut into 2-inch pieces
- 1 cup fresh or frozen sweet peas
- 3 cloves garlic, thinly sliced
- 1/2 cup heavy cream
- 1/2 cup freshly grated Parmesan cheese
- 2 tablespoons extra virgin olive oil
- Salt and cracked black pepper to taste
How to make it
- Bring a large pot of heavily salted water to a rolling boil—the water should taste like the sea to properly season the pasta from the inside out.
- Add the pasta to the boiling water and cook for about 2 minutes less than the package directions specify for al dente; this ensures it stays firm during the final tossing.
- In the last 2 minutes of the pasta’s cooking time, drop the asparagus and peas into the same pot to blanch them until they are bright green and tender-crisp.
- Before draining, reserve at least 1 cup of the starchy pasta water—this is the secret ingredient for a glossy, cohesive sauce.
- In a large skillet over medium-low heat, sauté the sliced garlic in olive oil until it is fragrant and just beginning to turn a pale gold, taking care not to burn it.
- Add the heavy cream to the skillet and bring to a gentle simmer, then toss in the drained pasta and vegetables.
- Gradually whisk in the Parmesan cheese and splashes of the reserved pasta water, tossing constantly until the sauce thickens and coats every strand beautifully.
How to make spring dinners?

Why we love this
A true spring dinner is all about balance—light proteins, vibrant colors, and flavors that feel energizing rather than heavy. This sheet-pan approach creates a meal that is as visually stunning as it is delicious, with salmon fillets that are tender and flaky against roasted baby carrots. The caramelization from the high heat brings out a natural sweetness in the vegetables that contrasts perfectly with a zesty herb gremolata. It’s the ultimate stress-free main for your board because it cooks all at once, leaving you free to mingle with your guests.
Ingredients
- 4 salmon fillets (6 oz each)
- 1 lb baby carrots with tops partially trimmed
- 1 lb fingerling potatoes, halved lengthwise
- 3 tablespoons olive oil
- 1 teaspoon smoked paprika
- Salt and pepper
- Fresh parsley and lemon juice for garnish
How to make it
- Preheat your oven to 400°F (200°C) and grab a large, rimmed baking sheet; the high heat is essential for roasting the vegetables while keeping the fish moist.
- Toss the halved fingerling potatoes and baby carrots with 2 tablespoons of olive oil, salt, pepper, and paprika directly on the baking sheet until evenly coated.
- Spread the vegetables into a single layer and roast for 15-20 minutes first, as they require more time than the delicate salmon.
- Move the vegetables to the edges of the pan and place the salmon fillets in the center; drizzle the fish with the remaining olive oil and season generously.
- Return the pan to the oven and roast for another 10-12 minutes, or until the salmon flakes easily with a fork and the potatoes are golden and crispy.
- Check the internal temperature of the salmon; it should reach 145°F (63°C) for a perfect medium-well finish that isn’t dry.
- Finish the entire tray with a heavy squeeze of fresh lemon juice and a handful of chopped parsley to brighten the deep roasted flavors.
How to serve crawfish boil?

Why we love this
Serving a crawfish boil is less about a meal and more about an interactive, festive experience that encourages everyone to get their hands a little messy. The aroma of spicy Cajun seasonings, bay leaves, and lemons simmering in a giant pot is enough to draw the whole neighborhood to your backyard. There is a primal joy in peeling back the shells to find tender, succulent meat that has absorbed all that wonderful, fiery broth. It’s the ultimate center-piece for a casual food board, inviting guests to linger, peel, and talk for hours.
Ingredients
- 5 lbs live crawfish, thoroughly rinsed
- 1 bag commercial crab/crawfish boil spice mix
- 3 lemons, halved
- 2 heads of garlic, top sliced off
- 1 lb small red potatoes
- 4 ears of corn, cut into thirds
- 1 lb smoked andouille sausage, sliced into rounds
How to make it
- Fill a very large stockpot halfway with water and bring it to a vigorous boil; add the spice mix, halved lemons (squeezing them in first), and the garlic heads.
- Add the red potatoes to the pot first, as they take the longest to soften, and boil for about 10-12 minutes until they are halfway cooked.
- Incorporate the sausage rounds and the corn pieces, continuing to boil for another 5 minutes to let the flavors meld and the corn tenderize.
- Add the rinsed crawfish to the pot, ensuring they are fully submerged, and return the water to a boil; cook for exactly 3-5 minutes until the shells turn a vibrant, bright red.
- Turn off the heat and let the crawfish soak in the seasoned liquid for 15-20 minutes; this ‘soak’ is the most critical step for the meat to absorb maximum flavor.
- Drain the entire mixture through a large colander, discarding the excess liquid.
- To serve, spread several layers of newspaper or brown butcher paper over your board or table and pour the steaming contents directly onto it for an authentic, communal feel.
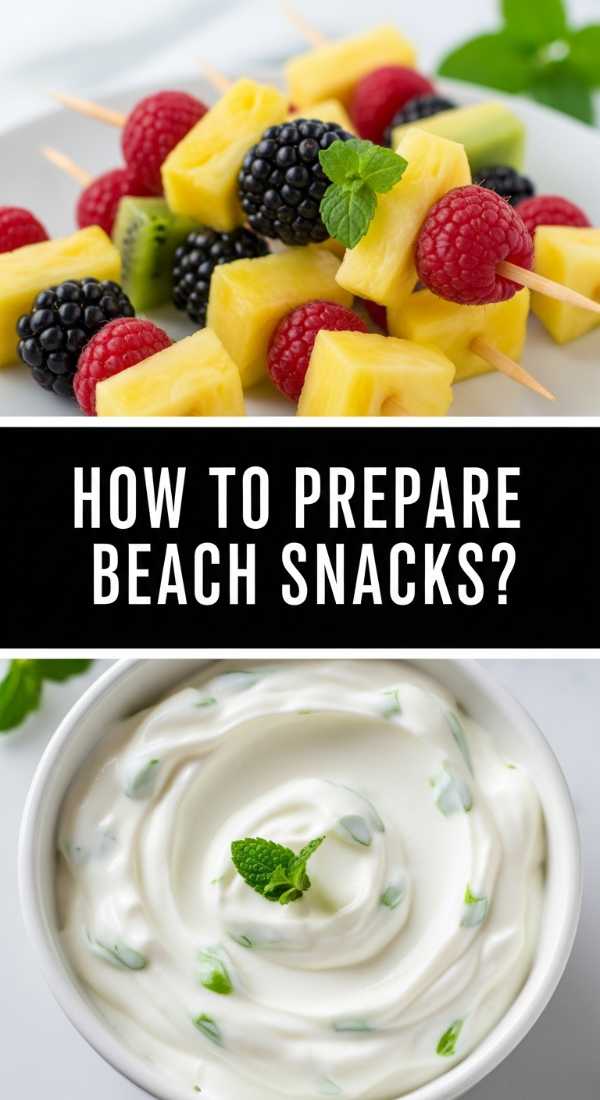
How to prepare beach snacks?
Why we love this
When the sun is out and the salt air is blowing, you want snacks that are hydrating, refreshing, and incredibly easy to handle with one hand. These fruit and cheese skewers are the perfect portable addition to a lifestyle board, offering a cool burst of sweetness followed by a creamy finish. The combination of juicy watermelon, sharp feta, and a hint of mint is a classic summer profile that feels sophisticated yet effortless. They stay fresh and vibrant even in warmer weather, making them a reliable go-to for any outdoor hosting scenario.
Ingredients
- 1 mini seedless watermelon, cubed
- 8 oz block of firm Feta cheese, cubed
- 1 bunch fresh mint leaves
- 1 cucumber, sliced into thick rounds
- Balsamic glaze for drizzling
- Long wooden skewers
How to make it
- Prepare your fruit and vegetables by cutting the watermelon and feta into uniform 1-inch cubes to ensure the skewers look neat and professional.
- Wash the cucumber and slice it into half-inch thick rounds; if the cucumber is large, you can cut the rounds into half-moons for easier eating.
- To assemble, thread a piece of watermelon onto the skewer, followed by a folded mint leaf, then a cube of feta, and finally a cucumber round.
- Repeat the pattern until the skewer is full, leaving enough space at the bottom for guests to hold them comfortably.
- Place the completed skewers on a chilled tray or a section of your food board lined with damp paper towels to keep them crisp.
- Just before serving, drizzle a very light amount of balsamic glaze over the watermelon and feta for a tangy contrast.
- Keep these in a cooler or refrigerator until the moment guests arrive to maintain that refreshing, icy temperature.
How to frost spring cakes?

Why we love this
A beautifully frosted spring cake is the crowning jewel of any dessert board, characterized by light textures and ethereal, pastel aesthetics. Using a Swiss Meringue buttercream provides a silky-smooth finish that isn’t overly sweet, allowing the delicate flavors of the cake to shine through. The process of smoothing the sides and creating gentle swoops on top is incredibly meditative and yields a professional, bakery-quality look. It’s the kind of dessert that makes guests pause for a photo before they even think about taking a slice.
Ingredients
- 5 large egg whites, room temperature
- 1 1/2 cups granulated sugar
- 2 cups unsalted butter, cubed and slightly softened
- 1 teaspoon vanilla bean paste
- A pinch of salt
- Gel food coloring (optional pastel tones)
How to make it
- Create a double boiler by placing a heat-proof glass bowl over a pot of simmering water, ensuring the bottom of the bowl does not touch the water.
- Whisk the egg whites and sugar together in the bowl constantly until the sugar has completely dissolved and the mixture reaches 160°F (71°C) on a thermometer.
- Transfer the mixture to a stand mixer fitted with the whisk attachment and beat on high speed for 10-15 minutes until stiff, glossy peaks form and the bowl feels cool to the touch.
- Switch to the paddle attachment and begin adding the butter one cube at a time on medium-low speed, allowing each piece to fully incorporate before adding the next.
- Continue beating even if the mixture looks curdled or soupy; it will eventually come together into a thick, velvety cream—this can take several minutes.
- Add the vanilla bean paste and a tiny drop of gel coloring if desired, mixing on low speed for 2 minutes to remove air bubbles and achieve a smooth consistency.
- Apply a thin ‘crumb coat’ to your cake first, chill for 20 minutes, then apply the final thick layer of frosting using an offset spatula for those signature spring swirls.
How to bake spring muffins?

Why we love this
Muffins are the unsung heroes of the hosting world, providing a grab-and-go option that feels both wholesome and indulgent. These spring-themed muffins feature a golden, domed top with a hidden pocket of tart rhubarb or sweet berries that bursts with flavor in every bite. The crumb is tender and moist, scented with a hint of nutmeg and cinnamon that evokes a cozy, morning-in-the-garden feeling. Piled high on a wooden board, they add vertical interest and a rustic charm that makes your spread feel abundant and thoughtfully curated.
Ingredients
- 2 cups all-purpose flour
- 1/2 cup granulated sugar
- 1/4 cup light brown sugar
- 1 tablespoon baking powder
- 1/2 teaspoon salt
- 1 cup buttermilk
- 1/2 cup melted butter
- 2 large eggs
- 1 1/2 cups fresh blueberries or diced rhubarb
How to make it
- Preheat your oven to 425°F (220°C)—starting with a high temperature is the professional trick to getting those high, bakery-style domed tops.
- In a large bowl, whisk together the flour, sugars, baking powder, and salt until there are no clumps left.
- In a separate jug, whisk the buttermilk, melted butter, and eggs until smooth; the buttermilk is essential for a tender, moist crumb.
- Make a well in the center of the dry ingredients and pour in the wet mixture, folding gently with a spatula until just combined; stop as soon as the flour disappears.
- Gently fold in your fruit, being careful not to over-mix and turn the batter blue or purple.
- Divide the batter into a lined muffin tin, filling each cup all the way to the top to encourage that dramatic rise.
- Bake at 425°F for 5 minutes, then without opening the oven door, reduce the heat to 375°F (190°C) and bake for another 13-15 minutes until a toothpick comes out clean.
How to make birthday cakes?

Why we love this
A birthday cake is more than just dessert; it is a symbol of celebration and love that deserves a place of honor on your board. This classic vanilla bean cake features a tight, velvety crumb that stands up perfectly to layering while remaining incredibly moist and light. There is a deep sense of nostalgia in the aroma of warm vanilla and butter, reminding everyone of childhood parties and happy memories. When decorated with simple, elegant touches, it becomes the ultimate centerpiece that bridges the gap between casual grazing and a formal celebration.
Ingredients
- 3 cups cake flour (sifted)
- 2 cups granulated sugar
- 1 tablespoon baking powder
- 1/2 teaspoon salt
- 1 cup unsalted butter, softened
- 4 large eggs, room temperature
- 1 cup whole milk
- 2 teaspoons vanilla bean paste
How to make it
- Preheat your oven to 350°F (175°C) and grease two 8-inch round cake pans, lining the bottoms with parchment paper for a flawless release.
- Sift the cake flour, sugar, baking powder, and salt together into a large bowl—sifting is vital for achieving that professional, light texture.
- Add the softened butter and half of the milk, mixing on low speed until the dry ingredients are moistened, then increase to medium and beat for 2 minutes to develop the cake’s structure.
- In a separate small bowl, whisk the remaining milk, vanilla bean paste, and eggs together.
- Add the egg mixture to the batter in three separate additions, beating for 30 seconds after each addition until the batter is smooth and pale.
- Divide the batter equally between the prepared pans and smooth the tops with a spatula.
- Bake for 30-35 minutes or until the cakes spring back when lightly touched in the center; let them cool completely in the pans before attempting to frost.
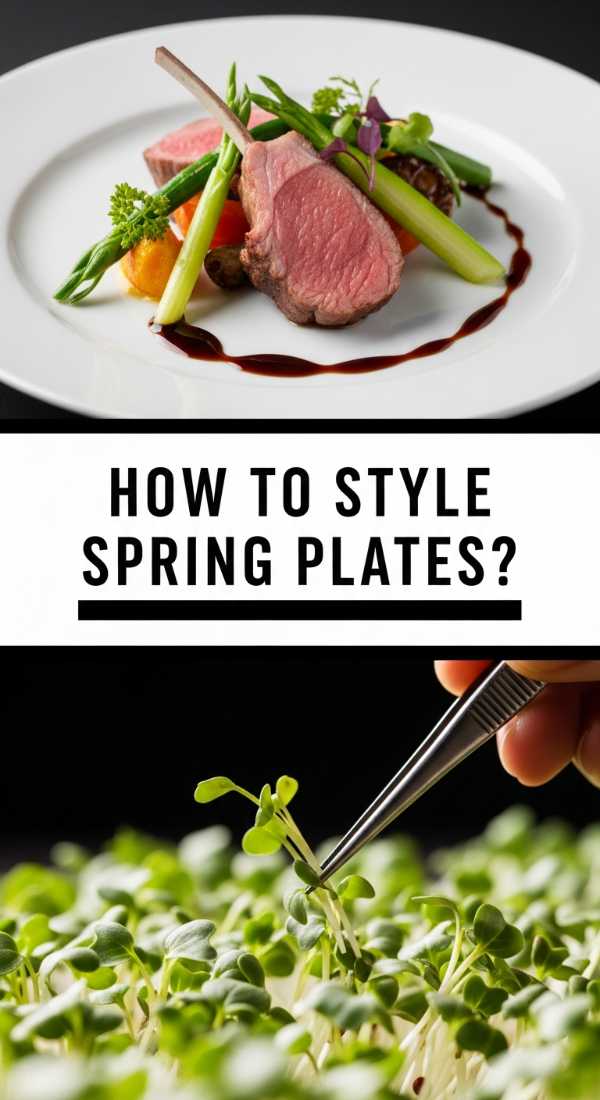
How to style spring plates?
Why we love this
Styling is the ‘secret sauce’ that turns a collection of recipes into a viral-worthy food board. It’s about creating a visual rhythm with colors, heights, and textures that lead the eye across the table. When you style a plate or board with intention, you’re telling your guests that their experience matters, making the meal feel like a curated event. The use of negative space, pops of green from microgreens, and the organic scattering of ingredients creates a look that is both effortless and deeply sophisticated.
Ingredients
- A variety of wooden boards and ceramic platters
- Fresh microgreens and edible flowers (pansies or nasturtiums)
- Small glass bowls for dips and sauces
- Whole fruits (like grapes or figs) for garnish
- Linen napkins in neutral tones
How to make it
- Start by placing your largest items first—the cake, the pasta bowl, or the crawfish pile—to create ‘anchor points’ on your board or table.
- Use small bowls or ramekins to hold wet ingredients like dips, glazes, or olives, which prevents them from making other foods soggy.
- Incorporate height by using cake stands or even small overturned bowls hidden under a linen cloth to elevate certain platters.
- Fill in the large gaps with clusters of grapes, handfuls of nuts, or folded slices of high-quality meats to create a sense of abundance.
- Add a ‘living’ element by scattering fresh microgreens or edible flowers over savory dishes just before serving to give them a high-end restaurant finish.
- Ensure there is a clear color story; for spring, aim for a mix of soft pastels, bright greens, and neutral wood tones to keep the look cohesive.
- Place serving utensils near each dish at an angle, inviting guests to dig in without having to search for a fork or spoon.
How to glaze lemon cakes?

Why we love this
The perfect lemon glaze is the finishing touch that transforms a simple loaf into a show-stopping dessert. It should be thick enough to hold its white color but fluid enough to drip gracefully down the sides of the cake in beautiful, lazy rivers. As it sets, it forms a thin, crackly crust that provides a sharp, tart contrast to the sweet, buttery cake beneath. The scent of fresh lemon oil being released as the glaze hits the warm cake is a sensory delight that signals the start of spring hosting season.
Ingredients
- 2 cups powdered sugar, sifted
- 3-4 tablespoons fresh lemon juice
- 1 tablespoon heavy cream (for opacity)
- 1/2 teaspoon lemon zest
- A pinch of salt
How to make it
- Start by sifting your powdered sugar into a medium-sized bowl; even tiny lumps will be visible in the final glaze, so do not skip this step.
- Add the lemon juice one tablespoon at a time, whisking vigorously after each addition to monitor the consistency.
- Whisk in the heavy cream and a tiny pinch of salt; the cream makes the glaze bright white and opaque rather than translucent, while the salt balances the sugar.
- Check the ‘ribbon stage’: lift the whisk; the glaze should fall back into the bowl and hold its shape for about 2 seconds before disappearing.
- If the glaze is too thin, add a tablespoon more sugar; if too thick, add a few drops of lemon juice until it’s perfectly pourable.
- Ensure your cake is almost completely cool; if it’s too hot, the glaze will melt and run off, but if it’s slightly warm (room temp), the glaze will ‘grip’ the surface better.
- Pour the glaze over the center of the cake and use the back of a spoon to gently push it toward the edges, letting it drip down naturally for that viral, artisanal look.
The Art of Stress-Free Hosting
Hosting doesn’t have to be a frantic marathon of cooking and cleaning. By focusing on a communal food board filled with fresh, seasonal ingredients and simple techniques, you create an environment where the food is the bridge to connection. Each of these elements—from the snap of the spring pasta to the crackle of a lemon glaze—is designed to be manageable yet impressive. Remember, the best part of any gathering isn’t the perfection of the plating, but the warmth of the company. So, grab a board, start prepping, and enjoy the beautiful simplicity of hosting this season.