
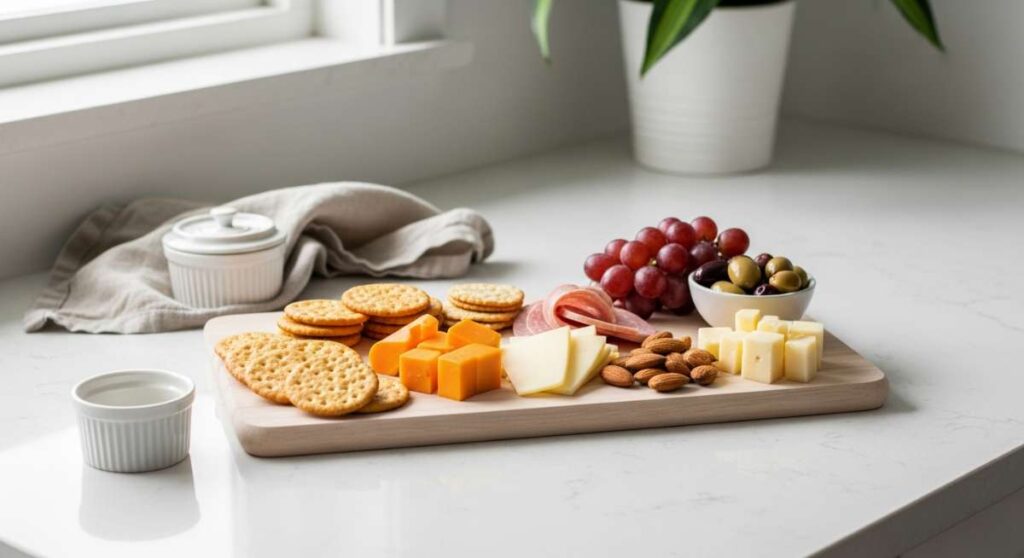
Lazy Host Hacks: How to Master the Simple Food Board Craze
We’ve all been there—the doorbell rings in twenty minutes, your living room looks like a whirlwind hit it, and you haven’t even thought about what to serve. The pressure to be the ‘perfect host’ often feels like a full-time job we didn’t sign up for. But here is a secret I’ve learned after years of hosting: the best gatherings aren’t about complicated five-course meals; they are about the connection sparked over a beautiful, communal spread. The food board craze has saved my social life, turning stressful dinner parties into effortless, grazing-style hangouts where the food is the centerpiece and the vibe is purely relaxed.
The magic of a ‘Simple Food Board’ is that it allows you to showcase a variety of flavors without being stuck in the kitchen all night. It’s about assembly, not just labor. By mixing homemade staples with fresh ingredients, you create a visual and culinary feast that looks like you spent hours prepping, when in reality, you were probably sipping wine and picking out a playlist. Today, I’m sharing ten versatile recipes that transition perfectly from individual dishes to the stars of your next epic hosting board.
How to make authentic tacos?

Why we love this
There is something deeply communal about a tray of authentic tacos, with the aroma of toasted corn tortillas mingling with the zing of fresh lime and the smoky depth of seasoned meat. When you bite into one, you get that perfect contrast of textures: the soft, warm tortilla, the succulent, juice-filled protein, and the crisp, refreshing bite of raw white onion and cilantro. It’s a sensory explosion that feels like a celebration of street-food culture right in your dining room, making it the ultimate interactive addition to any food board where guests can build their own perfect bite.
Ingredients
- 1 lb flank steak or chicken thighs
- Corn tortillas
- 1 white onion, finely diced
- Fresh cilantro, chopped
- 2 cloves garlic, minced
- 1 tbsp cumin and 1 tbsp chili powder
- Lime wedges
- Radishes, thinly sliced
How to make it
- Begin by preparing your protein; if using steak, slice it against the grain into very thin strips to ensure maximum tenderness.
- In a heavy cast-iron skillet over medium-high heat, add a splash of oil until it shimmers, then sear the meat in batches to avoid crowding, which ensures a crusty, brown exterior rather than steaming the meat.
- Season the meat generously with cumin, chili powder, and salt during the last two minutes of searing, adding the minced garlic at the very end so it perfumes the oil without burning.
- While the meat rests, heat your corn tortillas directly over a gas flame for about 10-15 seconds per side using tongs until they show charred spots and become pliable.
- Assemble by layering the meat onto two stacked tortillas (the street style way), then topping with a pinch of the diced onions and a heavy sprinkle of cilantro.
- Serve immediately with lime wedges and radish slices on the side to provide a bright, acidic contrast to the savory meat.
How to bake strawberry cobbler?
Why we love this
Nothing says comfort like a warm strawberry cobbler pulled fresh from the oven, its ruby-red juices bubbling up around a golden, biscuit-like crust. The scent of sweet berries and vanilla fills the entire house, creating an atmosphere of cozy indulgence that is impossible to resist. As you spoon into it, the contrast between the soft, jammy fruit and the slightly crunchy, sugary top of the cobbler creates a mouthfeel that is both rustic and sophisticated, especially when paired with a melting dollop of cold vanilla cream.
Ingredients
- 2 lbs fresh strawberries, hulled and halved
- 1 cup granulated sugar (divided)
- 1 cup all-purpose flour
- 1 tbsp baking powder
- 1/2 cup cold salted butter, cubed
- 1/2 cup whole milk
- 1 tsp vanilla extract
How to make it
- Preheat your oven to 375°F (190°C) and lightly grease a 9×9 inch baking dish with butter.
- Toss the prepared strawberries with half a cup of sugar and a tablespoon of flour directly in the baking dish, spreading them out into an even layer so they cook consistently.
- In a separate bowl, whisk together the remaining flour, sugar, and baking powder, then use your fingers or a pastry cutter to work the cold butter into the flour until it resembles coarse crumbs.
- Gently stir in the milk and vanilla extract until a thick, shaggy dough forms; be careful not to overmix, as this will result in a tough crust.
- Drop spoonfuls of the dough onto the strawberry mixture, leaving small gaps for the steam to escape and the fruit juices to thicken during the baking process.
- Bake for 35 to 40 minutes, or until the fruit is bubbling vigorously and the cobbler topping has turned a deep, golden brown and feels firm to the touch.
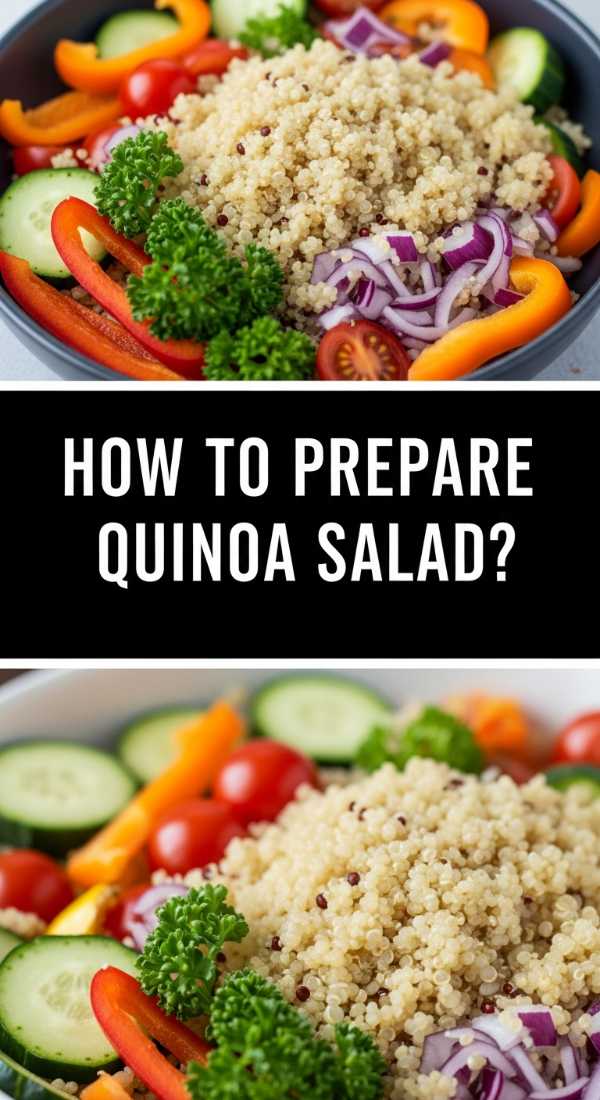
How to prepare quinoa salad?
Why we love this
Quinoa salad is the unsung hero of the food board, offering a vibrant, nutrient-dense base that stays fresh for hours. We love the nutty undertones of the grain combined with the sharp saltiness of feta and the earthy sweetness of roasted vegetables or fresh herbs. It provides a satisfying chew and a rainbow of colors that instantly elevates the visual appeal of your spread. It feels light and energizing, making it the perfect palate cleanser between richer, more indulgent components of your board.
Ingredients
- 1 cup uncooked quinoa
- 2 cups water or vegetable broth
- 1 cucumber, diced
- 1 cup cherry tomatoes, halved
- 1/2 red onion, finely minced
- 1/4 cup chopped parsley
- 1/4 cup olive oil and 2 tbsp lemon juice
How to make it
- First, rinse the quinoa thoroughly in a fine-mesh strainer under cold water to remove the natural saponin coating, which can taste bitter if left on.
- In a medium saucepan, combine the quinoa and water (or broth for more flavor) and bring to a rolling boil over high heat.
- Once boiling, turn the heat down to the lowest setting, cover with a tight-fitting lid, and simmer for exactly 15 minutes without lifting the lid.
- Remove from heat and let the quinoa sit, covered, for 5 minutes; this allows the steam to finish fluffing the grains perfectly.
- While the quinoa cools to room temperature, whisk together the olive oil, lemon juice, salt, and pepper in a large mixing bowl to create a bright, emulsified dressing.
- Fold the cooled quinoa, diced cucumber, tomatoes, onion, and parsley into the dressing until every grain is lightly coated, then let it chill for at least 30 minutes before serving to allow the flavors to marry.
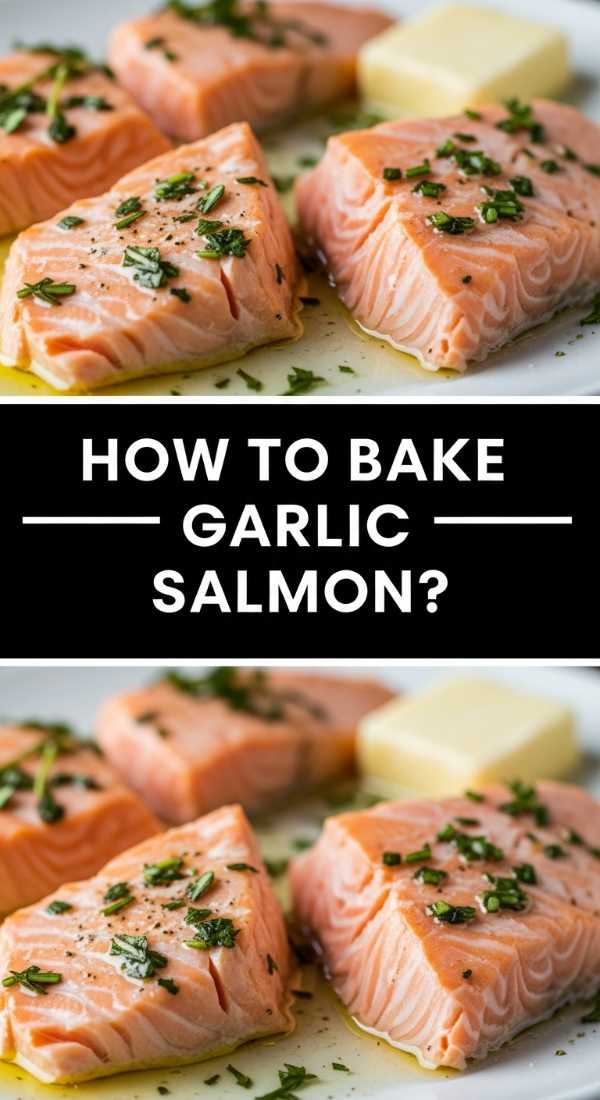
How to bake garlic salmon?

Why we love this
Garlic salmon is the ultimate crowd-pleaser because it manages to be both healthy and incredibly decadent at the same time. When baked correctly, the salmon flakes effortlessly under a fork, releasing the rich, buttery aroma of roasted garlic and fresh herbs. The edges get slightly caramelized and crisp, while the center remains tender and moist. It’s a sophisticated addition to a board that feels high-end but requires minimal effort, providing a hit of savory umami that pairs beautifully with crisp white wines.
Ingredients
- 1 large salmon fillet (approx 1.5 lbs)
- 4 cloves garlic, crushed
- 3 tbsp melted butter
- 1 tbsp honey
- 1 lemon, thinly sliced
- Fresh dill and parsley
How to make it
- Preheat your oven to 400°F (200°C) and line a large baking sheet with parchment paper or foil to prevent sticking and make cleanup easier.
- Pat the salmon fillet completely dry with paper towels; removing surface moisture is the key to getting a good texture and preventing the fish from steaming.
- In a small bowl, whisk together the melted butter, crushed garlic, honey, and a pinch of salt and pepper until well combined.
- Place the salmon on the baking sheet and brush the garlic butter mixture generously over the entire surface of the fish.
- Lay the lemon slices across the top of the fillet and bake for 12-15 minutes, depending on the thickness of the fish.
- Check for doneness by pressing a fork into the thickest part; if it flakes easily and the internal temperature reaches 145°F, remove it immediately and garnish with fresh dill.
How to make glazed tarts?

Why we love this
There is a whimsical, patisserie-style charm to glazed tarts that makes them a showstopper on any food board. We love the architectural beauty of the crisp, buttery shortcrust pastry holding a silky filling and topped with glistening, jewel-toned fruit. The glaze isn’t just for shine; it adds a delicate layer of sweetness that ties the tart together. Every bite is a journey of textures—from the snap of the crust to the soft fruit—making it the perfect bite-sized dessert for a grazing evening.
Ingredients
- 1 sheet pre-made puff pastry or tart dough
- 2 cups sliced seasonal fruit (peaches, berries, or kiwi)
- 1/4 cup apricot jam (for the glaze)
- 1 tbsp water
- Optional: 1 cup pastry cream or sweetened cream cheese
How to make it
- Preheat your oven to 400°F (200°C). If using puff pastry, roll it out slightly and cut into small squares or circles to create individual-sized tarts.
- Score a border about half an inch from the edge of each pastry piece and prick the center with a fork; this prevents the middle from rising too much while the edges get puffy and crisp.
- Bake the pastry shells for 10-12 minutes until they are a light golden brown, then remove from the oven and let them cool completely on a wire rack.
- If using a cream base, spread a thin layer into the cooled shells, then artfully arrange your sliced fruit on top in an overlapping pattern.
- In a small microwave-safe bowl, mix the apricot jam and water, then heat for 20 seconds and strain through a sieve to create a smooth, liquid glaze.
- Using a pastry brush, gently dab the warm glaze over the fruit until it shines, then let the tarts set for 10 minutes before serving.
How to grill juicy burgers?

Why we love this
A perfectly grilled burger is a masterclass in backyard hosting. We love that smoky, charred exterior that gives way to a center that is dripping with juice and packed with savory flavor. When placed on a food board alongside gourmet cheeses, caramelized onions, and artisan buns, the humble burger becomes a customizable gourmet experience. The sound of the sizzle on the grates and the smell of the charcoal create an instant atmosphere of summer nostalgia that guests find absolutely magnetic.
Ingredients
- 1.5 lbs ground beef (80/20 fat ratio is essential)
- 1 tsp kosher salt and 1/2 tsp black pepper
- 1 tsp garlic powder
- Brioche buns
- Cheese slices (cheddar, swiss, or provolone)
- Toppings: Lettuce, tomato, pickles, and special sauce
How to make it
- Start with cold ground beef and handle it as little as possible; overworking the meat results in a dense, tough burger rather than a tender, juicy one.
- Divide the meat into 6-ounce portions and gently shape them into patties that are about an inch thick, making sure to press a small indentation in the center with your thumb to keep them from bulging while cooking.
- Generously season both sides of the patties with salt, pepper, and garlic powder just before they hit the grill; seasoning too early can draw out moisture.
- Heat your grill to high (about 450°F) and oil the grates. Place the patties down and sear for 3-4 minutes without moving them to develop a deep brown crust.
- Flip the burgers once and immediately place a slice of cheese on each. Close the grill lid for the final 2-3 minutes of cooking to ensure the cheese melts perfectly.
- Toast your buns on the edge of the grill for 30 seconds, then let the meat rest for 2-3 minutes before serving to allow the juices to redistribute inside the patty.
How to mix fresh mojitos?

Why we love this
The mojito is the ultimate refresher, providing a bright, herbaceous counterpoint to salty or spicy board snacks. We love the way the muddled mint releases its essential oils, creating a fragrance that is instantly cooling. The sparkle of the soda water and the sharp citrus of the lime make it incredibly sessionable. Visually, the vibrant green leaves trapped in ice and crystal-clear liquid look stunning on a drink station next to your food board, signaling to your guests that the party has officially started.
Ingredients
- 2 oz white rum
- 1 oz fresh lime juice
- 2 tsp sugar or 1 oz simple syrup
- 6-8 fresh mint leaves
- Soda water to top
- Ice (crushed works best)
How to make it
- Place the mint leaves and sugar (or simple syrup) in a sturdy highball glass.
- Using a muddler, gently press down on the mint leaves and give a few light twists; the goal is to bruise the leaves to release their oils, not to tear them into tiny bitter pieces.
- Add the lime juice and stir briefly to help dissolve the sugar.
- Fill the glass three-quarters full with crushed ice, then pour the white rum over the top.
- Stir the mixture vigorously with a long spoon, pulling the muddled mint from the bottom up through the ice to distribute the flavor evenly.
- Top with a splash of soda water and garnish with a large, slapped mint sprig (slapping the mint against your hand wakes up the aroma right before you serve it).
How to cook spicy enchiladas?

Why we love this
Spicy enchiladas bring a cozy, bubbling warmth to any gathering, with their layers of soft tortillas, melted cheese, and rich, complex sauce. We love the deep, earthy heat of the chili-based sauce that seeps into every crevice of the filling. It’s a dish that feels incredibly generous and soulful. When served on a board, they offer a hearty, savory anchor that can be paired with cool dips like guacamole or sour cream to balance the heat, making it a favorite for those who love bold, punchy flavors.
Ingredients
- 12 corn tortillas
- 2 cups shredded cooked chicken or beef
- 2 cups red enchilada sauce
- 3 cups shredded Mexican blend cheese
- 1/2 cup diced green chilis
- Optional: Black beans or corn
How to make it
- Preheat your oven to 350°F (175°C). Spread a thin layer of enchilada sauce on the bottom of a large baking dish to keep the tortillas from sticking.
- To make the tortillas pliable and prevent them from cracking, lightly fry each one in a pan with a drop of oil for 5 seconds per side, or wrap the stack in a damp paper towel and microwave for 30 seconds.
- Dip a tortilla into the bowl of enchilada sauce, then lay it flat and fill with a handful of meat, a sprinkle of cheese, and a few green chilis.
- Roll the tortilla tightly and place it seam-side down in the prepared baking dish; repeat until the dish is packed tightly with rolls.
- Pour the remaining enchilada sauce over the top, ensuring every inch of the tortillas is covered (dry edges will become hard and crunchy in the oven).
- Top with the remaining cheese and bake for 20-25 minutes until the cheese is bubbling and slightly browned at the edges, then let rest for 5 minutes before serving.
How to make strawberry sorbet?

Why we love this
Strawberry sorbet is the pure essence of summer captured in a bowl. We love its vibrant, almost neon-pink color and the way it melts on the tongue with a clean, intense burst of fruit flavor. Unlike heavy ice creams, sorbet is light and refreshing, acting as the perfect sweet finish to a long grazing session. It’s naturally dairy-free, making it an inclusive option for guests with dietary restrictions, and its icy, smooth texture provides a delightful contrast to crunchy board elements like nuts or crackers.
Ingredients
- 1 lb frozen strawberries
- 1/2 cup honey or agave nectar
- 1 tsp lemon juice
- 1/4 cup warm water (use only if needed for blending)
How to make it
- Place your frozen strawberries into a high-powered blender or food processor. Using frozen fruit is essential as it creates the instant ‘soft-serve’ texture.
- Add the honey and lemon juice. The lemon juice is critical as it balances the sweetness and makes the strawberry flavor ‘pop’.
- Pulse the mixture several times to break down the large chunks of fruit.
- Turn the blender to a medium-high speed and process until the mixture is completely smooth. If the blender struggles, add warm water one tablespoon at a time through the top until the fruit begins to move freely.
- Once the consistency is smooth and uniform, you can serve it immediately as a soft-serve style sorbet.
- For a firmer, scoopable texture, transfer the mixture to a shallow metal container and freeze for 2-3 hours before serving with a sprig of fresh mint.
How to roast seasoned vegetables?
[IMAGE_10]
Why we love this
Roasted vegetables are the secret weapon of a beautiful food board, offering caramelized sweetness and earthy depth that you just can’t get from raw veggies. We love the way high heat transforms humble carrots, broccoli, or peppers into tender, flavor-packed morsels with crispy, browned edges. They add a sophisticated, rustic aesthetic to your presentation and provide a healthy, high-fiber component that feels just as indulgent as the heavier items. They are the ultimate versatile side that absorbs herbs and spices beautifully.
Ingredients
- 4 cups mixed vegetables (bell peppers, zucchini, carrots, red onion)
- 3 tbsp olive oil
- 1 tsp dried oregano and 1 tsp dried thyme
- 1/2 tsp smoked paprika
- Salt and pepper to taste
How to make it
- Preheat your oven to 425°F (220°C). High heat is necessary to achieve caramelization (the Maillard reaction) without turning the vegetables into mush.
- Cut all your vegetables into uniform sizes; this ensures they all cook at the same rate. Keep root vegetables like carrots slightly smaller than softer veggies like zucchini.
- In a large bowl, toss the vegetables with olive oil, oregano, thyme, smoked paprika, salt, and pepper until every piece is glistening and evenly coated.
- Spread the vegetables out on a large baking sheet in a single layer. Crucial tip: do not crowd the pan! If the veggies are touching too much, they will steam rather than roast and won’t get those crispy edges.
- Roast for 20-25 minutes, tossing them halfway through the cooking time with a spatula to ensure even browning.
- Remove when the vegetables are tender when pierced with a fork and have developed distinct charred spots, then serve warm or at room temperature as part of your board.
Conclusion: The Art of the Easy Invite
Hosting doesn’t have to be a performance; it should be an invitation into your life. By mastering these simple food board staples, you’re not just serving food—you’re creating an environment where people feel comfortable to linger, talk, and enjoy. The beauty of the board is its flexibility. Mix and match these recipes based on your mood, the season, or what’s in your pantry. Remember, the ‘Lazy Host’ isn’t actually lazy—they’re just smart enough to know that the best memories are made when the host is actually present at the party, not hidden away in the kitchen. So, grab a board, start prepping, and enjoy the ease of a viral-worthy spread!