
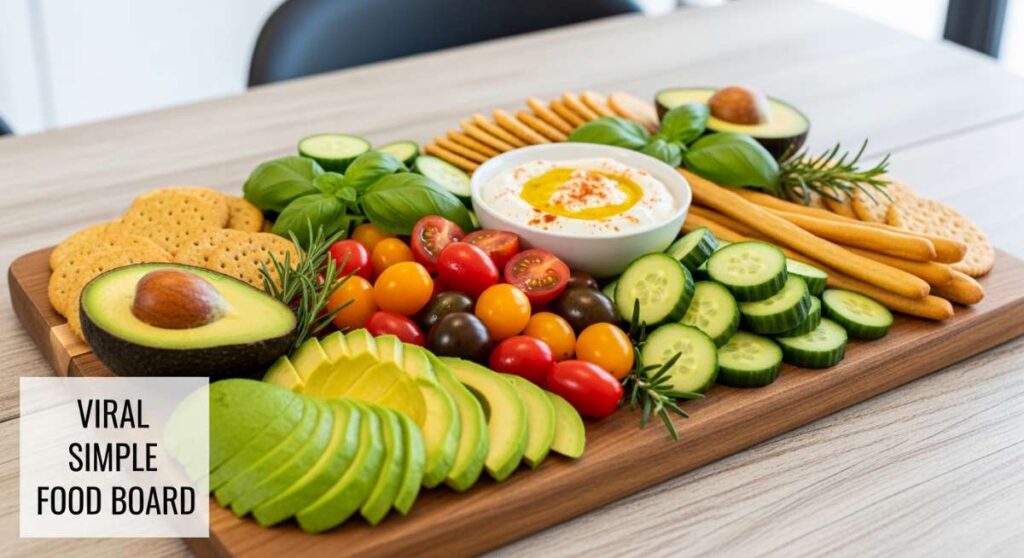
How to Make the Viral Food Board Everyone is Obsessed With
There is something undeniably magical about the way a shared meal can turn a regular afternoon into a core memory. We’ve all seen those stunning, overflowing boards on our feeds—the ones that look like a Dutch still-life painting brought to life with vibrant colors and textures that practically jump off the screen. For me, creating a viral-style food board isn’t just about the aesthetics; it’s about the slow, intentional process of gathering seasonal flavors and arranging them in a way that says, ‘Stay a while, there’s plenty for everyone.’
Whether you are hosting a sun-drenched garden party or just want to treat your family to a weekend spread that feels like a celebration, the secret lies in the variety. A truly obsession-worthy board balances the sweet, the savory, the crunchy, and the creamy. It’s a tapestry of flavors that invites people to graze, chat, and linger. Today, I’m pulling back the curtain on every single component you need to build the ultimate seasonal board, from the nectar that brings the birds to your garden to the squishy butter that makes every bite of bread feel like a luxury.
How to make bird nectar?

Why we love this
There is nothing quite as serene as sitting on your porch with a glass of iced tea and watching tiny, iridescent hummingbirds flit through the air. Making your own nectar is a beautiful way to connect with the local ecosystem, ensuring your garden becomes a sanctuary for these delicate creatures. The simple shimmer of the clear liquid as it catches the morning light adds an element of life and movement to your outdoor dining space that no decoration can match. It’s a quiet, rhythmic act of care that brings a sense of wonder and gentle energy to your home environment.
Ingredients
- 1 cup granulated white sugar
- 4 cups filtered water
- Extra water for boiling
How to make it
- Begin by bringing a small pot of filtered water to a rolling boil on your stovetop. This step is crucial for ensuring the sugar dissolves completely and for neutralizing any impurities or bacteria in the water that could harm the birds.
- In a heat-safe glass measuring cup, combine 1 cup of granulated white sugar with 4 cups of the boiling water. Avoid using honey, brown sugar, or artificial sweeteners, as these can be toxic or cause fungal growth for hummingbirds.
- Stir the mixture vigorously with a clean spoon until the liquid is crystal clear and no sugar granules remain visible at the bottom of the container.
- Allow the nectar to cool completely at room temperature. Placing hot nectar in a feeder can warp the plastic or cause the liquid to ferment too quickly.
- Once cooled, fill your hummingbird feeders. Store any leftover nectar in a sealed glass jar in the refrigerator for up to one week. Remember to clean and refill your feeders every 2-3 days to keep the nectar fresh and safe.
How to bake spring cookies?

Why we love this
Spring cookies are like a love letter to the changing seasons, capturing the lightness of a breeze and the delicate scent of the first blooms. Imagine a soft, buttery crumb that practically melts on your tongue, infused with the zesty brightness of lemon and the subtle, earthy floral notes of culinary lavender. These cookies aren’t just a treat; they are a sensory experience, decorated with pastel glazes that mimic the soft hues of a spring sunrise. They bring a whimsical, elegant touch to any food board, bridging the gap between a simple snack and a sophisticated dessert.
Ingredients
- 2 1/2 cups all-purpose flour
- 1 cup unsalted butter, softened
- 3/4 cup granulated sugar
- 1 large egg
- 1 tsp vanilla extract
- Zest of 2 lemons
- 1 tbsp dried culinary lavender, crushed
- 1/2 tsp baking powder
- 1/4 tsp salt
How to make it
- In a large mixing bowl, cream together the softened butter and granulated sugar using a hand mixer or stand mixer on medium-high speed. Continue beating for about 3-4 minutes until the mixture is pale, light, and fluffy, which ensures a delicate cookie structure.
- Add the egg, vanilla extract, lemon zest, and crushed lavender. Mix until fully incorporated, scraping down the sides of the bowl to ensure even distribution of the aromatics.
- In a separate bowl, whisk together the flour, baking powder, and salt. Gradually add the dry ingredients to the wet mixture on low speed, mixing just until a soft dough forms; overmixing will result in a tough cookie.
- Wrap the dough in plastic wrap and chill in the refrigerator for at least 1 hour. This firms up the butter, preventing the cookies from spreading too much in the oven.
- Preheat your oven to 350°F (175°C) and line a baking sheet with parchment paper. Roll the dough into 1-inch balls and place them 2 inches apart on the sheet.
- Bake for 10-12 minutes, or until the edges are just barely golden but the centers still look soft. Let them cool on the pan for 5 minutes before transferring to a wire rack. This allows the structure to set perfectly while maintaining that signature soft bite.
How to cook summer pasta?

Why we love this
Summer pasta is the epitome of effortless elegance, focusing on the vibrant, sun-ripened bounty of the garden. The aroma of fresh basil being torn by hand, the sight of heirloom cherry tomatoes bursting with juice, and the silky coating of high-quality olive oil create a dish that feels like a warm embrace. It’s light enough for a humid evening yet deeply satisfying, offering a perfect balance of acidity, salt, and herbaceous freshness. Eating this pasta feels like sitting at an outdoor bistro in the heart of the Mediterranean, where time slows down and every bite is a celebration of the present moment.
Ingredients
- 1 lb linguine or spaghetti
- 2 cups cherry tomatoes, halved
- 3 cloves garlic, thinly sliced
- 1/2 cup extra virgin olive oil
- 1/2 tsp red pepper flakes
- 1 cup fresh basil leaves, torn
- 1/2 cup grated Parmesan cheese
- Flaky sea salt and cracked black pepper
How to make it
- Bring a large pot of heavily salted water to a boil. Use about 1 tablespoon of salt per gallon of water—it should taste like the sea to properly season the pasta from the inside out.
- Cook the pasta according to the package instructions until it is just ‘al dente,’ meaning it still has a slight resistance when bitten. Before draining, reserve 1 cup of the starchy pasta water.
- While the pasta cooks, heat the olive oil in a large skillet over medium-low heat. Add the sliced garlic and red pepper flakes, sautéing gently for 2-3 minutes until the garlic is fragrant and translucent, but not browned.
- Increase the heat to medium and add the halved cherry tomatoes. Cook for 5-7 minutes, stirring occasionally, until the tomatoes begin to soften and release their juices, creating a rustic sauce base.
- Add the cooked pasta directly into the skillet with the tomatoes. Pour in half of the reserved pasta water and toss vigorously with tongs. The starch in the water will emulsify with the oil to create a silky, glossy sauce that clings to every strand.
- Remove from heat, fold in the fresh basil and Parmesan cheese, and season with sea salt and black pepper. Serve immediately while the flavors are at their peak.
How to prepare cookout sides?

Why we love this
No outdoor gathering is complete without the unsung heroes: the cookout sides. These dishes provide the necessary crunch, tang, and creaminess that balance the smoky flavors of the grill. We love them because they are nostalgic and comforting, yet they offer endless opportunities for a modern twist. From a zesty, vinegar-based slaw that cuts through richness to a charred corn salad that tastes like pure sunshine, these sides are the foundational elements of a communal feast. They invite guests to heap their plates high with a variety of textures, making the meal feel abundant and thoughtfully curated.
Ingredients
- 4 cups shredded cabbage (red and green mix)
- 1 cup shredded carrots
- 1/2 cup mayonnaise
- 2 tbsp apple cider vinegar
- 1 tbsp honey
- 1 tsp celery seed
- Salt and pepper to taste
- 4 ears of corn, husked
- 1/4 cup chopped cilantro
- Lime wedges for serving
How to make it
- To make the Perfect Slaw: In a large bowl, whisk together the mayonnaise, apple cider vinegar, honey, celery seed, salt, and pepper until smooth and creamy.
- Add the shredded cabbage and carrots to the dressing. Toss thoroughly to ensure every ribbon of vegetable is coated. Cover and refrigerate for at least 30 minutes before serving; this allows the flavors to meld and the cabbage to soften slightly while retaining its crunch.
- To make Charred Corn Salad: Preheat your grill to medium-high heat. Place the husked corn directly on the grates and grill for 8-10 minutes, turning occasionally, until the kernels are tender and show beautiful charred spots.
- Once the corn is cool enough to handle, use a sharp knife to cut the kernels off the cob into a medium bowl.
- Toss the charred kernels with chopped cilantro, a squeeze of fresh lime juice, and a pinch of salt. This provides a smoky, bright contrast to the creamy slaw and serves as a vibrant addition to your food board.
How to make summer desserts?

Why we love this
Summer desserts are all about honoring the peak of fruit season with minimal fuss and maximum flavor. We adore the rustic charm of a fruit galette or a simple berry crumble, where the juices bubble over and the pastry is golden and flaky. The scent of baking peaches or macerating strawberries fills the kitchen with a sweet, heady perfume that signals the height of the year. These desserts are meant to be eaten slightly warm with a dollop of cold, whipped cream, creating a delightful temperature contrast that makes the experience feel truly indulgent and celebratory of nature’s sweetness.
Ingredients
- 4 cups fresh berries (blueberries, raspberries, blackberries)
- 1/2 cup granulated sugar
- 1 tbsp lemon juice
- 1 tbsp cornstarch
- 1 sheet refrigerated pie crust
- 1 egg (for egg wash)
- 1 tbsp turbinado sugar
How to make it
- Preheat your oven to 400°F (200°C) and line a baking sheet with parchment paper. A higher temperature ensures the pastry crisps up quickly without the fruit becoming too mushy.
- In a large bowl, gently toss the fresh berries with the granulated sugar, lemon juice, and cornstarch. The cornstarch is vital as it thickens the fruit juices into a jammy consistency during baking.
- Unroll the pie crust onto the prepared baking sheet. Pile the berry mixture into the center of the crust, leaving a 2-inch border all the way around the edge.
- Fold the edges of the crust over the berries, pleating the dough as you go to create a rustic, circular shape. The center of the fruit should still be exposed.
- Whisk the egg with a teaspoon of water to create an egg wash. Brush the crust liberally with the wash and sprinkle with turbinado sugar for a professional, crunchy finish.
- Bake for 25-30 minutes, or until the crust is deeply golden brown and the fruit filling is bubbling thick. Allow it to cool for at least 15 minutes before slicing so the filling sets properly.
How to make squishy butter?

Why we love this
If there is one thing that has taken the internet by storm, it’s the concept of ‘squishy,’ ultra-spreadable butter. This isn’t just a condiment; it’s an art form. By whipping high-quality butter with herbs, honey, or sea salt, you transform it into a light, airy cloud that glides over warm bread with ease. The texture is velvety and luxurious, and the visual of a beautifully swirled butter mound on a board is incredibly inviting. It adds a touch of gourmet flair to even the simplest baguette, making every guest feel like they are dining at a high-end creamery.
Ingredients
- 1 cup (2 sticks) high-quality salted grass-fed butter, softened to room temperature
- 2 tbsp heavy cream
- 1 tbsp honey (optional for sweet)
- 1 tbsp fresh thyme or rosemary, finely chopped (optional for savory)
- Maldon sea salt for finishing
How to make it
- Place the softened butter into the bowl of a stand mixer fitted with the whisk attachment (or use a hand mixer). It is essential that the butter is truly room temperature—soft to the touch but not melting—to achieve the right volume.
- Begin whipping the butter on medium speed for 2 minutes. Increase the speed to high and whip for another 3-5 minutes. The butter should transition from a yellow color to a pale, almost white shade and become significantly fluffier.
- Slowly drizzle in the heavy cream while continuing to whisk. The cream adds moisture and ensures the ‘squishy,’ spreadable texture remains even after being slightly chilled.
- Add your choice of honey or chopped herbs and fold them in gently with a spatula to maintain the airiness you’ve created.
- Transfer the butter to a shallow bowl or a parchment-lined board. Use the back of a spoon to create deep swirls and ridges, which not only looks beautiful but provides little pockets for extra salt or honey to settle.
- Sprinkle generously with flaky Maldon sea salt just before serving. This adds a crucial textural crunch that contrasts perfectly with the soft butter.
How to use sourdough discard?

Why we love this
There is a deep satisfaction in turning something that might otherwise be wasted into a delicious, tangy component of your food spread. Sourdough discard offers a complex, fermented depth of flavor that you simply can’t get from standard flour. We love using discard to make thin, crispy crackers or savory pancakes because they provide a sophisticated, sour note that pairs perfectly with rich cheeses and the ‘squishy’ butter we just made. It feels like a culinary secret, a way to add artisanal character to your board while practicing sustainable, zero-waste kitchen habits.
Ingredients
- 1 cup sourdough discard (unfed)
- 1 cup all-purpose flour
- 1/4 cup unsalted butter, melted
- 1/2 tsp sea salt
- 2 tsp dried herbs (like de provence or rosemary)
- Extra sea salt for topping
How to make it
- In a medium bowl, combine the sourdough discard, melted butter, and dried herbs. Stir until well combined. The discard should be at room temperature to make mixing easier.
- Gradually add the flour and sea salt, stirring until a cohesive dough forms. If the dough is too sticky, add a tablespoon more of flour until it can be handled without sticking to your fingers.
- Divide the dough into two balls, wrap them in plastic, and let them rest in the refrigerator for at least 30 minutes. This relaxes the gluten, making the dough much easier to roll out thinly.
- Preheat your oven to 350°F (175°C). Place one ball of dough on a large sheet of parchment paper and roll it out as thin as possible—ideally about 1/16th of an inch. The thinner the dough, the crispier the cracker.
- Transfer the parchment and dough to a baking sheet. Brush the top lightly with a bit of water or oil and sprinkle with extra sea salt. Use a pizza cutter to score the dough into squares or diamonds.
- Bake for 15-20 minutes, or until the crackers are golden brown and firm to the touch. Let them cool completely on the pan to reach maximum crunch before breaking them along the scored lines.
How to host spring brunch?

Why we love this
Spring brunch is the ultimate occasion for a viral food board. It’s the time when we transition from the heavy, comforting foods of winter into the bright, fresh energy of the new season. We love hosting this meal because it’s inherently relaxed; it bridges the gap between breakfast and lunch, allowing for a mix of sweet pastries, savory egg dishes, and crisp greens. The table becomes a canvas of soft linens, fresh-cut tulips, and platters filled with smoked salmon, vibrant radishes, and soft cheeses. It’s a moment to toast to new beginnings with a mimosa in hand and the sun streaming through the window.
Ingredients
- 1 dozen large eggs
- 1 cup heavy cream
- 2 cups fresh spinach
- 1 cup crumbled feta cheese
- 1/2 cup sliced radishes
- Assorted pastries and fresh fruit
- Prosciutto or smoked salmon
How to make it
- To create the centerpiece Savory Quiche: Preheat your oven to 375°F (190°C). Whisk the 12 eggs with 1 cup of heavy cream until completely smooth and pale. Season generously with salt and pepper.
- In a pre-baked pie shell or a parchment-lined tart pan, layer the fresh spinach and crumbled feta. Pour the egg mixture over the top, ensuring it fills all the gaps.
- Bake for 35-45 minutes until the center is set but still has a slight jiggle, and the top is golden. Let it cool for at least 20 minutes; quiche is best served warm or at room temperature for the best texture.
- While the quiche bakes, prepare the ‘Board’ elements: Wash and thinly slice the radishes and arrange them in a fan shape. Roll the prosciutto or fold the smoked salmon into ribbon-like shapes.
- Assemble the board by placing the quiche in the center and surrounding it with clusters of fresh berries, sliced pastries, and the prepared meats and vegetables.
- Add small bowls of jam, honey, and the ‘squishy’ butter to create interactive elements for your guests. Finish the look with a few sprigs of fresh mint or edible flowers.
How to cook summer soups?

Why we love this
When the temperature rises, we swap steaming bowls for refreshing, chilled summer soups. These are a revelation—vibrant, cold, and packed with the concentrated flavor of raw vegetables. Gazpacho, for instance, is like a liquid garden, offering a cooling zing of vinegar and the crunch of finely diced cucumbers and peppers. We love these soups because they are incredibly hydrating and light, making them a perfect addition to a heavy food board as a palate cleanser. The bright red or green hues of the soup in small glass jars add a stunning pop of color and a sophisticated touch to your spread.
Ingredients
- 6 large ripe tomatoes, cored and chopped
- 1 cucumber, peeled and chopped
- 1 red bell pepper, seeded and chopped
- 1/2 small red onion, chopped
- 2 cloves garlic, minced
- 2 tbsp sherry vinegar
- 1/4 cup extra virgin olive oil
- Salt and pepper to taste
How to make it
- Place the chopped tomatoes, cucumber, bell pepper, red onion, and garlic into a high-powered blender. If your blender is smaller, do this in two batches to ensure a smooth consistency.
- Add the sherry vinegar and a generous pinch of salt and pepper. Blend on high speed for 1-2 minutes until the soup is completely liquefied and smooth.
- While the blender is running on low, slowly stream in the extra virgin olive oil. This creates a stable emulsion, giving the soup a creamy, velvety mouthfeel without the need for dairy.
- Pour the soup through a fine-mesh sieve into a large glass pitcher. This step is optional but highly recommended for a truly ‘viral’ gourmet texture, as it removes any remaining bits of skin or seeds.
- Chill the soup in the refrigerator for at least 4 hours, or ideally overnight. Summer soups must be served ice-cold to be truly refreshing.
- To serve on a board, pour the soup into small individual glasses or shot glasses. Garnish each with a tiny drizzle of olive oil and a single leaf of basil or a slice of cucumber.
How to bake spring cake?
[IMAGE_10]
Why we love this
A spring cake is the crowning glory of any seasonal board, a towering testament to the beauty of the season. We love a lemon poppyseed or a classic carrot cake for this time of year, finished with a crown of silky cream cheese frosting and a scattering of edible petals. The texture should be moist and tender, with a bright flavor profile that feels light rather than heavy. It’s more than just a dessert; it’s a centerpiece that demands attention, inviting everyone to gather around for one final, sweet indulgence. The sight of a perfectly sliced cake, revealing layers of soft sponge, is the ultimate ‘Instagrammable’ moment.
Ingredients
- 2 1/2 cups cake flour
- 1 1/2 cups granulated sugar
- 1 tbsp baking powder
- 1/2 tsp salt
- 3/4 cup unsalted butter, softened
- 1 cup whole milk
- 1 tbsp lemon zest
- 4 large egg whites
- 1 tsp vanilla extract
How to make it
- Preheat your oven to 350°F (175°C) and grease and flour two 8-inch round cake pans. Using cake flour instead of all-purpose flour is the secret to a professional, fine-crumb texture.
- In a large bowl, whisk together the cake flour, sugar, baking powder, and salt. Add the softened butter and half of the milk. Beat on low speed until the dry ingredients are moistened, then increase to medium speed and beat for 2 minutes to develop the cake’s structure.
- In a separate bowl, whisk the egg whites with the remaining milk, lemon zest, and vanilla extract.
- Add the egg white mixture to the batter in three separate additions, beating for 30 seconds after each addition to fully incorporate the liquid while keeping the batter light and airy.
- Divide the batter evenly between the prepared pans and smooth the tops with a spatula. Tap the pans gently on the counter to release any large air bubbles.
- Bake for 25-30 minutes, or until a wooden skewer inserted into the center comes out clean. Allow the cakes to cool in the pans for 10 minutes before inverting them onto wire racks to cool completely.
- Frost with a light cream cheese frosting and decorate with fresh pansies or lavender sprigs for a breathtaking spring look that will be the star of your food board.
Conclusion
Building the viral food board of your dreams is about more than just following recipes; it’s about the joy of curation and the love of sharing good food with your favorite people. From the first pour of bird nectar in the garden to the final slice of spring cake, every element we’ve covered adds a layer of story and flavor to your table. I hope this guide inspires you to slow down, head to the farmer’s market, and start creating your own masterpiece. Don’t forget to take a photo before everyone dives in—though with flavors this good, it won’t stay pretty for long! Happy hosting!