
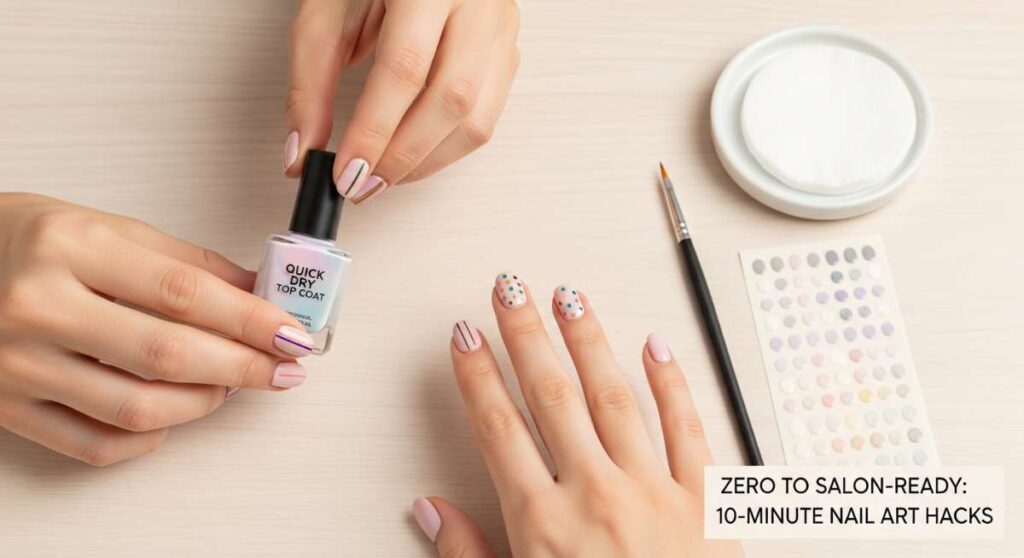
Hi loves! I know exactly how it feels when your schedule is a whirlwind and you look down at your hands only to realize your nails haven’t had a moment of love in weeks. There’s something so grounding about a fresh manicure—it’s like a tiny, colorful hug for your fingertips that says, ‘I’ve got this.’ I wanted to create a space today where we can slow down, even if just for ten minutes, to reclaim that bit of everyday magic together.
We don’t need a professional studio or hours of silence to feel beautiful. These little hacks are my gift to you—gentle, easy, and designed for the busiest hearts. Whether you’re sipping your morning tea or catching a quiet moment before bed, let’s turn your home into a sanctuary of creativity. You deserve this soft pause in your day, my sweet friends.
Tiny Hearts for Minimalist Souls
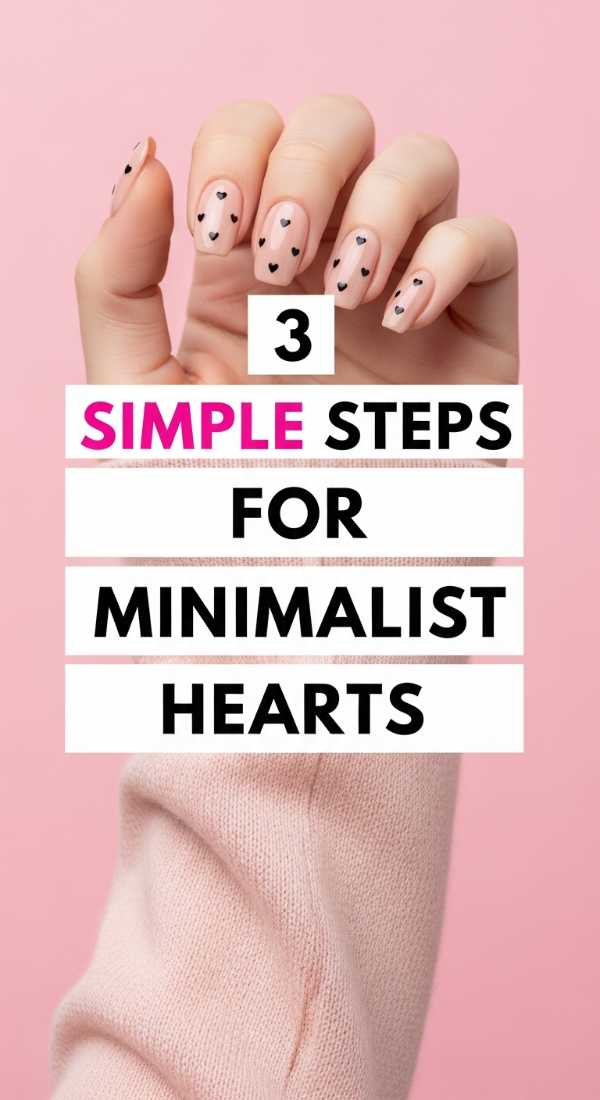
Why to love these Nails:
These tiny hearts are the sweetest whisper of self-love. They are subtle enough for the office but carry a warmth that makes you smile every time you type or reach for your coffee. It is minimalism with a heartbeat.
Essential Items:
- Pale pink or nude base polish
- Red or white accent polish
- A simple toothpick or dotting tool
How to Prepare:
- Apply your favorite sheer base coat and let it dry completely.
- Dip your toothpick into the accent color and place two tiny dots side-by-side.
- Gently drag the polish from each dot downward to meet in a ‘V’ shape to form the heart.
Budget Range
- Essie Ballet Slippers ($10.00)
- Sally Hansen Insta-Dri Red ($6.00)
- Wooden Toothpicks ($1.50)
4 Quick Ways to Style French Tips
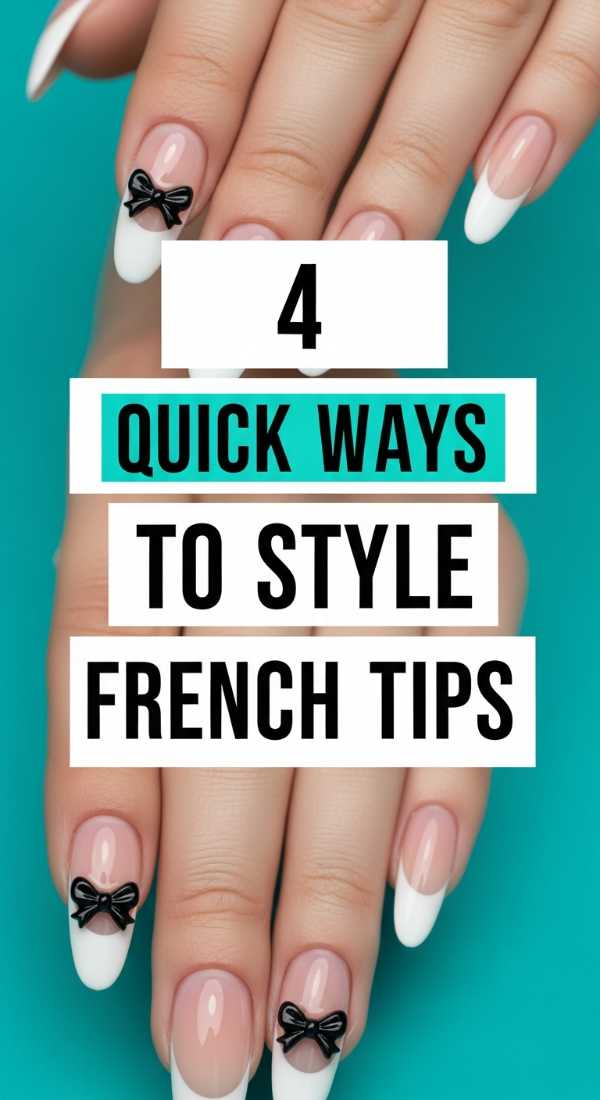
Why to love these Nails:
The French manicure is a timeless classic that makes any hand look instantly elongated and elegant. By adding these quick modern twists, you bring a fresh, cloud-soft energy to a traditional look without the stress of perfect lines.
Essential Items:
- Clear top coat
- White or pastel polish
- Rubber bands or French tip stickers
- Small makeup sponge
How to Prepare:
- The Rubber Band Method: Tie a rubber band in the middle and tension it over your nail to create a straight guide for the tip.
- The Sponge Gradient: Dab a bit of white polish onto a sponge and tap the very edge of your nail for a soft, ombré French look.
- The Sideways Swipe: Brush the polish from the left side to the middle, then the right side to the middle for a crisp peak.
- The Sticker Guide: Apply a curved reinforcement sticker, paint the tip, and peel while wet for a perfect arc.
Budget Range
- Orly White Tips ($9.50)
- Latex-free Makeup Sponges ($4.00)
- Generic Stationery Reinforcement Stickers ($2.00)
5 Easy Steps for Floral Spring Nails
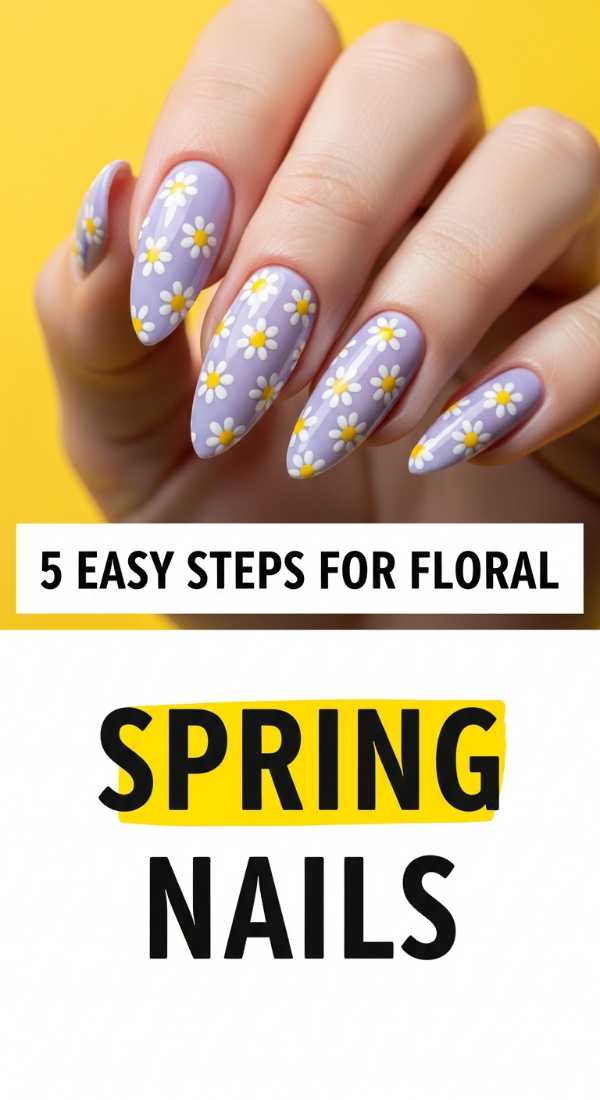
Why to love these Nails:
There is nothing quite like the feeling of spring blooming right at your fingertips. These floral designs are intentionally imperfect, mimicking the organic beauty of a wildflower meadow—perfect for beginners who want a professional result.
Essential Items:
- Meadow green polish
- Yellow and white polishes
- A bobby pin (the rounded end is perfect!)
How to Prepare:
- Paint your nails with a soft green base to represent the grass.
- Using the end of a bobby pin, place one yellow dot in the center of where you want your flower.
- Clean the pin and place five white dots around the yellow center to create petals.
- Use a toothpick to add a tiny green line for a stem if you’re feeling extra creative.
- Seal the garden with a glossy top coat.
Budget Range
- OPI ‘I’m On a Sushi Roll’ Green ($11.50)
- Revlon Core Nail Enamel ($5.00)
- Bobby Pins ($2.00)
6 Steps for the Perfect Almond Shape

Why to love these Nails:
The almond shape is the ultimate ‘chic’ silhouette. It softens the look of your hands and provides a sophisticated canvas for any art. It’s like a gentle contour for your fingers, making them look long and slender.
Essential Items:
- Nail clippers
- 180-grit nail file
- Buffer block
- Cuticle oil
How to Prepare:
- Find the exact center point of your nail tip and mark it mentally.
- Use clippers to trim the sides of the nail toward that center point at an angle.
- File from the side walls toward the center in a long, fluid upward motion.
- Round out the sharp tip until it resembles the shape of an actual almond.
- Use a buffer to smooth any jagged edges around the perimeter.
- Massage cuticle oil in to give that salon-fresh glow.
Budget Range
- Tweezerman Stainless Steel Clippers ($12.00)
- Glass Nail File ($8.00)
- CUCCIO Revitalize Cuticle Oil ($7.00)
3 Methods to Paint Plaid Nail Patterns
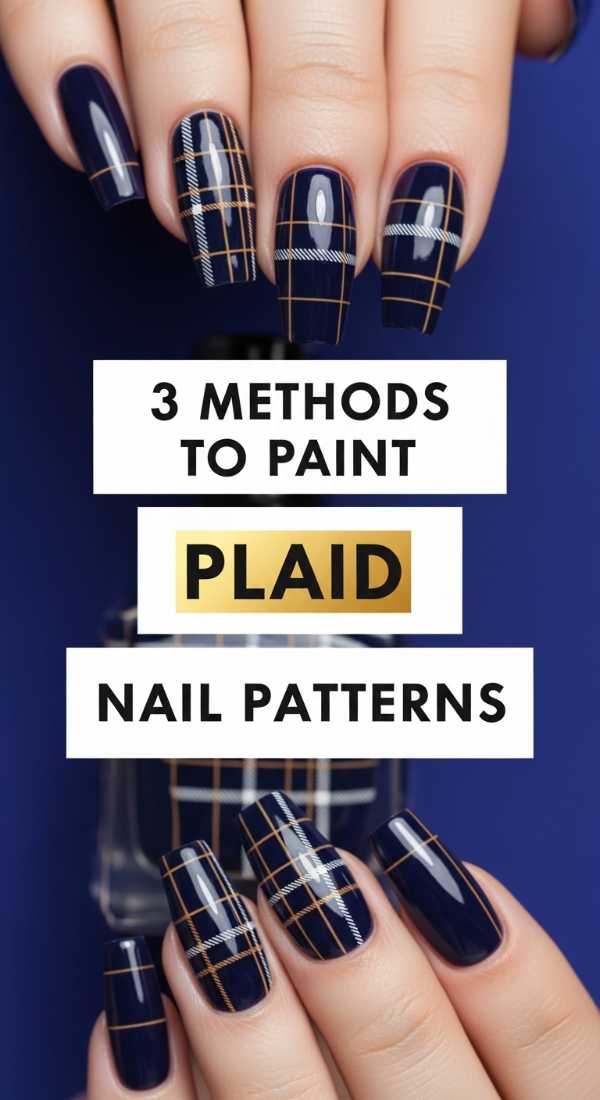
Why to love these Nails:
Plaid is like a cozy flannel shirt for your nails. It adds a layer of texture and warmth to your look, and surprisingly, you don’t need a steady hand of an artist to master these geometric charms.
Essential Items:
- Striping tape or a very thin brush
- Two contrasting polish colors
- Matte top coat
How to Prepare:
- The Tape Method: Lay thin strips of tape in a grid, paint over them, and peel to reveal clean negative-space lines.
- The Dry Brush Method: Wipe most of the polish off your brush and swipe horizontally and vertically for a rustic, ‘distressed’ plaid.
- The Striper Pen: Use a dedicated nail art pen to draw two vertical lines and one horizontal line for a minimalist grid.
Budget Range
- Nail Art Striping Tape Set ($5.00)
- Beetles Nail Art Liners ($12.99)
- Zoya Matte Velvet Top Coat ($10.00)
7 Tips for Vibrant Pastel Spring Designs
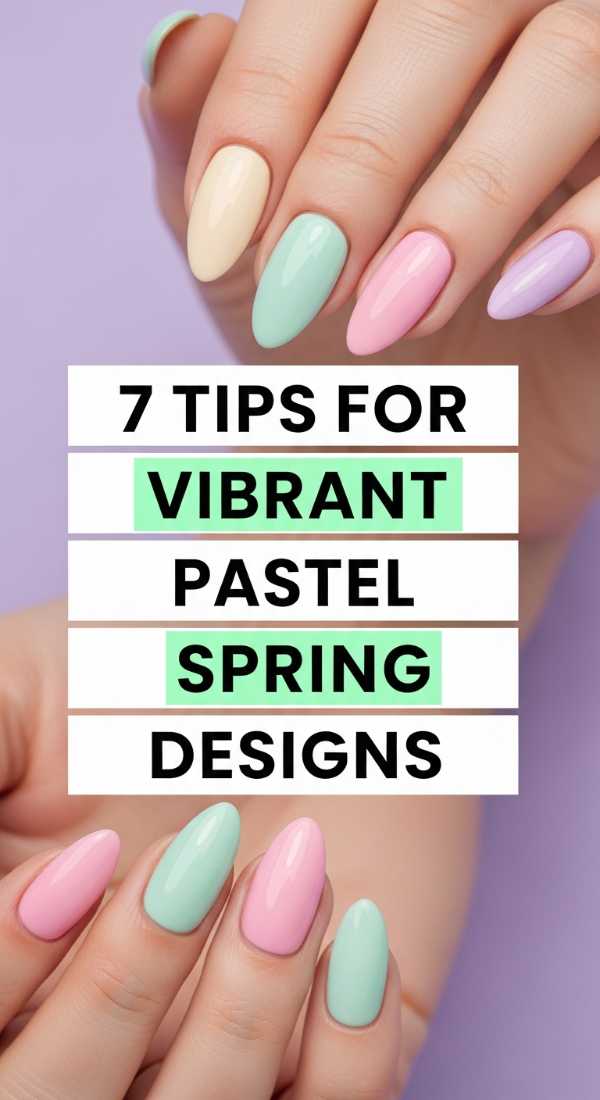
Why to love these Nails:
Pastels are the soft whispers of the soul. They are bright enough to be cheerful but muted enough to stay sophisticated. Mastering these ensures your spring look is always ‘on-trend’ and perfectly dreamy.
Essential Items:
- White base polish (the secret weapon!)
- A set of pastel shades (lavender, mint, lemon)
- Matte top coat
How to Prepare:
- Always start with a white base coat to make the pastel colors pop without needing five layers.
- Try a different pastel color on each finger for a ‘Skittles’ mani.
- Use a matte top coat to give the pastels a modern, ‘sugared’ appearance.
- Dot a contrasting pastel in the corner of each nail for a ‘polka-pastel’ vibe.
- Mix two pastels on a plate to create a custom peach or lilac shade.
- Apply very thin layers to avoid the ‘chalky’ look common with light colors.
- Clean your edges with a brush dipped in remover for a sharp, high-end finish.
Budget Range
- China Glaze Pastel Collection ($7.50 each)
- Wet n Wild Wild Shine White ($1.50)
- Pure Acetone ($3.00)
4 Easy Ways to do Coffee Bean Art
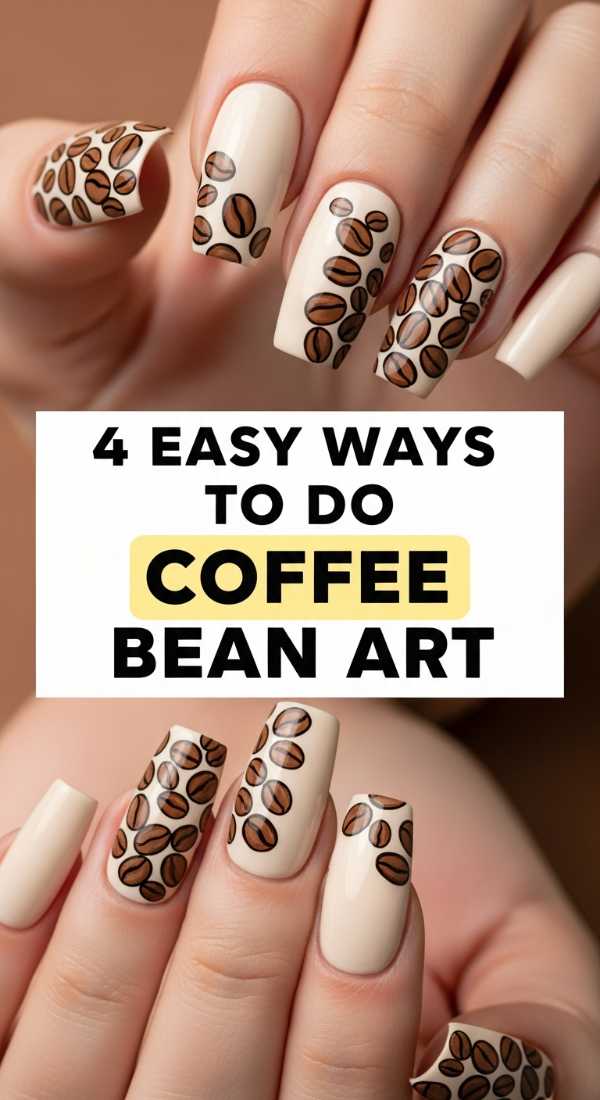
Why to love these Nails:
For my fellow caffeine lovers, this is the ultimate cozy aesthetic. It’s warm, brown-toned, and feels like a rainy afternoon spent in a bookstore. It’s the perfect ‘brown girl’ aesthetic that works on every skin tone.
Essential Items:
- Deep espresso brown polish
- Light latte tan polish
- Toothpick
How to Prepare:
- The Classic Bean: Paint a small oval of espresso brown, then use a toothpick to drag a tiny line through the center.
- The Spilled Latte: Swirl a drop of white into a wet tan base for a ‘marbled milk’ effect.
- The Minimalist Speckle: Use a toothbrush to flick tiny brown ‘coffee grounds’ over a nude base.
- The Ombré Roast: Paint each finger a different shade of brown, from cream to dark roast.
Budget Range
- Expressie ‘Cold Brew’ Brown ($9.00)
- E.L.F. Cosmetics Nude Polish ($3.00)
- Disposable Toothbrushes ($1.00)
5 Hacks for Professional Glitter Nail Designs
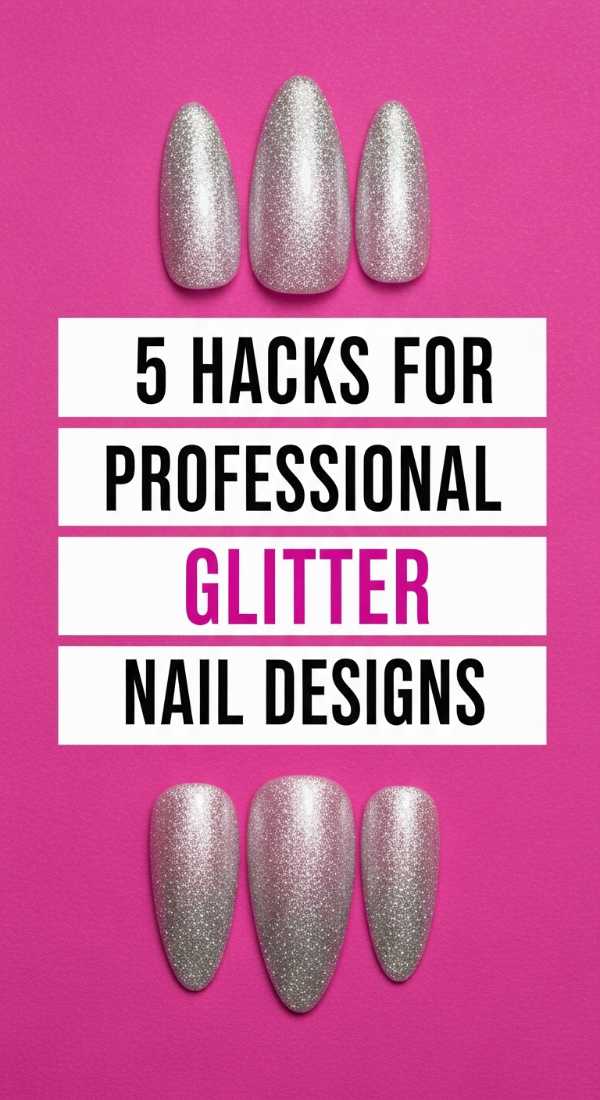
Why to love these Nails:
Glitter shouldn’t feel messy or childish—it should feel like stardust. These hacks help you achieve that dense, expensive-looking sparkle without the frustration of thin, watery glitter polishes.
Essential Items:
- Chunky glitter polish
- Cosmetic sponge
- Liquid latex or Elmer’s glue
How to Prepare:
- Paint liquid latex around your skin to catch the glitter mess before you start.
- Dab the glitter polish directly onto a sponge first; the sponge absorbs the clear base, leaving more glitter behind.
- Press the sponge onto the nail for an instantly opaque, high-impact sparkle.
- Use a ‘glitter placement’ technique by picking out individual sequins with a toothpick for a custom look.
- Apply two coats of top coat to smooth out the ‘gritty’ texture of the glitter.
Budget Range
- ILNP Holographic Glitter ($12.50)
- Liquid Palisade/Latex Barrier ($10.00)
- Generic Wedge Sponges ($3.00)
6 Unique Ideas for Matte Almond Nails
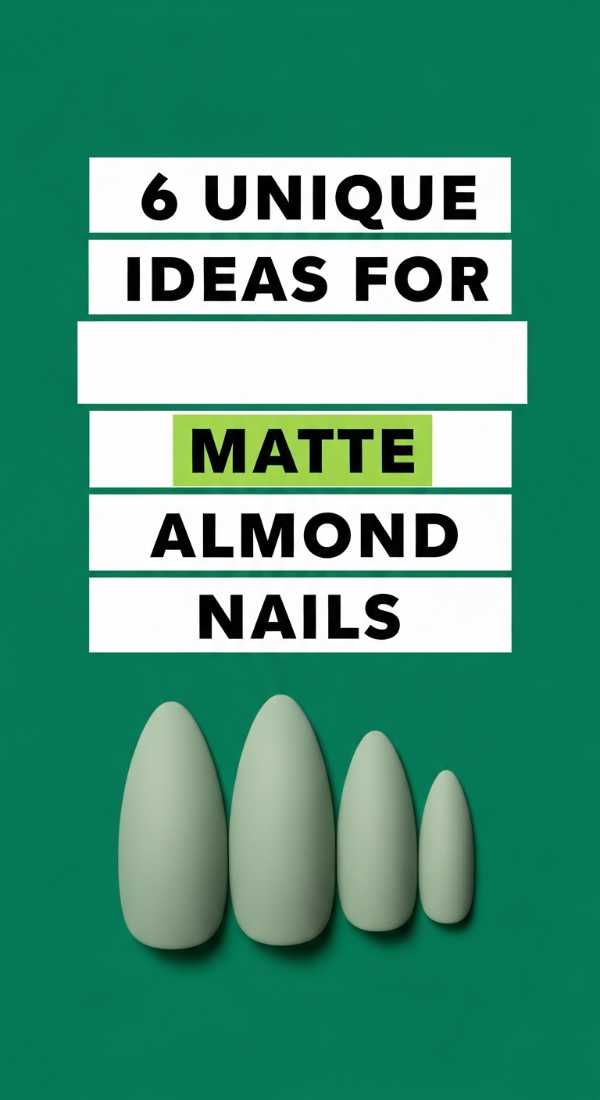
Why to love these Nails:
Matte almond nails are the epitome of ‘quiet luxury.’ They look expensive, feel like velvet, and offer a modern alternative to the high-shine finishes we see everywhere. It’s a soft, sophisticated touch for the modern woman.
Essential Items:
- Matte top coat
- Deep jewel-toned polishes
- Glossy top coat (for contrast)
How to Prepare:
- The French Matte: Paint the whole nail matte, then use a glossy top coat just on the very tip.
- The Velvet Forest: Use a deep emerald green with a matte finish for a regal look.
- The Raindrops: Apply a matte top coat, then use a dotting tool with glossy top coat to create ‘water droplets.’
- The Negative Space: Leave a small triangle at the base of the nail unpainted for a modern edge.
- The Half-and-Half: Tape off half the nail vertically; matte on one side, gloss on the other.
- The Subtle Marble: Swirl matte grey and white together while wet for a stone-like texture.
Budget Range
- Essie Gel Couture Matte Top Coat ($13.00)
- Sinful Colors Professional Matte ($3.00)
- OPI ‘Lincoln Park After Dark’ ($11.50)
8 Steps to Create Blooming Spring Nail Art
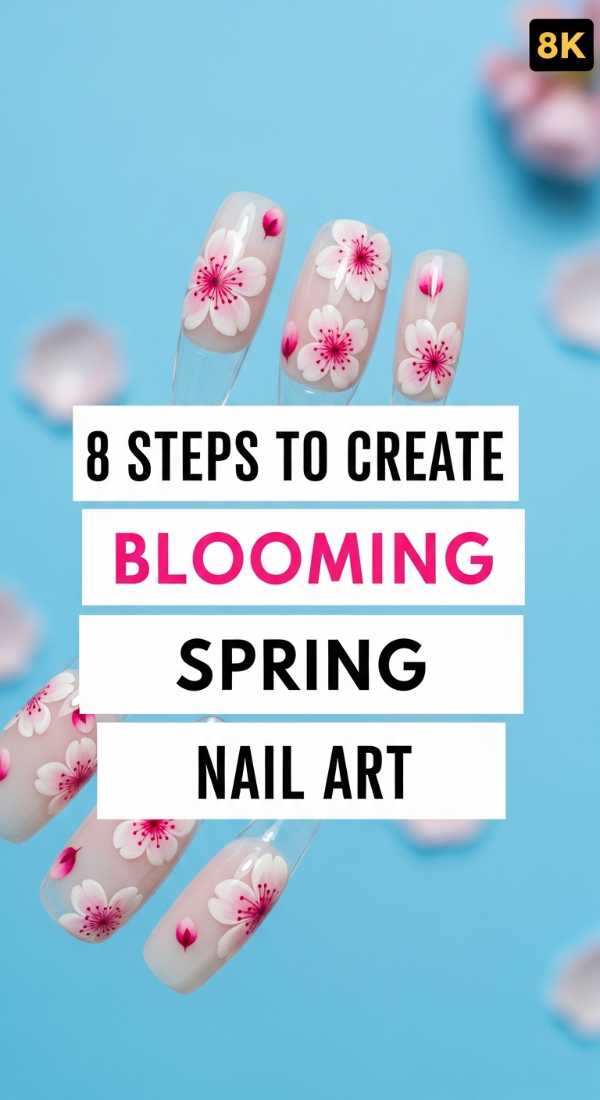
Why to love these Nails:
Blooming art looks like a watercolor painting. The colors bleed into each other in the most ethereal, romantic way. It is high-art made simple, and it feels like wearing a masterpiece on your hands.
Essential Items:
- ‘Blooming Gel’ or a clear base coat
- Three bright spring colors
- Fine liner brush
How to Prepare:
- Apply a base color and cure or let dry completely.
- Apply a generous ‘slip layer’ of clear base coat or blooming gel (do not dry yet!).
- While the clear coat is wet, drop tiny beads of color onto the nail.
- Watch for 10 seconds as the color naturally spreads and ‘blooms’ outward.
- Use a liner brush to gently swirl the edges of the blooms for a marble effect.
- Add a tiny gold foil flake in the center of the bloom for extra luxury.
- Allow the design to settle so the surface becomes level.
- Seal everything with a high-shine top coat to lock in the watercolor magic.
Budget Range
- Modelones Blooming Gel ($8.00)
- Gold Leaf Flakes for Nails ($6.00)
- Holo Taco Bright Polishes ($13.00)
Wrapping Your Hands in Magic
I hope these little hacks bring a spark of joy to your busy week, loves. Remember, nail art isn’t about perfection; it’s about the ten minutes you took just for yourself. Your hands do so much for the world—they hold, they work, they comfort. Giving them a little bit of color is just a way of saying thank you. I can’t wait to see the beautiful things you create. Stay soft, stay bright, and keep shining!