

Beyond the Brush: Advanced Physics for Flawless Acrylic Architecture
Hello, my sweet loves! Welcome back to our little corner of the world, where we turn the ordinary into something truly magical. Today, I wanted to sit down and share something that has been living in my heart for a while—the beautiful, intricate dance of creating the perfect manicure. It’s more than just paint on a canvas; it’s about the physics of balance, the way light catches a curve, and that soft, cloud-like feeling of looking down at your hands and feeling completely, utterly put together.
I know how life can get so busy, and sometimes we forget to take those few minutes for ourselves. But darling, your hands do so much for you—they hold your coffee, they hug your friends, and they create your life. Giving them a little extra love through nail art is a ritual of self-care. Today, we’re diving into the ‘architecture’ of beauty, blending the science of a perfect set with the trendy art styles we all adore. Let’s get cozy, grab a tea, and master these looks together.
7 steps to master the perfect pink gradient

Why to love these Nails:
There is something so incredibly soothing about a soft gradient, isn’t there? It’s like watching a sunset right on your fingertips, transitioning from a deep, heartfelt rose to a whisper of blush. It’s romantic, feminine, and perfectly balanced physics-wise to elongate your fingers.
Essential Items:
- Makeup sponge wedges
- Light pink and deep rose gel polish
- Liquid latex or cuticle guard
- High-shine top coat
- UV/LED Lamp
How to Prepare:
- Cleanse the nail plate and apply a thin base coat.
- Apply a light pink base color and cure.
- Paint stripes of both shades onto your sponge.
- Lightly dab the sponge onto the nail, moving slightly up and down to blur the line.
- Cure for 60 seconds.
- Repeat for a second layer of depth.
- Apply top coat and cure for that glassy finish.
Budget Range
- Essie Polish in ‘Ballet Slippers’ ($10.00)
- Beetles Gel Polish Starter Kit ($19.99)
- Modelones Liquid Latex ($7.99)
3 secrets to achieve flawless French tip nails
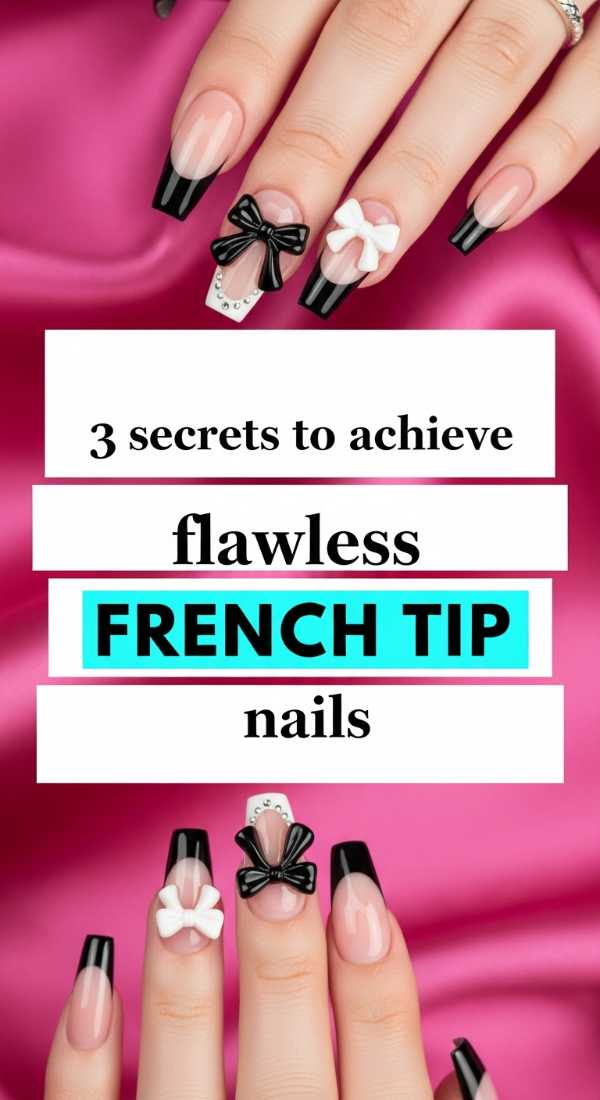
Why to love these Nails:
Classic, timeless, and oh-so-sophisticated. A French tip is the little black dress of the nail world. The ‘physics’ here is all about the smile line—that perfect curve that mimics the natural beauty of your nail bed while adding a touch of architectural precision.
Essential Items:
- Nude or sheer pink base polish
- Crisp white liner polish
- Clean-up brush dipped in acetone
- Buffer block
How to Prepare:
- Find your center point on the nail tip to ensure symmetry.
- Sweep from the outer edge toward the center in one fluid motion.
- Use a clean-up brush to sharpen the ‘smile’ curve before curing.
Budget Range
- OPI ‘Bubble Bath’ ($11.50)
- Zoya ‘Purity’ White ($12.00)
- Makartt Liner Brush Set ($9.99)
4 easy ways to apply liquid chrome nails
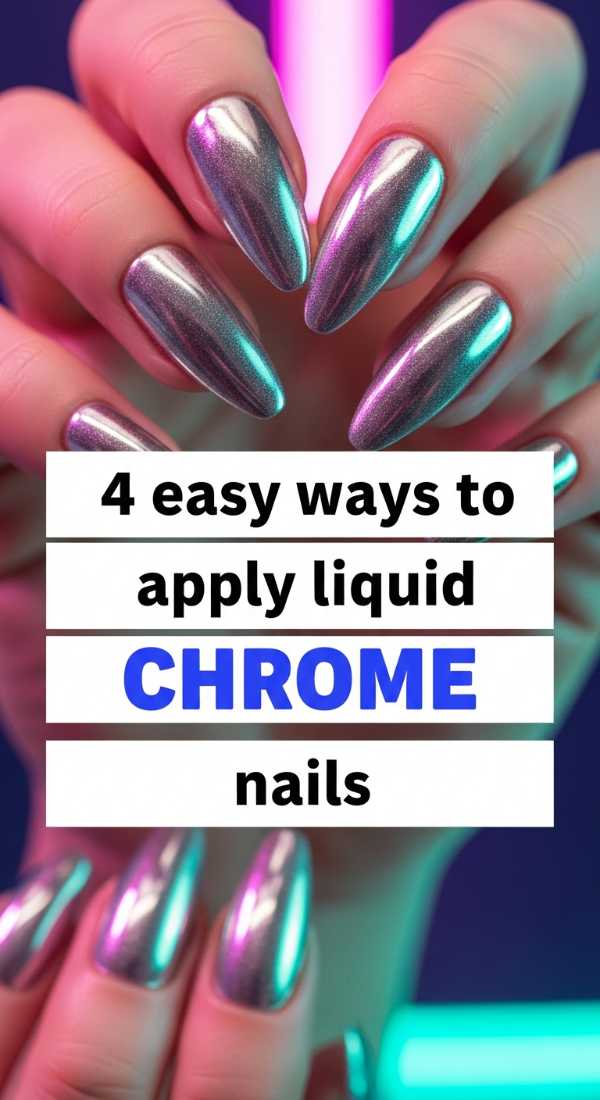
Why to love these Nails:
If you want to feel like a futuristic goddess, liquid chrome is your secret weapon. It catches every light and reflects the world back at you. It’s all about surface tension—creating a base so smooth that the chrome pigments lay perfectly flat to create a mirror effect.
Essential Items:
- Black gel polish (for maximum pop)
- No-wipe top coat
- Chrome pigment powder or liquid
- Silicone applicator
How to Prepare:
- Apply black base and cure fully.
- Apply no-wipe top coat and cure for exactly 30 seconds (it needs to be slightly tacky).
- Buff the chrome powder into the surface using circular motions.
- Seal with another layer of top coat.
Budget Range
- Born Pretty Chrome Powder ($8.99)
- Gelish No-Wipe Top Coat ($14.99)
- Saviland Liquid Chrome Kit ($15.00)
5 steps for painting detailed plaid nail art
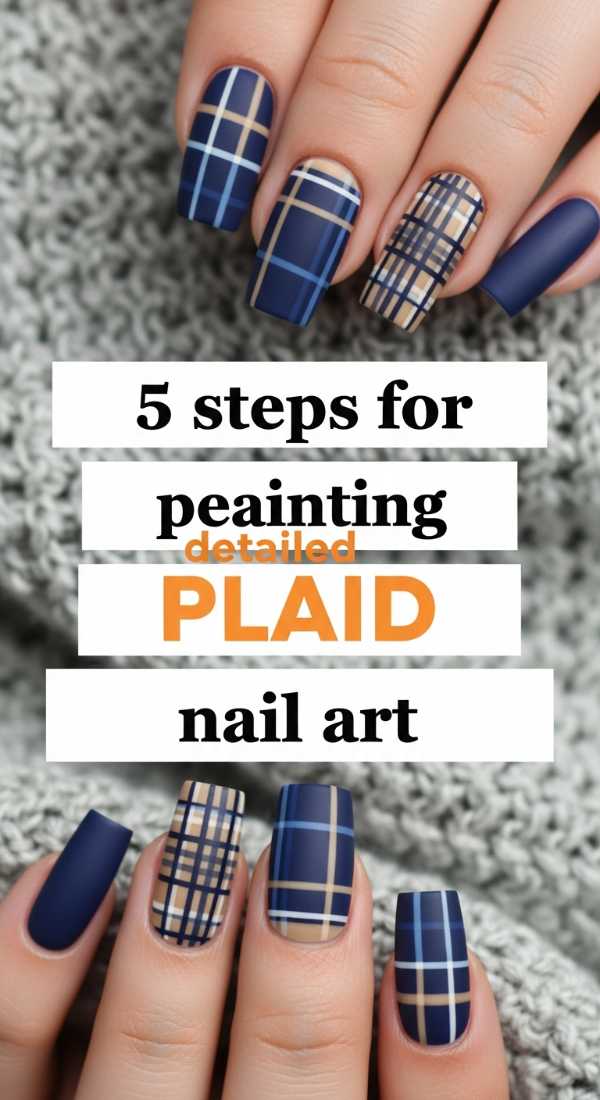
Why to love these Nails:
Plaid nails are the ultimate cozy sweater for your hands. They bring a sense of structure and warmth, perfect for those crisp morning coffee dates. The physics here is all about linear precision and layering translucent colors to create depth.
Essential Items:
- Ultra-thin striping brush
- Deep green, red, or beige polishes
- Matte top coat
- Steady hand!
How to Prepare:
- Apply your base color and cure.
- Paint two thick vertical lines in a contrasting shade.
- Paint matching thick horizontal lines.
- Using your thinnest brush, add delicate ‘accent’ lines in gold or white.
- Finish with a matte top coat for that fabric-like texture.
Budget Range
- Vrenmol Gel Liner Set ($16.00)
- Sally Hansen Miracle Gel Matte Top Coat ($9.00)
- Holler and Glow Plaid Decal Set ($5.00)
6 minutes to create aesthetic coffee latte nails
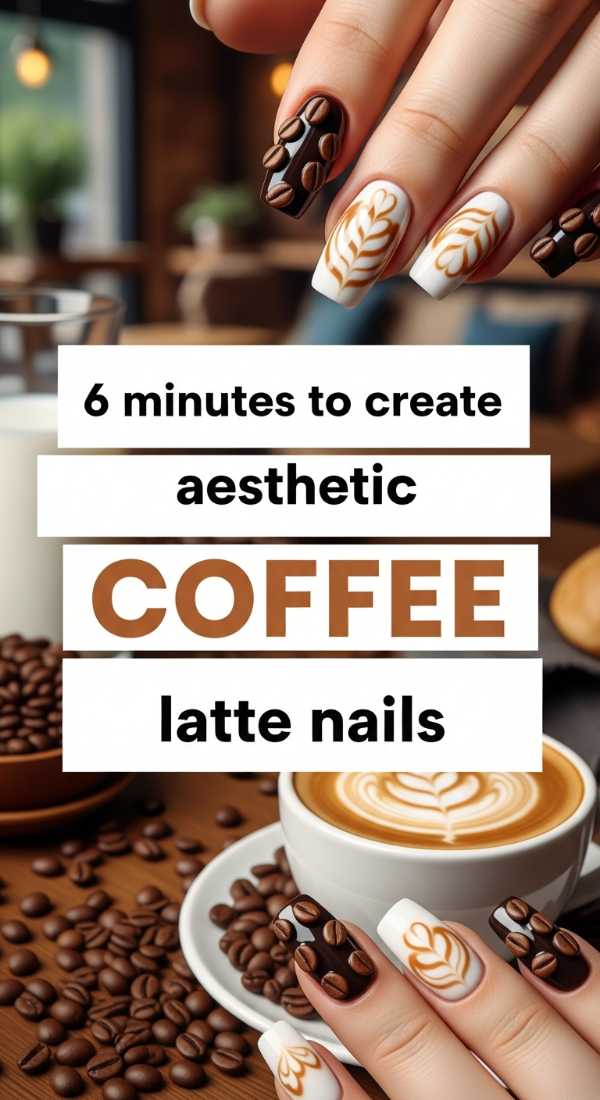
Why to love these Nails:
That perfect swirl of cream in a dark roast—it’s not just a drink, it’s an aesthetic. These nails are warm, inviting, and use the ‘wet-on-wet’ technique to let the pigments flow together naturally like a morning brew.
Essential Items:
- Espresso brown polish
- Cream/Vanilla polish
- Dotting tool or toothpick
- Mixing palette
How to Prepare:
- Apply a coat of cream polish but do not cure.
- Drop three small dots of brown polish onto the wet surface.
- Use a toothpick to swirl the colors together in a figure-eight motion.
- Let it level for 5 seconds before curing.
- Apply top coat and admire the swirl.
Budget Range
- Revel Nail Dip Powder in ‘Coffee’ ($15.00)
- DND Gel Polish ‘Cappuccino’ ($12.00)
- Amazon Nail Art Dotting Tools ($6.00)
5 easy steps to design cute heart nails
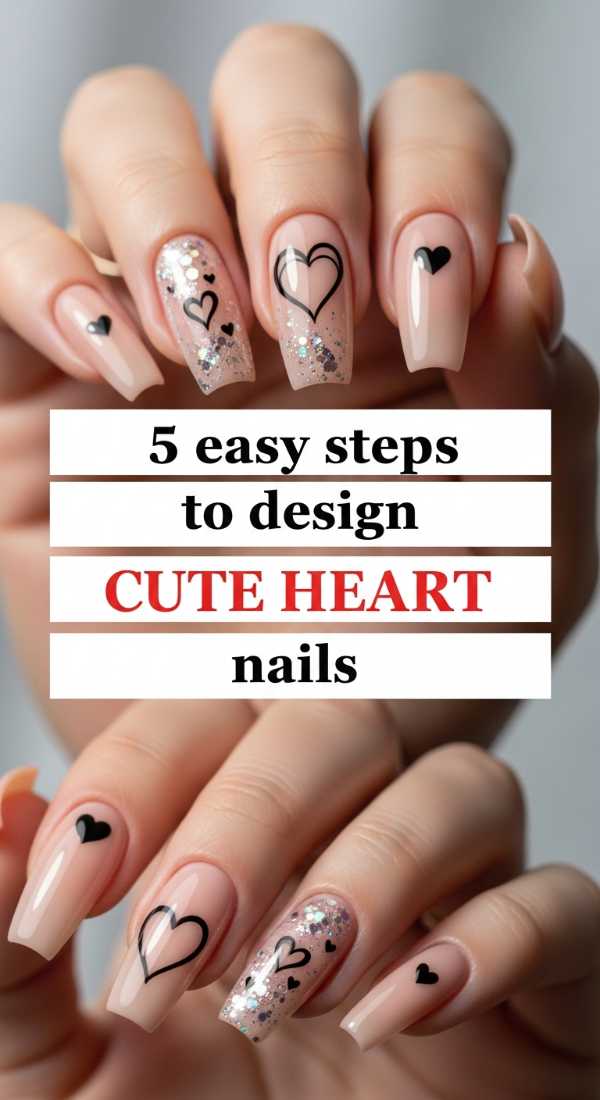
Why to love these Nails:
Wear your heart on your… nails! These are just the sweetest little reminders of love and kindness. They use simple geometry—two dots and a flick—to create a symbol that brings a smile to everyone who sees it.
Essential Items:
- Red or pink polish
- Large dotting tool
- Fine detail brush
- Pale pink base color
How to Prepare:
- Place two dots of red polish side-by-side on the nail.
- Use the detail brush to drag the bottom of each dot down to a central point.
- Fill in the center of the V shape.
- Cure and seal with a high-gloss top coat.
Budget Range
- Essie ‘Rocky Rose’ ($9.00)
- Orly Bonder Base Coat ($12.00)
- Nail Art heart charms ($7.00)
8 tricks for long lasting summer gel nails
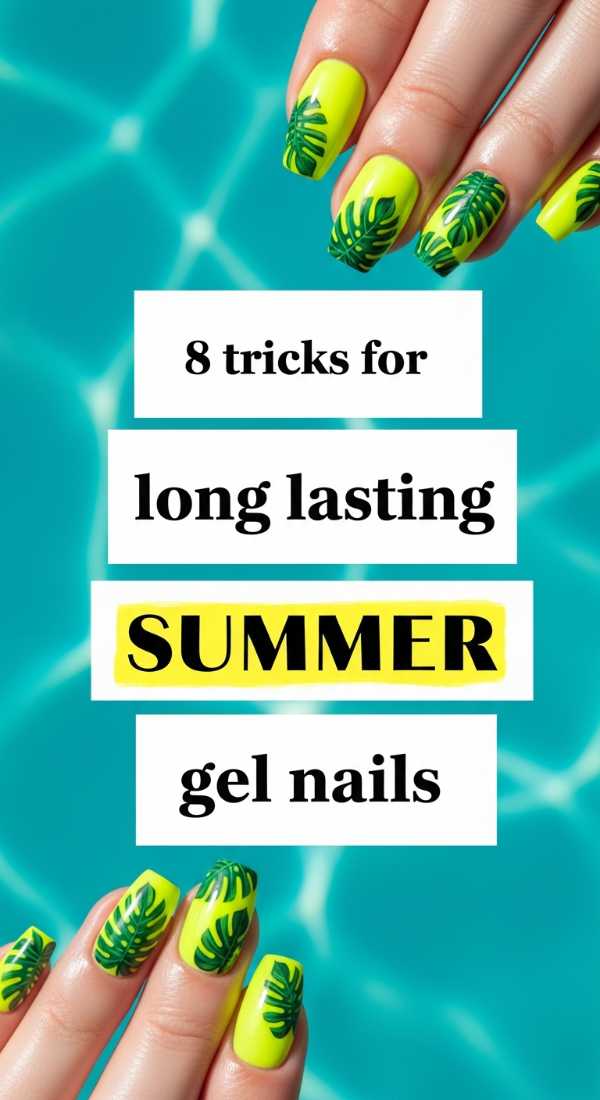
Why to love these Nails:
Summer is for adventures, not for worrying about chipped polish. These tricks focus on the chemistry of adhesion and the physics of protection, ensuring your mani survives sun, sand, and sea while looking effortlessly radiant.
Essential Items:
- Dehydrator and Primer
- High-quality UV lamp
- Cuticle oil
- Capping the free edge
How to Prepare:
- Always dehydrate the nail first.
- Apply primer to the tips.
- Use thin layers—thick layers peel!
- ‘Cap’ the very front edge of the nail with every coat.
Budget Range
- Mia Secret Dehydrator & Primer ($13.00)
- SunUV LED Lamp ($25.00)
- SolarOil Cuticle Care ($9.00)
4 steps to achieve a classy bridal manicure
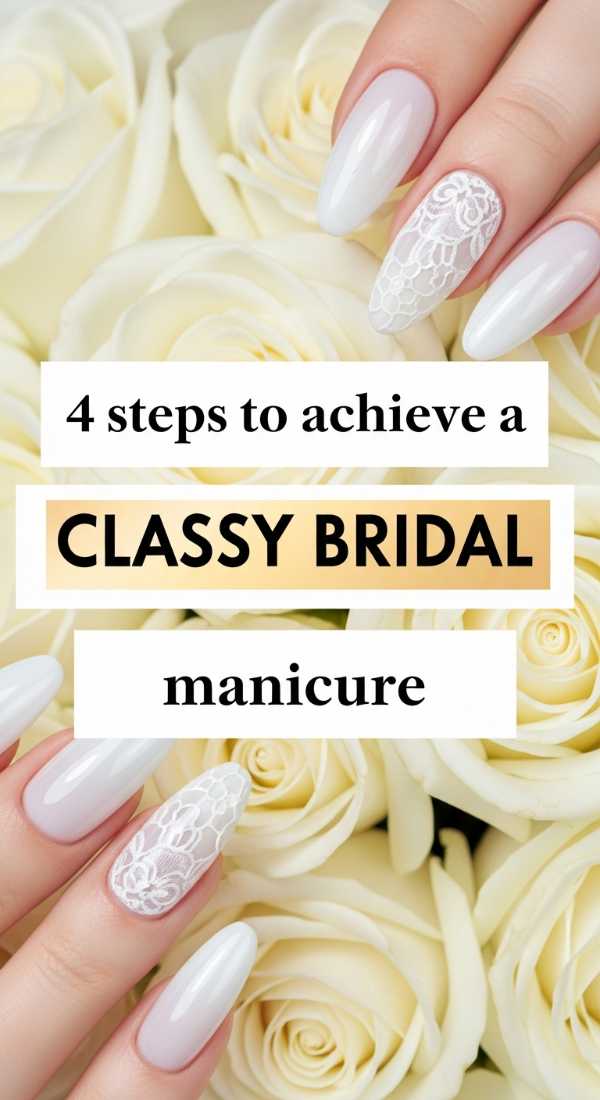
Why to love these Nails:
On your big day, your hands tell a story. This look is all about that soft, ethereal glow—minimalist, elegant, and designed to complement your ring without stealing the show. It’s the physics of light diffusion at its best.
Essential Items:
- Sheer milky white polish
- Fine pearl shimmer
- Soft buffer
- Long-wear top coat
How to Prepare:
- Buff the nail to a perfectly smooth surface.
- Apply two coats of sheer milky white.
- Dust a tiny amount of pearl pigment over the top.
- Seal with a non-yellowing top coat.
Budget Range
- OPI ‘Funny Bunny’ ($11.50)
- Essie ‘Gel Couture’ Top Coat ($13.00)
- Nicole Diary Pearl Powder ($6.00)
5 ways to apply mess free glitter nails

Why to love these Nails:
Sparkle shouldn’t be stressful! This method gives you all the joy of glitter with none of the ‘everywhere’ mess. It’s about using the right suspension physics to keep the glitter on the nail and off your carpet.
Essential Items:
- Loose glitter
- Clear gel or ‘glitter grabber’
- Fan brush
- Peel-off base coat (optional)
How to Prepare:
- Apply a thin layer of clear gel.
- Use a fan brush to gently ‘tap’ glitter onto the nail over a small tray.
- Press the glitter down flat with a gloved finger.
- Encapsulate with a thick builder gel or top coat.
Budget Range
- KBShimmer Glitter Grabber ($12.00)
- Holo Taco Loose Glitter ($11.00)
- Unt Ready for Takeoff Peel Base ($15.00)
3 minute guide to chic minimalist nails
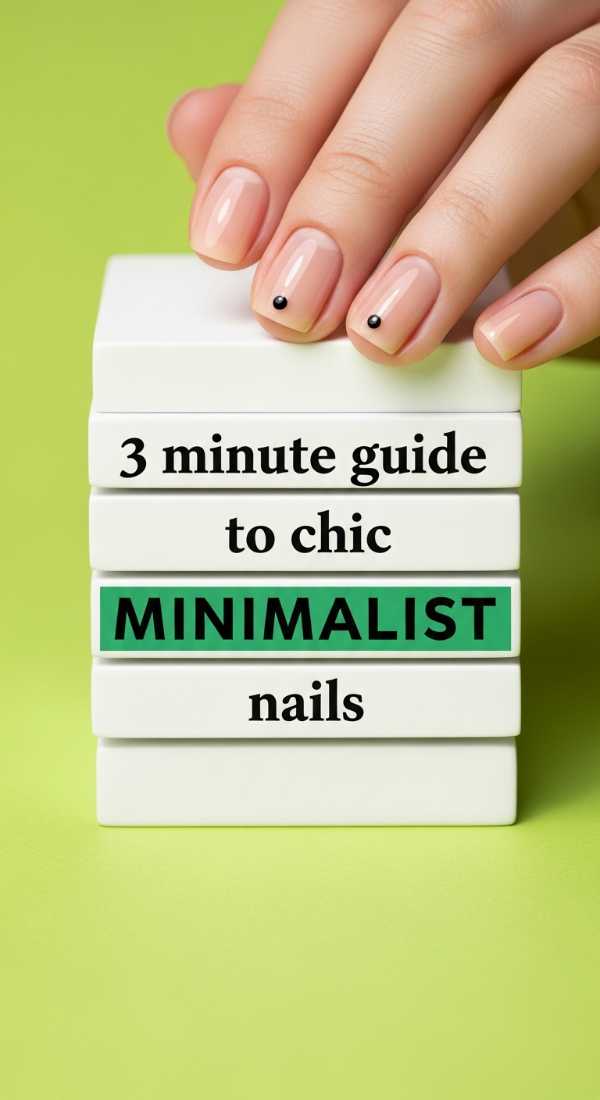
Why to love these Nails:
Sometimes, less is so much more. Minimalist nails highlight your natural beauty with just a touch of polish. This is the ‘quiet luxury’ of the nail world, focusing on clean lines and healthy, hydrated cuticles.
Essential Items:
- Nude polish that matches your skin tone
- Single black or gold stud/dot
- Matte or satin top coat
How to Prepare:
- Apply one coat of a ‘your nails but better’ nude shade.
- Place a single tiny dot at the base of the nail.
- Finish with a satin-finish top coat for a natural look.
Budget Range
- Cirque Colors ‘Nude’ ($12.50)
- Lights Lacquer ‘Paper Snow’ ($13.00)
- Nail art tweezers ($5.00)
Conclusion
Oh, my loves, I hope this guide feels like a warm hug for your creativity. Remember, beauty isn’t about perfection; it’s about the joy you feel while creating something with your own two hands. Whether you’re rocking a bold chrome or a soft, minimalist nude, wear it with confidence and kindness. You are the architect of your own light. Until next time, stay beautiful, stay soft, and keep shining!