
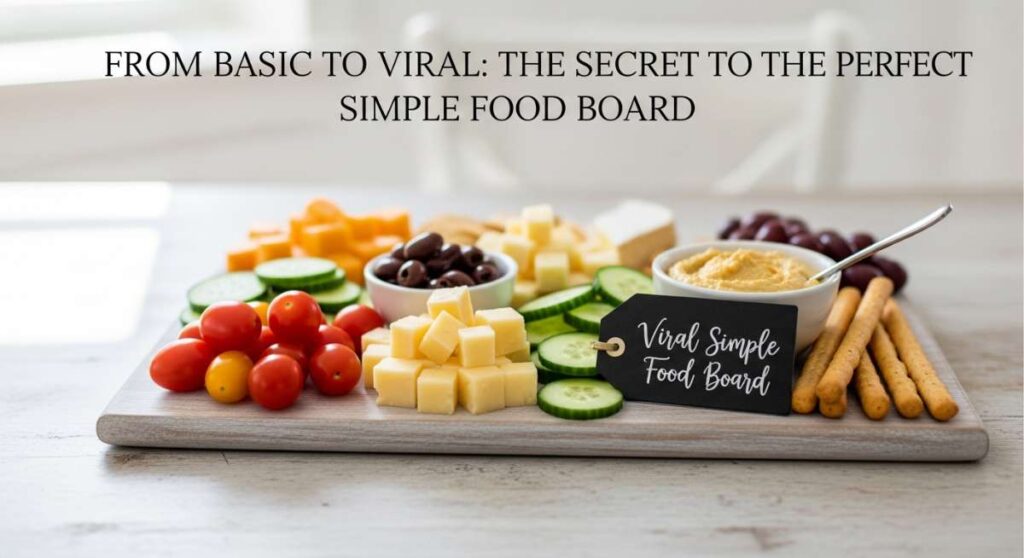
There is something inherently magical about a gathering where the food isn’t just served, but presented as an invitation to connect. I remember the first time I set out a massive wooden board overflowing with different textures and aromas; the room instantly shifted from polite conversation to genuine excitement. It wasn’t just about the meal; it was about the shared experience of picking, choosing, and discovering new flavors together.
We’ve all seen those viral boards on social media—the ones that look like a work of art. But the secret to moving from a ‘basic’ spread to a viral masterpiece isn’t about expensive ingredients. It’s about mastering the staples and presenting them with soul. Today, we are diving deep into the ultimate protein board centerpiece: the versatile chicken. By mastering these ten preparation styles, you will create a food board that is not only visually stunning but tastes like a professional chef spent the day in your kitchen.
How to Bake Perfect Chicken
Why we love this
There is nothing quite like the comforting, herb-infused aroma of perfectly baked chicken wafting through the house on a Sunday afternoon. When done right, the skin achieves a translucent, golden-brown shimmer that crackles slightly under the knife, revealing meat that is incredibly succulent and bursting with natural juices. It is the ultimate culinary hug, offering a clean, savory profile that pairs beautifully with everything from sharp mustards to sweet fruit compotes on your board.
Ingredients
- 1 Whole chicken (approx. 4 lbs)
- 4 tbsp Unsalted butter, softened
- 2 tbsp Fresh rosemary and thyme, chopped
- 2 tsp Kosher salt
- 1 tsp Cracked black pepper
- 1 Lemon, halved
How to make it
- Preheat your oven to 425°F (218°C). This high initial heat is crucial for rendering the fat and starting the browning process.
- Remove the chicken from the refrigerator 30 minutes before cooking to bring it to room temperature, ensuring an even bake.
- Pat the skin completely dry with paper towels; moisture is the enemy of a crisp skin.
- Generously rub the softened butter under the skin of the breast and over the entire exterior. This creates a fat barrier that locks in moisture.
- Season aggressively with salt, pepper, and herbs. Stuff the lemon halves into the cavity for aromatic steam.
- Place the chicken on a roasting rack in a pan. Bake for 15 minutes at 425°F, then reduce the heat to 375°F (190°C).
- Cook until the internal temperature reaches 165°F (74°C) at the thickest part of the thigh. Let it rest for at least 15 minutes before carving to allow the juices to redistribute.
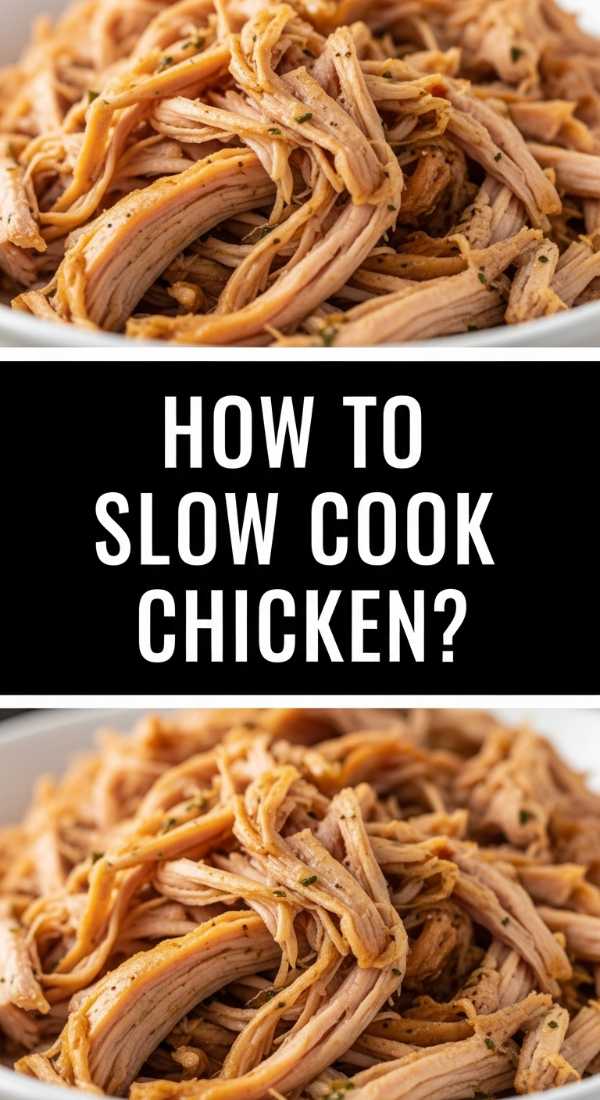
How to Slow Cook Chicken

Why we love this
Slow-cooked chicken is the soul of the board, providing a texture that is so tender it literally melts the moment it touches your tongue. This method allows flavors to penetrate deep into the fibers of the meat, creating a rich, complex profile that tastes like it has been simmering for days. It provides a wonderful contrast to the crunchier elements on your spread, offering a soft, savory element that guests can easily pile onto crostini or crackers.
Ingredients
- 2 lbs Chicken thighs (boneless or bone-in)
- 1 cup High-quality chicken bone broth
- 1 Yellow onion, thinly sliced
- 4 Cloves garlic, smashed
- 1 tsp Smoked paprika
- Salt and pepper to taste
How to make it
- Layer the sliced onions and smashed garlic at the bottom of the slow cooker to create a flavor base and prevent the meat from sticking.
- Season the chicken thighs thoroughly on all sides with salt, pepper, and smoked paprika.
- Place the chicken on top of the onions. Pour the broth around the sides, not directly over the meat, to keep the seasoning intact.
- Set the slow cooker to ‘Low’ for 6 to 7 hours. Avoid using the ‘High’ setting if possible, as the slower temperature rise ensures the protein fibers break down without becoming tough.
- Once the chicken is fork-tender, remove it from the pot. If shredding, use two forks to pull the meat apart while it is still warm.
- Strain the remaining liquid and drizzle a small amount back over the shredded meat to keep it moist for the board.
How to Make Crispy Legs

Why we love this
There is a primal joy in a perfectly crispy chicken leg. The contrast between the shattered-glass texture of the skin and the dark, silky meat underneath is a sensory delight that keeps everyone reaching for seconds. These are the “showstoppers” of the board, providing height and a rustic, handheld element that makes the meal feel approachable and fun. The aroma of toasted spices and rendered fat is absolutely intoxicating.
Ingredients
- 8 Chicken drumsticks
- 2 tbsp Cornstarch (the secret to the crunch)
- 1 tbsp Garlic powder
- 1 tsp Cayenne pepper (optional)
- 3 tbsp Vegetable oil or avocado oil
How to make it
- Preheat your oven to 400°F (204°C). Line a baking sheet with parchment paper and place a wire cooling rack on top. This allows hot air to circulate under the legs.
- Dry the drumsticks thoroughly. In a large bowl, whisk together the cornstarch, garlic powder, salt, pepper, and cayenne.
- Toss the legs in the oil first, then dredge them in the cornstarch mixture until lightly coated. Shake off any excess.
- Arrange the legs on the wire rack, ensuring they aren’t touching.
- Bake for 40-45 minutes. Halfway through, use tongs to rotate each leg to ensure even browning.
- Look for the skin to be bubbling and deeply golden. Let them sit on the rack for 5 minutes after removing from the oven to let the crust solidify.
How to Cook Juicy Boneless

Why we love this
Boneless chicken often gets a bad reputation for being dry, but when cooked with precision, it becomes the most versatile canvas on your food board. We love the clean, lean bite it provides, acting as a perfect vehicle for vibrant pestos or zesty chimichurris. It feels light and modern, offering a smooth texture that balances the richer, fat-heavy components of a viral-style spread.
Ingredients
- 4 Boneless, skinless chicken breasts
- 2 tbsp Extra virgin olive oil
- 1 tsp Dried oregano
- 1 Lemon, zested
- Flaky sea salt
How to make it
- Place the chicken breasts between two sheets of plastic wrap. Use a meat mallet or a heavy pan to pound them to an even thickness (about 3/4 inch). This is the most important step for even cooking.
- Rub the meat with olive oil, lemon zest, oregano, and salt. Let it marinate for at least 15 minutes at room temperature.
- Heat a heavy skillet or cast-iron pan over medium-high heat. Add a splash of oil.
- Place the chicken in the pan. Do not crowd it. Cook for 5-6 minutes without moving it to develop a deep golden sear.
- Flip the chicken and cook for another 4-5 minutes. The internal temperature should hit 160°F (it will rise to 165°F while resting).
- Remove from the pan and rest for 10 minutes. Slice against the grain for the most tender bite on your board.
How to Roast Tender Thighs

Why we love this
Roasting chicken thighs is an exercise in pure decadence. The dark meat is naturally more flavorful and forgiving than the breast, and when roasted at high heat, the fat renders out to baste the meat from within. The result is a silky, rich mouthfeel that feels incredibly luxurious. They bring a deep, savory bass note to your food board that anchors the lighter vegetables and cheeses.
Ingredients
- 6 Bone-in, skin-on chicken thighs
- 2 tbsp Dijon mustard
- 1 tbsp Honey
- Fresh rosemary sprigs
- 4 Garlic cloves, halved
How to make it
- Preheat your oven to 425°F (218°C). High heat is essential for those crispy edges and tender centers.
- In a small bowl, whisk the mustard and honey together. Pat the thighs dry and season with salt and pepper.
- Sear the thighs skin-side down in a cold oven-safe skillet over medium-high heat. Starting with a cold pan allows the fat to render slowly, resulting in crispier skin.
- Once the skin is golden (about 8 minutes), flip the thighs and brush the honey-mustard mixture onto the skin.
- Toss the garlic cloves and rosemary into the pan and transfer the whole skillet into the oven.
- Roast for 15-20 minutes until the thickest part reaches 175°F (thighs benefit from a slightly higher temp than breasts for maximum tenderness).
How to Bake Chicken Legs

Why we love this
Baked chicken legs are the ultimate nostalgic comfort food. There’s something so satisfying about the way the meat pulls away from the bone with just the slightest tug. When baked slowly, the flavors concentrate, and the seasoning forms a beautiful, colorful crust. They look stunning arranged in a circular pattern on a board, inviting guests to simply reach in and grab one by the bone.
Ingredients
- 10 Chicken drumsticks
- 1/4 cup Olive oil
- 1 tbsp Smoked paprika
- 1 tsp Onion powder
- 1 tsp Dried parsley
How to make it
- Preheat the oven to 375°F (190°C). This slightly lower temperature than roasting allows the bone-in meat to cook through without burning the skin.
- In a large zip-top bag, combine the olive oil, paprika, onion powder, and parsley.
- Add the legs to the bag and massage the seasoning into the meat, ensuring every crevice is covered.
- Arrange the legs on a parchment-lined baking sheet. For extra air circulation, use a wire rack.
- Bake for 35 to 45 minutes. Use a meat thermometer to ensure the internal temperature is at least 165°F.
- For a final touch of color, turn on the broiler for the last 2 minutes, watching closely so they don’t char.
How to Tenderize Chicken Thighs

Why we love this
Tenderizing isn’t just a step; it’s a transformation. When you take the time to properly tenderize chicken thighs, you change the entire experience of the meal. The meat becomes velvety and supple, absorbing marinades like a sponge. This method is perfect for boards where you want a “melt-in-your-mouth” quality that feels high-end and sophisticated, almost like a confit but with a fraction of the effort.
Ingredients
- 1.5 lbs Boneless chicken thighs
- 1/2 cup Plain Greek yogurt or buttermilk
- 1 tsp Salt
- 1/2 tsp Cumin
- Juice of 1 lime
How to make it
- Use a meat tenderizer (the flat side) to lightly flatten the thighs to a uniform thickness. This breaks down tough connective tissues.
- In a glass bowl, whisk together the yogurt (or buttermilk), lime juice, salt, and cumin. The lactic acid in the dairy gently breaks down proteins without making the meat mushy.
- Submerge the chicken in the marinade. Cover and refrigerate for at least 2 hours, but preferably 6-8 hours.
- When ready to cook, wipe off the excess marinade (leave a thin coating).
- Grill or pan-sear over medium heat. The yogurt will caramelize slightly, creating a beautiful charred effect while the inside remains incredibly soft.
How to Season Chicken Legs

Why we love this
Seasoning is the bridge between “good” and “viral.” Properly seasoned chicken legs aren’t just salty; they are a multi-layered explosion of flavor. We love how a dry rub can create a textured, colorful exterior that looks like stained glass on your board. Every bite offers a journey from the initial spice kick to the deep, savory umami of the meat, making them an addictive addition to any spread.
Ingredients
- 8 Chicken legs
- 2 tbsp Brown sugar (for caramelization)
- 1 tbsp Chili powder
- 1 tsp Garlic salt
- 1/2 tsp Ground ginger
How to make it
- Pat the legs dry. Use your fingers to gently loosen the skin from the meat without removing it entirely.
- Mix the dry ingredients in a small bowl. The brown sugar is the secret ingredient here; it helps the spices stick and creates a beautiful mahogany glaze as it melts.
- Rub the seasoning directly onto the meat under the skin, then rub the remainder over the skin. This ensures the flavor isn’t just on the surface.
- Let the seasoned legs sit for 30 minutes at room temperature. This “dry brine” helps the salt penetrate the meat.
- Bake or grill as desired. The sugars will bubble and the spices will bloom in the heat, creating a deep, complex crust.
How to Glaze Bone-in Chicken
Why we love this
A glazed chicken piece is the crown jewel of the food board. There is an irresistible visual appeal to the high-gloss, sticky finish that catches the light. The flavor profile is a sophisticated balance of sweet, salty, and tangy, creating a finger-licking experience that feels celebratory. It’s the perfect way to add a “gourmet” touch that looks like it came from a high-end bistro.
Ingredients
- Mixed bone-in chicken pieces (wings, thighs, legs)
- 1/2 cup Apricot preserves or honey
- 2 tbsp Soy sauce
- 1 tbsp Apple cider vinegar
- 1 tsp Sriracha
How to make it
- Prepare your chicken by roasting or baking it until it is about 80% cooked (internal temp around 145°F).
- While the chicken cooks, simmer the glaze ingredients in a small saucepan over medium heat until thickened and syrupy (about 5-7 minutes).
- Remove the chicken from the oven and use a pastry brush to apply a thick layer of the glaze over each piece.
- Return to the oven for 5 minutes. Remove and apply a second coat.
- Switch the oven to ‘Broil’ for the final 2-3 minutes. Stay close! You want the glaze to bubble and slightly char in spots, not burn.
- Let the pieces rest so the glaze sets into a sticky, lacquered finish.
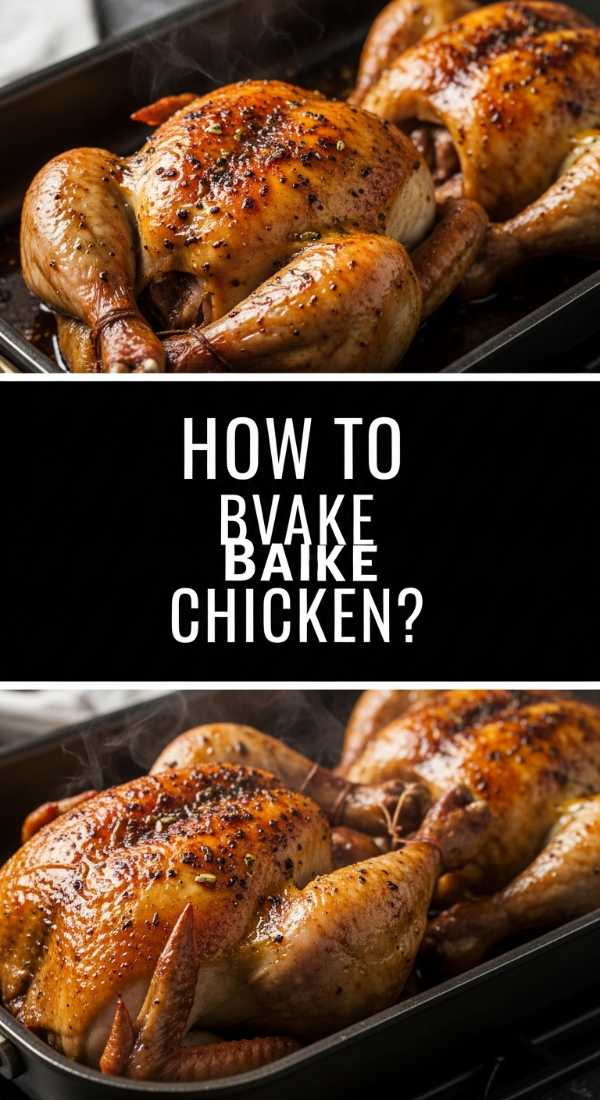
How to Oven Bake Chicken
[IMAGE_10]
Why we love this
Oven baking is the reliable hero of the busy host. It’s a clean, efficient method that produces consistently delicious results with very little hands-on time. We love the clarity of flavor this method provides—it tastes purely of chicken, salt, and whatever fresh herbs you choose. It’s the perfect “base” for your board, providing a healthy and familiar option that pleases everyone from the pickiest eaters to the foodies.
Ingredients
- 4 Chicken breasts or 6 thighs
- 2 tbsp Melted coconut oil or butter
- 4 sprigs Fresh thyme
- 1 tsp Sea salt
- Lemon slices
How to make it
- Preheat your oven to 400°F (204°C).
- Place the chicken in a single layer in a glass baking dish. Avoid stainless steel if you want a more gentle heat distribution.
- Brush with the melted oil or butter and season generously. Lay the thyme sprigs and lemon slices directly on top of the meat.
- Bake for 20-30 minutes depending on the cut. Breasts usually take less time than thighs.
- The visual cue for doneness is when the juices run clear when poked with a fork, and the meat feels firm but springy.
- Always rest the meat for at least 5-10 minutes under a loose tent of foil to ensure the moisture stays locked within the fibers.
Bringing Your Board to Life
Creating the perfect food board is about more than just the protein—it’s about the harmony of textures and colors. Arrange your masterfully cooked chicken as the focal points, then fill the gaps with vibrant roasted vegetables, creamy cheeses, and a variety of dipping sauces. Remember, the goal is to create a visual and flavorful journey that invites your guests to linger, laugh, and enjoy. Happy hosting!