
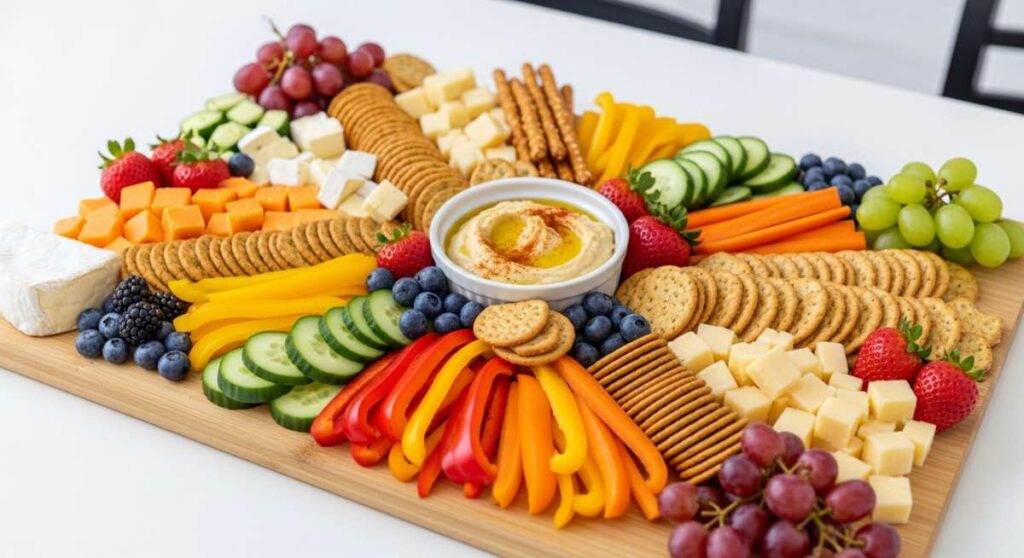
There is something truly magical about a shared meal that requires more assembly than actual labor, yet looks like a masterpiece curated for a high-end magazine. We’ve all been there: the sun is setting, friends are arriving, and the last thing you want is to be trapped in a hot kitchen while the laughter drifts in from the patio. That’s why I’m so obsessed with the concept of the ‘Viral Food Board’—it’s not just a trend; it’s a lifestyle shift that prioritizes connection over complicated timers.
The secret to a stunning, viral-worthy snack board is the harmony of textures and the vibrant pop of colors that make your guests stop and pull out their phones before they even take a bite. It’s about creating a landscape of flavors, from the salty crunch of a well-seared protein to the sweet, bursting freshness of seasonal fruits. This board is my love letter to slow afternoons and easy entertaining, proving that you don’t need a culinary degree to create something absolutely breathtaking.
Today, I’m sharing ten of my absolute favorite components that can turn a simple wooden plank into a feast. Whether you choose one or two to anchor your board or go all out for a massive celebration, these recipes are designed to be foolproof, flavor-packed, and visually stunning. Let’s dive into the art of the board and reclaim our time in the kitchen!
How to cook juicy salmon cakes?

Why we love this
There is a profound satisfaction in the contrast between the crisp, golden-brown crust of a perfectly seared salmon cake and the tender, buttery flakes of fish waiting inside. As they sizzle in the pan, the aroma of fresh dill and bright lemon zest fills the air, promising a bite that is both decadent and refreshing. These cakes feel incredibly sophisticated on a snack board, especially when paired with a dollop of cold remoulade. Each mouthful offers a delicate crunch followed by a succulent, melt-in-your-mouth texture that makes them an instant favorite for anyone who loves seafood with a gourmet twist.
Ingredients
- 1 lb fresh salmon fillet (cooked and flaked)
- 1/2 cup panko breadcrumbs
- 1 large egg, lightly beaten
- 2 tablespoons mayonnaise
- 1 tablespoon Dijon mustard
- 1 tablespoon fresh dill, chopped
- 1/2 teaspoon lemon zest
- Salt and cracked black pepper to taste
- 2 tablespoons olive oil for frying
How to make it
- Begin by ensuring your cooked salmon is chilled and flaked into small, uniform pieces, removing any skin or bones. In a large mixing bowl, combine the flaked salmon with panko, egg, mayo, mustard, dill, and lemon zest. Fold gently with a spatula to avoid overworking the fish; you want to maintain some texture.
- Form the mixture into small patties, approximately 2 inches in diameter. Press them firmly so they hold their shape, then place them on a parchment-lined tray and chill in the refrigerator for at least 30 minutes. This is a critical professional tip—chilling allows the proteins and breadcrumbs to bond, preventing the cakes from falling apart in the pan.
- Heat a heavy-bottomed cast-iron or stainless steel skillet over medium-high heat. Add the olive oil and wait until it shimmers but isn’t smoking. Gently place the patties in the pan, ensuring they aren’t crowded.
- Sear the cakes for 3 to 4 minutes per side. Look for a deep, amber-golden crust to form before flipping. Use a thin metal spatula to turn them carefully. Once both sides are crispy and the center is heated through (an internal temp of 145°F), remove them to a wire rack to maintain crunchiness until serving.
How to make zesty tacos?

Why we love this
Zesty tacos are the ultimate crowd-pleaser because they engage every single taste bud at once. Imagine the sharp, acidic bite of pickled red onions hitting your tongue, followed by the smoky warmth of seasoned meat and the cooling creaminess of a lime-infused crema. The texture is a symphony of soft corn tortillas and the sharp crunch of fresh cabbage slaw. Eating these feels like a celebration; the vibrant colors of cilantro and radish slices make them look like edible jewels on your board, and the citrusy aroma instantly transports you to a seaside cantina under the summer sun.
Ingredients
- 8 small corn tortillas
- 1 lb protein of choice (shredded chicken, beef, or firm tofu)
- 1 tablespoon taco seasoning (cumin, chili powder, garlic powder)
- 1/2 cup shredded red cabbage
- 1/4 cup pickled red onions
- 1/4 cup fresh cilantro, chopped
- 2 limes, cut into wedges
- 1/2 cup sour cream or Greek yogurt
- 1 teaspoon hot sauce
How to make it
- Prepare your protein by sautéing it in a skillet over medium heat with the taco seasoning and a splash of water to keep it moist. Ensure the meat is fully cooked and slightly browned at the edges for extra flavor. For chicken, shred it finely; for beef, ensure it’s well-drained.
- While the meat rests, prepare the zesty crema. In a small bowl, whisk together the sour cream, the juice of half a lime, and the hot sauce until smooth. This adds a necessary acidic brightness to balance the savory spices.
- Toast the corn tortillas directly over a low gas flame for 10-15 seconds per side using tongs, or in a dry skillet until they show charred spots and become pliable. Keep them warm wrapped in a clean kitchen towel.
- Assemble the tacos by layering the protein, cabbage slaw, and pickled onions. Drizzle generously with the crema and garnish with fresh cilantro. Serve immediately with extra lime wedges on the board to allow guests to add that final, essential spritz of citrus.
How to bake berry flatbread?
Why we love this
Berry flatbread is that unexpected star that bridges the gap between sweet and savory, making it a sophisticated addition to any board. The scent of roasted strawberries and blueberries caramelizing in the oven is intoxicating, creating a jammy texture that contrasts beautifully with a crispy, charred dough. When you add a layer of creamy mascarpone or goat cheese beneath the fruit, it creates a rich, velvety base that carries the flavors perfectly. Topped with a drizzle of balsamic glaze and fresh basil, it offers a complex profile of earthy, tart, and sweet notes that feel like a decadent garden party in every bite.
Ingredients
- 1 store-bought flatbread or pre-made pizza dough
- 1/2 cup mascarpone cheese
- 1/2 cup sliced strawberries
- 1/2 cup fresh blueberries
- 1 tablespoon honey
- 1 tablespoon balsamic glaze
- Fresh basil leaves for garnish
- 1 tablespoon olive oil
How to make it
- Preheat your oven to 425°F (220°C). If using raw dough, roll it out thinly on a floured surface. Place the flatbread or dough on a baking stone or a preheated baking sheet. Brush the edges lightly with olive oil to ensure a golden, crackly crust.
- Bake the plain flatbread for about 5-7 minutes until it begins to firm up and show light golden spots. Remove from the oven and spread an even layer of mascarpone cheese across the surface, leaving a small border for the crust.
- Arrange the sliced strawberries and blueberries over the cheese. Drizzle the honey over the berries to help them macerate and caramelize during the second bake.
- Return the flatbread to the oven for another 8-10 minutes. You are looking for the berries to soften and release their juices and the cheese to become slightly bubbly. Once finished, remove from the oven, drizzle with balsamic glaze, and scatter fresh basil leaves over the top. Slice into long strips for easy grabbing from the board.
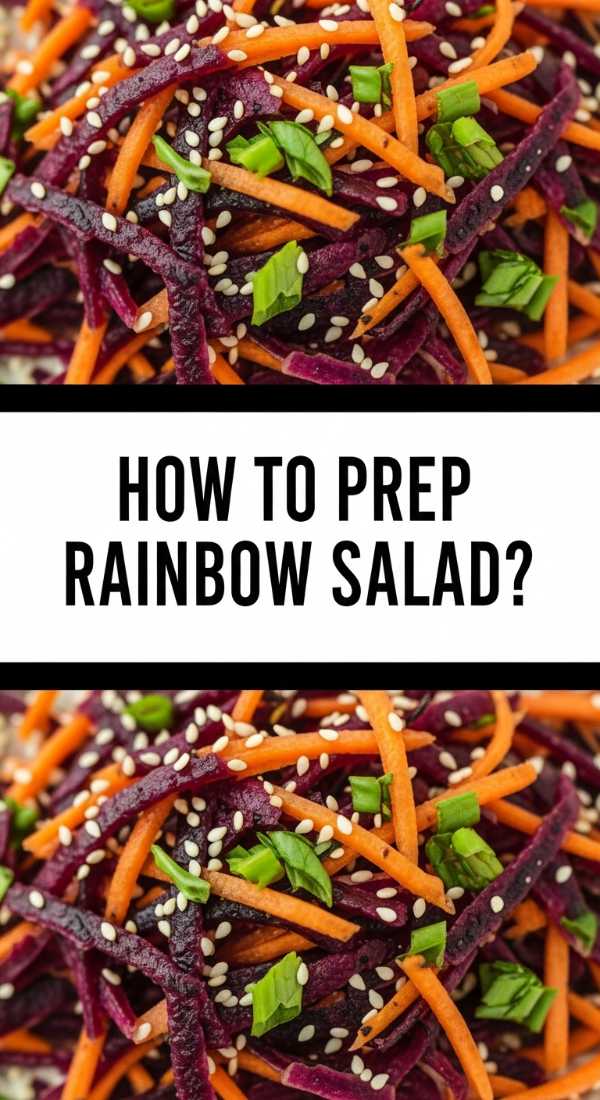
How to prep rainbow salad?

Why we love this
A rainbow salad is the visual anchor of a viral board, providing a much-needed freshness that cleanses the palate between richer snacks. It’s a celebration of nature’s palette—deep purples, bright oranges, and vivid greens that look like an artist’s canvas. The sensory experience is all about the ‘crunch factor’; the snap of bell peppers combined with the crispness of kale and the juice of cherry tomatoes creates a refreshing explosion of textures. It smells like a dew-covered garden and feels incredibly light and energizing, making it the perfect healthy balance to the more indulgent items on your spread.
Ingredients
- 2 cups shredded kale or spinach
- 1 cup shredded purple cabbage
- 1 yellow bell pepper, thinly sliced
- 1 cup cherry tomatoes, halved
- 1 large carrot, ribboned with a peeler
- 1/2 cup edamame, shelled
- Lemon-tahini dressing (tahini, lemon juice, maple syrup, water)
How to make it
- Start by prepping your kale. Place the shredded kale in a large bowl and add a teaspoon of olive oil and a pinch of salt. Massage the leaves with your hands for 2 minutes until they turn dark green and feel soft. This removes the bitterness and makes the texture much more pleasant.
- Use a vegetable peeler to create long, elegant ribbons of carrots and thinly slice the bell peppers and cabbage. Visual variety is key here, so aim for different shapes for each color of the rainbow.
- Layer the vegetables in a shallow bowl or directly on the board in a gradient fashion (red to purple) to maximize the ‘wow’ factor. Keep the dressing on the side to prevent the vegetables from wilting if the board sits out for a while.
- Whisk together the tahini, lemon juice, and a touch of maple syrup, adding water a teaspoon at a time until it reaches a pourable consistency. Drizzle lightly just before serving or provide small dipping cups for your guests.
How to layer vegetable lasagna?

Why we love this
Vegetable lasagna is the ultimate comfort food, offering layers of silky pasta and rich, roasted vegetables that feel like a warm hug. The aroma of garlic, bubbling mozzarella, and slow-cooked marinara sauce is enough to draw anyone to the table. We love it because it’s a masterclass in textures—from the slightly chewy pasta sheets to the soft, roasted zucchini and the creamy ricotta cheese. It’s a dense, satisfying dish that provides a hearty anchor to a snack board, especially when cut into small, manageable squares that show off the beautiful internal architecture of the layers.
Ingredients
- 9 no-boil lasagna noodles
- 2 cups marinara sauce
- 15 oz ricotta cheese
- 1 egg (to bind the ricotta)
- 2 cups shredded mozzarella
- 1 zucchini, thinly sliced
- 1 red bell pepper, roasted and sliced
- 2 cups fresh spinach, sautéed
- 1/2 cup grated Parmesan
How to make it
- Preheat your oven to 375°F (190°C). In a medium bowl, mix the ricotta cheese with the egg, a handful of Parmesan, and sautéed spinach. Season with salt, pepper, and nutmeg for a professional flavor profile.
- In an 8×8 inch baking dish (perfect for thicker layers), spread a thin layer of marinara sauce. Lay three noodles on top. Spread half of the ricotta mixture over the noodles, then layer half of the zucchini and bell peppers. Cover with more sauce and a sprinkle of mozzarella.
- Repeat the layering process: noodles, remaining ricotta, remaining vegetables, sauce, and cheese. For the final layer, place the last three noodles, the remaining sauce, and a generous coating of mozzarella and Parmesan to create a golden, bubbly crust.
- Cover the dish with foil (ensuring it doesn’t touch the cheese) and bake for 25 minutes. Remove the foil and bake for another 15 minutes until the cheese is browned and the sauce is bubbling. Crucial step: Let the lasagna rest for at least 15-20 minutes before cutting. This allows the layers to set so you get clean, beautiful squares for your board.
How to grill corn elote?
Why we love this
There is nothing quite like the smoky, charred aroma of corn elote fresh off the grill. This dish is a sensory powerhouse: the sweetness of the corn kernels popping under your teeth, the creamy tang of the Mexican crema, and the salty, crumbly texture of Cotija cheese. It’s messy in the best way possible, finished with a dusting of chili powder that adds a hint of heat and a vibrant red hue. It feels like a summer street fair and adds an earthy, rustic element to your board that is both visually striking and incredibly fun to eat.
Ingredients
- 4 ears of corn, shucked
- 1/4 cup Mexican crema or mayonnaise
- 1/2 cup crumbled Cotija cheese
- 1 teaspoon ancho chili powder
- 1/4 cup chopped fresh cilantro
- 1 lime, cut into wedges
- 1 tablespoon melted butter
How to make it
- Preheat your grill to medium-high heat. Brush the shucked corn lightly with melted butter and a pinch of salt. This helps the kernels caramelize and prevents sticking.
- Place the corn directly on the grill grates. Grill for about 10-12 minutes, turning every 2-3 minutes. You are looking for even char marks and kernels that look bright yellow and slightly translucent. This high-heat searing locks in the sugar and adds a smoky depth.
- Once the corn is charred and tender, remove it from the grill. While still hot, use a pastry brush to coat each ear with a thin, even layer of Mexican crema. The heat will melt the crema slightly, allowing it to seep into the gaps between the kernels.
- Immediately roll the corn in the crumbled Cotija cheese until well-coated. Sprinkle with chili powder and cilantro. For a snack board, you can serve them whole with sticks inserted into the ends, or cut them into smaller ‘ribs’ for easier grazing. Serve with lime wedges to cut through the richness of the cheese.
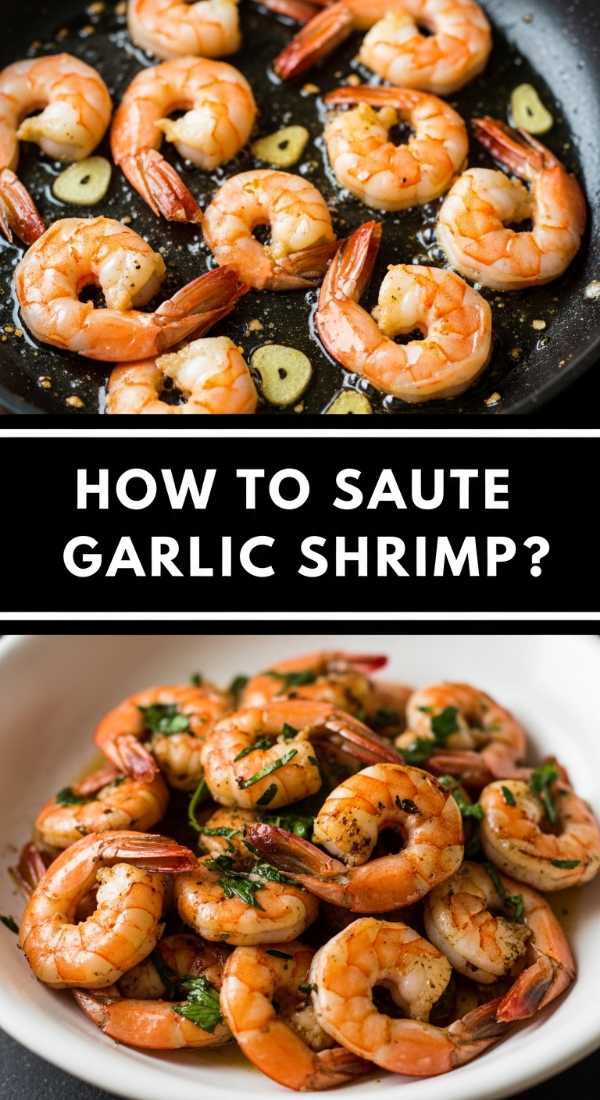
How to sauté garlic shrimp?

Why we love this
Garlic shrimp is the ultimate ‘fast gourmet’ dish that looks and tastes like a million bucks. The sound of shrimp hitting a hot, buttery pan is music to any food lover’s ears, and the scent of toasted garlic and white wine is simply irresistible. These shrimp come out plump, succulent, and coated in a glossy, savory sauce that begs for a piece of crusty bread. They provide a high-protein, elegant element to the board, with their pink-orange curves adding a sophisticated aesthetic. Each bite is a burst of Mediterranean flavor that is light yet deeply satisfying.
Ingredients
- 1 lb large shrimp, peeled and deveined (tail on for aesthetics)
- 4 cloves garlic, minced
- 3 tablespoons unsalted butter
- 1 tablespoon olive oil
- 1/4 cup dry white wine (like Sauvignon Blanc)
- 1/4 teaspoon red pepper flakes
- 2 tablespoons fresh parsley, chopped
- Salt and lemon juice to taste
How to make it
- Pat the shrimp extremely dry with paper towels. This is a professional secret: moisture is the enemy of a good sear. Season the shrimp lightly with salt and red pepper flakes.
- In a large skillet, heat the olive oil and 1 tablespoon of butter over medium-high heat. Once the butter is foaming, add the shrimp in a single layer. Cook for 1-2 minutes until they turn pink on the bottom, then flip.
- Add the remaining butter and the minced garlic to the pan. Sauté for just 30-60 seconds—be careful not to burn the garlic, as it will turn bitter. Pour in the white wine; it will sizzle and deglaze the pan, picking up all the flavorful browned bits.
- Let the wine reduce by half (about 1-2 minutes) while tossing the shrimp to coat them in the forming sauce. Remove from the heat immediately once the shrimp are opaque and curled into a ‘C’ shape. Garnish with fresh parsley and a squeeze of lemon. Serve in a small decorative bowl in the center of your board.
How to roast citrus chicken?
Why we love this
Roast citrus chicken brings a bright, sunny energy to the snack board with its crispy, herb-rubbed skin and incredibly juicy interior. The aroma of roasting oranges and lemons mingling with rosemary and thyme is classic and comforting, yet the citrus adds a modern, zesty twist. We love the way the fruit slices caramelize in the oven, becoming soft and sweet-tart garnishes themselves. It’s a versatile protein that feels substantial and elevated, providing a savory, aromatic anchor that pairs beautifully with everything from fresh greens to crusty bread.
Ingredients
- 1.5 lbs chicken thighs (bone-in, skin-on for best flavor)
- 1 orange, sliced into rounds
- 1 lemon, sliced into rounds
- 3 tablespoons olive oil
- 2 cloves garlic, smashed
- 1 tablespoon fresh rosemary, chopped
- 1 teaspoon smoked paprika
- Salt and black pepper
How to make it
- Preheat your oven to 400°F (200°C). In a large bowl, whisk together the olive oil, rosemary, smoked paprika, garlic, salt, and pepper. Add the chicken thighs and toss thoroughly, ensuring the marinade gets under the skin for maximum flavor penetration.
- Arrange the orange and lemon slices on a large rimmed baking sheet or in a roasting pan. Place the chicken thighs on top of the citrus slices. This acts as a natural roasting rack, flavoring the meat from the bottom and preventing the skin from getting soggy.
- Roast for 30-35 minutes. For extra crispy skin, turn the broiler on for the last 2-3 minutes, watching closely to ensure the skin turns deep golden and crackly without burning.
- Check the internal temperature with a meat thermometer; it should reach 165°F. Let the chicken rest for 10 minutes before slicing into smaller pieces for the board. The resting period allows the juices to redistribute, ensuring every bite is succulent. Arrange the caramelized citrus slices around the chicken on the board for a beautiful finish.
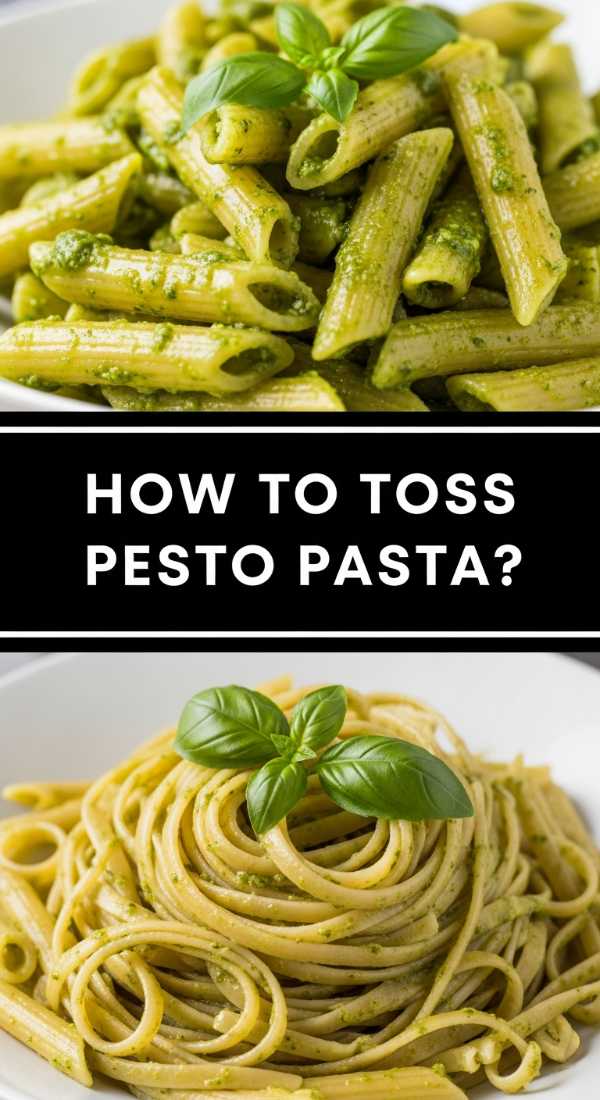
How to toss pesto pasta?

Why we love this
Pesto pasta is a vibrant, emerald-green delight that brings an earthy, herbaceous soul to your snack board. The smell of fresh basil, toasted pine nuts, and sharp Parmesan is intoxicating and instantly recognizable. We love the way the sauce clings to every ridge of the pasta, creating a silky, rich mouthfeel that isn’t heavy. It’s a dish that celebrates simplicity and high-quality ingredients, offering a cool or room-temperature option that remains delicious throughout the duration of a party. Its bright color and fragrant profile make it a standout component that feels both rustic and refined.
Ingredients
- 12 oz fusilli or trofie pasta
- 2 cups fresh basil leaves
- 1/2 cup grated Parmesan cheese
- 1/3 cup pine nuts, toasted
- 2 cloves garlic
- 1/2 cup extra virgin olive oil
- 1/2 cup frozen peas (optional, for extra green color)
- Salt and pepper to taste
How to make it
- Cook your pasta in a large pot of heavily salted water. Aim for ‘al dente’—usually 1-2 minutes less than the package directions. Before draining, reserve 1 cup of the starchy pasta water; this is the secret to a silky sauce.
- While the pasta cooks, make the pesto. In a food processor, pulse the basil, toasted pine nuts, garlic, and Parmesan until finely minced. With the motor running, slowly drizzle in the olive oil until a smooth, thick paste forms. Season with salt and pepper.
- Drain the pasta and return it to the pot (off the heat). Add the pesto and half of the reserved pasta water. Toss vigorously. The starch in the water will emulsify with the oil in the pesto, creating a sauce that coats the pasta perfectly rather than sitting at the bottom of the bowl.
- Add more pasta water if needed to reach your desired consistency. For a board, let it cool slightly and serve in a wide, shallow bowl topped with extra Parmesan and a few fresh basil leaves. This prevents the pasta from sticking together while it sits.
How to sear steak fajitas?
[IMAGE_10]
Why we love this
Steak fajitas bring a dramatic, sizzling energy to any food spread. The sight of thin, perfectly charred strips of beef alongside vibrant, softened peppers and onions is a visual feast. We love the deep, umami flavor of a good sear combined with the zing of a lime-and-cumin marinade. The texture is all about the contrast between the tender, medium-rare steak and the slightly crunchy vegetables. It’s an interactive, bold dish that fills the room with a smoky, savory aroma, making it the ultimate savory highlight of a viral snack board.
Ingredients
- 1 lb flank or skirt steak
- 2 bell peppers (different colors), sliced into strips
- 1 large white onion, sliced into wedges
- 2 tablespoons olive oil
- 2 tablespoons soy sauce
- 1 tablespoon lime juice
- 1 teaspoon cumin
- 1/2 teaspoon chili powder
How to make it
- In a gallon-sized bag, combine the soy sauce, lime juice, cumin, chili powder, and 1 tablespoon of olive oil. Add the steak and marinate for at least 30 minutes (or up to 4 hours) in the fridge. This acid-based marinade tenderizes the tough fibers of the flank steak.
- Heat a cast-iron skillet over high heat until it is nearly smoking. Add a tablespoon of oil. Remove the steak from the marinade and pat it dry. Sear the steak for 3-4 minutes per side for medium-rare. The high heat is essential for the ‘Maillard reaction,’ creating that flavorful dark crust.
- Remove the steak to a cutting board and let it rest for at least 10 minutes. While the steak rests, throw the peppers and onions into the same hot skillet. The moisture from the veggies will deglaze the pan. Cook for 5-6 minutes until they are charred but still have a bit of ‘snap.’
- Slice the steak against the grain into thin strips. This is the most important step for tenderness! Combine the steak strips with the peppers and onions on a platter or directly on the board, garnished with fresh cilantro and served with warm tortillas on the side.
The Ultimate Board Awaits
Creating a viral food board is less about following a rigid set of rules and more about embracing the joy of variety and the beauty of fresh ingredients. By combining these different elements—from the savory sear of steak fajitas to the sweet, jammy goodness of berry flatbread—you create a dining experience that is interactive, visually stunning, and undeniably delicious. Remember to play with heights using small bowls, fill in gaps with nuts or grapes, and always, always serve with a smile. Your guests will be talking about this feast long after the last crumb is gone!