
There is something truly magical about the way a shared meal can transform a simple afternoon into a lifelong memory. Picture this: the golden hour sun is streaming through the windows, a chilled bottle of rosé is sweating on the counter, and you are surrounded by the laughter of your favorite people. Instead of being stuck in the kitchen over a hot stove, you’re right there in the middle of it all, gesturing toward a sprawling, vibrant board filled with the season’s best flavors. This isn’t just about food; it’s about the art of the ‘slow gather’—where the host is as relaxed as the guests and the table becomes a canvas of color and conversation.
The secret to effortless entertaining isn’t a secret at all; it’s the ‘Viral Simple Food Board.’ It’s the ultimate evolution of the charcuterie craze, but focused on fresh, cooked, and assembled bites that feel substantial yet light. By combining textures, temperatures, and tastes—from smoky grilled peaches to sizzling garlic shrimp—you create an interactive experience that invites people to graze and linger. Let’s dive into the components that will make your board the highlight of the season and the star of your social feed.
How to grill peach salad?

Why we love this
This dish is the essence of summer captured on a plate. The heat of the grill caramelizes the natural sugars in the peaches, creating a deep, smoky sweetness that contrasts beautifully with the sharp, creamy tang of goat cheese. As you bite into a slice, you get the warmth of the fruit followed by the peppery bite of fresh arugula and the crunch of toasted pecans. It smells like a backyard barbecue and feels like a sophisticated garden party, making it an absolute crowd-pleaser that looks stunning nestled on a large wooden board.
Ingredients
- 4 ripe but firm yellow peaches, halved and pitted
- 2 cups fresh baby arugula
- 4 oz goat cheese crumbles
- 1/4 cup toasted pecans
- 2 tbsp balsamic glaze
- 1 tbsp olive oil
- Flaky sea salt
How to make it
- Preheat your grill or a cast-iron grill pan to medium-high heat. You want it hot enough to sear quickly without turning the fruit to mush.
- Lightly brush the cut sides of the peaches with a neutral oil or light olive oil to prevent sticking and encourage those beautiful charred grill marks.
- Place peaches cut-side down on the hot grates. Grill for 3-4 minutes without moving them; you are looking for distinct char lines and a slight softening of the fruit.
- Carefully flip the peaches using tongs and grill for an additional 1-2 minutes on the skin side just to warm them through.
- While the peaches are still warm, arrange them over a bed of fresh arugula on your board.
- Immediately sprinkle with goat cheese and pecans so the cheese softens slightly from the residual heat.
- Drizzle generously with balsamic glaze and a pinch of flaky salt just before serving to lock in the flavors.
How to fry zucchini fritters?
Why we love this
There is nothing quite as satisfying as the crunch of a perfectly fried zucchini fritter. These little golden cakes are crispy on the outside while remaining tender and herb-fragrant on the inside. The aroma of frying batter mixed with fresh dill and green onions is enough to bring everyone into the kitchen. They serve as the perfect savory anchor for your food board, offering a warm, salty contrast to the fresher fruits and vegetables. When dipped in a cold yogurt sauce, they provide a textural harmony that is deeply comforting and incredibly addictive.
Ingredients
- 2 medium zucchinis, grated
- 1/2 cup all-purpose flour
- 1 large egg, beaten
- 2 green onions, thinly sliced
- 1/4 cup crumbled feta cheese
- 1 tsp dried dill
- Vegetable oil for frying
- Salt and pepper
How to make it
- Place the grated zucchini in a colander and sprinkle with a half teaspoon of salt. Let it sit for 10 minutes; this is a non-negotiable step to draw out excess moisture.
- Squeeze the zucchini using a clean kitchen towel or cheesecloth until it is as dry as possible. If the mixture is too wet, the fritters will be soggy rather than crispy.
- In a large bowl, combine the dried zucchini, beaten egg, green onions, feta, dill, and black pepper.
- Gradually stir in the flour until a thick batter forms. Do not overmix, or the texture will become tough.
- Heat about 1/4 inch of vegetable oil in a large skillet over medium-high heat. Test the oil by dropping a small bit of batter in; if it sizzles immediately, it’s ready.
- Drop large spoonfuls of the mixture into the hot oil, flattening them slightly with the back of the spoon.
- Fry for 2-3 minutes per side until deeply golden brown and crispy. Drain on paper towels before placing them on the board to keep them from becoming greasy.
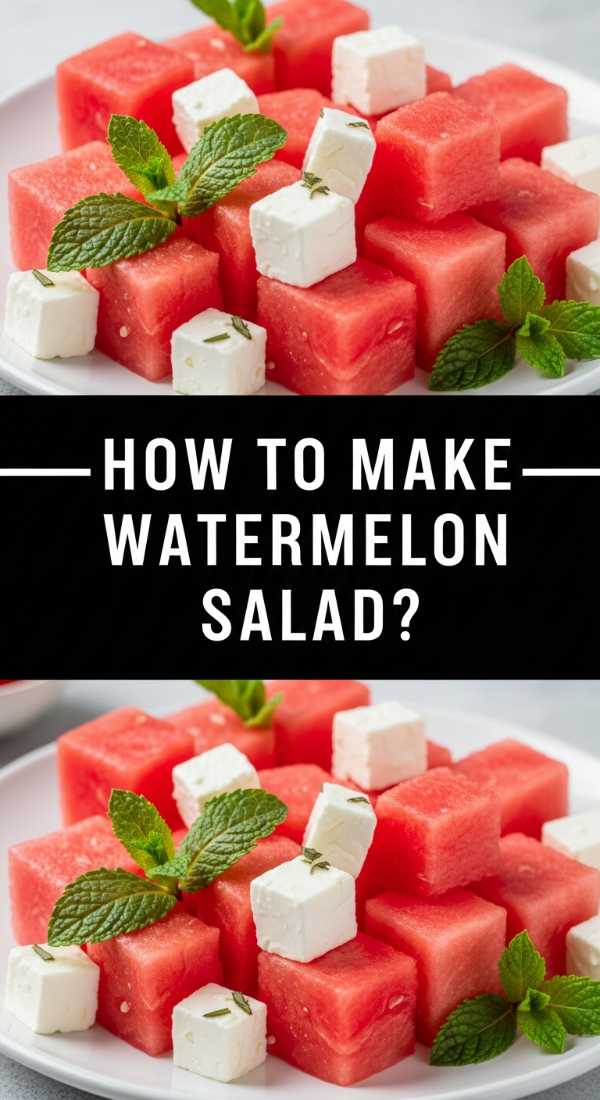
How to make watermelon salad?

Why we love this
Watermelon salad is the ultimate refresher, providing an icy, hydrating crunch that cuts through the richness of other board components. The combination of sweet melon, salty feta, and aromatic mint creates a flavor profile that is both simple and remarkably complex. It looks like a jewel box on your board, with the vibrant pinks and deep greens popping against the wood. The scent of fresh lime zest hitting the cold melon is instantly revitalizing, making this the most requested dish for hot afternoon gatherings.
Ingredients
- 4 cups seedless watermelon, cubed
- 1/2 cup feta cheese, cubed or crumbled
- 1/4 cup red onion, very thinly sliced
- 1/2 cup fresh mint leaves, torn
- Juice and zest of 1 lime
- 1 tbsp extra virgin olive oil
How to make it
- Ensure your watermelon is thoroughly chilled before starting; the temperature contrast is part of the appeal.
- Slice the watermelon into uniform 1-inch cubes to ensure every bite has a balanced ratio of fruit to topping.
- If you find the red onion too sharp, soak the slices in ice water for 5 minutes then pat dry; this removes the ‘bite’ while keeping the crunch.
- In a small bowl, whisk together the lime juice, lime zest, and olive oil to create a bright, citrusy emulsion.
- Layer the watermelon and red onion in a shallow bowl or directly on a section of your board.
- Toss gently with the lime dressing, ensuring the fruit is lightly coated.
- Top with the feta cheese and torn mint leaves at the very last second to prevent the mint from bruising and the cheese from discoloring the melon.
How to glaze summer salmon?

Why we love this
A glazed salmon fillet adds a touch of luxury and a hearty protein element to your viral food board. The glaze creates a sticky, lacquer-like finish that glistens under the lights, while the fish remains buttery and flake-tender inside. The aroma of honey and soy caramelizing over high heat is irresistible, promising a savory-sweet depth that pairs perfectly with the lighter salads on the board. It’s a sophisticated addition that proves ‘simple’ can still be incredibly impressive.
Ingredients
- 1 lb salmon fillet, skin-on
- 2 tbsp honey
- 1 tbsp soy sauce
- 1 tsp grated fresh ginger
- 1 clove garlic, minced
- 1 tbsp lime juice
- Fresh cilantro for garnish
How to make it
- Whisk together the honey, soy sauce, ginger, garlic, and lime juice in a small bowl until the honey is fully incorporated.
- Pat the salmon fillet completely dry with paper towels; moisture is the enemy of a good sear.
- Heat a non-stick or cast-iron skillet over medium-high heat with a teaspoon of oil.
- Place the salmon skin-side down in the hot pan. Press down lightly with a spatula to ensure even contact for crispy skin. Cook for 4-5 minutes.
- Flip the fish carefully and pour the glaze into the pan. The glaze will bubble and thicken almost instantly.
- Cook for another 2-3 minutes, using a spoon to constantly baste the salmon with the thickening glaze until it reaches an internal temperature of 145°F.
- Remove from heat and let it rest for 3 minutes. The residual heat will finish the cooking and the glaze will set into a beautiful sheen.
How to bake berry tarts?

Why we love this
Individual berry tarts are the perfect ‘sweet’ corner for your food board, offering a buttery, flaky pastry shell filled with the tart burst of summer berries. They are visually charming and much easier to serve than a full cake. The smell of baking pastry dough is the ultimate scent of a welcoming home. Each bite delivers a mix of crisp crust and macerated fruit juices, providing a dessert element that isn’t overly sugary but celebrates the natural ripeness of the season’s harvest.
Ingredients
- 1 sheet pre-made puff pastry, thawed
- 1 cup mixed berries (blueberries, raspberries, blackberries)
- 2 tbsp sugar
- 1 tsp lemon zest
- 1 egg (for egg wash)
- Apricot jam for glazing (optional)
How to make it
- Preheat your oven to 400°F (200°C) and line a baking sheet with parchment paper.
- Unroll the puff pastry and cut into 3-inch squares or circles. Use a knife to score a smaller border inside each shape, being careful not to cut all the way through.
- Prick the center of each tart with a fork to prevent it from rising too much in the middle.
- In a bowl, toss the berries with sugar and lemon zest until they are lightly coated.
- Mound a tablespoon of the berry mixture into the center of each pastry square.
- Brush the edges of the pastry with a beaten egg wash; this ensures a deep golden, professional-looking finish.
- Bake for 15-18 minutes until the pastry is puffed and golden brown. For a viral-worthy shine, brush the warm fruit with a little melted apricot jam once they come out of the oven.
How to roast summer corn?
Why we love this
Roasted corn brings a rustic, charred element to the board that feels wonderfully tactile and grounded. There is something primal and joyful about biting into sweet corn that has been kissed by fire. The kernels become concentrated in flavor, snapping with sweetness against a backdrop of smoky paprika and silky butter. It’s a sensory powerhouse—yellow, bright, and smelling of toasted husks—making it the perfect ‘finger food’ for a casual yet elevated gathering.
Ingredients
- 4 ears of fresh corn, husks removed
- 2 tbsp melted butter
- 1/2 tsp smoked paprika
- 1/4 cup cotija cheese or parmesan
- Fresh cilantro and lime wedges
How to make it
- Adjust your oven rack to the top position and turn on the broiler, or preheat your grill to high.
- Brush each ear of corn generously with melted butter mixed with smoked paprika and a pinch of salt.
- Place the corn on a baking sheet or directly on the grill grates.
- Roast/grill for about 10-12 minutes, turning every 2-3 minutes. You are looking for the kernels to turn bright yellow and develop dark brown or black charred spots evenly around the cob.
- The corn should stay crisp-tender; overcooking will make the kernels chewy rather than snappy.
- Once charred to your liking, remove and immediately sprinkle with the cheese so it adheres to the warm butter.
- Serve with lime wedges on the side for guests to squeeze over the top for a bright acidic finish.
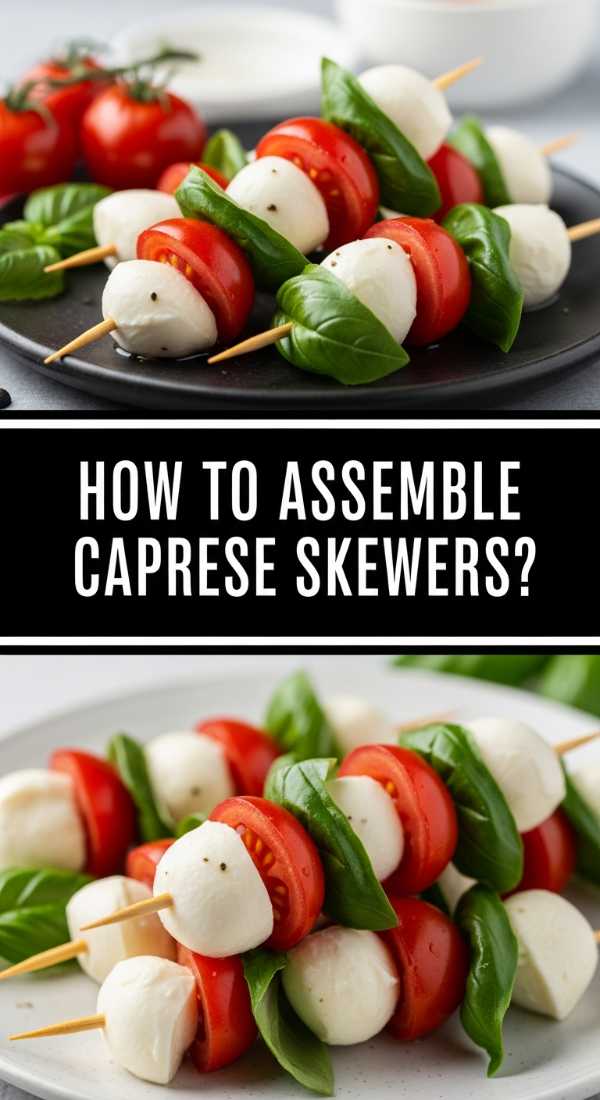
How to assemble caprese skewers?
Why we love this
Caprese skewers are the ultimate bite-sized version of the classic Italian salad, making them perfect for a board where guests can simply grab and go. They offer a refreshing burst of milky mozzarella, acidic tomato, and herbaceous basil. The glossy drizzle of balsamic reduction adds a sophisticated touch that looks beautiful on camera. It’s a clean, bright, and familiar flavor profile that acts as a palate cleanser between the more savory or spicy items on your display.
Ingredients
- 1 pint cherry tomatoes
- 8 oz fresh bocconcini (mini mozzarella balls)
- 1 bunch fresh basil leaves
- Balsamic glaze
- Extra virgin olive oil
- Bamboo skewers or toothpicks
How to make it
- Wash and dry your tomatoes and basil thoroughly. Moisture on the basil can cause it to wilt or turn black prematurely.
- Start the skewer with a cherry tomato, which provides a sturdy base.
- Fold a fresh basil leaf in half or thirds and thread it onto the skewer next. This keeps the herb’s aroma trapped and ready to release when bitten.
- Add a mini mozzarella ball to finish the skewer. Ensure the cheese is at room temperature for the best creamy texture.
- Arrange the skewers in a fan pattern on your board to create visual interest and height.
- Just before guests arrive, whisk a tiny bit of olive oil with salt and pepper and brush it over the skewers to keep them glistening.
- Drizzle the balsamic glaze in a zigzag pattern across the entire arrangement for that ‘viral’ professional finish.
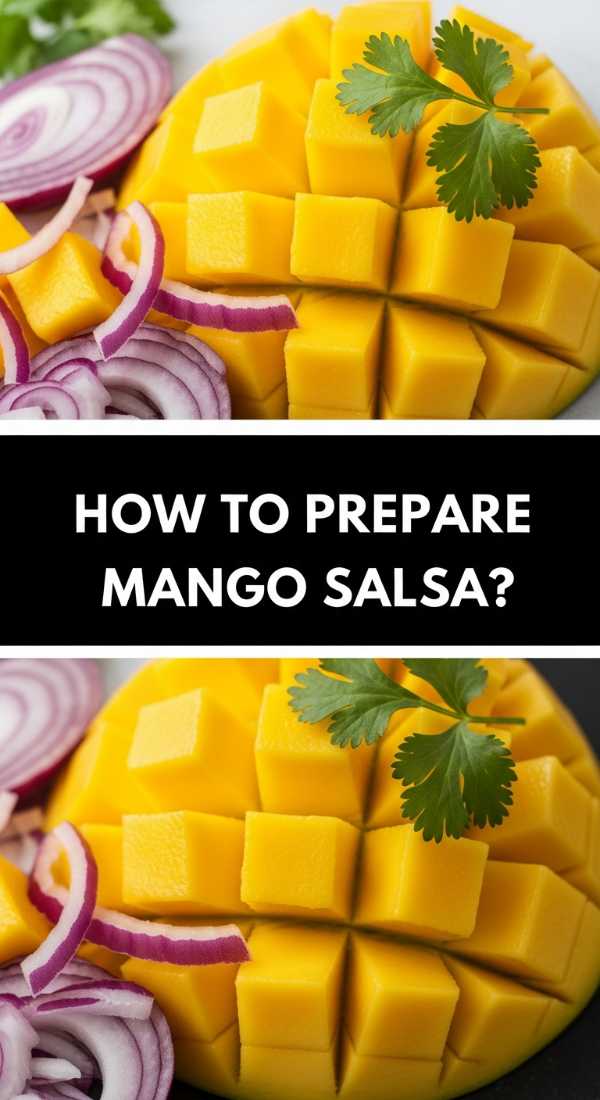
How to prepare mango salsa?
Why we love this
Mango salsa is like sunshine in a bowl. Its vibrant orange and red hues draw the eye immediately, and its tropical, zesty flavor profile provides an incredible lift to grilled meats or chips. The texture is a delightful mix of soft, juicy fruit and the sharp crunch of bell peppers and onions. It smells like a tropical vacation and provides a sweet-and-heat balance that keeps people coming back for ‘just one more’ scoop. It’s the perfect versatile condiment for any food board.
Ingredients
- 2 ripe mangoes, diced
- 1 red bell pepper, finely diced
- 1/2 small red onion, finely diced
- 1 jalapeno, seeded and minced
- 1/4 cup chopped fresh cilantro
- Juice of 2 limes
- Pinch of salt
How to make it
- The key to a great salsa is the ‘uniform dice.’ Aim to cut the mango, pepper, and onion into similar 1/4-inch pieces so every spoonful has a bit of everything.
- To dice the mango easily, cut the ‘cheeks’ off the pit, score a grid into the flesh without cutting the skin, and then invert the skin to pop the cubes out.
- Combine the diced mango, bell pepper, red onion, and jalapeno in a glass or ceramic bowl (avoid metal to keep the flavors clean).
- Stir in the fresh cilantro and lime juice. The lime juice acts as a preservative and flavor enhancer.
- Season with a pinch of salt to draw out the juices of the fruit.
- Let the salsa sit at room temperature for at least 20 minutes before serving. This allows the flavors to macerate and the onion to mellow.
- Serve in a hollowed-out mango skin or a bright ceramic bowl in the center of your board.
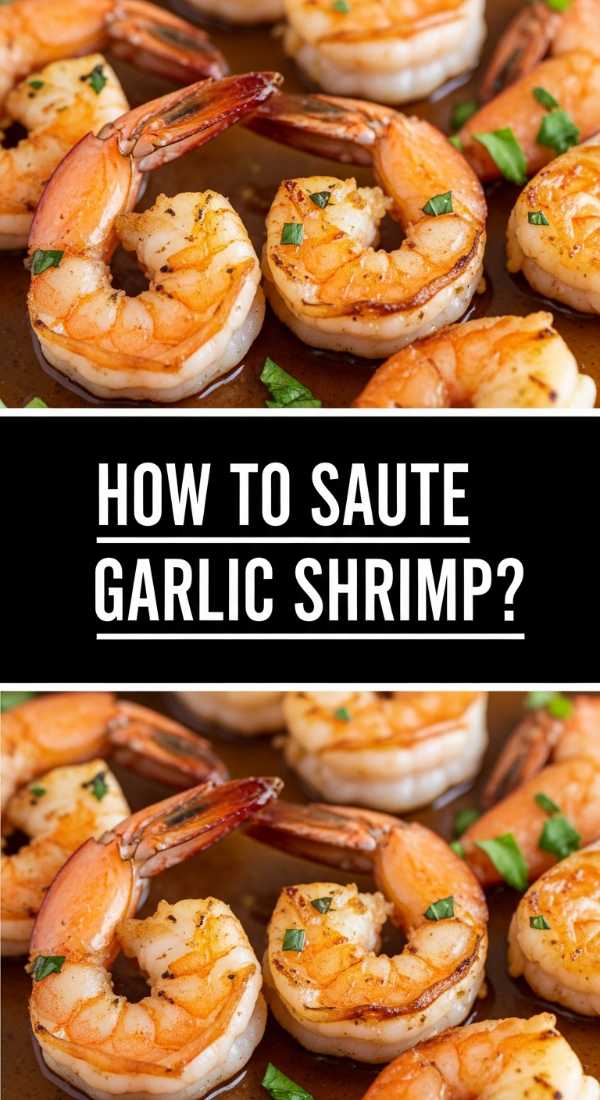
How to saute garlic shrimp?

Why we love this
Garlic shrimp is the high-protein ‘wow’ factor that every viral board needs. The sizzling sound as they hit the pan and the intoxicating aroma of garlic and butter will have guests hovering before the board is even finished. These shrimp are succulent, snap-tender, and coated in a silky, savory sauce that begs for a piece of crusty bread. They bring a warm, savory luxury to the spread, making the entire board feel like a complete, gourmet meal rather than just snacks.
Ingredients
- 1 lb large shrimp, peeled and deveined
- 4 cloves garlic, minced
- 3 tbsp unsalted butter
- 1 tbsp olive oil
- 1/2 tsp red pepper flakes
- Fresh parsley, chopped
- Lemon wedges
How to make it
- Pat the shrimp completely dry with paper towels. If they are wet, they will steam instead of sear, losing that beautiful golden exterior.
- Heat the olive oil and 1 tablespoon of butter in a large skillet over medium-high heat. The oil prevents the butter from burning at high temperatures.
- Add the shrimp in a single layer. Do not overcrowd the pan; work in batches if necessary.
- Cook the shrimp for 2 minutes on the first side until they start to turn pink and opaque at the edges.
- Flip the shrimp and immediately add the remaining butter, minced garlic, and red pepper flakes.
- Sauté for another 1-2 minutes, tossing constantly so the garlic browns slightly but does not burn. The shrimp are done when they form a ‘C’ shape; if they curl into an ‘O’, they are overcooked.
- Remove from heat, toss with fresh parsley and a squeeze of lemon, and serve immediately while the butter is still foamy.
How to toss strawberry salad?
[IMAGE_10]
Why we love this
A strawberry salad is a sophisticated way to incorporate fruit into a savory course. The sweetness of the berries, the peppery bite of arugula or baby spinach, and the crunch of poppy seeds create a multi-dimensional experience. It feels light and ethereal, like a spring breeze. The visual of the bright red strawberries against deep green leaves is classic and appetizing. It’s the kind of dish that feels healthy and indulgent at the same time, rounding out the board with a final touch of fresh elegance.
Ingredients
- 1 lb fresh strawberries, hulled and sliced
- 5 oz baby spinach or arugula
- 1/4 cup slivered almonds, toasted
- 1/4 cup red onion, paper-thin slices
- 3 tbsp poppyseed dressing
How to make it
- Select the ripest strawberries possible; they should be fragrant and red all the way to the stem.
- Slice the strawberries vertically to showcase their beautiful heart shape.
- Place the greens in a very large bowl. You want plenty of room to toss without crushing the leaves.
- Add the sliced strawberries, red onion, and half of the toasted almonds.
- Drizzle the poppyseed dressing around the edges of the bowl rather than directly on top; this allows for more even distribution when tossing.
- Gently lift and turn the salad using large spoons or clean hands until the leaves are just glistening.
- Transfer to the board and sprinkle the remaining almonds on top for a final bit of texture and visual appeal.
Bringing It All Together
Building a viral simple food board is about more than just the recipes; it’s about the joy of sharing and the ease of the process. By choosing fresh ingredients and focusing on a few key techniques—like the perfect sear on a peach or the right crunch on a fritter—you create an experience that guests will talk about long after the last crumb is gone. Remember, there are no mistakes here, only opportunities to explore flavors and enjoy the company of those you love. So, pour a glass of something cold, clear off the table, and start building your masterpiece.