
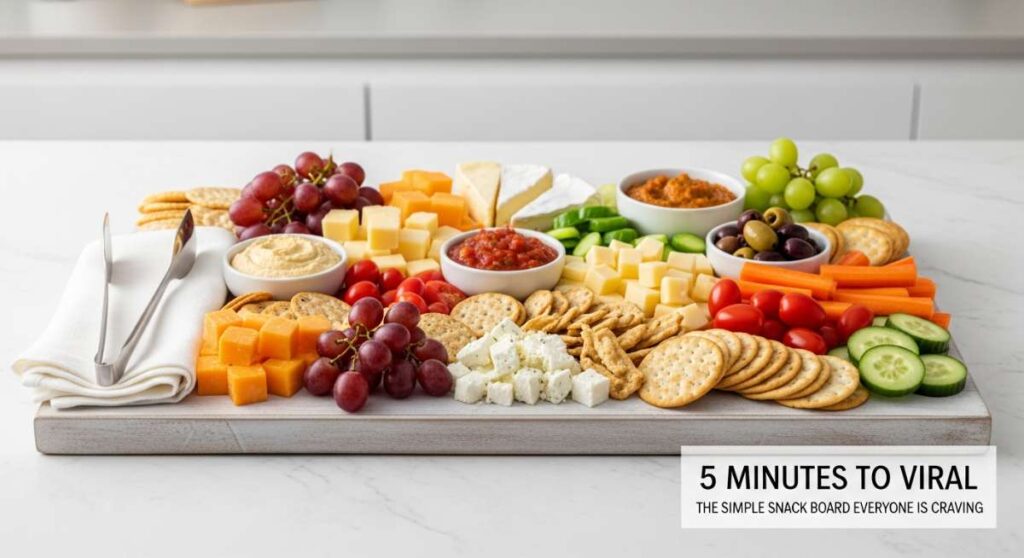
5 Minutes to Viral: The Simple Snack Board Everyone is Craving
There is something inherently magical about a shared meal that looks as good as it tastes. We live in a world of fast-paced scrolls and fleeting trends, but the ‘Ultimate Viral Snack Board’ has remained a staple for a reason: it connects us. I remember the first time I set one of these down on my coffee table; the room went quiet for a split second before everyone reached in, sharing stories and laughter over a mosaic of colors and textures. It’s not just about the food; it’s about that warm, fuzzy feeling of being surrounded by your favorite people.
The beauty of this viral board is its versatility. You don’t need to be a Michelin-starred chef to create a masterpiece that stops the scroll. It’s about balance—pairing something crunchy with something creamy, something savory with something sweet. Whether you’re hosting a cozy movie night or a bustling Sunday brunch, this guide will show you how to master the individual components that turn a simple tray into a viral sensation. Let’s dive into the kitchen and start building your most delicious memory yet.
How to make crispy potatoes?
Why we love this
There is nothing quite like the auditory satisfaction of biting into a perfectly roasted potato that shatters with a crisp crunch before giving way to a fluffy, cloud-like interior. The aroma of rosemary and garlic infusing into the golden skin creates a rustic, earthy scent that fills the entire house with comfort. We love these because they are the ultimate texture play—salty, jagged edges that catch every bit of dipping sauce, making them the undeniable star of any snack board. It’s the kind of side dish that feels like a warm hug for your taste buds.
Ingredients
- 1.5 lbs Yukon Gold potatoes, cubed
- 3 tbsp extra virgin olive oil
- 2 cloves garlic, smashed
- 1 sprig fresh rosemary, chopped
- 1 tsp sea salt
- 1/2 tsp cracked black pepper
How to make it
- Start by par-boiling your potato cubes in a large pot of heavily salted water for about 8-10 minutes. You want them tender on the outside but still firm in the center; this creates the starch slurry needed for maximum crunch.
- Drain the potatoes and let them steam-dry in the colander for 2 minutes. Give them a vigorous shake to roughen up the edges—those fuzzy bits will become the crispiest parts later.
- Preheat your oven to 425°F (220°C) and place a baking sheet inside to get screaming hot.
- In a bowl, toss the potatoes with olive oil, rosemary, garlic, salt, and pepper until thoroughly coated.
- Carefully spread the potatoes onto the hot baking sheet in a single layer, ensuring they aren’t crowded. Roast for 25-30 minutes, flipping halfway through when the bottoms are deep golden brown and release easily from the pan.
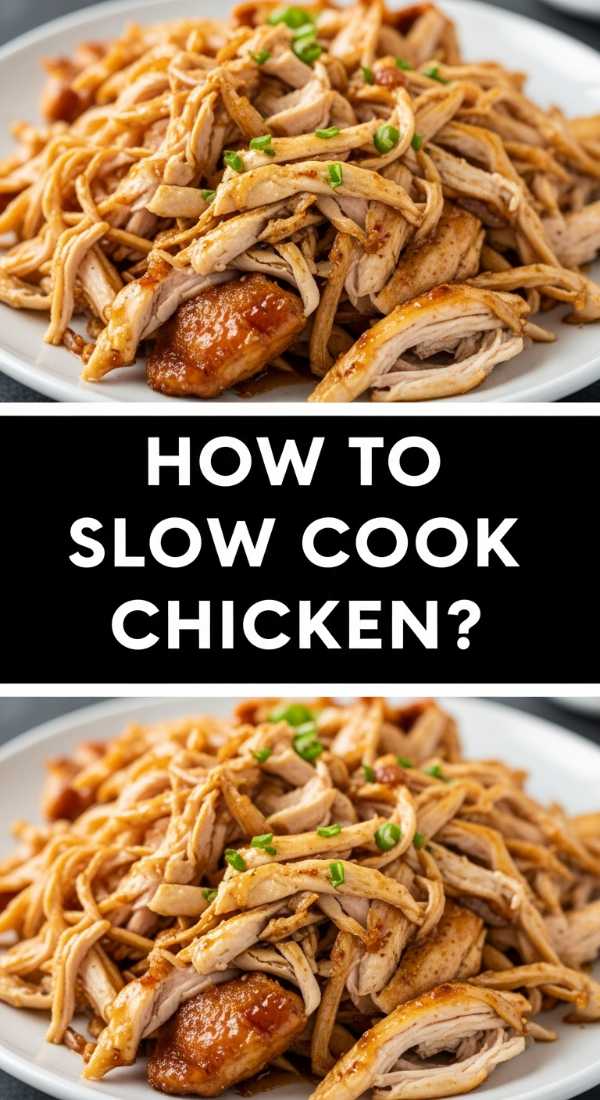
How to slow cook chicken?

Why we love this
Slow-cooked chicken is the epitome of effortless elegance, offering a depth of flavor that quick-cooking methods simply cannot replicate. As the meat simmers in its own juices and aromatics, it transforms into succulent, fork-tender ribbons that melt in your mouth with a rich, savory essence. The gentle heat coaxes out a natural sweetness from the chicken while the herbs permeate every fiber, creating a succulent protein that is as fragrant as it is delicious. It’s the perfect, low-stress centerpiece that lets you focus on your guests while the kitchen does all the work.
Ingredients
- 2 lbs boneless, skinless chicken thighs
- 1 cup low-sodium chicken broth
- 3 cloves garlic, minced
- 1 tbsp Italian seasoning
- 1 tsp onion powder
- Salt and pepper to taste
How to make it
- Begin by patting the chicken thighs dry with paper towels; this ensures the seasonings stick and prevents excess moisture from diluting the flavor. Season generously on both sides with salt, pepper, onion powder, and Italian seasoning.
- Optional but recommended: Sear the chicken in a hot skillet with a teaspoon of oil for 2 minutes per side to develop a golden crust and lock in juices.
- Place the chicken into the slow cooker basin, pouring the chicken broth and minced garlic over the top.
- Cover and set your slow cooker to the ‘Low’ setting. For chicken thighs, 4 to 5 hours is the sweet spot; for breasts, aim for 3 to 4 hours to avoid drying them out.
- The chicken is done when it registers 165°F (74°C) internally and shreds easily with two forks. Let it rest in the liquid for 10 minutes after turning off the heat to ensure it stays incredibly juicy.
How to bake fluffy rolls?
Why we love this
The scent of yeast-leavened dough rising in a warm kitchen is perhaps the most nostalgic aroma in existence, promising a treat that is light, airy, and buttery. These rolls are like edible pillows, with a delicate, paper-thin golden crust that yields to a soft, stretchy interior that practically begs for a smear of salted butter. There is a primal joy in pulling a warm roll apart and watching the steam rise from the center—it’s a sensory experience that feels both indulgent and deeply grounding. They are the perfect vessel for soaking up sauces and adding a touch of sweetness to your board.
Ingredients
- 3 cups all-purpose flour
- 1 cup warm milk (110°F)
- 2 1/4 tsp active dry yeast (1 packet)
- 2 tbsp honey
- 4 tbsp unsalted butter, melted
- 1 tsp salt
- 1 egg (for egg wash)
How to make it
- In a large bowl, combine the warm milk, honey, and yeast. Let it sit for about 5-10 minutes until it becomes frothy and bubbly, indicating the yeast is alive.
- Stir in the melted butter and salt, then gradually add the flour one cup at a time. Mix until a shaggy dough forms.
- Knead the dough on a floured surface for about 8-10 minutes. You are looking for the ‘windowpane test’—the dough should be smooth, elastic, and translucent when stretched thin without tearing.
- Place the dough in a greased bowl, cover with a damp cloth, and let it rise in a warm, draft-free spot for 1 hour or until doubled in size.
- Punch the dough down, divide into 12 equal balls, and place them in a greased baking dish. Let them rise again for 30 minutes. Brush with a beaten egg and bake at 375°F (190°C) for 15-18 minutes until the tops are a shiny golden brown.
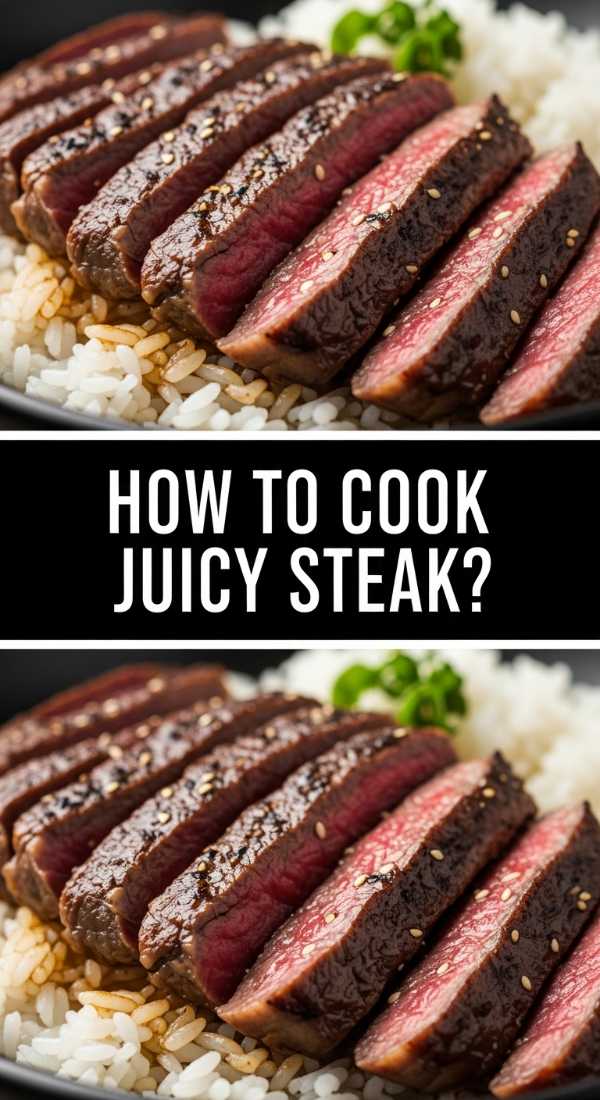
How to cook juicy steak?
Why we love this
A perfectly cooked steak is a masterclass in culinary contrast, featuring a charred, salt-crusted exterior that gives way to a tender, ruby-red center dripping with rich, beefy umami. The sizzle of the meat hitting the cast iron and the subsequent aroma of browning butter and toasted garlic is enough to make anyone’s mouth water in anticipation. We love this for the sheer luxury it adds to a snack board; it’s a high-protein indulgence that feels celebratory and sophisticated. Every bite offers a complex profile of smoke, salt, and succulent fat that lingers on the palate.
Ingredients
- 1 lb Ribeye or New York Strip (1.5 inches thick)
- 2 tbsp high-smoke point oil (avocado or grapeseed)
- 3 tbsp unsalted butter
- 3 cloves garlic, crushed
- 2 sprigs fresh thyme
- Coarse sea salt and cracked black pepper
How to make it
- Remove the steak from the refrigerator at least 30-45 minutes before cooking. This is crucial; a room-temperature steak cooks more evenly than a cold one. Pat it extremely dry with paper towels and season aggressively with salt and pepper.
- Heat a heavy cast-iron skillet over high heat until it starts to slightly smoke. Add the oil and swirl to coat.
- Lay the steak away from you in the pan. Sear undisturbed for 3-4 minutes until a deep brown crust forms. Flip the steak.
- Immediately reduce the heat to medium-high and add the butter, garlic, and thyme to the pan. As the butter melts and foams, use a large spoon to continuously baste the steak with the hot, flavored fat for another 3-4 minutes.
- Remove the steak when it reaches 130°F (54°C) for medium-rare. Transfer to a cutting board and let it rest for at least 10 minutes before slicing against the grain to ensure the juices redistribute.
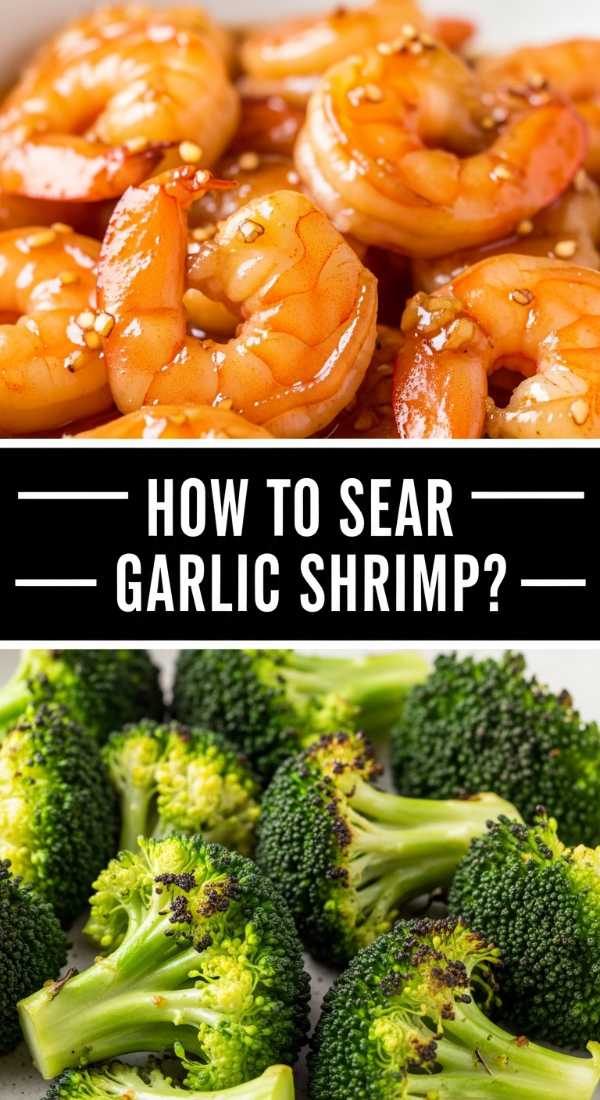
How to sear garlic shrimp?

Why we love this
Garlic shrimp are the ultimate ‘fast-fancy’ food, offering a bright, briny pop of flavor that cuts through the heavier elements of a food board. The way the shrimp curl into tight, pink ‘C’ shapes as they hit the hot pan is visually stunning, and the resulting sauce—a golden emulsion of lemon, butter, and toasted garlic—is liquid gold. We love the snappy texture of a well-seared shrimp, which provides a clean, refreshing contrast to roasted meats or starchy sides. It’s a dish that smells of the Mediterranean and tastes like a summer evening by the sea.
Ingredients
- 1 lb jumbo shrimp, peeled and deveined
- 4 cloves garlic, thinly sliced
- 2 tbsp olive oil
- 1 tbsp unsalted butter
- 1/2 lemon, juiced
- Fresh parsley, chopped
- Pinch of red pepper flakes
How to make it
- Thoroughly pat the shrimp dry. Any moisture on the surface will cause them to steam rather than sear, robbing you of that beautiful golden color.
- Heat the olive oil in a large skillet over medium-high heat. Once shimmering, add the shrimp in a single layer, making sure they don’t overlap.
- Cook for 2 minutes without moving them until the bottoms turn pink and slightly charred. Flip each shrimp.
- Add the butter, sliced garlic, and red pepper flakes to the center of the pan. Sauté for just 1 minute until the garlic is fragrant and translucent, but not brown (burnt garlic is bitter!).
- Toss the shrimp to coat in the garlic butter, squeeze the lemon juice over the top, and sprinkle with parsley. Remove from heat immediately—shrimp are finished when they form a ‘C’ shape; an ‘O’ shape means they are overcooked and rubbery.
How to make creamy pasta?
Why we love this
Creamy pasta is the ultimate comfort food, a velvety embrace of carbs and silkiness that feels both decadent and deeply satisfying. The way a thick, parmesan-infused sauce clings to every ridge of the pasta ensures that each mouthful is a harmonious blend of richness and savory depth. There is a subtle nutty aroma from the aged cheese and a hint of warmth from nutmeg or garlic that makes this dish feel complete. We love it on a board because it acts as a grounding, luxurious base that pairs beautifully with everything from seared steak to roasted vegetables.
Ingredients
- 8 oz pasta (Fettuccine or Penne)
- 1 cup heavy cream
- 1/2 cup freshly grated Parmesan cheese
- 2 tbsp unsalted butter
- 1 clove garlic, minced
- Freshly cracked black pepper and a pinch of nutmeg
How to make it
- Boil a large pot of water and salt it until it ‘tastes like the sea.’ Cook the pasta until it is just shy of al dente (about 2 minutes less than the package directions). Reserve 1 cup of the starchy pasta water before draining.
- In a wide skillet, melt the butter over medium heat and sauté the minced garlic for about 30 seconds until fragrant.
- Pour in the heavy cream and bring to a gentle simmer. Let it reduce for 3-5 minutes until it slightly thickens, then stir in the nutmeg and black pepper.
- Reduce heat to low and whisk in the Parmesan cheese slowly to prevent clumping. Once smooth, add the undercooked pasta directly into the sauce.
- Toss the pasta continuously, adding splashes of the reserved pasta water as needed. This creates an emulsion that makes the sauce glossy and helps it stick to the noodles. Serve immediately while it’s still velvety.
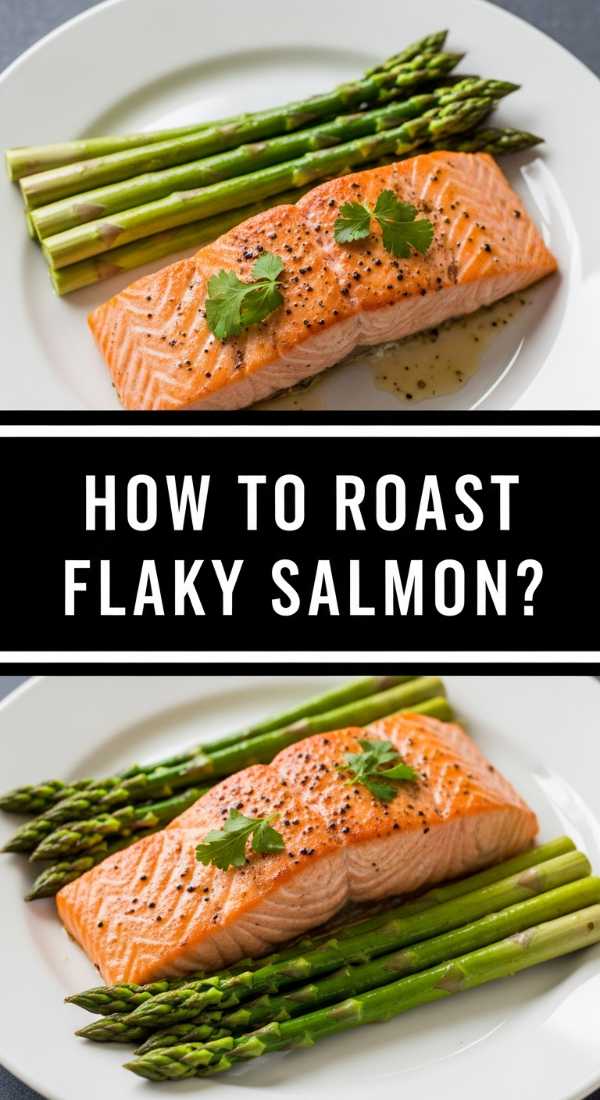
How to roast flaky salmon?
Why we love this
Roasting salmon is one of the most reliable ways to achieve a sophisticated, melt-in-your-mouth texture that is naturally rich in healthy fats and vibrant flavor. When done right, the fish separates into large, moist flakes at the mere touch of a fork, releasing a delicate, buttery aroma accented by fresh herbs and citrus. We love the striking coral color it adds to the board, making the spread look instantly more vibrant and professional. It’s a lighter protein option that feels incredibly high-end, providing a clean yet indulgent flavor profile that balances the saltier snacks.
Ingredients
- 2 large salmon fillets (center-cut)
- 1 tbsp olive oil
- 1/2 lemon, thinly sliced
- 2 sprigs fresh dill
- 1/2 tsp garlic powder
- Salt and pepper
How to make it
- Preheat your oven to 400°F (200°C) and line a baking sheet with parchment paper for easy cleanup.
- Pat the salmon fillets dry with a paper towel. Rub the flesh side with olive oil and season evenly with salt, pepper, and garlic powder.
- Place the fillets skin-side down on the baking sheet. Top each fillet with two lemon slices and a sprig of fresh dill. This infuses the fish with bright, citrusy notes while it roasts.
- Bake for 12-15 minutes, depending on the thickness of the fillet. The key visual cue is that the salmon should turn from translucent pink to an opaque, pale coral color.
- To check for doneness, press the thickest part of the fish with a fork; it should flake easily. Do not overcook, or the white protein (albumin) will squeeze out, making the fish dry. Let it rest for 3 minutes before serving.
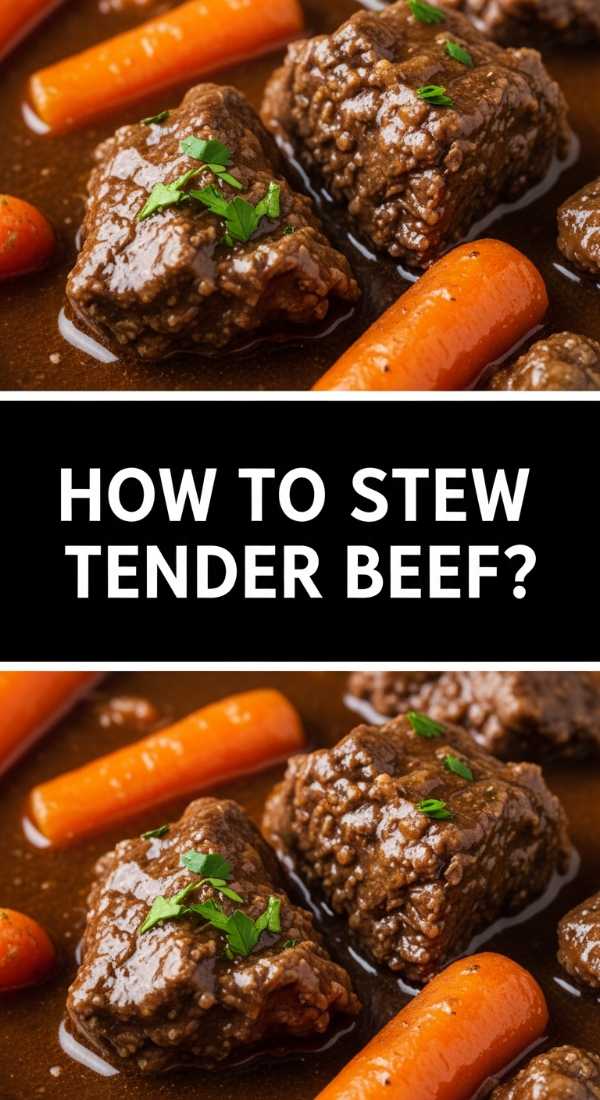
How to stew tender beef?

Why we love this
Stewed beef is a labor of love that rewards patience with a richness that is unparalleled, turning tough cuts into buttery, succulent morsels that practically dissolve on the tongue. The deep, dark gravy that forms during the slow simmering process is packed with the essence of red wine, root vegetables, and herbs, creating a complex flavor profile that is both hearty and refined. We love this for the ‘slow-food’ soul it brings to a board, offering a warm, savory element that feels like home. It’s the ultimate dip-friendly dish for those fluffy rolls we made earlier.
Ingredients
- 1.5 lbs beef chuck, cut into 1-inch cubes
- 2 tbsp all-purpose flour
- 1 cup dry red wine (like Cabernet)
- 2 cups beef broth
- 2 carrots and 2 stalks celery, chopped
- 1 onion, diced
- 2 bay leaves and 1 tsp dried thyme
How to make it
- Toss the beef cubes in flour, salt, and pepper until coated. Heat oil in a heavy pot over medium-high heat and sear the beef in batches. You want a dark, crusty brown on all sides—this ‘fond’ on the bottom of the pot is where the flavor lives.
- Remove the beef and add the onions, carrots, and celery. Sauté for 5 minutes until softened, scraping up the brown bits from the beef.
- Pour in the red wine to deglaze the pan. Let it bubble and reduce by half to cook off the harsh alcohol taste.
- Return the beef to the pot and add the beef broth, bay leaves, and thyme. The liquid should just cover the meat.
- Lower the heat to a very gentle simmer, cover tightly, and cook for 2 to 2.5 hours. The beef is ready when it offers zero resistance to a fork. Remove the bay leaves before serving the thick, glossy stew.
How to prepare street tacos?

Why we love this
Street tacos are the life of the party, bringing an explosion of vibrant colors, zesty acidity, and smoky char to your food board. There is a playful, hands-on energy to assembling a taco—choosing the perfect ratio of tender meat, sharp white onions, and herbaceous cilantro. We love the contrast between the warm, toasted corn tortilla and the cold, spicy salsa, all tied together with a sharp squeeze of lime that wakes up every other flavor on the tray. It’s a bite-sized festival of textures and temperatures that keeps everyone coming back for ‘just one more.’
Ingredients
- 12 small corn tortillas
- 1 lb carne asada or carnitas
- 1/2 white onion, finely diced
- 1/2 cup fresh cilantro, chopped
- 2 limes, cut into wedges
- Your favorite hot sauce or salsa verde
How to make it
- Prepare your protein of choice (seared steak or slow-cooked pork) and chop it into very small, bite-sized pieces. Keep the meat warm in a covered dish.
- The secret to a great street taco is the tortilla prep. Heat a dry cast-iron skillet over high heat. Place the corn tortillas in the pan for about 30 seconds per side until they develop charred spots and become pliable. Keep them warm in a clean kitchen towel.
- Double up the tortillas (use two per taco) to ensure they don’t break under the weight of the fillings—this is the traditional street style.
- Place a generous spoonful of meat in the center of the doubled tortillas. Top with a sprinkle of diced onions and a heavy hand of fresh cilantro.
- Serve with lime wedges on the side. The acidity of the lime is non-negotiable; it cuts through the fat of the meat and brightens the entire flavor profile.
How to bake fudgy brownies?
[IMAGE_10]
Why we love this
No viral board is complete without a sweet finale, and a fudgy brownie is the gold standard of chocolate indulgence. These brownies feature a wafer-thin, crackly ‘meringue’ top that yields to a dense, truffle-like interior that is unapologetically rich and dark. The aroma of premium cocoa and melting butter creates a heady, dessert-shop scent that draws everyone in. We love them because they provide that essential bitter-sweet contrast to the salty components of the board, ending the meal on a high note of pure, chocolatey decadence that feels like a total celebration.
Ingredients
- 1/2 cup unsalted butter, melted
- 1 cup granulated sugar
- 2 large eggs
- 1 tsp vanilla extract
- 1/2 cup high-quality cocoa powder
- 1/2 cup all-purpose flour
- 1/4 tsp salt
- 1/2 cup semi-sweet chocolate chips
How to make it
- Preheat your oven to 350°F (175°C) and grease an 8×8 inch baking pan. Whisk the melted butter and sugar together vigorously for 2 minutes; this helps create that iconic shiny, crackly top.
- Add the eggs one at a time, followed by the vanilla, whisking until the batter is smooth and slightly pale.
- Sift in the cocoa powder, flour, and salt. Use a spatula to gently fold the dry ingredients into the wet ones. Stop as soon as the last streak of flour disappears—overmixing will make them cakey instead of fudgy.
- Fold in the chocolate chips for extra pockets of melted chocolate. Pour the batter into the prepared pan and smooth the top.
- Bake for 20-25 minutes. Do not overbake! A toothpick inserted into the center should come out with a few moist crumbs attached, not clean. Let them cool completely in the pan to allow the fudge to set before slicing into small, bite-sized squares.
Creating Your Viral Moment
Building this board is about more than just following recipes; it’s about the art of the arrangement. Start with your larger items—the bowls of stew or pasta—and fill in the gaps with the crispy potatoes and street tacos. Use the brownies and rolls as anchors on the corners. When you see your friends and family hovering over this spread, phones out to capture the beauty before diving in, you’ll know you’ve created something special. Cooking is an act of love, and this viral board is the ultimate expression of that sentiment.
Frequently Asked Questions
Can I make these components ahead of time? Yes! The beef stew and slow-cooked chicken actually taste better the next day. However, for the best experience, sear the shrimp and roast the potatoes right before serving to maintain their texture.
How do I keep the food warm on the board? Use warmed wooden boards or stone platters. You can also keep the ‘wet’ dishes like pasta and stew in small ceramic crocks that hold heat well.
What is the best way to arrange the board for photos? Follow the ‘rule of thirds’ and group colors together. Place bright items like the salmon and street tacos near more neutral items like the rolls or steak for a pop of visual interest.