
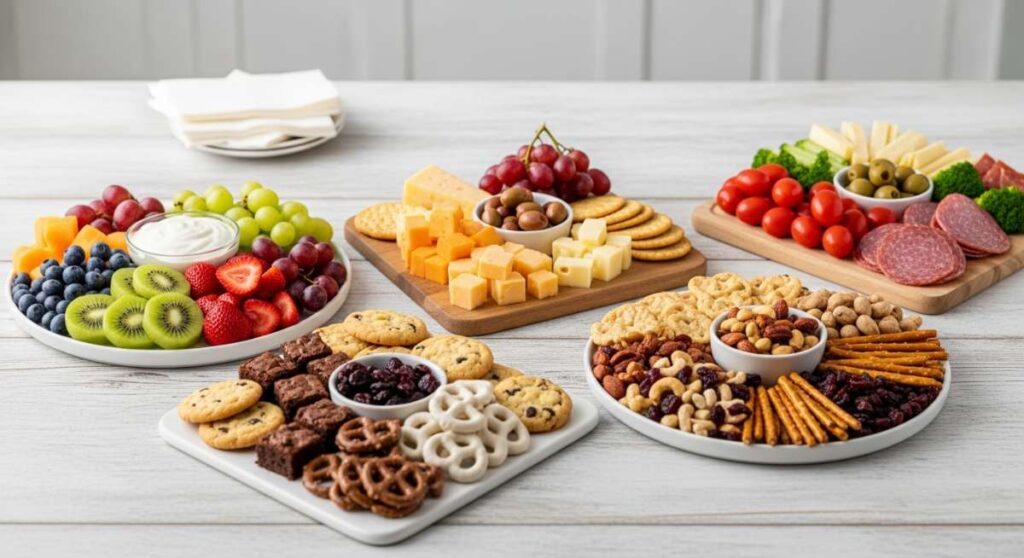
We’ve all been there—the guest list is growing, the clock is ticking, and the sudden realization hits that you haven’t even started the appetizers. Hosting should be about the laughter shared over a glass of wine and the joy of catching up with old friends, not the silent panic of a chaotic kitchen. I used to spend hours meticulously plating individual servings, only to find myself too exhausted to actually enjoy the party. That all changed when I discovered the magic of the food board: a rustic, communal, and effortlessly chic way to feed a crowd without losing your mind.
The secret to being a ‘lazy’ host isn’t about doing less; it’s about doing things smarter. By leaning into the viral trend of themed boards, you’re creating a focal point that invites people to linger and graze. Whether you’re celebrating a big milestone like a graduation or just hosting a cozy Sunday brunch, these ideas take the stress out of the preparation. They turn simple ingredients into a visual masterpiece that looks like it took hours, even if you only spent minutes assembling it.
Today, I’m sharing my ultimate guide to the boards and treats that have taken my social feed by storm. From the tart, nostalgic scent of simmering rhubarb to the festive decorations of a graduation spread, these recipes are designed to be approachable yet impressive. Let’s reclaim our time and transform our hosting game with these stunning, shareable creations that prove you don’t need a culinary degree to be the host of the year.
How to make graduation cakes

Why we love this
There is something incredibly nostalgic and heartwarming about a perfectly baked graduation cake sitting at the center of a celebration board. The aroma of Madagascar vanilla bean and sweet cream butter wafts through the air, creating an instant sense of festivity and achievement. As you slice into the moist, tender crumb, you can feel the lightness of the sponge, which contrasts beautifully with a silky, cloud-like buttercream. It’s a sensory experience that balances the richness of the dairy with the delicate sweetness of the sugar, making every bite feel like a well-deserved reward for years of hard work.
Ingredients
- 2 1/2 cups all-purpose flour
- 1 1/2 cups granulated sugar
- 1 cup unsalted butter, softened
- 4 large eggs, room temperature
- 1 cup whole milk
- 2 tsp vanilla extract
- 1 tbsp baking powder
- 1/2 tsp salt
How to make it
- Preheat your oven to 350°F (175°C) and grease two 8-inch round cake pans with butter, lining the bottoms with parchment paper to ensure an easy release.
- In a large mixing bowl, sift together the flour, baking powder, and salt to aerate the dry ingredients and remove any clumps.
- Using a stand mixer fitted with the paddle attachment, cream the softened butter and sugar on medium-high speed for about 5 minutes until the mixture is pale, light, and fluffy.
- Add the eggs one at a time, beating well after each addition to emulsify the fats and liquids properly; if the batter looks curdled, add a tablespoon of flour.
- Reduce the mixer speed to low and alternate adding the dry ingredients and the milk in three parts, starting and ending with the flour to maintain the cake’s structure.
- Fold in the vanilla extract by hand using a spatula, ensuring no pockets of flour remain at the bottom of the bowl.
- Divide the batter evenly between the prepared pans and smooth the tops with an offset spatula for an even rise.
- Bake for 30-35 minutes or until a wooden skewer inserted into the center comes out clean with just a few moist crumbs attached.
- Cool in the pans for 10 minutes before transferring to a wire rack to cool completely before frosting.
How to prepare rhubarb jam
Why we love this
Rhubarb jam is the unsung hero of the brunch board, offering a sophisticated tartness that cuts through the richness of cheeses and pastries. As it simmers on the stove, the fibrous stalks transform into a glossy, ruby-red nectar, filling the kitchen with a bright, zesty fragrance that hints at the coming of spring. The texture is a delightful mix of smooth jelly and soft, jammy fruit pieces that pop with flavor on the tongue. It’s the perfect balance of sugar and acidity, providing a vibrant crimson hue that makes any board look instantly more artisanal and curated.
Ingredients
- 4 cups fresh rhubarb, chopped into 1/2-inch pieces
- 2 cups granulated sugar
- 1 tbsp lemon juice
- 1 tsp lemon zest
- 1/2 tsp vanilla bean paste (optional)
How to make it
- In a heavy-bottomed stainless steel saucepan, combine the chopped rhubarb and sugar, stirring well to coat the fruit thoroughly.
- Let the mixture sit at room temperature for about 30 minutes; this maceration process draws out the natural juices of the rhubarb, creating its own syrup.
- Place the saucepan over medium heat and stir in the lemon juice and lemon zest to provide the necessary pectin and acidity for setting.
- Bring the mixture to a gentle boil, stirring frequently with a heat-resistant spatula to prevent the sugar from scorching at the bottom.
- Once boiling, reduce the heat to medium-low and simmer for 20-25 minutes, or until the rhubarb has completely broken down and the liquid has thickened.
- To test the set, place a small spoonful of jam on a chilled plate and let it sit for a minute; if it wrinkles when pushed with a finger, it is ready.
- Stir in the vanilla bean paste at the very end for an extra layer of aromatic complexity.
- Pour the hot jam into sterilized glass jars, leaving 1/4 inch of headspace, and let cool to room temperature before sealing and refrigerating.
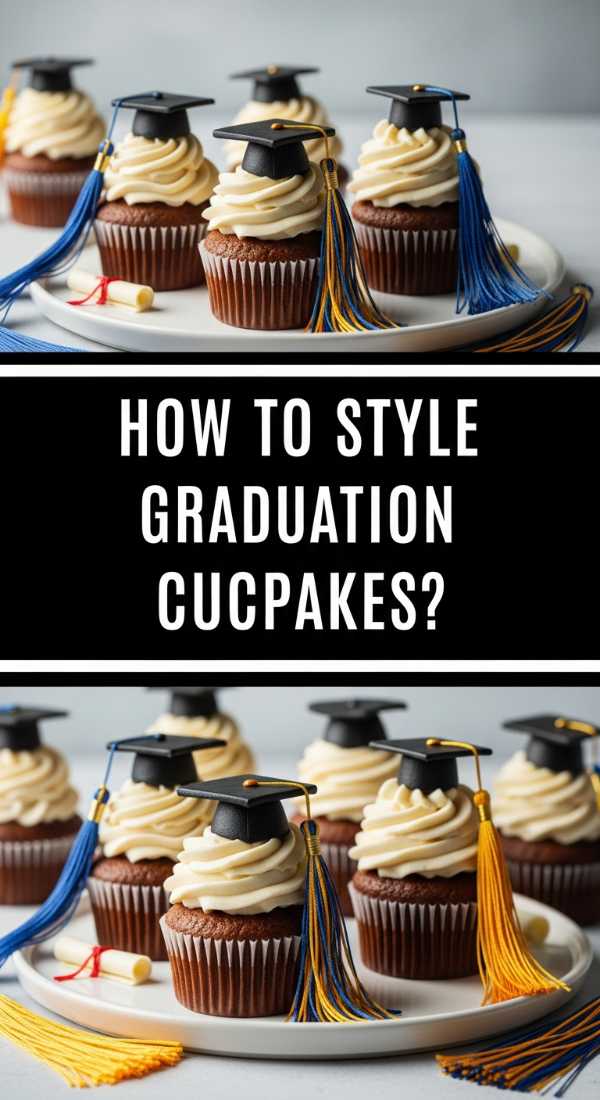
How to design graduation cupcakes
Why we love this
Graduation cupcakes are the ultimate grab-and-go treat for a celebratory board, offering a miniature canvas for creativity and school spirit. There is a playful elegance in seeing a dozen perfectly domed cakes topped with intricate graduation caps and tassels, making them an instant conversation starter. The tactile joy of peeling back the paper liner to reveal a soft, cocoa-infused or vanilla sponge is unmatched, especially when topped with a swirl of decadent frosting. They add height and variety to your board, ensuring every guest gets a personalized bit of sweetness to celebrate the big achievement.
Ingredients
- 12 pre-baked cupcakes (flavor of choice)
- 2 cups vanilla buttercream frosting
- 12 square chocolate thins (for the caps)
- 12 miniature chocolate peanut butter cups (inverted)
- Sour straw candy or fruit leather (for tassels)
- Small round candies or M&Ms (for the cap button)
- Food coloring in school colors
How to make it
- Begin by preparing your frosting; divide it into bowls and use gel food coloring to match the specific school colors for a personalized touch.
- Fit a piping bag with a large star tip and fill it with the colored buttercream, ensuring there are no air pockets in the bag.
- Pipe a flat, sturdy swirl onto each cooled cupcake to create a stable base for the graduation cap decorations.
- To assemble the ‘cap,’ place an inverted miniature chocolate peanut butter cup in the center of the buttercream swirl to act as the base of the hat.
- Apply a small dot of frosting to the bottom of a chocolate thin square and press it firmly onto the peanut butter cup.
- Cut thin strips of sour straw candy or fruit leather to about 1 inch in length to serve as the tassels.
- Use a tiny dab of frosting to attach the tassel to the center of the chocolate square, letting it hang off the side.
- Place a small round candy on top of the tassel’s starting point to represent the button of the mortarboard.
- Chill the cupcakes for 15 minutes to set the chocolate decorations before arranging them on your serving board.
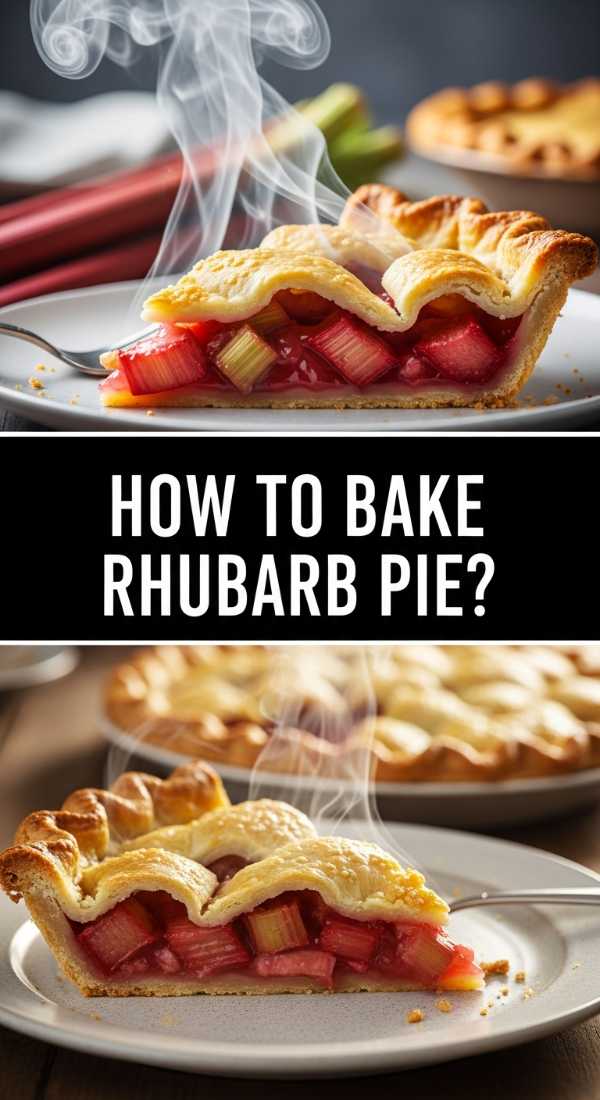
How to bake rhubarb pie

Why we love this
A rhubarb pie is a masterpiece of contrasts, featuring a buttery, flaky crust that shatters upon impact to reveal a bubbling, tart interior. The visual of the golden-brown lattice top, with bits of pink juice peeking through, is enough to make anyone’s mouth water before the first slice is even served. When baked, the rhubarb releases a complex, earthy aroma that is sweetened just enough to be addictive, providing a sharp, refreshing finish to a meal. It serves as a rustic, traditional anchor for a dessert board, inviting guests to scoop up every last bit of the caramelized fruit filling.
Ingredients
- Double pie crust (homemade or store-bought)
- 5 cups fresh rhubarb, sliced
- 1 1/4 cups granulated sugar
- 1/4 cup cornstarch
- 1/2 tsp ground cinnamon
- 1/4 tsp salt
- 1 tbsp unsalted butter, cubed
- 1 egg wash (1 egg beaten with 1 tbsp water)
How to make it
- Preheat your oven to 400°F (200°C) and place a baking sheet on the bottom rack to catch any overflow drippings during the baking process.
- Roll out one half of the pie dough on a floured surface to a 12-inch circle and drape it into a 9-inch pie plate, trimming the edges to a 1-inch overhang.
- In a large bowl, toss the sliced rhubarb with the sugar, cornstarch, cinnamon, and salt until the fruit is evenly coated and the sugar begins to look wet.
- Pour the rhubarb mixture into the prepared bottom crust, mounding it slightly in the center, and dot the top with the small cubes of butter for extra richness.
- Roll out the second piece of dough and cut into strips to create a lattice top, or place the whole sheet over the top and cut several large steam vents.
- Crimp the edges of the top and bottom crusts together to create a tight seal, preventing the filling from escaping.
- Brush the entire top crust with the egg wash to ensure a deep golden color and a slight shine.
- Bake at 400°F for 20 minutes, then reduce the heat to 350°F (175°C) and continue baking for another 35-45 minutes until the crust is golden and the filling is bubbling thick.
- Allow the pie to cool for at least 3 hours on a wire rack to let the juices set before slicing into it.
How to decorate graduation cookies
Why we love this
Decorated graduation cookies are like little edible trophies that add a pop of color and detail to any celebration board. The snap of a crisp sugar cookie followed by the smooth, sweet crunch of royal icing creates a satisfying textural experience that guests of all ages adore. These cookies allow for incredible customization, from writing the graduation year to matching the icing to the graduate’s gown. They are the perfect ‘filler’ for a food board, tucked between larger items to create a dense, bountiful look that feels professionally staged yet remains completely homemade.
Ingredients
- Batch of sugar cookies (cut into rounds or cap shapes)
- 4 cups powdered sugar
- 3 tbsp meringue powder
- 1/2 cup warm water
- Gel food coloring
- Fine-tip piping bags
- Gold sanding sugar
How to make it
- Prepare the royal icing by whisking the powdered sugar, meringue powder, and water in a stand mixer for 7-10 minutes until stiff peaks form.
- Divide the icing into separate bowls and add gel food coloring until you achieve the desired school shades; keep one bowl white for detailing.
- Transfer a portion of the icing to a piping bag with a small round tip to create ‘outline’ icing; thin the remaining icing with drops of water to ‘flood’ consistency.
- Pipe a border around the edge of the cooled cookie with the outline icing and let it dry for 5 minutes to create a dam.
- Fill the center of the cookie with the flood icing, using a toothpick to pop any air bubbles and push the icing into the corners.
- Allow the base layer of icing to dry completely (about 4-6 hours) before adding secondary details like ‘Class of 2024’ or tassel lines.
- To create a metallic effect, mix a tiny bit of gold luster dust with lemon extract and paint it onto specific piped details.
- If using sanding sugar, sprinkle it over wet icing immediately after piping so it adheres to the design.
- Let the cookies dry overnight in a cool, dry place before stacking or placing them on your board to prevent smudging.
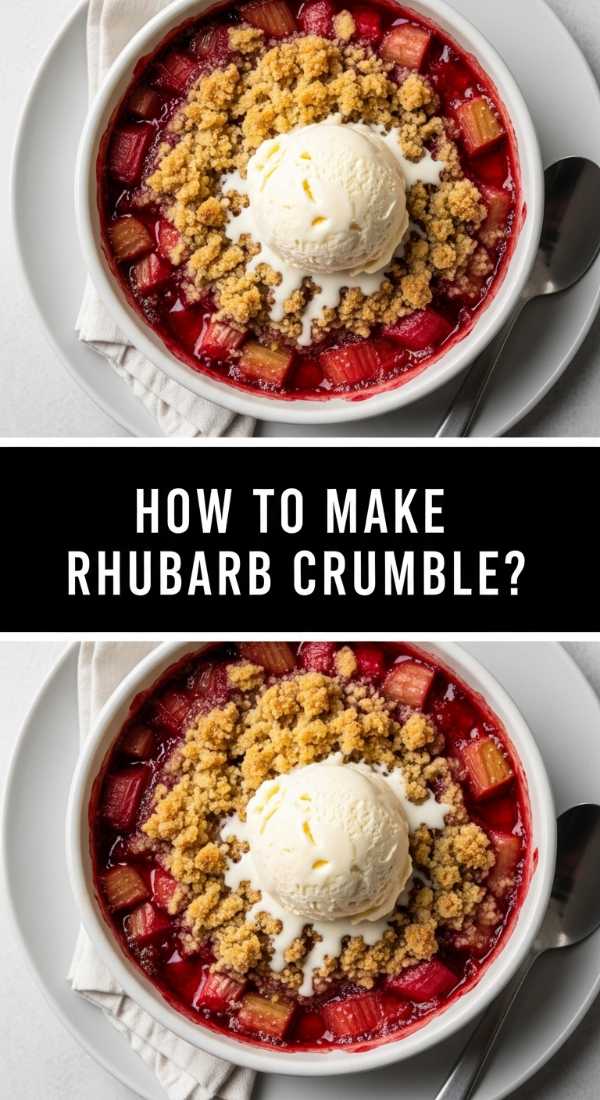
How to make rhubarb crumble
Why we love this
Rhubarb crumble is the epitome of comfort food, offering a warm, bubbly fruit base topped with a buttery, crunchy oat topping that is impossible to resist. The contrast between the softened, tart rhubarb and the toasted, cinnamon-spiced crumble provides a sensory delight that is both rustic and refined. When served on a board, individual ramekins of crumble allow guests to enjoy a hot dessert without the mess of slicing, making it ideal for casual hosting. The smell of toasted oats and melted brown sugar creates an inviting atmosphere that makes your home feel instantly more welcoming.
Ingredients
- 6 cups chopped rhubarb
- 3/4 cup granulated sugar
- 1 cup old-fashioned rolled oats
- 1 cup all-purpose flour
- 1 cup packed brown sugar
- 1/2 cup cold unsalted butter, cubed
- 1 tsp ground cinnamon
How to make it
- Preheat your oven to 375°F (190°C) and lightly grease an 8×8 inch baking dish or individual ramekins with butter.
- In a medium bowl, toss the chopped rhubarb with the granulated sugar until the pieces are evenly coated, then spread them into the bottom of the dish.
- In a separate large bowl, combine the flour, rolled oats, brown sugar, and cinnamon, stirring to distribute the spice evenly.
- Add the cold, cubed butter to the oat mixture; use a pastry cutter or your fingertips to rub the butter into the dry ingredients until it resembles coarse crumbs.
- Ensure the butter pieces are no larger than peas to achieve the perfect balance of crunch and melt-in-your-mouth texture.
- Sprinkle the crumble topping evenly over the rhubarb, pressing down very lightly to ensure it adheres to the fruit.
- Bake for 35-40 minutes; look for the rhubarb juices to be bubbling vigorously at the edges and the topping to be a deep golden brown.
- If the topping browns too quickly, tent the dish with aluminum foil for the last 10 minutes of baking.
- Serve warm, preferably with a scoop of vanilla bean ice cream to balance the heat and acidity.
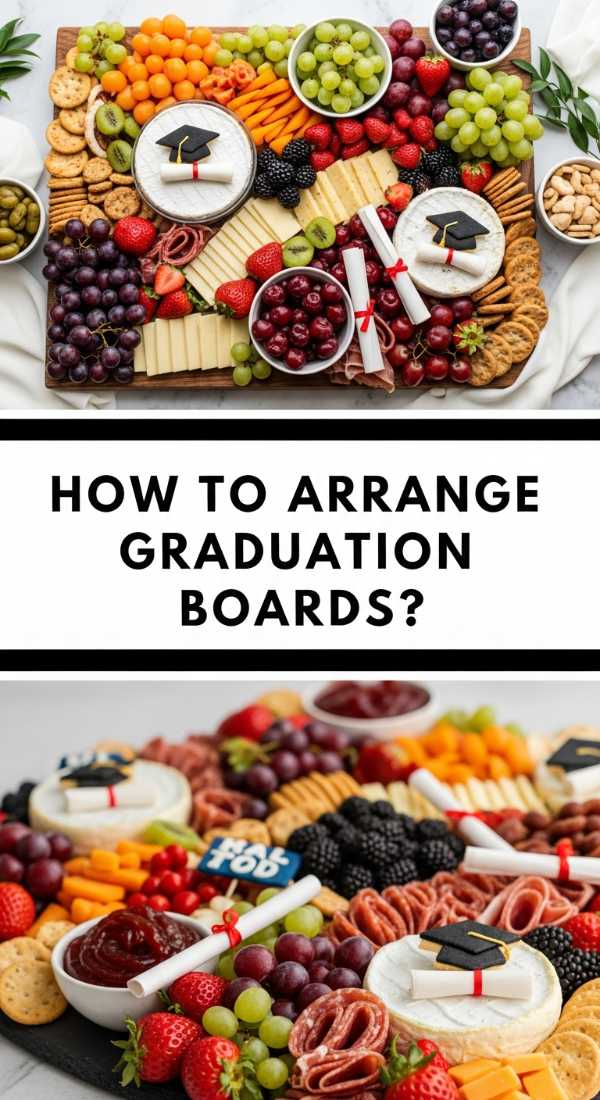
How to assemble graduation boards
Why we love this
The graduation board is a visual storytelling masterpiece that captures the essence of a milestone in one cohesive display. It’s a riot of colors, textures, and flavors, combining sweet treats, fresh fruits, and perhaps a few savory bites to satisfy every palate. There is a sense of abundance and generosity in a well-assembled board, with every nook and cranny filled with something delicious. It’s more than just food; it’s a centerpiece that encourages guests to gather around, pick their favorites, and celebrate the journey of the graduate in a relaxed, communal setting.
Ingredients
- Large wooden board or slate platter
- Graduation cookies and cupcakes (prepared earlier)
- Fresh berries (strawberries, blueberries, raspberries)
- Grapes and sliced kiwi
- Assorted nuts and chocolate-covered pretzels
- Diplomas made from rolled wafers tied with ribbon
- Small bowls of dip or honey
How to make it
- Start by placing your largest items—the cake or the bowls of dip—on the board first to act as anchors for the overall design.
- Position the graduation cupcakes in a diagonal line or in clusters to create visual movement across the platter.
- Fill in the gaps around the large items with the decorated cookies, layering them slightly to create a sense of depth and height.
- Add the fresh fruit in ‘rivers’ or piles, using the bright colors of the berries to contrast with the baked goods and school-colored icing.
- Use small items like nuts, chocolate-covered pretzels, or loose candies to fill in every single empty space; a great board should show none of the wood underneath.
- Place the ‘edible diplomas’ (rolled wafers) in a prominent spot, perhaps fanned out near the center of the board.
- Incorporate non-edible elements like a few sprigs of fresh mint or small graduation-themed confetti to enhance the festive theme.
- Step back frequently to check the balance of colors and textures, ensuring that the school colors are distributed evenly throughout the display.
- Serve immediately, providing small tongs or napkins nearby so guests can easily serve themselves.
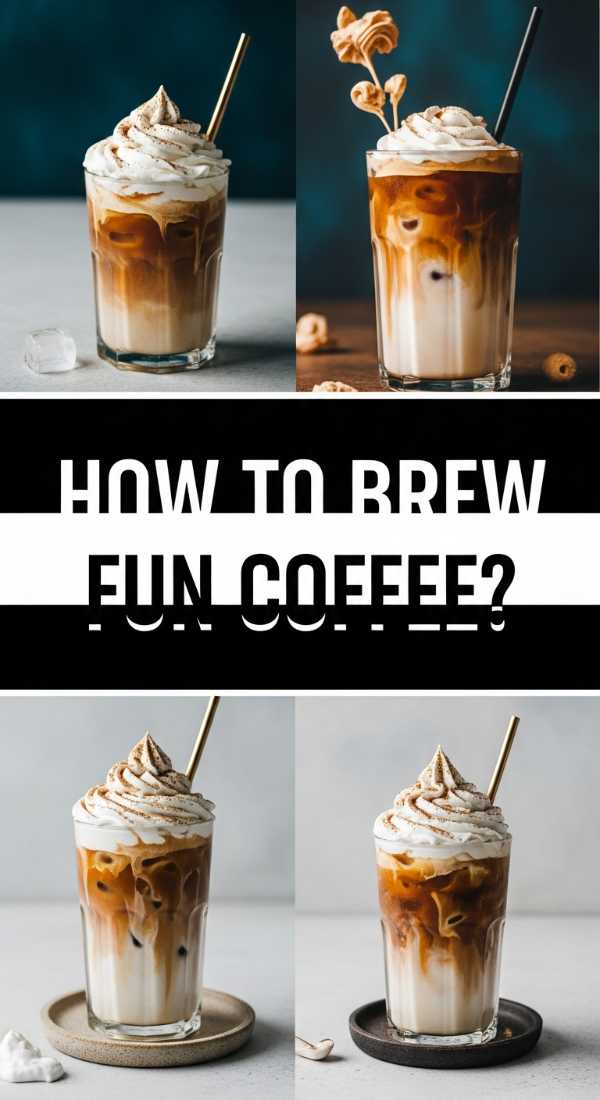
How to create fun coffee
Why we love this
A ‘fun’ coffee station is the ultimate luxury for a morning or afternoon gathering, turning a simple caffeine fix into an interactive dessert experience. The rich, earthy scent of freshly brewed espresso mixes with the sweetness of caramel and the spicy notes of cinnamon, creating an irresistible aroma that draws guests in. Watching a swirl of cream bloom in dark coffee is visually hypnotic, and the ability to customize with toppings like whipped cream or chocolate shavings makes everyone feel like their own barista. It’s a playful, sophisticated addition that keeps the energy high and the vibes cozy.
Ingredients
- Freshly brewed hot coffee or cold brew
- Various syrups (vanilla, caramel, hazelnut)
- Heavy cream, oat milk, or almond milk
- Whipped cream
- Toppings: cocoa powder, cinnamon, chocolate shavings, or sea salt
- Long cinnamon sticks for stirring
How to make it
- Brew a strong pot of high-quality coffee or prepare a concentrated cold brew to ensure the flavor stands up to the added milk and syrups.
- Set up a dedicated ‘bar’ area with different carafes for hot coffee and various milk options, clearly labeled for guests with dietary preferences.
- Place the syrups in pump bottles to make measuring easy and mess-free; one pump is usually perfect for an 8oz cup.
- If serving hot coffee, keep the milk warm in a small slow cooker or a thermal carafe to maintain the drink’s temperature.
- To create a ‘latte’ effect without a machine, shake the milk vigorously in a jar and microwave it for 30 seconds to create a stiff foam.
- Provide a variety of shakers filled with cocoa, cinnamon, and nutmeg for guests to dust over their foam or whipped cream.
- Include ‘stir-ins’ like cinnamon sticks or chocolate-dipped spoons which slowly melt into the hot liquid, adding layers of flavor as they drink.
- Offer a bowl of fresh whipped cream kept on ice so it stays fluffy throughout the duration of the party.
- Finish the station with beautiful ceramic mugs or clear glass cups that showcase the layers of the drink.
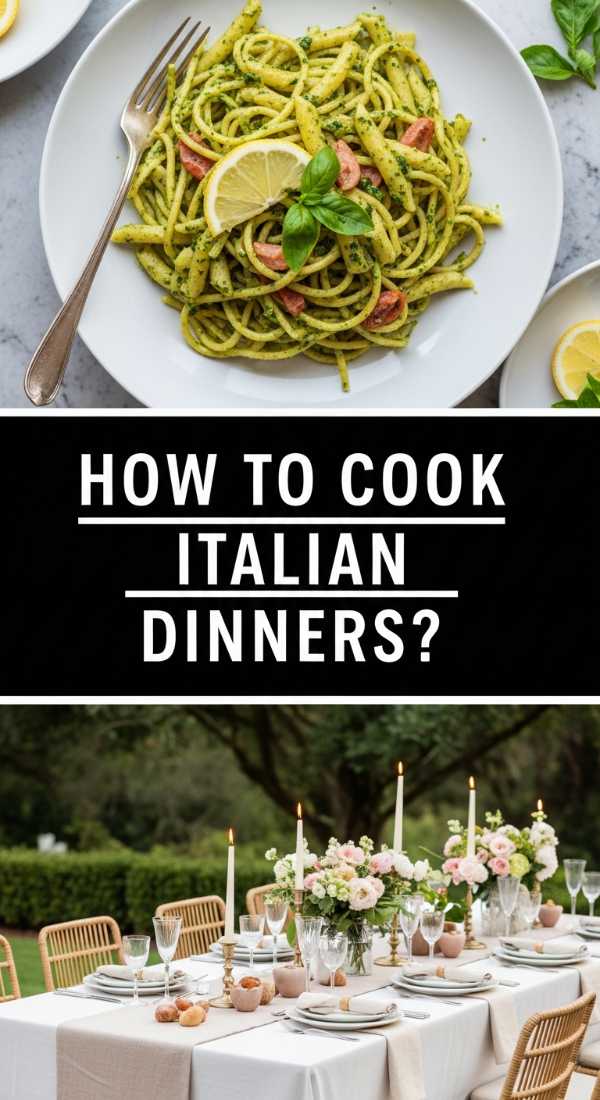
How to cook italian dinner
Why we love this
An Italian dinner board is a celebration of ‘la dolce vita,’ bringing the warmth and heart of a Mediterranean kitchen to your table. The savory aroma of garlic sautéed in olive oil, combined with the bright scent of fresh basil, creates an atmosphere that is instantly comforting and high-end. There’s something deeply satisfying about the silky texture of pasta and the salty bite of cured meats paired with creamy cheeses. It’s a meal that encourages slow eating and long conversations, making it the perfect choice for a host who wants their guests to feel truly nourished and cared for.
Ingredients
- 1 lb pasta (like rigatoni or pappardelle)
- 2 cups marinara or pesto sauce
- Assorted cured meats (prosciutto, salami, capicola)
- Cheeses (fresh mozzarella, sharp provolone, parmesan)
- Marinated artichokes and olives
- Roasted red peppers and sun-dried tomatoes
- Fresh focaccia or ciabatta bread
- Fresh basil leaves
How to make it
- Boil a large pot of heavily salted water—it should taste like the sea—and cook the pasta until it is ‘al dente,’ meaning it still has a slight bite.
- While the pasta cooks, warm your sauce in a wide skillet; once the pasta is done, transfer it directly into the sauce along with a splash of starchy pasta water to help it emulsify.
- Arrange the cured meats on a large board by folding them into ‘roses’ or ribbons to create volume and visual interest.
- Place the cheeses in different areas of the board; tear the fresh mozzarella into rustic chunks rather than slicing it for a more artisanal look.
- Fill small decorative bowls with the olives, artichokes, and roasted peppers, and nestle them onto the board among the meats and cheeses.
- Slice the fresh bread into thick wedges and toast them slightly with a drizzle of olive oil and a rub of raw garlic.
- Once the pasta is coated and glossy, place it in a large central bowl on the board or swirl it onto the platter if serving immediately.
- Garnish the entire spread with plenty of fresh basil leaves and a final dusting of freshly grated parmesan cheese.
- Serve with a side of balsamic glaze and high-quality olive oil for dipping the bread.
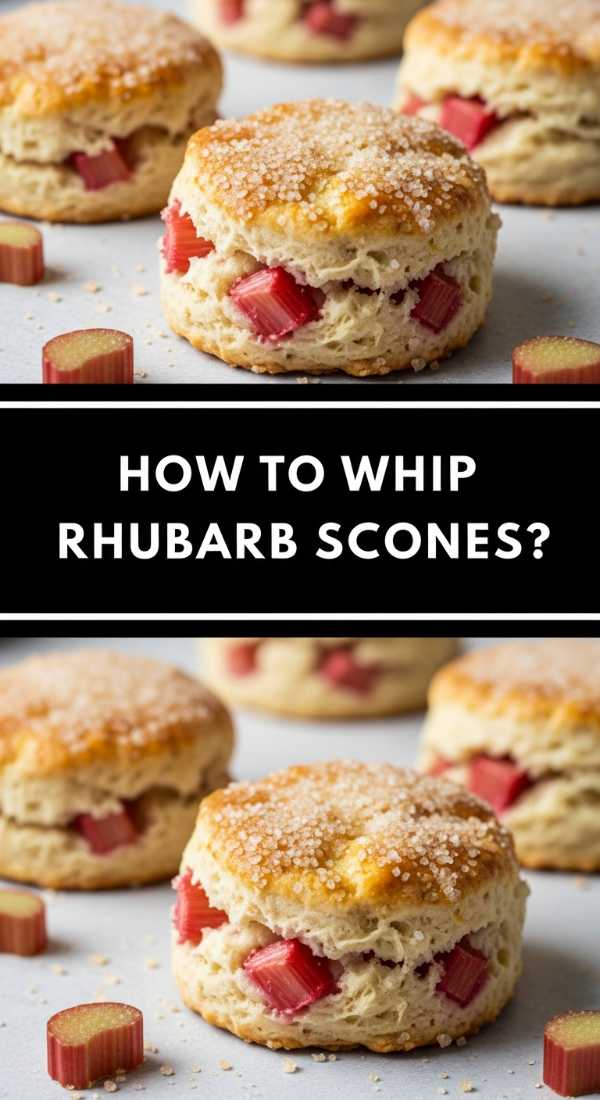
How to bake rhubarb scones
[IMAGE_10]
Why we love this
Rhubarb scones are the quintessential tea-time treat, boasting a crumbly, tender texture that melts away to reveal tart, juicy pockets of fruit. The golden, sugar-crusted exterior provides a delightful crunch that contrasts with the soft, buttery interior. When these come out of the oven, the scent of baked butter and tangy rhubarb is absolutely intoxicating, making them a star player on any breakfast or dessert board. They feel incredibly sophisticated, yet they possess a rustic charm that makes them approachable for a lazy Sunday morning or a high-stakes graduation brunch.
Ingredients
- 2 cups all-purpose flour
- 1/3 cup granulated sugar (plus more for topping)
- 1 tbsp baking powder
- 1/2 tsp salt
- 1/2 cup cold unsalted butter, grated or cubed
- 1 cup fresh rhubarb, finely diced
- 1/2 cup heavy cream (plus more for brushing)
- 1 large egg
- 1 tsp vanilla extract
How to make it
- Preheat your oven to 400°F (200°C) and line a baking sheet with parchment paper or a silicone baking mat.
- In a large bowl, whisk together the flour, sugar, baking powder, and salt until thoroughly combined.
- Incorporate the cold butter into the dry ingredients using a pastry cutter until the mixture resembles coarse meal with some pea-sized lumps of butter remaining.
- Gently fold in the finely diced rhubarb, ensuring each piece is coated in flour to prevent them from sinking or clumping.
- In a separate small bowl, whisk together the heavy cream, egg, and vanilla extract until smooth.
- Pour the wet ingredients into the center of the dry ingredients and stir with a fork just until a shaggy dough begins to form—do not overmix, or the scones will be tough.
- Turn the dough out onto a lightly floured surface and gently pat it into an 8-inch disc about 1 inch thick.
- Use a sharp knife to cut the disc into 8 wedges; place the wedges on the prepared baking sheet, leaving at least 2 inches between each.
- Brush the tops with a little extra heavy cream and sprinkle generously with granulated sugar for a sparkling, crunchy finish.
- Bake for 18-22 minutes or until the tops are golden brown and the scones feel firm to the touch.
Conclusion
Hosting doesn’t have to be a high-stress performance. By embracing the versatility of food boards and focusing on high-impact, simple recipes like these, you can create a memorable experience for your guests while actually getting to spend time with them. Whether it’s the tart snap of rhubarb or the festive flair of graduation treats, these ideas are designed to make you the star of the show with minimal effort. So, grab a board, pick your favorite theme, and start assembling your way to the perfect party!