
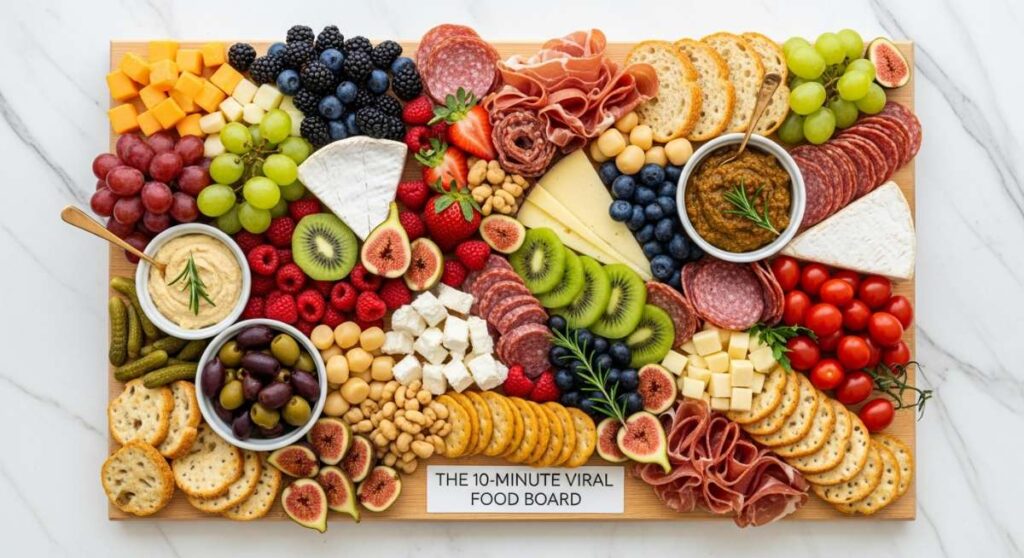
The 10-Minute Viral Food Board That Will Impress Every Guest
There is something truly magical about the way food brings us together, especially when the sun begins to linger a little longer in the evening sky and the air is filled with the scent of blooming jasmine. I remember the first time I hosted a big gathering; I was so stressed about every plate being perfect that I forgot to actually enjoy my guests. That all changed when I discovered the art of the ‘board’—a communal, beautiful, and effortlessly chic way to serve everything from celebratory sweets to seasonal savory bites that guests can graze on at their own pace.
Today, I’m showing you how to build a viral-worthy spread that celebrates two of my favorite themes: the bittersweet joy of graduation season and the tart, vibrant arrival of fresh rhubarb. Whether you are celebrating a high school senior moving on to their next chapter or just hosting a cozy Sunday brunch, these recipes are designed to be showstoppers. From the creamy depths of a custard pie to the zesty zing of a lemon pesto, this board is all about textures, colors, and making memories around the table.
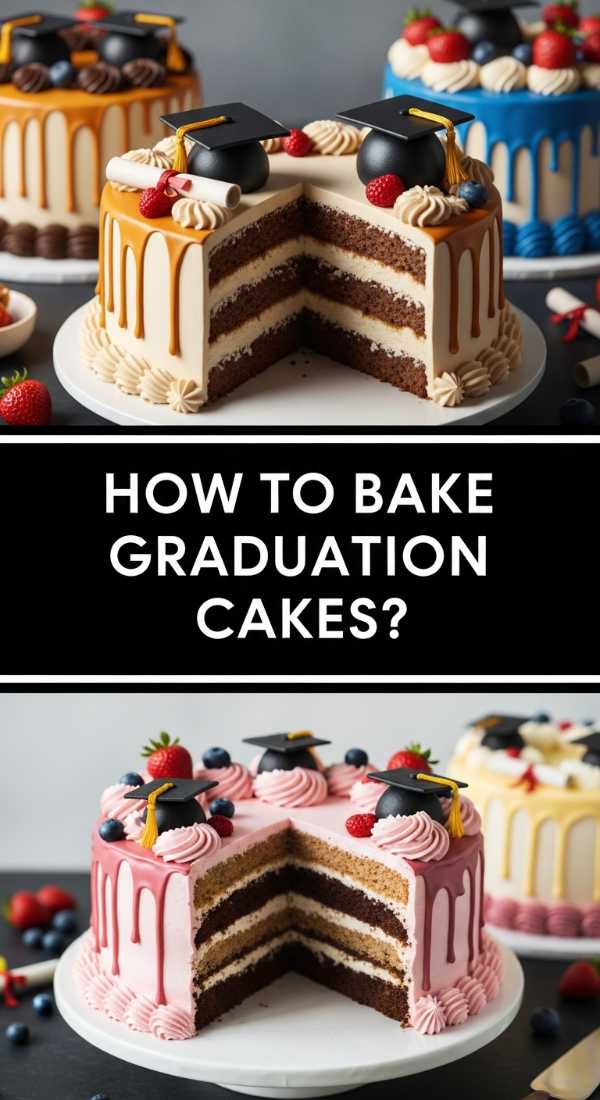
Stunning Graduation Cake Designs for High School
Why we love this
There is nothing quite like the look of pride on a graduate’s face when they see a cake designed specifically to honor their hard work and dedication. This design balances modern sophistication with youthful joy, featuring sleek buttercream lines, edible gold leaf accents, and perhaps a miniature fondant cap that serves as the crowning glory. The cake itself is a moist, velvet-crumbed vanilla bean sponge that fills the kitchen with a warm, sugary aroma, promising a bite that is both light and celebratory. As you slice into it, the layers are revealed, symbolizing the many steps taken to reach this incredible milestone.
Ingredients
- 2 1/2 cups all-purpose flour
- 1 1/2 cups granulated sugar
- 1 tbsp baking powder
- 1/2 tsp salt
- 3/4 cup unsalted butter, softened
- 1 cup whole milk
- 4 large egg whites
- 2 tsp vanilla bean paste
- 4 cups vanilla buttercream frosting
- Edible gold leaf and school color food gels
How to make it
- Preheat your oven to 350°F (175°C) and grease three 6-inch round cake pans, lining the bottoms with parchment paper for an easy release.
- In a large mixing bowl, sift together the flour, sugar, baking powder, and salt to ensure a light, airy texture for your sponge.
- Using a stand mixer on medium speed, beat the softened butter into the dry ingredients one tablespoon at a time until the mixture resembles coarse sand.
- In a separate jug, whisk together the milk, egg whites, and vanilla bean paste; slowly pour half of this into the flour mixture and beat for 2 minutes to develop the cake’s structure.
- Add the remaining liquid and beat for another 30 seconds until just combined, being careful not to overmix, which could make the cake tough.
- Divide the batter evenly among the prepared pans and bake for 25-30 minutes, or until a toothpick inserted into the center comes out clean with just a few moist crumbs.
- Let the cakes cool completely on a wire rack before leveling the tops with a serrated knife; then, apply a thin crumb coat of buttercream and chill for 20 minutes.
- Apply the final layer of smooth buttercream, use a palette knife to create textured ridges or ombre school colors, and carefully apply the edible gold leaf with tweezers for a professional finish.
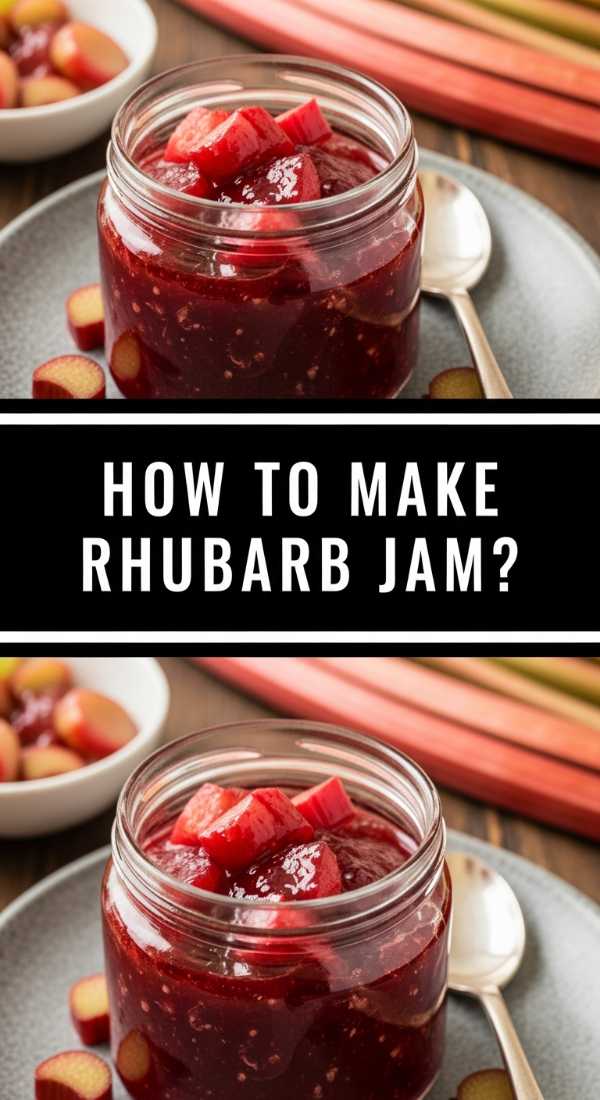
Easy Homemade Rhubarb Jam Recipe
Why we love this
This jam is like bottling up the very essence of spring, offering a perfect balance between sharp acidity and mellow sweetness that dances on the tongue. The vibrant pink hue is naturally stunning, catching the light like a gemstone when spread across a warm piece of sourdough or dolloped onto a cheese board. As it simmers on the stove, the tart, grassy scent of fresh rhubarb transforms into a deep, jammy fragrance that fills every corner of your home with comfort. It has a thick, luscious consistency that provides a satisfying mouthfeel, making it an indispensable staple for any seasonal brunch spread.
Ingredients
- 4 cups fresh rhubarb, chopped into 1/2-inch pieces
- 2 cups granulated sugar
- 2 tbsp fresh lemon juice
- 1 tsp lemon zest
- 1/2 tsp pure vanilla extract
- A pinch of sea salt
How to make it
- Combine the chopped rhubarb and sugar in a heavy-bottomed saucepan or a Dutch oven, stirring well to coat the fruit completely.
- Let the mixture sit at room temperature for about 30 to 60 minutes; this process, called maceration, allows the sugar to draw out the natural juices from the rhubarb stalks.
- Place the pan over medium heat and stir constantly until the sugar has completely dissolved and the mixture begins to bubble gently.
- Add the lemon juice, lemon zest, and a pinch of salt, then increase the heat to medium-high to bring the jam to a rolling boil.
- Maintain the boil for about 10-15 minutes, stirring frequently to prevent scorching on the bottom, until the mixture thickens and reaches 220°F (104°C) on a candy thermometer.
- Perform the ‘plate test’ by placing a small spoonful of jam on a chilled plate; if it wrinkles when pushed with your finger, it is ready.
- Remove from heat, stir in the vanilla extract, and let it sit for 5 minutes before skimming off any foam that has risen to the top.
- Ladle the hot jam into sterilized glass jars, leaving 1/4 inch of headspace, and seal tightly; let them cool at room temperature before refrigerating.
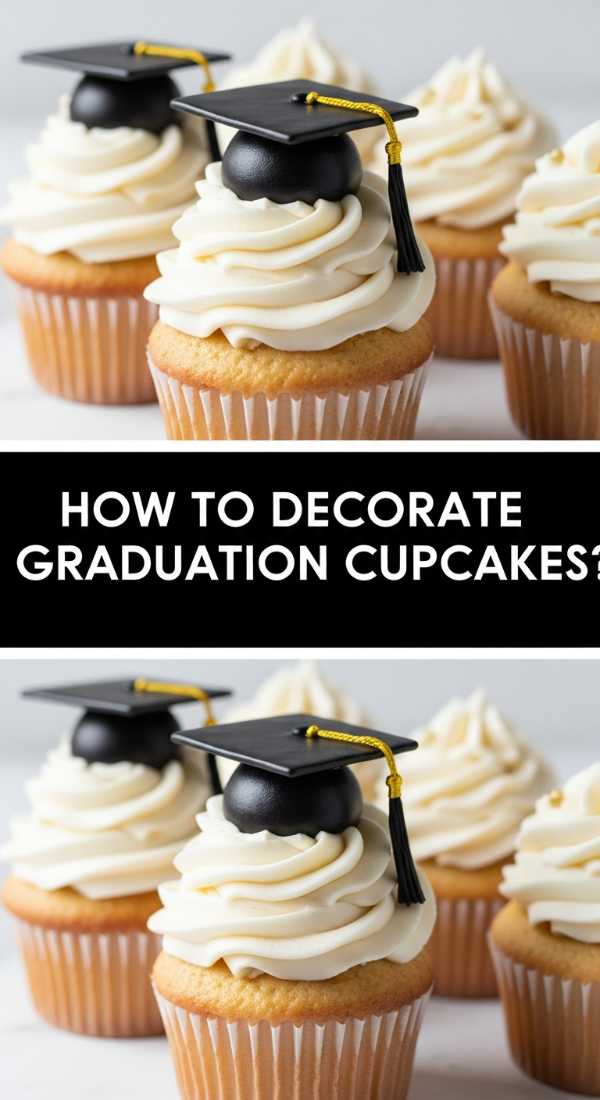
Elegant Graduation Cupcake Decoration Ideas
Why we love this
Cupcakes are the ultimate party food because they offer individual portions of joy, and these graduation-themed decorations elevate them into miniature works of art. Imagine a silky smooth swirl of Swiss meringue buttercream topped with a tiny, handmade chocolate mortarboard and a delicate tassel made of spun sugar. The contrast between the soft, fluffy cake and the snap of the decorative chocolate creates a delightful sensory experience for your guests. These treats are not only delicious but serve as highly Instagrammable centerpieces that celebrate the graduate’s personality and achievements in every bite.
Ingredients
- 12 pre-baked chocolate or vanilla cupcakes
- 3 cups Swiss meringue buttercream
- Dark chocolate melting wafers
- Square chocolate pieces (like Ghirardelli)
- Miniature peanut butter cups
- Sour belt candies or fruit leathers (for tassels)
- Small gold dragées
How to make it
- Begin by constructing the graduation caps: melt a small amount of chocolate wafers in the microwave in 20-second bursts until smooth.
- Turn the miniature peanut butter cups upside down and use a dot of melted chocolate to adhere a square chocolate piece to the top of each one; let these set in the fridge for 10 minutes.
- Cut your sour belt candy into very thin strips to act as the tassels, and use another tiny dab of chocolate to attach them to the center of the square chocolate ‘cap’.
- Place a single gold dragée in the center of the cap to mimic the button that holds the tassel in place.
- Fit a piping bag with a large open-star tip and fill it with your prepared buttercream; pipe high, elegant swirls onto each cupcake, moving from the outside in.
- Carefully place a finished chocolate graduation cap on top of each buttercream swirl, pressing down gently so it stays secure during transport.
- For an extra touch of elegance, lightly dust the cupcakes with edible silver glitter or add a custom ‘2026’ charm made of cardstock to the side.
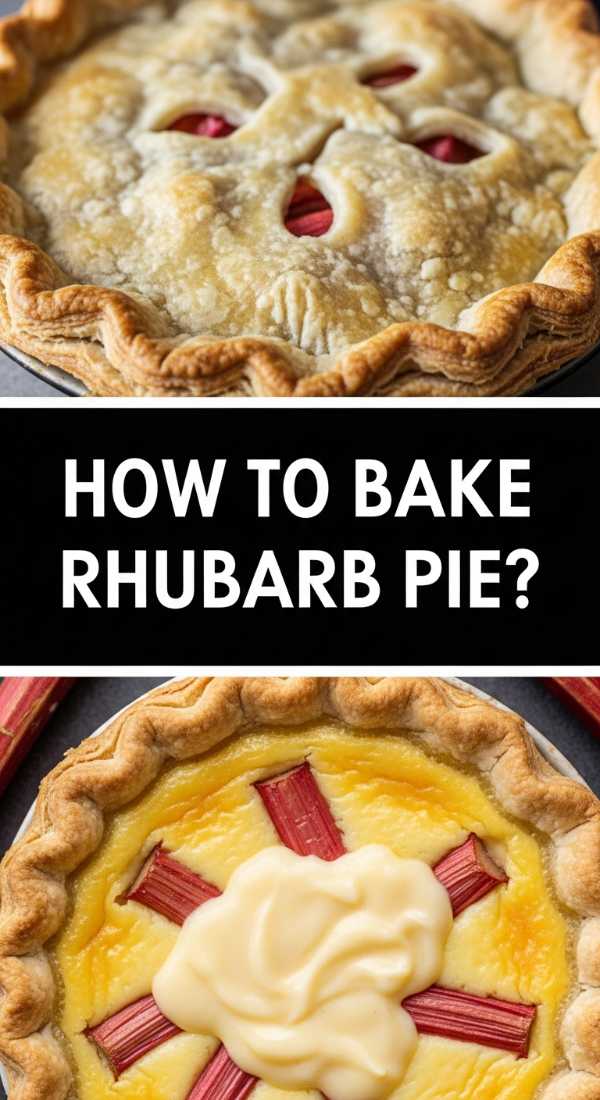
Classic Rhubarb Custard Pie Tutorial
Why we love this
There is a profound nostalgia in a slice of rhubarb custard pie, reminiscent of farmhouse kitchens and long summer afternoons spent on the porch. The beauty of this dish lies in the structural contrast: the flaky, buttery crust yields to a silky, egg-rich custard that perfectly envelopes the tart, softened pieces of rhubarb. Every bite offers a harmonious blend of creamy sweetness and refreshing tang, creating a sophisticated dessert that isn’t overly sugary. The custard sets into a beautiful pale gold, flecked with the vibrant reds and greens of the fruit, making it as visually appealing as it is delicious.
Ingredients
- 1 prepared 9-inch pie crust (unbaked)
- 3 cups fresh rhubarb, sliced thin
- 3 large eggs
- 1 1/2 cups granulated sugar
- 1/2 cup heavy cream
- 1/4 cup all-purpose flour
- 1/2 tsp ground nutmeg
- 1/4 tsp salt
How to make it
- Preheat your oven to 400°F (200°C) and place your pie crust into a deep-dish pie plate, crimping the edges for a decorative finish.
- In a large bowl, whisk the eggs until they are light and frothy; this helps create the signature airy texture of the custard.
- Slowly whisk in the sugar, flour, nutmeg, and salt until the mixture is completely smooth and no lumps remain.
- Pour in the heavy cream and whisk gently to combine, being careful not to incorporate too much air at this stage to prevent the custard from cracking.
- Spread the sliced rhubarb evenly across the bottom of the pie crust, ensuring the pieces are distributed well so every slice has fruit.
- Pour the custard mixture over the rhubarb, ensuring it fills all the gaps between the fruit pieces.
- Bake at 400°F for the first 10 minutes to help the crust set, then reduce the heat to 350°F (175°C) and continue baking for 40-50 minutes.
- The pie is done when the edges are set and the center has a slight, jello-like jiggle; allow it to cool completely on a wire rack for at least 3 hours to ensure the custard is fully set before slicing.
Sweet Strawberry Rhubarb Pie Guide

Why we love this
Strawberry and rhubarb are the ‘power couple’ of the baking world, offering a flavor profile that is both deeply comforting and excitingly vibrant. The strawberries provide a juicy, floral sweetness that rounds out the sharp, assertive tang of the rhubarb, resulting in a filling that is thick, bubbly, and incredibly aromatic. We love the rustic charm of a lattice-top crust, which allows the bright red juices to peek through and caramelize slightly during baking. When served warm with a scoop of melting vanilla bean ice cream, it creates a temperature and texture contrast that is simply heavenly.
Ingredients
- Double pie crust (top and bottom)
- 3 cups fresh strawberries, hulled and halved
- 3 cups rhubarb, chopped
- 1 cup granulated sugar
- 1/3 cup cornstarch
- 1 tbsp lemon juice
- 1 tsp cinnamon
- 1 egg (for egg wash)
- Coarse sparkling sugar
How to make it
- Preheat your oven to 425°F (220°C) and roll out the bottom half of your pie dough, fitting it into a 9-inch pie pan.
- In a large mixing bowl, toss the strawberries and rhubarb with the lemon juice to brighten the flavors and prevent the fruit from browning.
- In a small bowl, whisk together the sugar, cornstarch, and cinnamon; sprinkle this over the fruit and toss until every piece is evenly coated.
- Transfer the fruit mixture into the prepared pie crust, mounding it slightly in the center to account for the fruit shrinking as it cooks.
- Roll out the second piece of dough and cut into 1-inch strips to create a lattice top, weaving them over and under each other for a classic look.
- Trim the excess dough and pinch the top and bottom crusts together to seal the edges tightly.
- Brush the lattice with a beaten egg wash and sprinkle generously with coarse sparkling sugar for a beautiful crunch and golden shine.
- Bake at 425°F for 15 minutes, then reduce the heat to 375°F (190°C) and bake for another 45-50 minutes until the crust is golden brown and the filling is bubbling thick juices.
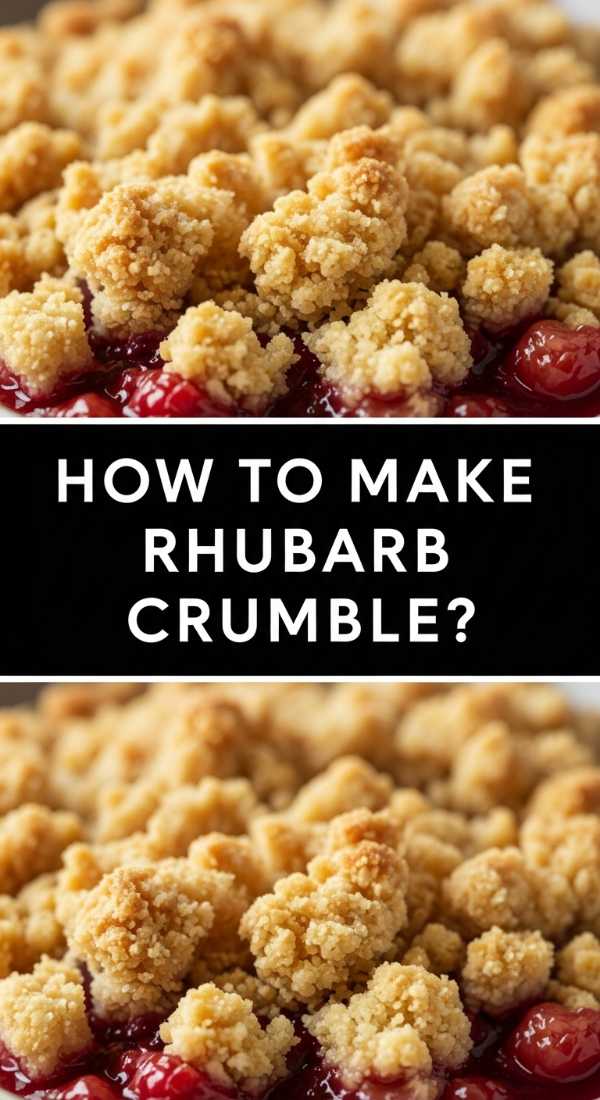
Perfect Rhubarb Crumble with Golden Topping
Why we love this
If you’re looking for a dessert that delivers maximum flavor with minimum stress, the rhubarb crumble is your new best friend. There is something deeply satisfying about the sound of a spoon cracking through a buttery, oat-filled topping into a lake of soft, tart fruit underneath. The topping is characterized by its golden-brown, toasted aroma and a crunch that stands up perfectly against the tender rhubarb. It’s the ultimate ‘hug in a bowl,’ evoking feelings of home-cooked warmth and casual elegance that makes every guest feel immediately at ease.
Ingredients
- 5 cups rhubarb, chopped into 1-inch pieces
- 3/4 cup granulated sugar
- 1 tbsp cornstarch
- 1 cup old-fashioned rolled oats
- 1 cup all-purpose flour
- 1 cup brown sugar, packed
- 1/2 cup cold unsalted butter, cubed
- 1 tsp ground ginger
How to make it
- Preheat your oven to 375°F (190°C) and lightly butter a 9×9 inch baking dish or a deep pie plate.
- In the baking dish, toss the chopped rhubarb with the granulated sugar and cornstarch until the fruit is well coated; the cornstarch is vital for thickening the juices.
- In a separate medium bowl, combine the oats, flour, brown sugar, and ground ginger, stirring to distribute the spice evenly.
- Add the cold, cubed butter to the oat mixture; use a pastry cutter or your fingertips to rub the butter into the dry ingredients until it forms pea-sized clumps.
- Sprinkle the crumble topping evenly over the rhubarb, making sure not to pack it down too tightly so that air can circulate and create a crisp texture.
- Bake for 35 to 45 minutes, or until the topping is a deep golden brown and the rhubarb juices are bubbling up around the edges.
- For the best experience, let the crumble rest for 10 minutes before serving; this allows the fruit base to set slightly.
- Serve warm, ideally with a dollop of fresh whipped cream or a pour of cold heavy cream for an authentic touch.
Creative Fun Coffee Drinks for Summer

Why we love this
Summer calls for a departure from the heavy lattes of winter, making room for playful, refreshing coffee creations that feel like a vacation in a glass. We love how a simple iced coffee can be transformed with floral syrups, whipped cold foams, or even a splash of tonic water for a sophisticated fizz. The sound of ice cubes clinking against glass and the sight of creamy milk marbling into dark espresso is a sensory delight that signals relaxation. These drinks are vibrant, energizing, and provide a much-needed cooling effect during warm afternoon celebrations.
Ingredients
- 2 shots of chilled espresso or 1/2 cup cold brew concentrate
- 1 cup ice cubes
- 1/4 cup whole milk or oat milk
- 2 tbsp lavender or vanilla simple syrup
- Fresh mint leaves or edible flowers for garnish
- Cold foam (skim milk frothed while cold)
How to make it
- Start by filling a tall, clear glass to the brim with large ice cubes; using large cubes ensures they melt slower, preventing your coffee from becoming watered down.
- Pour your chosen simple syrup over the ice—lavender syrup adds a beautiful floral note that pairs exceptionally well with light-roast summer coffees.
- Slowly pour the chilled espresso or cold brew over the ice; if you pour it slowly over the back of a spoon, you can create a beautiful layered effect.
- Add your milk of choice, watching as it swirls through the coffee to create those signature ‘viral’ aesthetic marble patterns.
- To make the cold foam, use a handheld milk frother to whisk cold skim milk in a small pitcher for about 30 seconds until it becomes thick and velvety.
- Spoon the cold foam generously over the top of the drink, allowing it to sit like a cloud on the surface.
- Garnish with a sprig of fresh mint or a few dried culinary lavender buds to enhance the aromatic experience.
- Serve immediately with a straw, encouraging guests to stir gently to combine the layers.
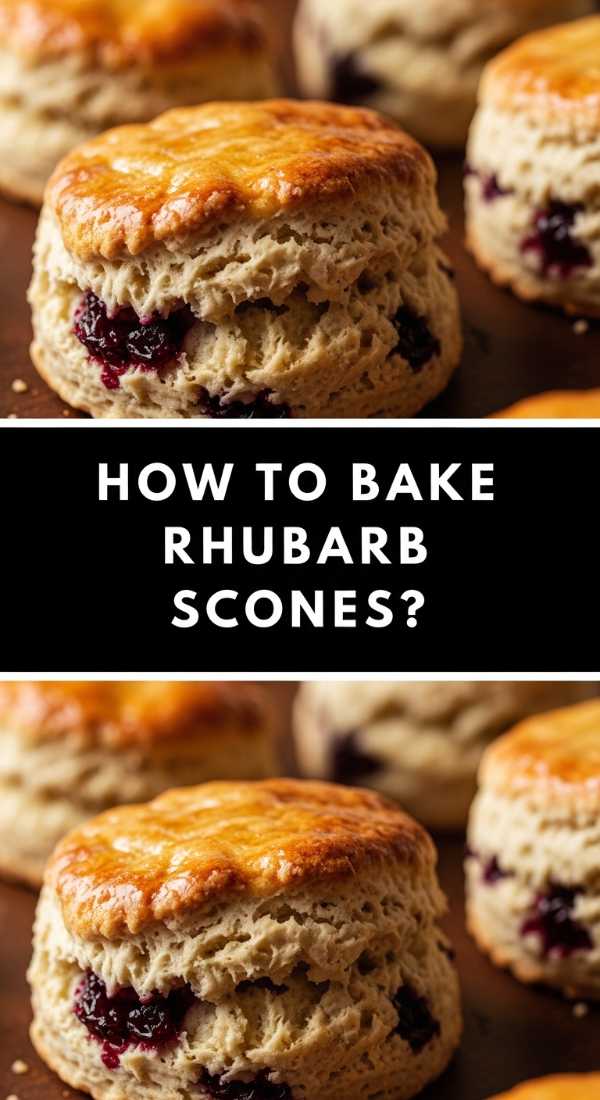
Fluffy Homemade Rhubarb Scones
Why we love this
Scones are often misunderstood as dry, but when done correctly with fresh rhubarb, they are incredibly moist, flaky, and tender. These scones feature ‘pockets’ of tart fruit that melt into the dough, creating little bursts of flavor that contrast with the buttery, slightly salty pastry. The exterior develops a beautiful golden crust with a light crunch from a sprinkle of turbinado sugar, while the inside remains soft and pillowy. They are the perfect accompaniment to a morning cup of tea, offering a sophisticated balance of textures that makes them feel like a true bakery-style indulgence.
Ingredients
- 2 cups all-purpose flour
- 1/3 cup granulated sugar
- 1 tbsp baking powder
- 1/2 tsp salt
- 1/2 cup cold unsalted butter, grated
- 1/2 cup heavy cream (plus more for brushing)
- 1 large egg
- 1 cup fresh rhubarb, finely diced
- Turbinado sugar for topping
How to make it
- Preheat your oven to 400°F (200°C) and line a large baking sheet with parchment paper or a silicone baking mat.
- In a large bowl, whisk together the flour, sugar, baking powder, and salt; for the fluffiest scones, make sure your leavening agents are fresh.
- Grate the cold butter into the dry ingredients; using a grater ensures the butter is distributed in small, even flakes which create the steam pockets necessary for height and flakiness.
- In a separate small bowl, whisk the heavy cream and egg together until fully combined.
- Gently fold the diced rhubarb into the flour mixture, then pour in the cream and egg mixture, stirring with a fork until a shaggy dough forms.
- Turn the dough out onto a lightly floured surface and gently pat it into an 8-inch disc about 1 inch thick—do not overwork the dough or the scones will be tough.
- Cut the disc into 8 wedges using a sharp knife or a bench scraper; place the wedges on the prepared baking sheet, leaving at least 2 inches between them.
- Brush the tops with extra heavy cream and sprinkle generously with turbinado sugar; bake for 18-22 minutes until the edges are golden brown and the centers are set.
Custom Decorated Graduation Cookies for 2026

Why we love this
Personalized cookies are the ultimate party favor, acting as both a delicious treat and a beautiful memento of a special day. These sugar cookies are soft with a slight snap, providing the perfect canvas for intricate royal icing designs that feature the ‘Class of 2026’ or individual names. We love the glossy, professional finish of flood-consistency icing, which gives the cookies a high-end look that rivals any professional bakery. Each cookie is a tiny celebration in itself, allowing you to incorporate school colors and symbols that make the graduate feel truly seen and celebrated.
Ingredients
- 3 cups all-purpose flour
- 1 cup unsalted butter, softened
- 1 cup granulated sugar
- 1 large egg
- 1 tsp almond extract
- Royal icing (confectioners’ sugar, meringue powder, and water)
- Gel food coloring
- Fine-tip piping bags
How to make it
- Cream the softened butter and sugar together in a stand mixer until the mixture is light and fluffy, which usually takes about 3 to 5 minutes on medium speed.
- Add the egg and almond extract, beating well; the almond extract provides that classic ‘bakery’ flavor that sets these cookies apart.
- Gradually add the flour on low speed until the dough comes together; wrap the dough in plastic wrap and chill in the fridge for at least 1 hour to prevent spreading.
- Roll the dough out to 1/4 inch thickness and use graduation-themed cutters (caps, diplomas, numbers) to cut out your shapes.
- Bake at 350°F (175°C) for 8-10 minutes; the cookies should be pale with just a hint of gold on the very bottom edges.
- Once the cookies are completely cool, prepare your royal icing in two consistencies: ‘outline’ (like toothpaste) and ‘flood’ (like honey).
- Use the outline icing to trace the edges of the cookie and the ‘2026’ text, then fill in the centers with the flood icing, using a toothpick to pop any tiny air bubbles.
- Allow the base layer to dry for at least 4 hours before adding finer details, like tassel lines or school crests, on top for a 3D effect.
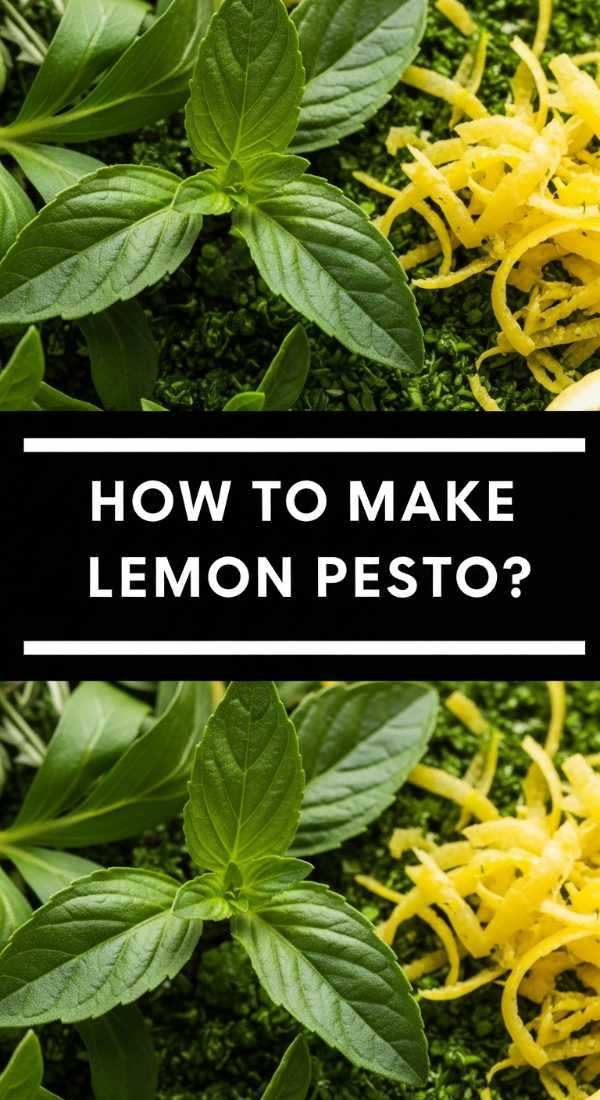
Fresh Lemon Pesto for Italian Dinners
Why we love this
This isn’t your average grocery store pesto; it’s a bright, herbaceous, and zesty revelation that cuts through the richness of pasta or grilled meats with incredible precision. The addition of fresh lemon zest and juice transforms the traditional basil-and-pine-nut profile into something much more vibrant and summery. We love how the aroma of fresh basil leaves being crushed fills the air, mingling with the sharp scent of aged Parmesan and the citrusy high notes of lemon. It’s a versatile sauce that adds a pop of brilliant emerald green to your food board, making everything look and taste remarkably fresh.
Ingredients
- 2 cups fresh basil leaves, packed
- 1/2 cup freshly grated Parmesan cheese
- 1/3 cup pine nuts, lightly toasted
- 2 cloves garlic, peeled
- 1/2 cup extra virgin olive oil
- Zest of 1 large lemon
- 2 tbsp fresh lemon juice
- 1/2 tsp sea salt
How to make it
- Start by toasting your pine nuts in a dry skillet over medium heat for 2-3 minutes, shaking the pan constantly until they are fragrant and golden; this step is crucial for a deep, nutty flavor.
- Place the fresh basil leaves and the toasted pine nuts into a food processor and pulse several times until they are coarsely chopped.
- Add the garlic cloves and the freshly grated Parmesan cheese; pulse again until the mixture is well combined but still has some texture.
- With the food processor running on low speed, slowly drizzle in the extra virgin olive oil in a steady stream to emulsify the sauce.
- Stop the processor and add the lemon zest, lemon juice, and sea salt; pulse just 2 or 3 more times to incorporate these final bright notes.
- Taste the pesto and adjust the seasoning if necessary—sometimes an extra squeeze of lemon or a pinch of salt is needed depending on the potency of your basil.
- To store, place the pesto in a small glass jar and pour a thin layer of olive oil over the top to prevent oxidation and keep that vibrant green color.
- Serve as a dip on your food board alongside crusty bread, or toss with hot linguine for an effortless, high-end Italian dinner.
The Final Flourish: Bringing Your Board Together
As you assemble these various elements onto your board, remember that the most important ingredient is the love and intention you put into the preparation. Whether you’re arranging the vibrant rhubarb scones next to a bowl of fresh jam or placing those custom 2026 cookies as a focal point, the goal is to create a space where people feel invited to linger, talk, and celebrate. These recipes are more than just food; they are the backdrop to the stories and laughter that define our lives. So, take a deep breath, pour yourself one of those creative summer coffees, and enjoy the beautiful spread you’ve created!