
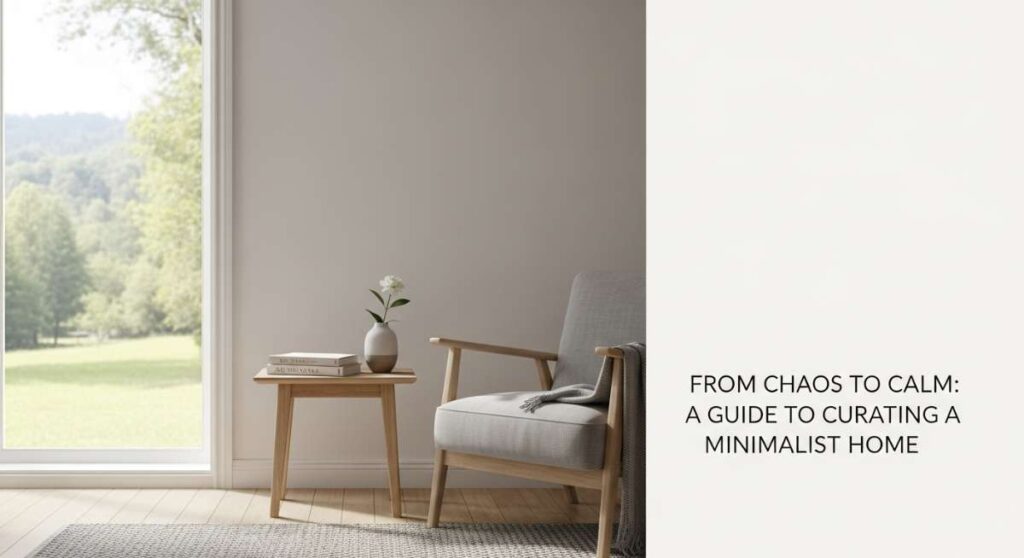
From Chaos to Calm: A Guide to Curating a Minimalist Home
We’ve all been there—standing in the middle of a room, feeling the weight of ‘stuff’ pressing in from every corner. It’s more than just a mess; it’s a mental load that prevents us from truly exhaling when we walk through our own front doors. I remember the exact moment I decided to transition to a more minimalist lifestyle; it was a Tuesday evening, and I couldn’t find my keys under a mountain of mail and decorative knick-knacks. I realized then that my home was no longer a sanctuary, but a source of stress.
Minimalism isn’t about living in a cold, empty box. It’s about intentionality. It’s about choosing items that serve a purpose or bring genuine joy, and letting go of the rest to make room for peace. In this guide, we’re going to explore how to curate that calm across every inch of your life—from the way you greet guests at the front door to the digital spaces you inhabit daily. Let’s reclaim our space and our sanity together, one thoughtful project at a time.
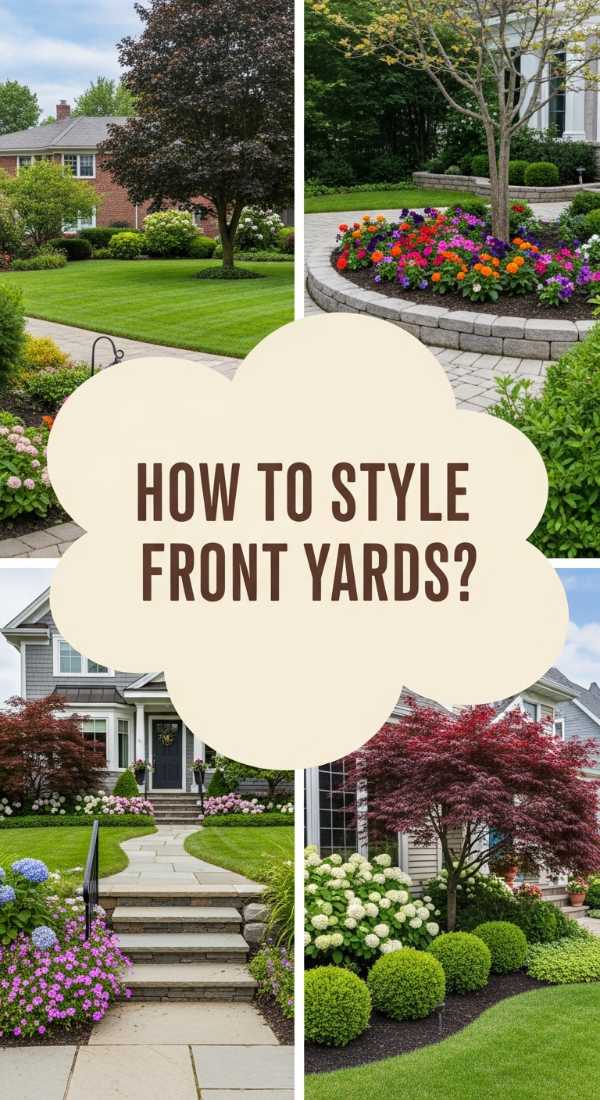
How to Design Simple Landscaping for a Welcoming Front Yard
Why we love this
There is nothing quite like the soft, earthy scent of damp mulch and the sight of clean, purposeful lines to signal that you’ve finally arrived home. A minimalist front yard isn’t just about low maintenance; it’s about creating a visual ‘deep breath’ for yourself and your neighbors. Imagine the texture of smooth river stones crunching underfoot, paired with the vibrant green of architectural grasses that sway gently in the breeze. This approach highlights the natural beauty of your home’s exterior without the cluttered chaos of overgrown flower beds, making the entire property feel more expensive, curated, and peaceful.
Essential Elements:
- Native ornamental grasses (like Fountain Grass or Maiden Grass).
- Smooth river rocks or dark charcoal mulch for high contrast.
- Metal or stone landscape edging for crisp borders.
- Minimalist solar-powered path lights in a matte black finish.
- Two or three large, uniform planters for a focal point.
How to make it
- Begin by clearing the canvas; remove all existing weeds, dead shrubs, and outdated plastic edging until you have a bare patch of soil.
- Sketch a simple geometric layout, favoring straight lines or one large, sweeping curve rather than fussy, jagged edges.
- Install your edging material—metal stakes are best for a professional, thin-profile look—ensuring it sits about an inch above the soil line to keep rocks and mulch contained.
- Lay down a heavy-duty weed barrier fabric, overlapping the seams by at least six inches and securing it with landscape staples to prevent future maintenance headaches.
- Dig holes for your primary plants, focusing on a ‘less is more’ philosophy by spacing them out significantly to allow their natural shapes to shine; backfill with high-quality garden soil and water them deeply.
- Pour your chosen ground cover (rocks or mulch) at a depth of at least three inches to ensure complete coverage and a lush, thick appearance that suppresses weed growth.
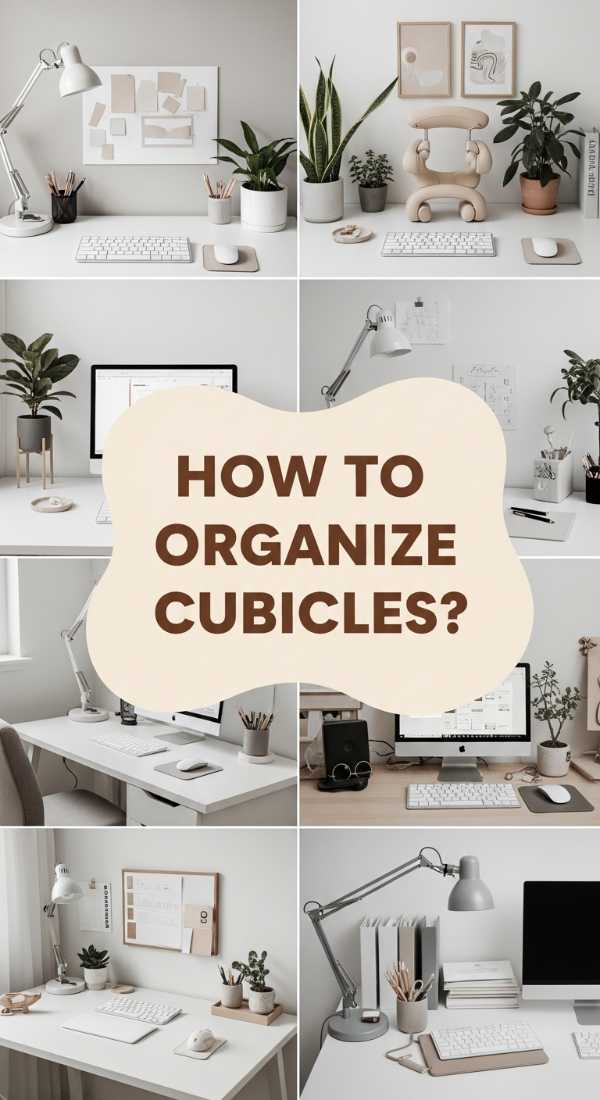
How to Organize an Office Desk for a Productive Work Cubicle
Why we love this
A cluttered desk is a cluttered mind, and in the high-stakes environment of a cubicle, having a pristine workspace is like having a secret weapon for productivity. We love the tactile satisfaction of a smooth, wood-grain desk surface that isn’t buried under loose papers, and the subtle, calming aroma of a single sprig of eucalyptus in a bud vase. When every cord is tucked away and every tool has a designated home, you stop wasting energy on looking for things and start focusing on your best work. It creates an aura of professional calm that makes even the busiest Mondays feel manageable.
Essential Elements:
- A monitor riser with built-in storage drawers.
- Cable management clips or a hidden wire tray.
- A neutral-toned desk mat (felt or vegan leather).
- A small, low-maintenance plant like a snake plant or succulent.
- A vertical file sorter for ‘active’ documents only.
How to make it
- Empty the entire desk area including drawers and shelves, placing everything into a ‘holding box’ so you can see the bare bones of your workspace.
- Wipe down every surface with a microfiber cloth and a gentle cleaner to remove dust and static, creating a fresh, hygienic starting point.
- Group your items by frequency of use: things you touch every hour (keyboard, mouse, coffee) stay on the desk; things you touch daily (planner, pens) go in the top drawer; things you touch weekly (stapler, extra paper) go in the bottom drawer.
- Thread all cables through a cable management tray or secure them to the back of the desk legs using velcro ties, ensuring no wires are dangling in your leg space or tangling on the surface.
- Place your monitor at eye level using a riser, which frees up the valuable real estate directly underneath the screen for your keyboard or notebook when not in use.
- Select exactly one personal item—a photo or a small sculpture—to keep the space feeling human without becoming a distraction.
How to Build a Cheap Pool Deck for Ultimate Summer Relaxation

Why we love this
There is a specific kind of summer magic that happens when your bare feet hit sun-warmed wood right before a cooling dip in the water. We love this budget-friendly approach because it democratizes luxury, turning a standard above-ground pool into a sophisticated resort-style oasis. The smell of cedar and the sound of water splashing against the timber creates an immersive sensory experience that feels far more expensive than it actually is. It’s about crafting a dedicated zone for relaxation where you can dry off in the sun, iced tea in hand, without the mess of grass and mud sticking to your toes.
Essential Elements:
- Pressure-treated 2x4s and 4×4 posts for the structural frame.
- Pre-cut decking boards (pine or cedar-tone).
- Deck screws with a weather-resistant coating.
- Concrete deck blocks for a floating foundation (no digging required!).
- Outdoor-rated wood sealant or a light oak stain.
How to make it
- Level the ground around the pool area meticulously using a rake and a spirit level, then lay down a layer of gravel to prevent moisture buildup under the deck.
- Position your concrete deck blocks in a grid pattern according to your deck size, ensuring they are perfectly level with one another to prevent the structure from wobbling.
- Build the outer frame using 2x4s, securing them into the slots of the deck blocks and checking the squareness by measuring diagonally from corner to corner.
- Install joists every 16 inches across the frame to provide a sturdy base that won’t bounce when walked upon; use joist hangers for a professional-grade connection.
- Lay your decking boards across the joists, using a spacer (like a large nail) to keep a consistent 1/8-inch gap between boards for drainage and wood expansion.
- Screw the boards down, making sure the screw heads are slightly countersunk so they don’t catch on bare feet, then finish with a high-quality sealant to protect against chlorine and UV rays.
How to Style a Patriotic Front Porch for a Festive Entrance

Why we love this
A patriotic porch is like a warm, nostalgic hug for your home’s curb appeal, blending classic Americana with the crispness of modern minimalism. We adore the high-contrast palette of deep navy, crisp white, and bold red against the natural textures of a woven jute rug or a wicker rocking chair. There’s something deeply comforting about the sound of a cotton flag flapping softly in the wind and the sight of bright red geraniums populating a clean white planter. It’s a celebratory look that feels intentional and curated rather than cluttered, inviting guests into a space that feels both festive and serene.
Essential Elements:
- A high-quality embroidered American flag with a wooden pole.
- Red, white, and blue throw pillows in weather-resistant fabric.
- A large navy blue or striped outdoor rug.
- Symmetrical white planters with red blooming flowers.
- A simple grapevine wreath with a burlap or navy ribbon.
How to make it
- Clean your porch thoroughly, removing any cobwebs from the ceiling and power-washing the floor to ensure your festive colors pop against a pristine background.
- Mount the flag bracket at a 45-degree angle near the front pillar or door frame, ensuring the flag has enough clearance to wave without getting caught on the roofline.
- Anchor the space with a large outdoor rug in a neutral or navy pattern; this defines the seating area and adds a layer of literal physical comfort underfoot.
- Arrange your seating—ideally a pair of white rockers or a simple bench—and add pillows that feature subtle patriotic patterns like stars or ticking stripes rather than loud graphics.
- Place matching planters on either side of the door to create symmetry, which is a hallmark of minimalist design; fill them with red flowers and white ‘filler’ plants for a balanced look.
- Hang a simple wreath at eye level on the door, securing it with a magnetic hook to avoid damaging the paint or wood.
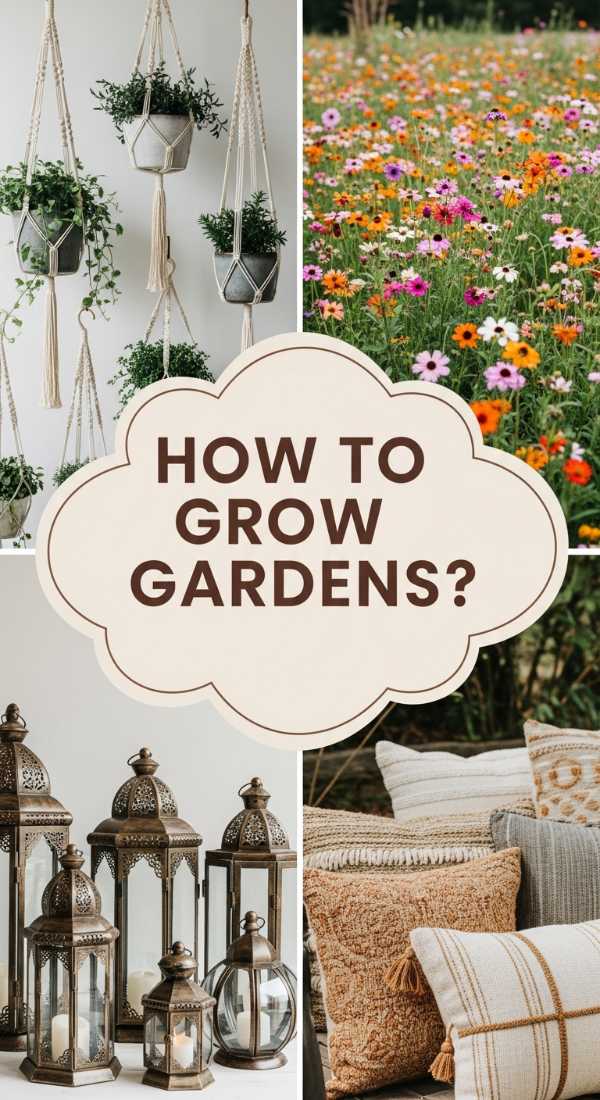
How to Create a Hippie Garden for a Boho Decor Vibe
Why we love this
The ‘hippie garden’ is the soulful, wilder cousin of minimalism—it’s about a curated wildness that celebrates the untamed beauty of nature. We love the heady aroma of flowering jasmine and lavender mixed with the earthy scent of drying sage bundles hanging from a porch. It’s a space where you can feel the soft texture of ornamental moss between your fingers and hear the delicate chime of a bamboo wind bell. This style brings a ‘boho’ warmth to your home, encouraging a slower pace of life where you can meditate among the wildflowers and feel grounded to the earth.
Essential Elements:
- Wildflower seed mix (local and pollinator-friendly).
- Upcycled vintage containers like galvanized tubs or clay pots.
- A Moroccan-style outdoor lantern or string of Edison bulbs.
- A weather-resistant floor pouf or low-profile wooden bench.
- Crystals or smooth river stones used as garden markers.
How to make it
- Choose a sunny spot and till the soil lightly, removing only the most aggressive weeds while leaving room for a diverse, ‘natural’ ecosystem to thrive.
- Scatter a high-quality wildflower mix heavily over the soil, then gently walk over the area to ensure good seed-to-soil contact without burying them too deep.
- Cluster your upcycled pots in groups of three (the ‘rule of three’ in design) at different heights, planting them with fragrant herbs like rosemary, mint, and thyme.
- Install low-hanging string lights in a zig-zag pattern over the garden area to create a ‘ceiling’ of soft, golden light for evening relaxation.
- Create a ‘zen’ focal point by clearing a small circle of ground and filling it with fine sand or smooth pea gravel, placing a single large stone or a weatherproof cushion in the center.
- Water with a gentle misting setting on your hose to keep the seeds moist until they germinate, then transition to deep, infrequent watering to encourage strong root systems.
How to Construct DIY Wood Planters for a Lush Garden Look

Why we love this
There is a profound sense of satisfaction in running your hand over the smooth, sanded surface of a planter you built with your own two hands. We love these DIY wood planters because they offer a structured, architectural element to the garden that contrasts beautifully with the soft, organic shapes of the plants they hold. The scent of freshly cut cedar is intoxicating and naturally repels pests, while the warm, honey-colored grain of the wood adds an instant touch of high-end design to any patio. They are the perfect solution for minimalists who want a lush look without the clutter of mismatched plastic pots.
Essential Elements:
- Cedar or Redwood boards (resistant to rot).
- Exterior-grade wood glue and pocket hole screws.
- A miter saw for clean, 45-degree angle cuts.
- Plastic pond liner or landscape fabric for the interior.
- Heavy-duty casters (optional, for easy moving).
How to make it
- Measure and cut four side panels to your desired height, using a miter saw to cut the edges at 45-degree angles so they fit together like a picture frame for a seamless look.
- Apply a bead of waterproof wood glue to the mitered edges, then clamp them together and secure from the inside using pocket hole screws to keep the exterior clean.
- Cut a base piece of wood slightly smaller than the interior dimensions of your box, and drill several half-inch drainage holes into it to prevent root rot.
- Attach the base by screwing it into the side walls from the bottom, or by resting it on small ‘cleats’ (thin strips of wood) screwed into the interior walls.
- Line the inside of the planter with heavy-duty plastic or landscape fabric, stapling it to the top edge to protect the wood from constant contact with damp soil.
- Give the exterior a final sand with 220-grit sandpaper and apply a clear UV-protectant sealer to maintain the wood’s natural color against the sun’s rays.
How to Master a Vintage Grandma House Aesthetic for a Cozy Home

Why we love this
The ‘Grandmacore’ or vintage aesthetic is minimalism with a soul; it’s about curating a few high-quality, nostalgic pieces that make a house feel like a home. We love the sensory richness of this style—the feel of a heavy, hand-knitted wool throw, the faint scent of rosewater and beeswax, and the visual delight of a scalloped ceramic saucer. It’s about rejecting the ‘fast furniture’ trend in favor of items that have a history and a story. This aesthetic creates a space that feels lived-in and loved, offering a cozy sanctuary that prioritizes comfort and heritage over cold, modern trends.
Essential Elements:
- Thrifted lace doilies or embroidered linens.
- Vintage botanical prints in simple gold frames.
- A collection of mismatched floral teacups.
- A classic wingback chair or a velvet settee.
- Brass candlesticks with tapered beeswax candles.
How to make it
- Start by clearing out modern, plastic, or mass-produced decor items to make room for pieces with ‘patina’—look for wood with visible grain and metals with a natural tarnish.
- Visit local antique shops or estate sales with a specific eye for botanical themes and high-quality textiles like linen, wool, and silk.
- Create a ‘gallery wall’ of vintage prints, but keep it minimalist by using identical frames or a very limited color palette to prevent the wall from looking cluttered.
- Incorporate ‘living’ elements like dried flower arrangements or a bowl of fresh fruit, which ground the vintage items in the present moment.
- Layer your lighting by using small table lamps with fabric shades instead of harsh overhead lights; this creates the warm, amber glow characteristic of old-world homes.
- Display your ‘treasures’ (like a vintage clock or a porcelain figurine) in small, intentional vignettes rather than spreading them across every available surface.
How to Install Vinyl Lattice Panels for a Private Backyard Oasis

Why we love this
Privacy is the ultimate luxury in a minimalist home, and vinyl lattice panels provide a clean, modern way to carve out a secret sanctuary in your backyard. We love the crisp, white lines of the lattice against the deep greens of a garden, creating a trellis effect that feels both airy and secure. The smooth, cool-to-the-touch surface of the vinyl is incredibly low-maintenance, meaning you spend less time painting and more time enjoying the gentle breeze that filters through the diamond-shaped openings. It’s a functional design choice that adds vertical interest and a sense of architectural ‘completion’ to your outdoor space.
Essential Elements:
- Pre-cut vinyl lattice panels (white or driftwood grey).
- Vinyl U-channel molding for a finished edge.
- Stainless steel screws with white caps to match the lattice.
- Pressure-treated 4×4 posts for structural support.
- A power drill and a level.
How to make it
- Map out your privacy line and install 4×4 posts every four or eight feet (depending on panel size), ensuring they are set in concrete for a sturdy, long-term foundation.
- Attach horizontal support rails (2x4s) between the posts at the top and bottom to create a ‘frame’ that the lattice will sit inside.
- Cut your vinyl U-channel molding to the size of the frame and screw it into the inner edges of the posts and rails; this channel will hold the lattice securely.
- Slide the lattice panel into the U-channels, leaving about a quarter-inch of space on all sides to allow the vinyl to expand and contract with the temperature.
- Secure the lattice to the frame using a few screws through the lattice into the support rails, but don’t over-tighten them—let the panel ‘float’ slightly within the channel.
- Snap the decorative screw caps over the heads of your screws to hide the hardware, creating a seamless, professional-looking wall of privacy.
How to Host a Fall Baby Shower for a Magical Celebration

Why we love this
A fall baby shower is a sensory masterpiece, celebrating new life amidst the golden, cooling transition of the seasons. We love the warm, spicy aroma of hot apple cider simmering on the stove and the tactile comfort of chunky knit blankets draped over chairs for guests. By focusing on a palette of muted terracotta, sage green, and cream, you can create a festive atmosphere that feels sophisticated and calm rather than over-the-top. It’s about the simple joy of sharing a meal around a table decorated with mini white pumpkins and dried wheat stalks, making the mother-to-be feel surrounded by the quiet beauty of nature.
Essential Elements:
- A ‘hot beverage station’ with cider, tea, and cinnamon sticks.
- Natural decor: mini pumpkins, eucalyptus, and pinecones.
- Linen napkins and simple ceramic plates in earth tones.
- A ‘prediction and advice’ station with recycled paper cards.
- Soft acoustic folk music playing at a low volume.
How to make it
- Design a minimalist invitation using a clean font and a single botanical illustration to set a calm, intentional tone for the event from the start.
- Set the main table with a linen runner and a ‘centerpiece’ made of staggered heights of white candles and sprigs of fresh greenery—avoid plastic confetti or loud streamers.
- Prepare a menu of warm, comforting finger foods like mini quiches, squash soup shooters, and apple tarts, focusing on high-quality ingredients and beautiful presentation.
- Create a ‘cozy corner’ for opening gifts by layering a plush rug with several oversized pillows and a basket of blankets, ensuring the mom-to-be is the most comfortable person in the room.
- Organize one or two low-stress activities, like ‘decorating a wooden block’ for the baby, which provides a meaningful keepsake without the chaos of traditional shower games.
- Send guests home with a ‘living’ favor, such as a small succulent or a packet of wildflower seeds, echoing the theme of growth and new beginnings.
How to Find Summer Themed Wallpaper for a Bright Tech Vibe
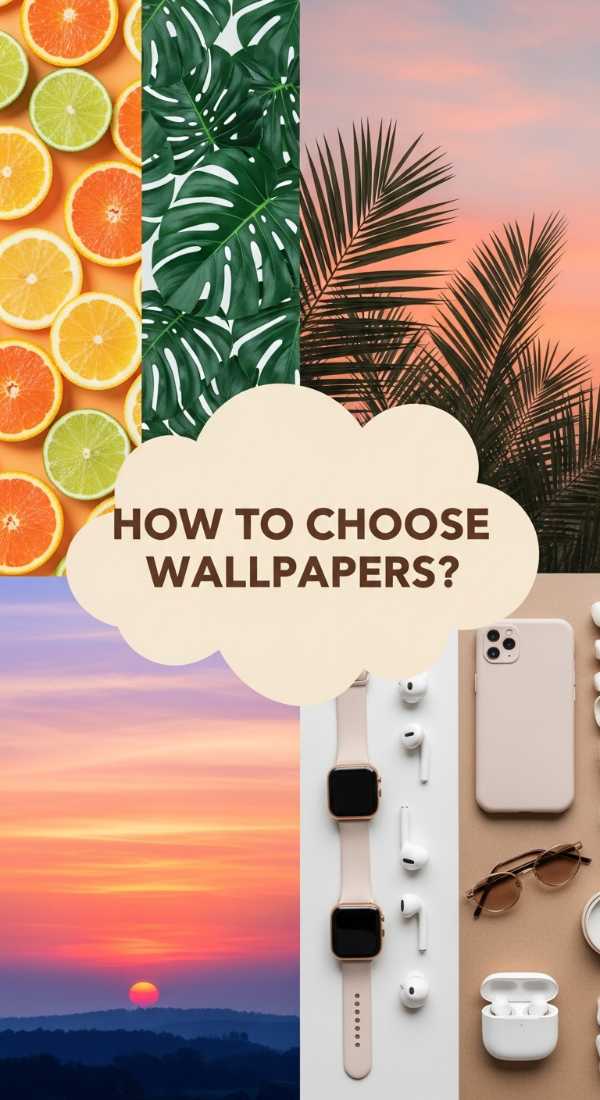
Why we love this
In our modern world, our digital screens are as much a part of our home environment as our physical walls. We love the idea of ‘digital minimalism’—curating your phone and computer backgrounds to reflect a bright, summer aesthetic that boosts your mood every time you check a notification. Imagine the visual ‘pop’ of a high-resolution image featuring a slice of bright citrus against a turquoise pool, or the calming symmetry of a minimalist palm leaf. These bright, airy visuals reduce digital fatigue and make your tech feel like an extension of your sunny, organized lifestyle rather than a cluttered tool of stress.
Essential Elements:
- High-resolution stock photo sites (like Unsplash or Pexels).
- Keywords: ‘Minimalist Summer,’ ‘Aesthetic Citrus,’ ‘Ocean Aerial.’
- Editing apps like Canva or Lightroom to adjust brightness and tone.
- Consistent color palettes across all devices.
- Clear space on your home screen (hide unnecessary icons!).
How to make it
- Search for ‘minimalist summer aesthetic’ on high-quality image platforms, looking for photos with a lot of ‘negative space’ (empty areas) so your app icons remain legible.
- Choose an image with a ‘cool’ color temperature—like ocean blues or mint greens—to create a psychological sense of cooling down during the hot summer months.
- Download the image in the highest resolution possible to ensure it looks crisp and professional on your specific screen size.
- Use a simple editing tool to increase the ‘exposure’ and ‘vibrance’ slightly, giving the wallpaper that signature ‘bright and airy’ blogger look.
- Apply the wallpaper to your device, then go through your apps and delete or hide anything you haven’t used in the last month to achieve true digital minimalism.
- Sync your wallpaper across your phone, tablet, and laptop to create a cohesive visual experience that feels intentional and curated.
The Art of Living Light
Curating a minimalist home isn’t a destination; it’s a practice. It’s the daily choice to value space over stuff and peace over chaos. Whether you’re building a pool deck or just changing the wallpaper on your phone, remember that every small step toward intentionality makes a difference. Your home should be the place where you feel most like yourself—free from the noise of the world and surrounded by things that truly matter. Here’s to a life that is simpler, brighter, and infinitely more calm.