
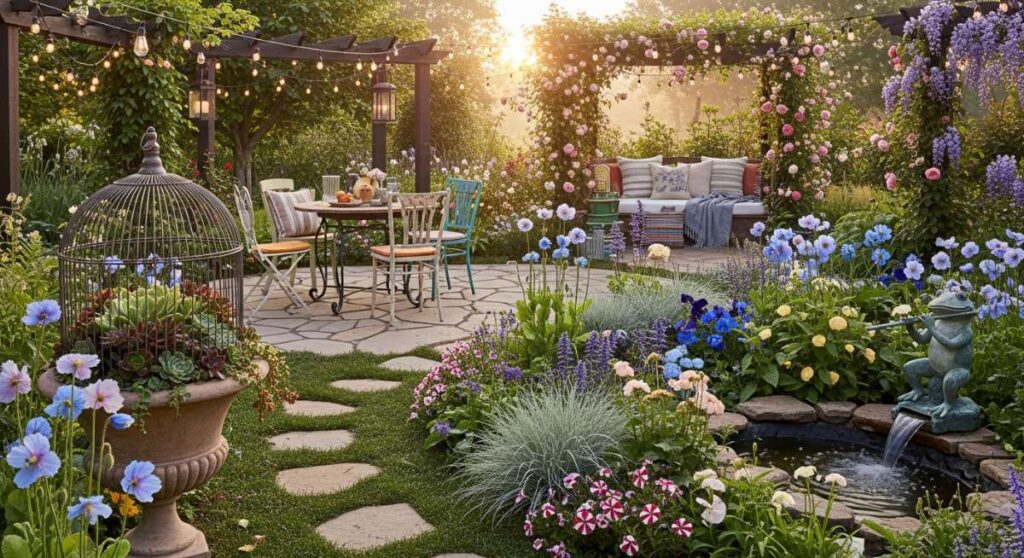
There is a specific kind of magic that happens when the sun begins to dip below the horizon, casting a honey-hued glow across your backyard. It’s that fleeting moment where the world slows down, the air feels a little cooler, and your outdoor space transforms from a mere patch of grass into a living, breathing sanctuary. For me, gardening has never just been about the plants; it’s about creating a narrative—a whimsical escape from the digital noise where every stepping stone and every flickering lantern tells a story of peace and wonder.
This season, I’m leaning into the ‘Enchanted’ aesthetic. We’re moving away from sterile, perfectly manicured lawns and embracing the wild, the textured, and the slightly mysterious. Imagine walking through a gate and feeling like you’ve stepped into the pages of a classic storybook, where the scents of wild herbs mingle with the soft babble of water. Whether you have a sprawling estate or a tiny balcony, these trends are about infusing your personal space with soul and a touch of DIY magic.
How to Craft Enchanting Pathways for an Elegant Outdoor Walkway

Why we love this
An enchanting pathway is the literal and metaphorical journey through your garden, inviting guests to slow their pace and notice the small details. We love the way irregular flagstones tucked into lush, velvet-green moss feel underfoot—soft, cool, and ancient. It creates a sense of discovery, leading the eye toward hidden corners while providing a structural elegance that anchors the entire landscape. The earthy aroma of damp soil and the tactile contrast between cold stone and soft groundcover make every walk to the mailbox feel like a stroll through a misty English woodland.
Essential Elements:
- Irregularly shaped flagstones or recycled slate tiles
- Low-growing groundcover like Irish Moss or Stepables
- Landscaping fabric and leveling sand
- A rubber mallet for precision setting
- Fine gravel or pea shingle for drainage
How to make it
- Begin by mapping out a winding, organic curve for your path using a garden hose to visualize the flow; avoid straight lines to keep the look whimsical.
- Excavate the area to a depth of about 4 inches, ensuring the ground is relatively level but slightly sloped for water runoff.
- Lay down a heavy-duty landscaping fabric to suppress weeds, then add a 2-inch layer of leveling sand, tamping it down firmly until it provides a solid, flat base.
- Place your flagstones onto the sand, leaving 2-to-3-inch gaps between them. Use a rubber mallet to tap each stone into place, checking that they don’t wobble and sit slightly higher than the surrounding soil level.
- Fill the gaps between the stones with high-quality potting soil or fine grit, then carefully tuck in small plugs of Irish Moss or Thyme. Water gently with a misting nozzle to settle the roots without displacing the soil.
How to Create Speckled Mushroom Sculptures for a Whimsical Backyard Escape

Why we love this
Nothing screams ‘fairytale’ quite like the sight of oversized, speckled mushrooms peeking out from beneath a Hosta leaf or nestled near a gnarled tree root. These sculptures add a playful, artisanal touch that breaks up the greenery with pops of color and unexpected shapes. They capture the imagination of children and adults alike, evoking images of woodland sprites and secret forest gatherings. The smooth, glazed finish of the ‘cap’ catches the light, while the sturdy ‘stem’ provides a rustic, organic contrast that feels perfectly at home in a wild garden setting.
Essential Elements:
- Terracotta pots and matching saucers (various sizes)
- Outdoor-grade acrylic paint (red, white, and earthy tones)
- Waterproof silicone adhesive or construction glue
- High-gloss UV-resistant clear sealant
- Sandpaper and a clean cloth
How to make it
- Select your pairs: a tall, narrow terracotta pot will serve as the stem, while a wider, shallow saucer will act as the mushroom cap. Ensure the pot’s base fits securely against the saucer’s underside.
- Sanding the surfaces lightly with medium-grit sandpaper is crucial; this creates ‘tooth’ for the paint to adhere to, preventing peeling during summer rain.
- Paint the exterior of the saucer with a vibrant red or deep forest green. Once dry, use a round sponge brush to dab varying sizes of white ‘speckles’ across the top. Paint the inverted pot a creamy off-white or light tan to mimic a natural stalk.
- Apply a generous bead of waterproof silicone adhesive to the bottom of the inverted pot. Carefully center the saucer (also upside down) onto the pot and press firmly. Let this cure for at least 24 hours in a dry area.
- Finish the sculpture with two coats of high-gloss outdoor sealant. This not only gives it a professional ‘ceramic’ look but protects the paint from fading in direct sunlight.
How to Design Fairytale Floral Borders for a Magical Cottage Aura
Why we love this
The fairytale floral border is all about controlled chaos—a riot of colors, heights, and textures that look like they’ve grown together by happy accident. We love the vertical drama of Foxgloves and Delphiniums reaching for the sky, while the soft, pillowy blooms of Peonies and Roses fill the air with a dizzying, romantic fragrance. It’s a sensory feast that attracts butterflies and bees, turning your garden into a vibrating, living ecosystem. This style of planting feels nostalgic and generous, offering a lushness that shields the modern world from view.
Essential Elements:
- Tall structural perennials (Foxgloves, Hollyhocks, Lupines)
- Mid-height filler plants (Lavender, Salvia, Phlox)
- Low-growing spillers (Alchemilla mollis, Sweet Alyssum)
- Organic mulch or compost
- Stakes or supports for taller blooms
How to make it
- Prepare your border by clearing all weeds and digging in several inches of organic compost to ensure the soil is nutrient-rich and well-draining.
- Use the ‘staircase’ method for placement: position your tallest structural plants (like Foxgloves) at the very back of the bed against a fence or wall to create a vertical backdrop.
- In the middle zone, plant your filler species in ‘drifts’ of three or five. Planting in odd numbers looks more natural and avoids a rigid, formal appearance.
- At the very front, place ‘spiller’ plants that will soften the edge of the garden bed and spill over onto the grass or path, blurring the lines between structure and nature.
- Mulch heavily around the base of the plants to retain moisture and keep the roots cool. Stake the taller Foxgloves early in the season to prevent them from flopping over during heavy summer thunderstorms.
How to Build Solar Lantern Displays for a Dreamy Twilight Glow

Why we love this
As evening falls, these solar lantern displays transform the garden into a constellation of soft, amber light. We love the way they eliminate the need for harsh, bright floodlights, instead offering a warm, diffused glow that mimics the flicker of candlelight. They add a vertical dimension to the landscape, hanging like glowing fruit from tree branches or shepherd’s hooks. The gentle transition from daylight to lantern-light creates a serene atmosphere, perfect for long conversations and stargazing without ever having to worry about an electrical outlet.
Essential Elements:
- Decorative solar-powered lanterns (metal or glass)
- Black iron shepherd’s hooks of varying heights
- Outdoor-rated twine or thin chains
- AA rechargeable solar batteries
- A sunny spot for daytime charging
How to make it
- Select lanterns with ‘warm white’ LEDs to avoid the clinical blue tint often found in cheaper solar lights; the warm tone is essential for the ‘enchanted’ vibe.
- Install your shepherd’s hooks in clusters of three at different heights. Staggering the heights creates a more dynamic visual field than a single line of lanterns.
- Before hanging, place the lanterns in direct sunlight for a full 12-hour cycle to ensure the batteries are fully conditioned and will provide the maximum glow time.
- Secure the lanterns to the hooks using short lengths of dark chain or twine if the built-in handles feel flimsy. Ensure they are placed where they can catch at least 6 hours of sun during the day.
- For an extra touch of magic, hang several smaller fairy-light lanterns within the branches of a nearby tree, creating a ‘firefly’ effect that complements the larger path lanterns.
How to Install Cascading Water Features for a Peaceful Backyard Retreat

Why we love this
The sound of moving water is perhaps the most powerful tool in garden design for creating instant tranquility. We love how a cascading feature masks the distant hum of traffic or neighbors, replacing it with a rhythmic, splashing melody that lowers the heart rate. The visual of water trickling over dark, wet stones adds a cooling element to the garden’s microclimate, and the way light sparkles off the moving surface is hypnotic. It’s a focal point that breathes life into the space, offering a refreshing oasis for both humans and local birds.
Essential Elements:
- Submersible water pump (GPH rated for your feature size)
- Waterproof pond liner or large decorative basin
- Assorted river rocks and flat slate pieces
- Flexible plastic tubing
- GFCI outdoor outlet for power
How to make it
- Dig a hole slightly larger than your reservoir basin and ensure the bottom is perfectly level using a spirit level; an unlevel basin will cause uneven water flow.
- Place the submersible pump inside the basin and attach the flexible tubing. Run the tubing up to the highest point where you want the ‘cascade’ to begin.
- Stack flat stones or slate around the tubing to hide it, creating a natural-looking ‘staircase’ for the water. Use small dabs of pond-safe foam if needed to direct the water flow exactly where you want it.
- Fill the basin with water and perform a ‘test run.’ Adjust the rocks so the water splashes musically rather than just draining silently down the back of the feature.
- Surround the base with river rocks and moisture-loving plants like ferns or hostas to hide the edges of the basin and integrate the feature into the landscape.
How to Curate Hanging Herb Vertical Walls for a Lush Culinary Oasis

Why we love this
A vertical herb wall is where functionality meets pure enchantment. We love the sensory explosion of brushing against a wall of aromatic Rosemary, Mint, and Basil—the air instantly fills with a fresh, peppery fragrance that makes you want to cook right then and there. It’s a brilliant way to maximize small spaces, turning a plain wooden fence or brick wall into a lush, edible tapestry. The varying textures of the herbs, from the needle-like foliage of Rosemary to the broad, soft leaves of Sage, create a rich green backdrop that is as beautiful as it is delicious.
Essential Elements:
- Vertical wall planter or individual cedar boxes
- High-quality organic potting mix
- Herb starts (Basil, Thyme, Mint, Oregano, Rosemary)
- A sunny wall or fence (6+ hours of light)
- Drip irrigation kit or a long-neck watering can
How to make it
- Mount your vertical structure securely to the wall using rust-proof screws. Ensure the structure is sturdy enough to hold the weight of wet soil, which can be surprisingly heavy.
- Fill each pocket or box with a lightweight potting mix specifically designed for containers; avoid heavy garden soil which will compact and drown the herb roots.
- Group your herbs by their water needs: place ‘thirsty’ herbs like Mint and Basil at the bottom where water naturally collects, and ‘drought-tolerant’ herbs like Rosemary and Thyme at the top.
- Tease the roots of your herb starts gently before planting them into the pockets. Firm the soil around the base to remove any large air pockets.
- Water each level thoroughly until water drains from the bottom. Because vertical walls dry out faster than the ground, check the moisture levels daily, especially during the peak of summer.
How to Assemble Secret Garden Nooks for the Ultimate Personal Sanctuary

Why we love this
The secret garden nook is the heart of enchanted living—it’s a private world within a world. We love the feeling of ‘enclosure’ provided by a trellis draped in climbing vines, creating a leafy ceiling that dappled the sunlight. It’s the perfect spot for a morning coffee or an afternoon with a book, surrounded by the hum of the garden. The combination of soft textiles like outdoor pillows and the raw, natural texture of a wooden bench or iron chair creates a ‘hygge’ vibe outdoors. It’s a place where time seems to stand still, protected from the outside world.
Essential Elements:
- A semi-secluded corner of the yard
- Privacy screening (trellis, tall shrubs, or bamboo)
- Comfortable weather-proof seating (bench or bistro set)
- Climbing plants (Clematis, Jasmine, or Climbing Roses)
- Soft accents (outdoor rug, throw pillows, side table)
How to make it
- Identify a corner that feels naturally tucked away, perhaps under a large tree or behind a garden shed. The goal is to feel hidden, not isolated.
- Install a trellis or privacy screen on two sides of the nook. Plant fast-growing climbers like Honeysuckle or Clematis at the base to eventually create a living wall of green and flowers.
- Choose furniture that fits the scale of the space; a small wrought-iron bistro set feels classic, while a wooden bench with cushions feels more grounded and cozy.
- Define the ‘floor’ of the nook with a layer of pea gravel or a colorful outdoor rug. This separates the space from the rest of the lawn and makes it feel like an outdoor room.
- Add the final layers of comfort: a small side table for your tea, a weather-resistant basket for your books, and a few battery-operated candles to make the space usable even after the sun goes down.
Conclusion: Your Garden, Your Story
Creating an enchanted garden isn’t about following strict rules or having a professional landscaper on speed dial; it’s about infusing your outdoor space with things that make your heart skip a beat. Whether it’s the sound of a trickling fountain or the sight of a moss-covered path, these whimsical touches turn a backyard into a sanctuary. Start small, pick one trend that speaks to you, and watch as your garden begins to tell its own magical story. Happy planting!