

Have you ever stepped into your garden at twilight and felt like the veil between our world and a storybook was just a little bit thinner? There is something truly transformative about turning a patch of soil and grass into a sanctuary that breathes with personality and whimsy. This season, the ‘Fairy Tale Floral’ aesthetic is taking over, moving away from rigid landscaping and toward a more organic, enchanted vibe that celebrates the magic of the everyday outdoors. It’s about creating a space where the air smells of crushed herbs and damp moss, and where every corner holds a tiny, delightful surprise for the wandering eye.
As someone who spends more time talking to my hydrangeas than my neighbors, I can tell you that the secret to a viral-worthy garden isn’t a professional crew—it’s the DIY touches that add soul. Whether you have a sprawling backyard or a tiny balcony, adding layers of texture, soft lighting, and handcrafted details can turn a mundane space into a lush retreat. Let’s dive into the trends that are redefining outdoor living this year, turning our gardens into the ultimate whimsical escapes we all deserve.
How to Craft Whimsical Mushroom Lanterns for a Magical Evening Glow
Why we love this
There is nothing quite like the ethereal shimmer of a mushroom-shaped light peeking out from beneath a Hosta leaf as the sun begins to set. These lanterns evoke a sense of woodland wonder, casting a soft, diffused amber light that mimics the bioluminescence of a deep forest floor. The smooth cool touch of the glass paired with the earthy aroma of surrounding mulch creates a sensory experience that feels both grounded and supernatural, inviting you to linger just a little longer in the cool night air with a glass of wine and your favorite book.
Essential Elements:
- Large glass mixing bowls or globes (for the caps)
- Glass cylinders or vases (for the stems)
- Frosted glass spray paint in white or cream
- Solar-powered LED string lights or puck lights
- Weatherproof silicone adhesive
- Decorative moss and small river stones
How to make it
- Begin by cleaning your glass pieces thoroughly with rubbing alcohol to ensure a perfect bond; any oil from your fingers can prevent the paint and glue from sticking properly.
- Apply 2-3 thin, even coats of frosted glass spray paint to the interior of the glass bowls and cylinders, allowing them to dry for at least 30 minutes between coats until they have a soft, translucent finish.
- Position your solar light source inside the glass cylinder; if using string lights, coil them loosely to fill the space, ensuring the solar panel is positioned where it can catch the sun through the glass.
- Apply a generous bead of clear weatherproof silicone adhesive to the top rim of the glass cylinder, then carefully center the glass bowl (cap) on top of the stem.
- Hold the pieces firmly for 60 seconds to set the bond, then allow the lantern to cure in a dry, room-temperature area for a full 24 hours before moving it outside.
- Once cured, place your mushrooms in a shaded garden nook, tucking preserved moss and stones around the base to hide the seam and make them look like they’ve naturally sprouted from the earth.
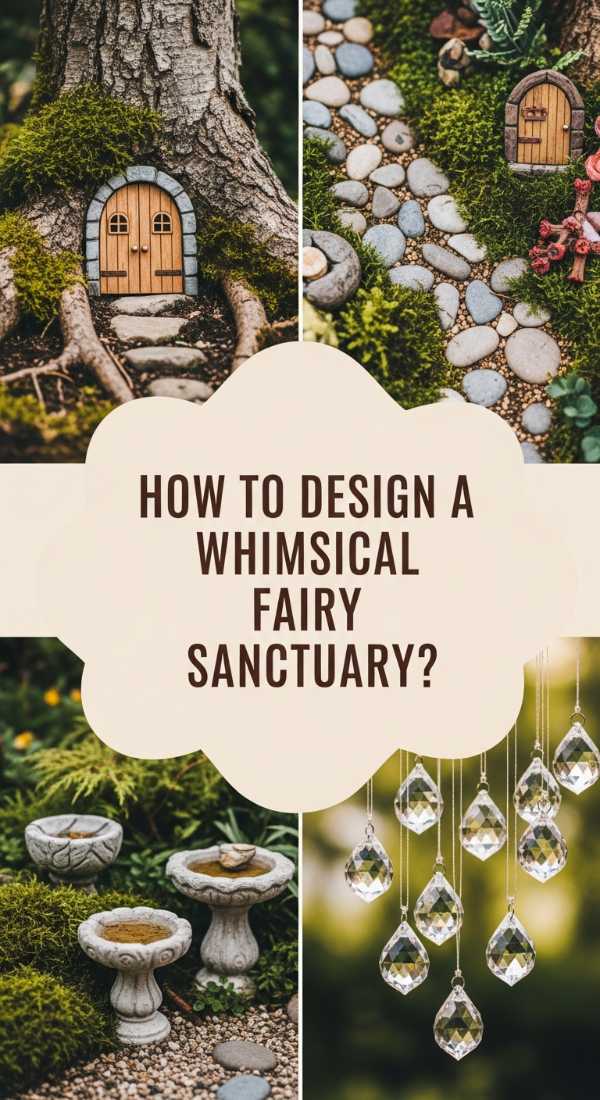
How to Design a Whimsical Fairy Sanctuary for Ultimate Backyard Serenity

Why we love this
Creating a fairy sanctuary is like writing a love letter to your inner child, offering a miniature world of peace amidst the chaos of adulting. The sight of tiny, intricate details—like a pebble path or a bark-roofed cottage—against the lush, vibrant green of Irish moss creates a stunning visual contrast that draws the eye in. It’s a tactile hobby where you can feel the gritty texture of the soil and the delicate softness of ferns, all while the scent of damp earth and sweet alyssum fills the air, grounding you in the present moment of creative bliss.
Essential Elements:
- A large, shallow weather-resistant planter or a sheltered garden corner
- Miniature plants like Irish Moss, Blue Star Creeper, or Dwarf Conifers
- Natural building materials: birch bark, flat stones, and twigs
- Miniature garden furniture or handmade wire chairs
- Polished sea glass or colorful pebbles for ‘water’ features
How to make it
- Select a location that receives filtered sunlight to prevent your delicate miniature plants from scorching; a spot under a large tree or on a covered porch is ideal.
- Fill your container with high-quality potting mix, mounding it in some areas to create ‘hills’ and ‘valleys’ for a more naturalistic, topographical look.
- Plan your layout by placing your largest ‘anchor’ pieces first, such as a miniature cottage or a large feature stone, to establish the focal point of the sanctuary.
- Plant your groundcovers like Irish Moss around the focal points, pressing them firmly into the soil and leaving small gaps for pathways made of fine gravel or crushed shells.
- Construct tiny accessories by hot-gluing twigs together to make fences or using birch bark to create shingle roofs for small structures, ensuring everything is sealed with a clear outdoor varnish.
- Mist the sanctuary daily with a spray bottle to maintain the high humidity these small plants crave, and use tweezers to place the smallest decorative elements like ‘fairy dust’ glitter or tiny mushrooms.
How to Build Custom Terra Cotta Towers for a Lush Vertical Oasis
Why we love this
Terra cotta towers are a masterclass in architectural gardening, turning simple clay pots into a towering cascade of color and fragrance. The porous nature of the clay has a distinct, nostalgic scent when watered, and the warm, sun-baked orange hue of the pots provides the perfect backdrop for trailing petunias or vibrant lobelia. There is a deep satisfaction in seeing the vertical space utilized, creating a lush pillar of life that hums with the activity of visiting bees and butterflies, making even the smallest patio feel like a grand, Mediterranean estate.
Essential Elements:
- 5-6 Terra cotta pots in graduating sizes (e.g., 14″, 12″, 10″, 8″, 6″)
- One 4-foot piece of heavy-duty rebar or a sturdy wooden stake
- High-quality potting soil with perlite
- A variety of ‘spiller’ and ‘filler’ plants (Petunias, Verbena, Bacopa)
- Hammer and a pair of work gloves
How to make it
- Choose a level spot in your garden where you want the tower to permanently reside, as it will be very heavy and difficult to move once fully assembled and watered.
- Drive the rebar stake at least 12-18 inches into the ground using a hammer, ensuring it is perfectly vertical and stable enough to support the weight of multiple wet pots.
- Thread the largest pot through its center drainage hole onto the rebar, then fill it with soil up to about two inches from the rim, packing it down firmly to create a stable base.
- Thread the second largest pot onto the rebar, resting its bottom directly on the soil of the first pot, and tilt it slightly if you want a ‘tipsy’ whimsical look, or keep it centered for a formal pillar.
- Repeat this process with all remaining pots, filling each with soil as you go, until you reach the top of the rebar; ensure the smallest pot sits securely at the apex.
- Plant your flowers in the exposed soil rings of each pot, placing trailing ‘spiller’ plants near the edges so they can eventually grow down and cover the clay for a waterfall effect.
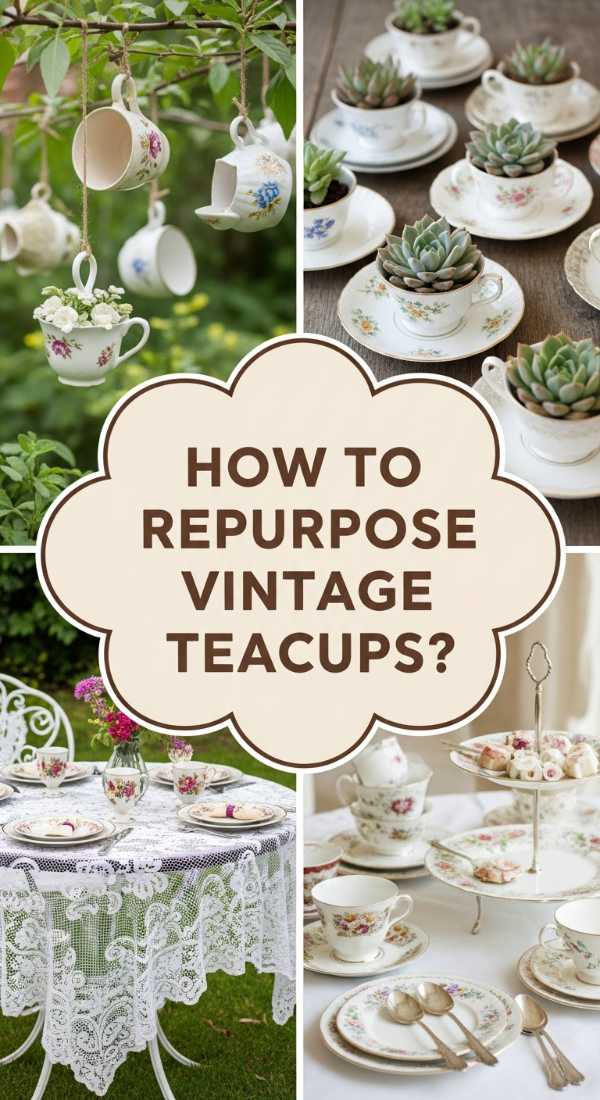
How to Repurpose Vintage Teacups for an Elegant Garden Party Aesthetic

Why we love this
Repurposing vintage teacups brings a touch of high-tea elegance and ‘Alice in Wonderland’ charm to your outdoor tablescapes. The delicate clinking of china and the sight of intricate floral patterns nestled among real blooms create a sophisticated yet playful atmosphere that is perfect for summer brunches. These tiny vessels hold the delicate fragrance of succulents or pansies, offering a tactile contrast between the hard, glazed porcelain and the soft, organic leaves, making every guest feel like they’ve stepped into a curated, boutique garden event.
Essential Elements:
- Mismatched vintage teacups and saucers (check thrift stores!)
- Small succulents, air plants, or violas
- Cactus potting mix or orchid bark
- A ceramic drill bit (optional but recommended)
- Decorative moss or small pearls
How to make it
- If you plan on keeping the plants in the cups long-term, use a ceramic drill bit to carefully create a small drainage hole in the bottom of each cup, using low speed and a drop of water to prevent cracking.
- For a temporary party decoration, skip the drilling and place a thin layer of activated charcoal or small pebbles at the bottom of the cup to help manage moisture and prevent root rot.
- Fill the teacup two-thirds of the way with the appropriate potting medium—use a gritty cactus mix for succulents or a rich loamy soil for flowering violas.
- Gently nestle your plant into the cup, adding more soil around the edges and pressing lightly with your finger to remove any air pockets.
- Apply a thin layer of decorative moss or even tiny craft pearls over the soil surface to hide the dirt and enhance the ‘tea party’ aesthetic.
- Arrange the cups on their matching saucers and scatter them across your garden table or hang them from tree branches using sturdy copper wire for a floating garden effect.
How to Style Pastel Mushroom Clusters for a Dreamy Cottagecore Vibe

Why we love this
There is something inherently soothing about pastel tones—soft pinks, mint greens, and buttery yellows—when they are used to mimic the shapes of nature. These mushroom clusters add a whimsical, ‘cottagecore’ pop of color to the shaded corners of your garden where bright flowers might struggle to grow. The smooth, matte finish of the painted ‘caps’ feels wonderful to the touch, and they provide a visual softness that complements the jagged edges of ferns and the sprawling nature of ivy, creating a curated look that feels both professional and homespun.
Essential Elements:
- Unfinished wooden mushrooms or DIY clay-molded shapes
- Outdoor-grade acrylic paints in pastel shades
- Matte or satin exterior sealant
- Small wooden dowels (if not already attached)
- Hot glue or wood glue
How to make it
- Sand your wooden mushrooms with fine-grit sandpaper to remove any splinters and create a smooth surface that will take the paint evenly without soaking up too much pigment.
- Apply a white outdoor primer to each mushroom; this is a critical step to ensure your pastel colors stay vibrant and don’t look muddy once they interact with the wood grain.
- Paint the caps in your chosen pastel colors—think lavender, dusty rose, and pale sage—using at least two coats for a solid, opaque finish that looks like candy.
- Once dry, use a small detail brush or the end of a pencil to add white ‘polka dots’ of varying sizes to the caps, giving them that classic fairy-tale toadstool appearance.
- Apply a generous coat of UV-resistant matte exterior sealant to protect your handiwork from the bleaching effects of the sun and the wear-and-tear of rain.
- Group the mushrooms in clusters of three or five (odd numbers always look more natural) at varying heights by pushing the dowel ‘stems’ into the soil near the base of a tree.
How to Create Glowing Stepping Stones for a Starlit Garden Path

Why we love this
Walking through a garden at night on a path that literally glows beneath your feet is an experience that borders on the cinematic. These stepping stones provide a subtle, cool blue or green radiance that guides your way without the harsh glare of floodlights, preserving the mystery of the night. The texture of the stone under your shoes, combined with the magical visual of ‘captured moonlight,’ creates a sense of safety and wonder, turning a simple walk to the back gate into an enchanted journey under the stars.
Essential Elements:
- Pre-cast concrete stepping stones or a stone mold with quick-set concrete
- High-quality glow-in-the-dark resin or pigment powder
- Clear exterior-grade epoxy resin
- Heat gun or torch (to remove bubbles)
- Stencils (optional for specific patterns)
How to make it
- Clean your pre-cast stones thoroughly to remove any dust or loose debris; if you are casting your own, ensure the concrete is fully cured for at least 48 hours before proceeding.
- If using a stencil, secure it to the stone and mix your glow pigment into the clear epoxy resin according to the manufacturer’s specific ratios—usually a 1:4 ratio of powder to resin.
- Carefully pour the glowing resin mixture into the stencil gaps or into pre-carved grooves in the stone, using a small spatula to level the surface so it’s flush with the concrete.
- Pass a heat gun or a butane torch quickly over the surface of the wet resin to pop any micro-bubbles that have formed, ensuring a crystal-clear, professional finish.
- Allow the resin to cure in a dust-free environment for 24 to 48 hours, depending on the humidity and temperature, until it is no longer tacky to the touch.
- Place the stones in an area that receives direct sunlight during the day so they can ‘charge’ their internal phosphorescence for a brilliant glow that lasts for hours after dark.
How to Arrange Aesthetic Herb Markers for a Chic Culinary Workspace

Why we love this
Herb markers are the perfect intersection of organization and art, bringing a sense of ‘chef’s garden’ chic to your kitchen window or outdoor planters. The crisp look of hand-lettered calligraphy against natural materials like slate or smooth river stones is incredibly satisfying to the eye. As you brush past the rosemary or mint to read the labels, the fragrance is released into the air, creating a sensory ritual that makes the act of gardening feel intentional and elegant, rather than just another chore on the list.
Essential Elements:
- Smooth, flat river stones or slate remnants
- White or gold waterproof paint pens (fine tip)
- Clear outdoor varnish spray
- A steady hand or alphabet stencils
- Microfiber cloth
How to make it
- Wash your stones in warm soapy water to remove all silt and biological material, then dry them completely with a microfiber cloth to ensure a clean slate for the ink.
- Practice your lettering on a piece of paper first to determine the best layout for herb names like ‘Thyme,’ ‘Oregano,’ and ‘Basil’ based on the shape of each individual stone.
- Using your waterproof paint pen, carefully write the herb names in the center of each stone; for a professional look, use a mix of ‘faux-calligraphy’ (thickening the downstrokes) and simple block letters.
- Allow the ink to dry for at least one hour; if you make a mistake, you can usually scrape the wet ink off with a fingernail or use a bit of rubbing alcohol to start over.
- Spray each stone with two light coats of clear outdoor varnish, waiting 15 minutes between sprays, to protect the lettering from water, soil, and UV rays.
- Nestle the markers into the soil at the base of each herb, ensuring they are angled slightly upward so they are easily readable while you are standing and harvesting.
How to Decorate Painted Birdhouses for a Vibrant Wildlife Haven

Why we love this
There is a unique joy in seeing a flash of bluebird wings against a vibrantly painted birdhouse that you decorated yourself. These little havens add a vertical element of color to your garden, drawing the eye upward and inviting the cheerful soundtrack of birdsong into your space. The combination of the smooth, painted wood and the rustic texture of the nesting materials creates a beautiful contrast, while the knowledge that you are providing a home for local wildlife adds a layer of soulful fulfillment to your garden design.
Essential Elements:
- Unfinished cedar or pine birdhouses
- Non-toxic, low-VOC exterior acrylic paints
- Variety of brushes (flat for coverage, round for detail)
- Exterior polyurethane sealant (water-based)
- Mounting brackets or heavy-duty twine
How to make it
- Choose birdhouses with proper ventilation and drainage holes, and ensure the wood is unfinished so it can properly absorb the paint without peeling later.
- Select a color palette that complements your garden; ‘Fairy Tale’ vibes often work well with sage greens, creamy whites, and pops of coral or periwinkle.
- Paint the body of the birdhouse first, using long, even strokes following the grain of the wood; avoid painting the inside of the house or the entrance hole, as the birds may peck at it.
- Add decorative details like hand-painted vines, tiny flowers, or geometric patterns on the roof once the base coat is fully dry to the touch.
- Once the paint has cured for 24 hours, apply two coats of water-based exterior polyurethane to the outside only, which will protect the colors from fading and prevent the wood from rotting.
- Mount the birdhouses on poles or hang them from sturdy branches at least 5-10 feet off the ground in a quiet area, away from high foot traffic and potential predators like neighborhood cats.
How to Install a Tranquil Stone Fountain for a Peaceful Outdoor Retreat

Why we love this
The sound of trickling water is the ultimate auditory cure for a stressful day, instantly signaling to your brain that it is time to relax. A stone fountain acts as a grounding centerpiece, its rugged, cool surface constantly glistening with water that catches the sunlight. The rhythmic splash creates a microclimate of coolness and moisture that feels incredible on a hot afternoon, and it serves as a vital watering hole for honeybees and thirsty birds, turning your garden into a living, breathing sanctuary of peace.
Essential Elements:
- A large decorative glazed pot or a stack of flat fieldstones
- Submersible solar-powered water pump
- Waterproof basin or pond liner (if building into the ground)
- River pebbles and larger ‘feature’ rocks
- Dechlorinated water or rainwater
How to make it
- Position your basin or large pot in a spot that receives at least 6 hours of direct sunlight, which is necessary to keep the solar pump running consistently throughout the day.
- Place the submersible pump at the very bottom of the container, ensuring the suction cups are firmly attached to the base so the pump doesn’t ‘drift’ and create noise.
- Fill the area around the pump with large river stones to hold it in place, then layer smaller pebbles on top to create a natural look and to help filter the water as it circulates.
- If using a stacked stone method, thread the pump’s outlet tube through pre-drilled holes in your fieldstones, stacking them carefully to ensure the structure is stable and the water will cascade beautifully.
- Fill the reservoir with water until the pump is completely submerged; never run the pump ‘dry’ as this will burn out the motor in a matter of minutes.
- Adjust the flow rate on the pump nozzle to achieve your desired sound level—a gentle trickle for a meditation corner or a vigorous splash to mask neighbor noise.
How to Hang Enchanting Lantern Strings for the Perfect Golden Hour Mood
[IMAGE_10]
Why we love this
When ‘Golden Hour’ hits, there is nothing more romantic than a canopy of soft lights overhead, blurring the lines between the garden and the sky. Lantern strings provide a warm, inviting glow that softens the hard edges of your outdoor furniture and makes every leaf and petal look like it’s dusted with gold. The gentle sway of the lanterns in a light breeze, combined with the scent of night-blooming jasmine, creates a mood that is perfectly suited for long conversations and making memories under a canopy of light.
Essential Elements:
- Heavy-duty outdoor string lights (Edison-style bulbs are best)
- Decorative paper or metal lantern cages
- Gutter hooks, zip ties, or eye bolts for hanging
- Outdoor-rated extension cord (if not solar)
- A tall ladder and a helper
How to make it
- Map out your hanging pattern—a ‘zig-zag’ or ‘criss-cross’ layout provides the best even coverage for a patio, while a single ‘drape’ looks better along a fence line.
- Install your anchor points (eye bolts or sturdy hooks) into the eaves of your house, sturdy tree trunks, or dedicated light poles, ensuring they are screwed in deep enough to hold the weight.
- Attach your decorative lantern cages to the individual bulb sockets before hanging the string; this is much easier and safer than trying to do it while standing on a ladder.
- Start hanging the lights from the point closest to your power source, securing the cord to your hooks with zip ties to prevent them from slipping or sagging too low over time.
- Ensure the string is taut enough to stay above head height but has enough ‘give’ to sway slightly in the wind without putting too much tension on the anchor points.
- Plug them in just as the sun starts to dip below the trees, and adjust any bulbs that are hidden by foliage to ensure your garden is perfectly and evenly illuminated.
Conclusion
Transforming your garden into a whimsical wonderland doesn’t require a magic wand—just a bit of creativity, a few weekend afternoons, and a willingness to get your hands a little dirty. By layering these trends, from the glowing paths to the tiny fairy sanctuaries, you create a space that feels personal, enchanted, and deeply restorative. Remember, the best gardens are never truly ‘finished’; they are living works of art that grow and change right along with you. So, grab your trowel and your paintbrushes, and start building the fairy tale retreat you’ve always dreamed of!