
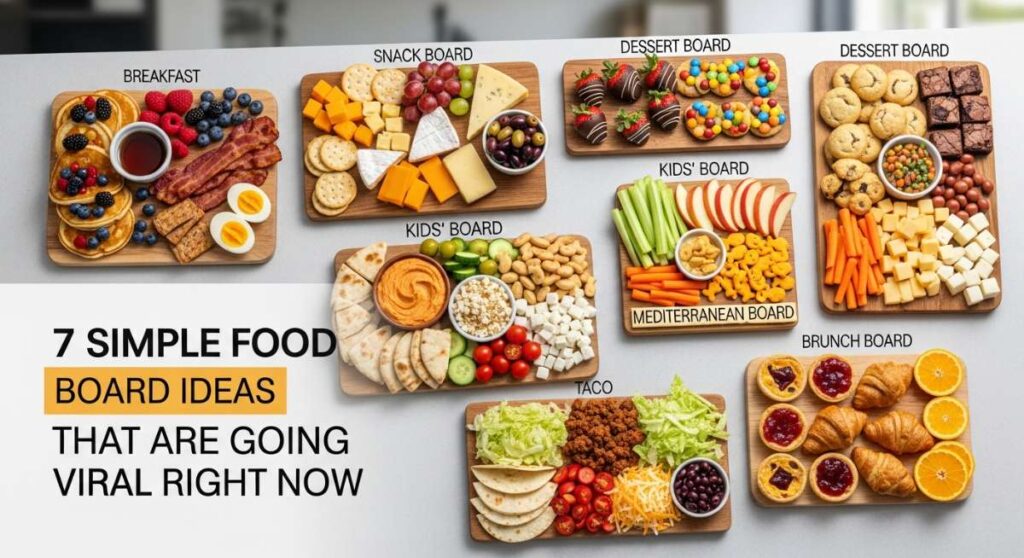
Gathering friends and family around a table is one of those timeless joys that feeds the soul just as much as it feeds the belly. Lately, I’ve found myself falling head-over-heels for the food board trend because it turns every meal into a tactile, shared experience that feels like a warm hug. There is something so incredibly intimate about a spread where everyone reaches in, picks their favorites, and creates a plate that is uniquely theirs while swapping stories and laughter.
These seven ideas aren’t just about the food; they are about the aesthetic of a life well-lived. Whether you are celebrating a massive milestone like a graduation or just the arrival of a crisp spring afternoon, these boards capture the viral magic of ‘visual snacking’ while keeping things surprisingly simple to pull off. Let’s dive into these vibrant, flavor-packed boards that will have your guests reaching for their phones to snap a photo before they even take their first bite.
How to bake rhubarb pie?
Why we love this
There is a nostalgic magic in the scent of a rhubarb pie cooling on a wooden board, its buttery, flaky crust yielding to a vibrant, ruby-red filling that is perfectly tart and sweet. We love the way the jagged, golden lattice catches the light, promising a satisfying crunch followed by the soft, jammy warmth of the stalks. It’s a sensory explosion—the smell of caramelized sugar, the sight of bubbling fruit juices, and the rustic, homemade feel that makes any gathering feel like a special occasion at Grandma’s house.
Ingredients
- 2 1/2 cups all-purpose flour
- 1 teaspoon salt
- 1 tablespoon sugar
- 1 cup cold unsalted butter, cubed
- 6-8 tablespoons ice water
- 5 cups fresh rhubarb, chopped into 1/2 inch pieces
- 1 1/4 cups granulated sugar
- 1/4 cup cornstarch
- 1/2 teaspoon cinnamon
- 1 tablespoon lemon juice
- 1 egg (for egg wash)
How to make it
- Begin by preparing the dough: whisk flour, salt, and 1 tablespoon sugar in a large bowl. Incorporate the cold butter using a pastry cutter or your fingers until the mixture resembles coarse crumbs with some pea-sized pieces of butter remaining. This cold butter is essential for a flaky crust.
- Drizzle in ice water one tablespoon at a time, tossing with a fork until the dough just starts to come together. Divide into two discs, wrap in plastic, and chill for at least one hour to allow the gluten to relax.
- Preheat your oven to 400°F (200°C). On a lightly floured surface, roll out one disc to a 12-inch circle and fit it into a 9-inch pie plate. Trim the edges, leaving a 1-inch overhang.
- In a large bowl, toss the chopped rhubarb with 1 1/4 cups sugar, cornstarch, cinnamon, and lemon juice. Ensure every piece of rhubarb is evenly coated in the thickener to avoid a soggy bottom.
- Pour the filling into the crust. Roll out the second disc and cut into strips to create a lattice top, weaving them over and under. Crimp the edges to seal.
- Brush the top with a beaten egg wash and sprinkle with extra sugar. Bake at 400°F for 20 minutes, then reduce heat to 375°F and bake for another 35-45 minutes. You are looking for the crust to be a deep golden brown and the juices to be bubbling thickly through the lattice gaps.
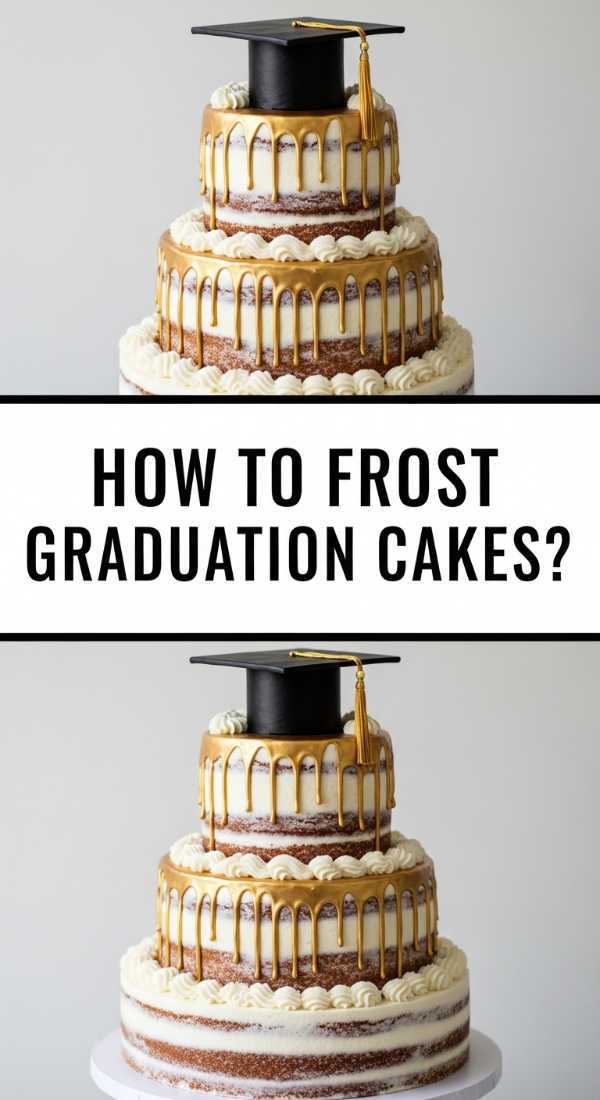
How to frost graduation cakes?
Why we love this
A graduation cake board is the ultimate centerpiece for celebrating hard-earned success, and the frosting technique is what truly brings the celebration to life. We love the silky, smooth finish of a well-applied Swiss meringue buttercream that glides over the cake like velvet, providing a blank canvas for school colors and joyful messages. The visual contrast between the sharp, clean edges of the cake and the whimsical, piped borders creates a sophisticated yet celebratory vibe that honors the graduate in style.
Ingredients
- Pre-baked cake layers (chilled)
- 4 cups unsalted butter, softened
- 8 cups powdered sugar
- 2 tablespoons heavy cream
- 1 tablespoon vanilla bean paste
- Gel food coloring (school colors)
- Offset spatula and bench scraper
- Piping bags and assorted tips
How to make it
- Start with completely chilled cake layers; a warm cake will melt your frosting instantly. Apply a thin ‘crumb coat’ of frosting over the top and sides of the cake using an offset spatula to trap any loose crumbs. Chill for 30 minutes until firm.
- For the final layer, apply a generous amount of frosting to the top and work it down the sides. Hold a bench scraper vertically against the side of the cake and spin your turntable slowly to create a perfectly smooth, professional finish.
- Divide your remaining frosting and mix in your gel colors. Gel is superior to liquid because it doesn’t thin out the frosting consistency.
- Use a star tip (like a 1M) to pipe a classic shell border around the base. For the top, create ‘rosettes’ by starting in the center and swirling outward.
- If you want a ‘tassel’ look, use a fine round tip to pipe long, thin lines hanging from the top edge. The key is consistent pressure; if you squeeze too hard, the lines will be clumpy, too light and they will break.
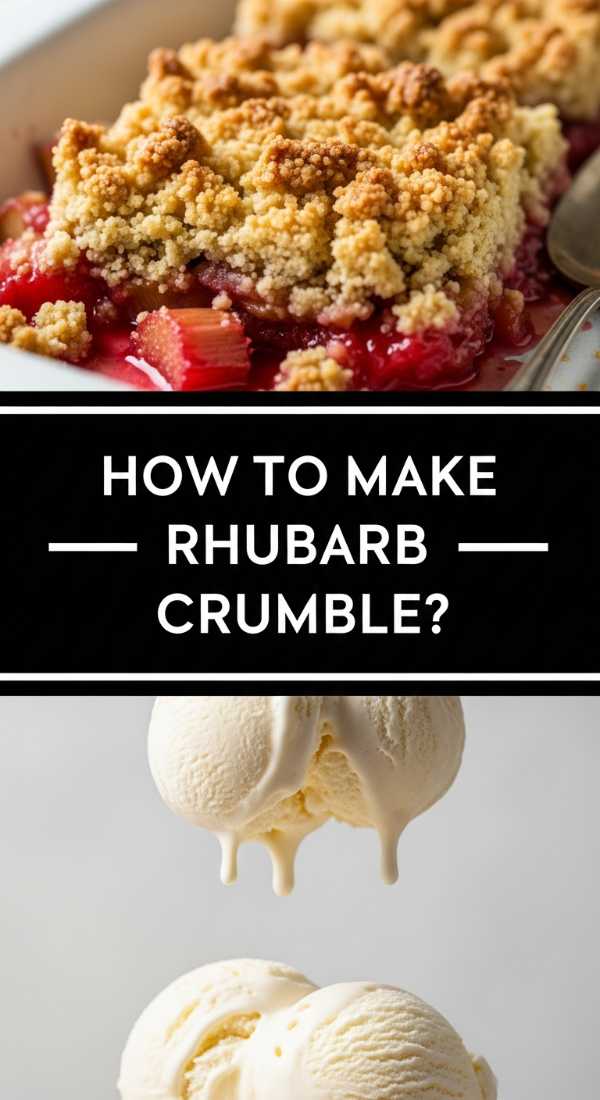
How to make rhubarb crumble?

Why we love this
This is the cozy, effortless cousin of the pie, perfect for a casual food board where guests can scoop their own portions into small bowls. We love the textural harmony here: the top layer is a buttery, golden-brown rubble of oats and brown sugar that shatters delightfully with every spoonful, revealing the bright, acidic, and molten rhubarb beneath. The aroma of toasted oats and warm vanilla wafting through the kitchen creates an atmosphere of pure, unadulterated comfort that is impossible to resist.
Ingredients
- 6 cups rhubarb, cut into 1-inch pieces
- 3/4 cup granulated sugar
- 1 tablespoon orange zest
- 1 cup all-purpose flour
- 1 cup rolled oats
- 1 cup packed light brown sugar
- 1/2 cup unsalted butter, cold and cubed
- 1 teaspoon cinnamon
- 1/2 teaspoon salt
How to make it
- Preheat your oven to 375°F (190°C) and grease a large baking dish. In the dish, toss the rhubarb with the granulated sugar and orange zest until well-combined and spread it into an even layer.
- In a separate medium bowl, combine the flour, oats, brown sugar, cinnamon, and salt. Add the cold, cubed butter.
- Using your hands or a pastry blender, work the butter into the dry ingredients. You want to achieve a mixture that has various sizes—some small sandy bits and some larger, pea-sized clumps. This variety is what creates the best ‘crumble’ texture.
- Sprinkle the topping evenly over the fruit. Do not press it down; you want it to remain airy so the heat can circulate.
- Bake for 35 to 45 minutes. The visual cue for doneness is when the fruit juices are bubbling vigorously at the edges and the topping has turned a deep, toasted golden brown. Let it stand for 10 minutes before serving so the juices can thicken slightly.
How to decorate graduation cupcakes?
Why we love this
Cupcakes are the perfect ‘grab-and-go’ addition to a viral food board, and decorating them for graduation adds a personalized touch that feels incredibly thoughtful. We love the playfulness of mini mortarboards perched atop swirls of frosting, and the way a simple dusting of gold sprinkles can make a standard cupcake look like a million bucks. It’s about the joy in the small details—the tiny tassels made of string or candy, and the vibrant school colors that pop against a white display board.
Ingredients
- Baked cupcakes (vanilla or chocolate)
- Buttercream frosting
- Square chocolate pieces (like Ghirardelli squares)
- Mini peanut butter cups or chocolate truffles
- Sour belt candy or fruit leather (for tassels)
- M&Ms or small round candies
- Gold luster dust or sprinkles
How to make it
- Pipe a flat swirl of frosting onto each cupcake to act as ‘glue.’ This needs to be stable, so use a stiff buttercream.
- Unwrap your mini peanut butter cups and place them upside down in the center of the cupcake. This serves as the base of the graduation cap.
- Place a small dot of frosting on top of the peanut butter cup and press a chocolate square firmly onto it. Ensure it sits level so the ‘cap’ doesn’t slide off.
- To make the tassel, cut a thin strip of sour belt candy or fruit leather about an inch long. Fray the bottom with a clean pair of kitchen shears.
- Attach the tassel to the center of the chocolate square using a tiny dab of frosting. Secure it in place by pressing a small M&M or candy on top of the ‘anchor’ point of the tassel.
- For an extra viral-worthy look, lightly mist the finished caps with edible gold luster dust to give them a celebratory shimmer.
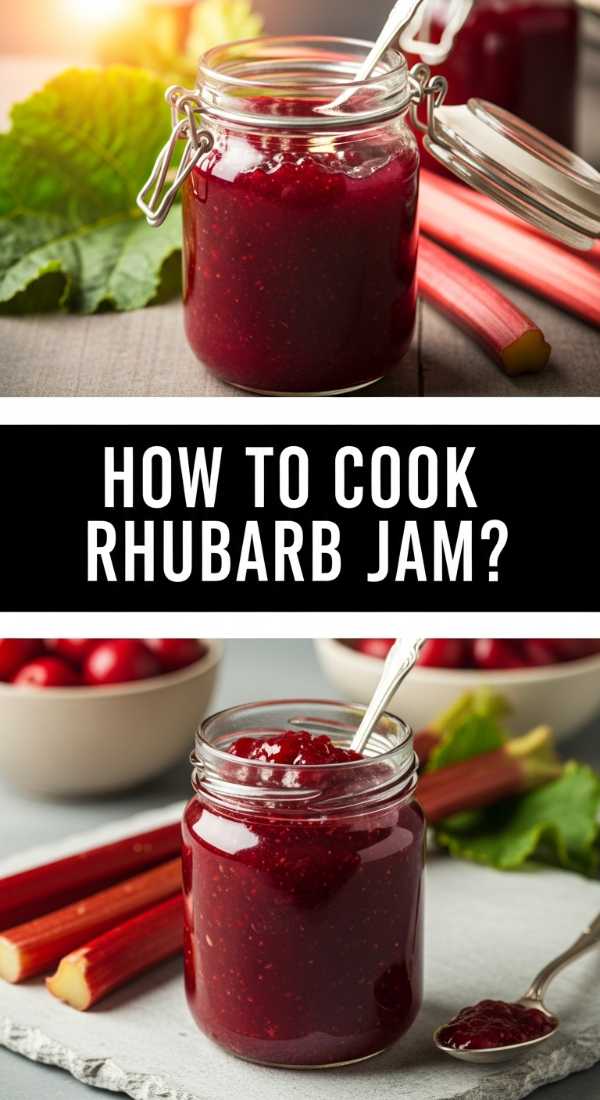
How to cook rhubarb jam?

Why we love this
A small jar of homemade rhubarb jam is the crown jewel of a brunch board, offering a concentrated burst of springtime flavor that is both sharp and sweet. We love the jewel-toned transparency of the finished jam, which catches the light like a ruby, and the way it spreads effortlessly over a warm, buttered scone or a piece of sourdough toast. The process of slow-simmering the stalks until they dissolve into a thick, glossy nectar is incredibly therapeutic and fills the house with a bright, fruity perfume.
Ingredients
- 2 lbs rhubarb, trimmed and chopped into small pieces
- 4 cups granulated sugar
- 1/4 cup lemon juice
- 1 teaspoon lemon zest
- 1/2 teaspoon vanilla extract (optional)
- Small pinch of salt
How to make it
- In a large, non-reactive heavy-bottomed pot, combine the chopped rhubarb, sugar, lemon juice, and zest. Stir well and let the mixture sit for about an hour; this maceration process draws the juices out of the rhubarb and creates its own syrup.
- Place the pot over medium heat and bring the mixture to a boil, stirring constantly to ensure the sugar dissolves and doesn’t scorch on the bottom.
- Once boiling, reduce the heat to medium-low and simmer. You will need to skim off any foam that rises to the surface with a spoon to ensure a clear, bright jam.
- Cook for 20-30 minutes, stirring frequently. To test for doneness, place a small spoon of jam on a chilled plate. Let it sit for 30 seconds, then push it with your finger. If it wrinkles, it has reached its setting point.
- Stir in the vanilla and salt at the very end. Pour the hot jam into sterilized jars, leaving a 1/4 inch headspace. Let cool completely before sealing and storing in the fridge.
How to whip lemon pesto?
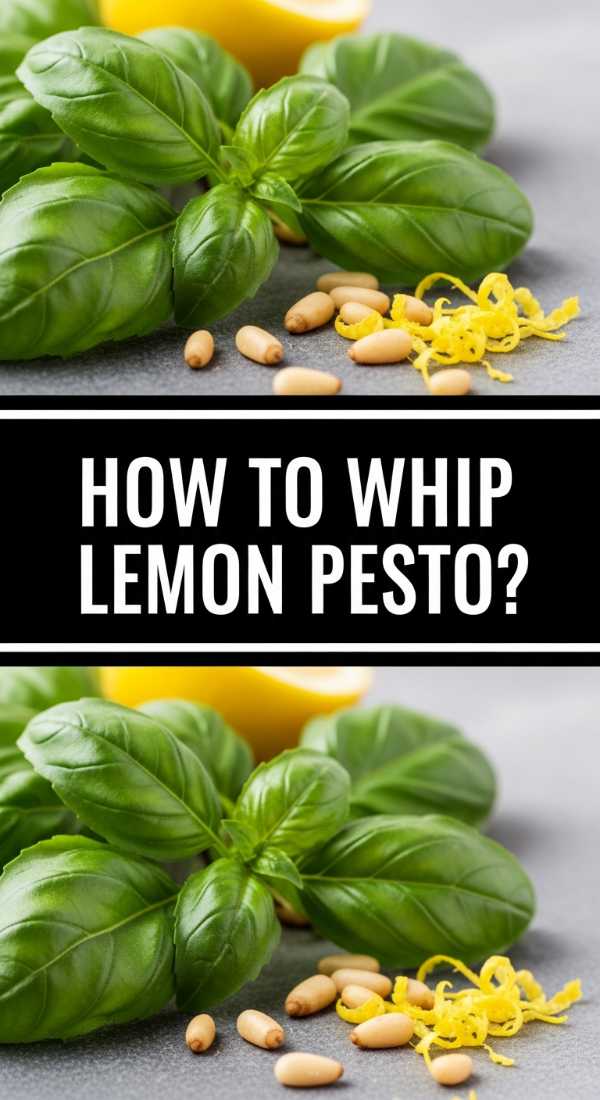
Why we love this
Moving into the savory realm, a whipped lemon pesto is the bright, zesty dip your food board didn’t know it needed. We love how the richness of the pine nuts and parmesan is cut through by the electric acidity of fresh lemon, creating a flavor profile that is both deeply savory and incredibly refreshing. The ‘whipped’ element—usually achieved by adding a bit of ricotta or mascarpone—gives it a light, cloud-like texture that makes it feel much more elevated than a standard jarred sauce.
Ingredients
- 2 cups fresh basil leaves, packed
- 1/2 cup grated Parmesan cheese
- 1/3 cup toasted pine nuts
- 2 cloves garlic, minced
- 1/2 cup extra virgin olive oil
- Zest and juice of 1 large lemon
- 1/2 cup whole milk ricotta cheese
- Salt and cracked black pepper to taste
How to make it
- In a food processor, combine the basil, Parmesan, toasted pine nuts, and garlic. Pulse until the ingredients are finely chopped but not yet a paste.
- With the motor running on low, slowly drizzle in the olive oil in a steady stream. This emulsion process is vital for a smooth, cohesive pesto that won’t separate later.
- Add the lemon zest and lemon juice, pulsing a few more times to incorporate. Taste and season generously with salt and pepper.
- Add the ricotta cheese to the food processor. Pulse on high for about 15-20 seconds. This is where the magic happens—the ricotta aerates the pesto, turning it into a pale green, fluffy ‘whipped’ spread.
- Transfer to a bowl and finish with a final drizzle of olive oil and extra lemon zest for a vibrant presentation on your board.
How to brew fun coffee?

Why we love this
A ‘Coffee Board’ is the ultimate way to end a brunch or a celebration, and ‘fun’ coffee is all about the layers, the foam, and the toppings. We love the visual drama of cold foam cascading down into dark espresso, or the whimsical touch of a cinnamon-dusted rim that makes every sip feel like a treat. It’s an interactive experience where guests can customize their caffeine fix with syrups and spices, turning a simple morning ritual into a viral-worthy moment of indulgence.
Ingredients
- Freshly roasted coffee beans (for espresso or cold brew)
- Milk of choice (oat milk works beautifully for foam)
- Simple syrups (vanilla, lavender, or caramel)
- Cinnamon or cocoa powder
- Ice cubes (extra points if they are coffee-shaped!)
- Whipped cream
How to make it
- For a layered ‘viral’ iced coffee, fill a tall glass with ice. Add 1-2 tablespoons of your chosen flavored syrup at the bottom.
- Slowly pour 6-8 ounces of milk over the ice. The milk should settle on top of the syrup.
- Carefully pour 2 shots of hot espresso or concentrated cold brew over the back of a spoon into the glass. This ‘back-of-the-spoon’ technique breaks the fall of the liquid, allowing the coffee to sit in a distinct layer above the milk.
- To make ‘fun’ foam, use a handheld milk frother on cold milk with a dash of syrup until it’s thick and holds its shape. Spoon this onto the top of the coffee.
- Finish with a flourish: a sprinkle of cinnamon, a drizzle of caramel, or even a few dried rose petals. Serve on a board with small biscuits and spoons for the perfect aesthetic.
Conclusion
Creating a food board is truly an art form that anyone can master. It’s about bringing together textures, colors, and flavors in a way that encourages people to slow down and savor the moment. From the tart pop of rhubarb to the celebratory spark of graduation sweets, these seven ideas are designed to inspire you to get creative in the kitchen. Remember, there are no real rules—just follow your taste buds and have fun with the presentation!