
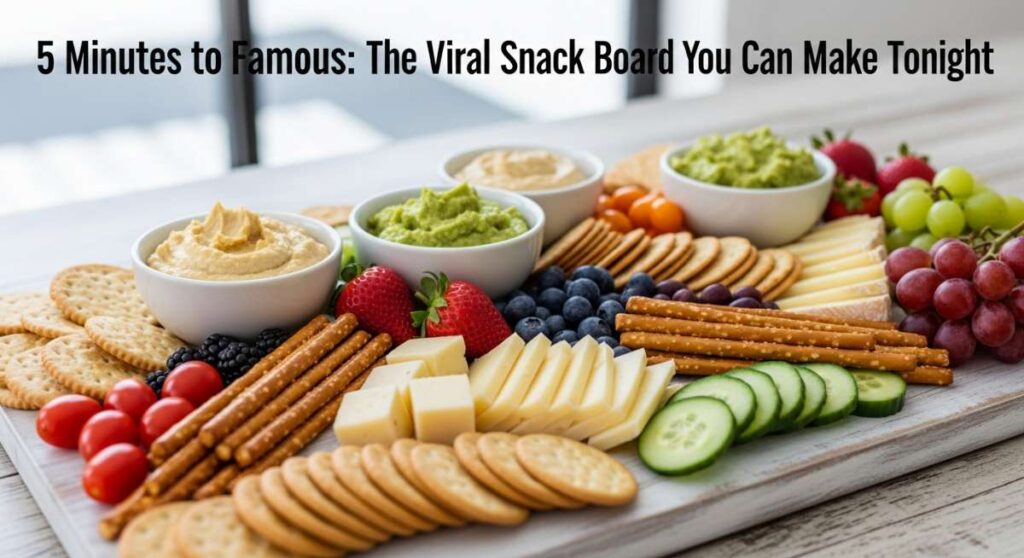
5 Minutes to Famous: The Viral Snack Board You Can Make Tonight
There’s something truly magical about the way food brings us together, isn’t there? I remember a particularly warm Tuesday last month when the house felt a bit too quiet and the evening a bit too long. I decided to clear off the dining table, pull out my largest wooden board, and just start assembling. Within twenty minutes, the kitchen was filled with the sound of laughter, the rhythmic clinking of glasses, and the irresistible aroma of fresh herbs and melted cheese. It wasn’t just a meal; it was an invitation for my family to linger a little longer and share stories they’d forgotten to tell during the busy day.
We often overcomplicate hosting, thinking we need a five-course menu to be ‘famous’ among our friends, but the secret to a viral-worthy gathering is actually simplicity. This snack board concept is all about high-impact, low-effort components that look like a million bucks but feel like a warm hug. Whether you’re prepping for a beach day, a camping trip, or just a cozy night in, these recipes are designed to be the stars of your spread. Let’s dive into the delicious details that will make your next board the talk of the town!
How to make strawberry pie

Why we love this
This strawberry pie is the ultimate celebration of summer’s bounty, offering a burst of sunshine in every single bite. Imagine a golden, buttery crust that shatters into delicate flakes, giving way to a mountain of ruby-red berries glazed in a translucent, sweet syrup that sparkles under the light. The aroma is intoxicatingly sweet, reminiscent of childhood picnics and farmers’ markets, while the texture provides a perfect contrast between the soft, jammy fruit and the crisp pastry. It is the kind of dessert that feels both rustic and incredibly elegant, making it the perfect centerpiece for a dessert-focused snack board.
Ingredients
- 2 pints fresh strawberries, hulled and sliced
- 1 cup granulated sugar
- 3 tablespoons cornstarch
- 1 cup water
- 1 package strawberry-flavored gelatin (3 oz)
- 1 pre-baked 9-inch pie crust
- Whipped cream for topping
How to make it
- Begin by meticulously cleaning your strawberries under cool running water; pat them completely dry to ensure the glaze adheres properly. Hull the berries and slice the larger ones into halves or quarters so they sit evenly in the crust.
- In a medium saucepan over medium heat, whisk together the granulated sugar and cornstarch until no lumps remain. Slowly whisk in the water until the mixture is smooth and opaque.
- Cook the mixture, stirring constantly with a heat-resistant spatula, until it reaches a boil. Once boiling, continue to cook for about 2 minutes until it becomes thick and clear. Look for a heavy ribbon consistency when you lift the spatula.
- Remove the pan from the heat and immediately whisk in the strawberry gelatin powder until fully dissolved. Allow this glaze to cool for about 10-15 minutes, but do not let it set completely.
- Arrange your sliced strawberries into the pre-baked, cooled pie crust, piling them high in a slight mound. Carefully pour the lukewarm glaze over the berries, ensuring every nook and cranny is filled.
- Refrigerate the pie for at least 4 hours, or until the glaze is firm and cold. Slice with a sharp, warm knife and serve with a generous dollop of homemade whipped cream.
How to make rotel dip
Why we love this
There is a reason this dip has achieved legendary status at every tailgate and house party—it is the definition of savory, creamy comfort. As the cheese melts into a velvety pool of gold, it carries the spicy, tangy kick of diced tomatoes and green chilies, creating a flavor profile that is addictive and deeply satisfying. The sight of a warm bowl of Rotel dip, steam rising and flecked with bits of seasoned meat, is enough to make anyone’s mouth water instantly. It’s a sensory experience that combines the heat of the peppers with the cooling richness of the cheese, perfect for dipping salty, crunchy corn chips.
Ingredients
- 1 lb block of processed cheese (like Velveeta), cubed
- 1 can (10 oz) Ro-Tel Diced Tomatoes and Green Chilies, undrained
- 1 lb ground beef or breakfast sausage
- 1/2 teaspoon garlic powder
- Fresh cilantro for garnish
How to make it
- Place a large skillet over medium-high heat. Add your ground beef or sausage and cook, breaking it up with a wooden spoon into small, uniform crumbles. Cook until no pink remains and the meat is slightly browned and crispy.
- Drain the excess grease thoroughly from the skillet; this step is crucial to prevent your dip from becoming oily. Season the meat with garlic powder and stir well.
- In a slow cooker or a heavy-bottomed pot over low heat, add the cubed processed cheese. The small cubes ensure even melting without scorching the bottom of the pan.
- Pour the entire can of Ro-Tel (including the flavorful juice) directly over the cheese. Add the browned meat to the mixture.
- Stir frequently as the cheese begins to melt. If using a stovetop, keep the heat very low and move the mixture constantly to prevent the cheese from sticking. If using a slow cooker, set it to ‘Low’ for 1-2 hours.
- Once the dip is completely smooth and bubbling gently at the edges, it is ready. Garnish with fresh cilantro and serve immediately while hot and molten.
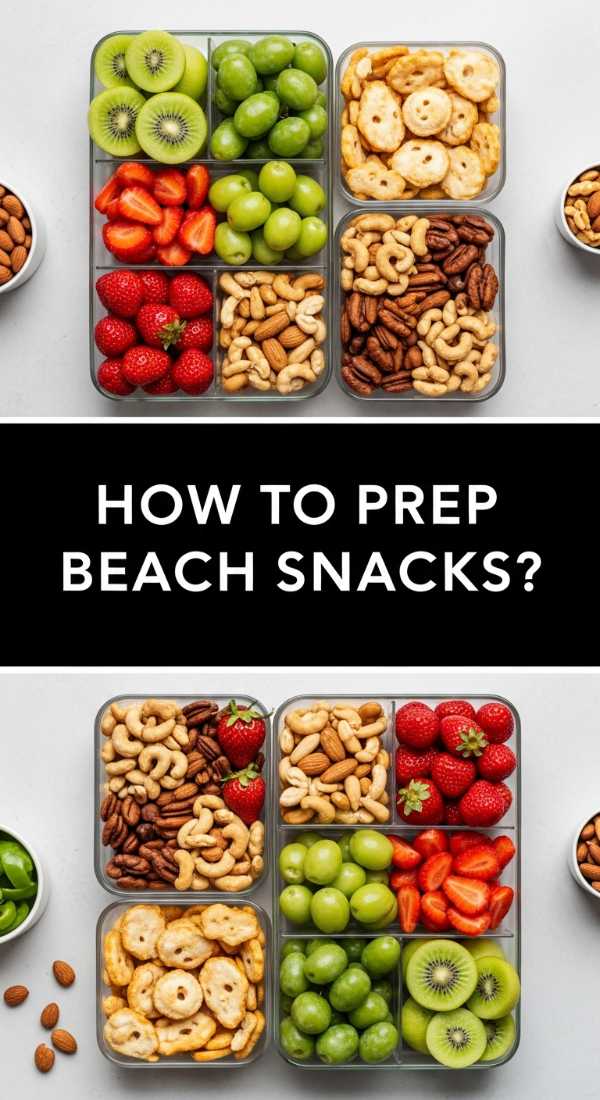
How to prep beach snacks

Why we love this
Prepping beach snacks is an art form that balances hydration, portability, and pure refreshment under the hot summer sun. When you’re lounging on the sand, you want snacks that provide a crisp, cooling relief from the heat, like chilled fruit and crunchy vegetables that snap with every bite. The smell of salt air pairs beautifully with the zing of citrus and the savory crunch of crackers, creating a light yet satisfying grazing experience. It’s about more than just food; it’s about having everything ready so you can focus on the waves and the company without worrying about messy hands or melting treats.
Ingredients
- Grapes and melon chunks (frozen for 2 hours)
- Pre-cut carrots, cucumbers, and bell peppers
- Individual hummus or guacamole cups
- String cheese or babybel rounds
- Salty pita chips or pretzels
- Reusable ice packs
How to make it
- Start by washing all your produce thoroughly. Slice melons into bite-sized cubes and cut vegetables into long, sturdy sticks that are easy to dip.
- For a viral hack, place your grapes and melon chunks on a baking sheet and freeze them for 2-3 hours before packing. These act as edible ice packs and stay incredibly refreshing as they slowly thaw in the sun.
- Use airtight, leak-proof containers to organize your snacks. Group similar items together—keep all the ‘wet’ fruits in one container and ‘dry’ crackers in another to prevent sogginess.
- Select individual portions of dips like hummus or guacamole. This prevents double-dipping in a communal bowl and makes cleanup much easier on the sand.
- Layer your cooler strategically: place the heavy ice packs at the bottom, followed by the most perishable items like cheese and dips. Place the fruits on top and keep the dry snacks in a separate bag outside the cooler.
- Include a pack of wet wipes and a small trash bag in your kit to ensure your beach spot stays clean and your hands stay salt-free while eating.
How to make whipped butter

Why we love this
Whipped butter is the unsung hero of a luxury snack board, elevating a humble condiment into a cloud-like, decadent experience. The process of aeration transforms standard butter into something ethereal—light, fluffy, and so soft that it melts the instant it touches a warm piece of sourdough. It has a delicate, silky mouthfeel that spreads like a dream, and when finished with flaky sea salt or honey, it hits every single taste bud. The sight of those soft, swirling peaks on a board immediately signals to guests that they are in for a special, elevated treat that feels straight out of a high-end bistro.
Ingredients
- 2 sticks (1 cup) high-quality unsalted butter, softened to room temperature
- 2 tablespoons whole milk or heavy cream
- 1/2 teaspoon flaky sea salt
- Optional: 1 tablespoon honey or chopped fresh herbs
How to make it
- Ensure your butter is perfectly softened—it should be soft to the touch but not melting or greasy. This is the most critical step for achieving the correct volume and texture.
- Place the softened butter in the bowl of a stand mixer fitted with the whisk attachment (a hand mixer also works well). Start beating on low speed to break up the butter.
- Gradually increase the speed to medium-high. Beat the butter for about 2-3 minutes until it begins to look pale and light.
- Slowly drizzle in the milk or heavy cream while the mixer is running. This adds moisture and helps create that iconic ‘whipped’ airy structure.
- Increase the speed to high and whip for another 2-4 minutes. You are looking for the butter to double in volume and turn nearly white in color. It should form soft, stable peaks.
- Fold in your salt, honey, or herbs by hand to maintain the airiness. Transfer to a decorative bowl and serve immediately at room temperature for the best spreading consistency.
How to prep camping meals

Why we love this
The beauty of prepping camping meals ahead of time lies in the freedom it grants you to actually enjoy the great outdoors rather than being stuck at a picnic table chopping onions. There is something deeply primal and satisfying about a meal cooked over an open flame, with the smell of woodsmoke infusing every ingredient. By doing the heavy lifting at home, you ensure that every meal is balanced, hearty, and full of flavor, providing the necessary fuel for hiking and exploring. These prepped meals turn a rugged experience into a gourmet adventure, allowing you to feast under the stars with minimal effort and maximum reward.
Ingredients
- Heavy-duty aluminum foil
- Marinated proteins (chicken, steak, or tofu)
- Pre-chopped hardy vegetables (potatoes, carrots, onions)
- Olive oil and seasoning blends
- Vacuum-seal bags or airtight containers
How to make it
- Plan your menu based on ‘shelf life.’ Eat fresh meats and delicate greens on the first night, and save frozen prepped stews or hardier root vegetable packs for later in the trip.
- At home, chop all vegetables into uniform sizes to ensure even cooking over the unpredictable heat of a campfire. Toss them in olive oil and seasonings before packing.
- Marinate your proteins in vacuum-sealed bags. Not only does this infuse deep flavor, but the flat bags save immense space in the cooler and prevent cross-contamination.
- Assemble ‘foil packets’ by placing a portion of protein and vegetables in the center of a large square of heavy-duty foil. Fold the edges tightly to create a leak-proof seal. These can go directly onto a grill grate or the edge of hot coals.
- Freeze any prepped meals that you plan to eat on day two or three. They will act as extra ice for your cooler and will be perfectly thawed by the time you’re ready to cook them.
- Pack a small ‘spice kit’ in a pill organizer or small jars containing salt, pepper, garlic powder, and crushed red pepper to add a final punch of flavor at the campsite.
How to make tomato salad
Why we love this
A fresh tomato salad is the ultimate tribute to the peak of summer, where the ingredients are so vibrant they barely need any help. When you slice into a sun-ripened heirloom tomato, the aroma is earthy and sweet, filling the kitchen with the scent of a garden in bloom. The contrast between the juicy, acidic tomatoes, the creamy pearls of mozzarella, and the sharp, peppery bite of fresh basil is a symphony of flavors. It’s light, hydrating, and visually stunning on a board, with a spectrum of reds, yellows, and oranges that look like a sunset on a plate.
Ingredients
- 2 lbs assorted heirloom or cherry tomatoes
- 8 oz fresh mozzarella pearls or torn buffalo mozzarella
- 1/4 cup extra-virgin olive oil
- 2 tablespoons balsamic glaze
- 1/2 cup fresh basil leaves, chiffonade
- Flaky sea salt and cracked black pepper
How to make it
- Select tomatoes that are heavy for their size and fragrant at the stem. Slice larger heirloom tomatoes into thick wedges and cut cherry tomatoes in half to expose their juicy interiors.
- Arrange the tomatoes on a large platter in a single layer. This prevents them from getting crushed and allows you to season every single piece.
- Scatter the mozzarella pearls evenly over the tomatoes. If using a large ball of mozzarella, tear it by hand into bite-sized pieces for a more rustic, artisanal look that holds the dressing better.
- Drizzle the high-quality extra-virgin olive oil over the entire salad. Use a generous hand; the oil mingles with the tomato juices to create a delicious natural dressing.
- Just before serving, sprinkle generously with flaky sea salt and freshly cracked black pepper. The salt is crucial as it draws out the moisture and intensifies the tomato flavor.
- Finish with the fresh basil and a decorative drizzle of balsamic glaze. Do not add the basil too early, as it will wilt and turn dark when exposed to acid and air for too long.
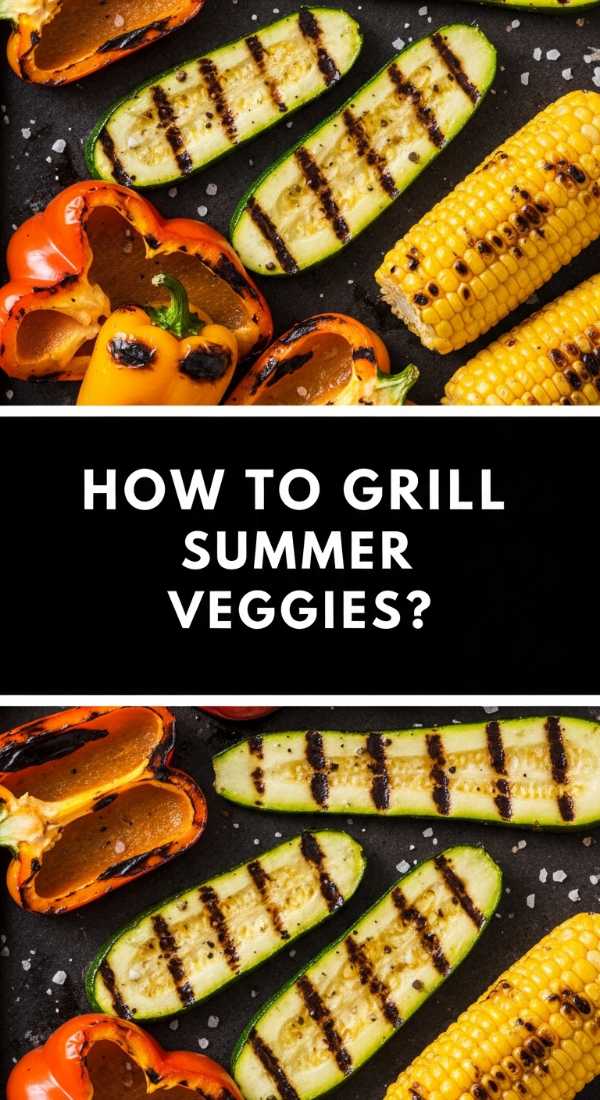
How to grill summer veggies

Why we love this
Grilling summer vegetables transforms them from simple side dishes into charred, smoky masterpieces that are the highlight of any snack board. The high heat of the grill caramelizes the natural sugars in zucchinis, peppers, and corn, creating a complex sweetness that you just can’t get from steaming or roasting. There’s a satisfying crunch to a perfectly grilled asparagus spear and a tender, melt-in-your-mouth quality to a thick slice of eggplant. The smoky aroma and the beautiful sear marks add a professional, rustic touch that makes the whole spread feel intentional and chef-prepared.
Ingredients
- Assorted vegetables (zucchini, bell peppers, asparagus, red onion, corn)
- 3 tablespoons olive oil
- 2 cloves garlic, minced
- 1 teaspoon dried oregano
- Lemon wedges for serving
How to make it
- Preheat your grill to medium-high heat (about 400°F). Ensure the grates are clean and lightly oiled to prevent sticking.
- Prep your veggies by cutting them into large, flat pieces. Slice zucchini and eggplant into long planks rather than rounds to prevent them from falling through the grates. Keep onion wedges intact by leaving the root end slightly attached.
- In a large bowl, whisk together the olive oil, minced garlic, and oregano. Toss the vegetables in this mixture until they are thinly and evenly coated. Do not over-oil, as this can cause flare-ups on the grill.
- Place the heartier vegetables like corn and onions on the hottest part of the grill first. Asparagus and peppers should go on slightly later as they cook faster.
- Grill the vegetables for 3-5 minutes per side. You are looking for distinct char marks and a ‘tender-crisp’ texture. Avoid moving them too much; let them sit to develop those beautiful grill lines.
- Remove from the grill and arrange on your board. Squeeze fresh lemon juice over the top while they are still hot to brighten the smoky flavors and add a hit of acidity.
How to make summer meals
Why we love this
Summer meals are all about celebrating the ease of the season, leaning into recipes that require minimal time over a hot stove and maximum time enjoying the long twilight hours. We love this approach because it emphasizes freshness—think cold pastas, vibrant grain bowls, and boards overflowing with seasonal produce. These meals feel light and energizing rather than heavy, making them perfect for those humid nights when you want something substantial but refreshing. It’s a philosophy of cooking that prizes assembly over labor, allowing the natural quality of the ingredients to shine through with every forkful.
Ingredients
- Base: Quinoa, farro, or chilled pasta
- Protein: Rotisserie chicken, canned chickpeas, or smoked salmon
- Produce: Cucumber, radishes, avocado, snap peas
- Dressing: Lemon tahini or a simple herb vinaigrette
- Toppings: Toasted seeds, feta cheese, or sprouts
How to make it
- Start with a ‘batch-cooked’ base. Cook a large pot of grains or pasta at the beginning of the week and keep it chilled in the fridge. This significantly cuts down on daily prep time.
- Utilize ‘no-cook’ proteins to keep the kitchen cool. A store-bought rotisserie chicken can be shredded in minutes, or a can of seasoned chickpeas can provide a quick, fiber-rich protein source.
- Focus on texture by incorporating at least three different vegetable types. Use a mandoline for paper-thin radishes, a peeler for cucumber ribbons, and your hands to snap fresh peas for variety.
- Whisk together a bright, acidic dressing. A standard ratio of 3 parts oil to 1 part acid (lemon or vinegar) works best. Add a teaspoon of Dijon mustard to help emulsify the dressing so it clings to the ingredients.
- Assemble by layering the grains first, followed by the protein and vegetables. Do not dress the entire meal if you aren’t eating it immediately; keep the dressing on the side to maintain the crunch.
- Finish with ‘flavor bombs’ like salty feta, creamy avocado, or crunchy sunflower seeds. These small additions provide the contrast that makes a simple summer meal feel gourmet.
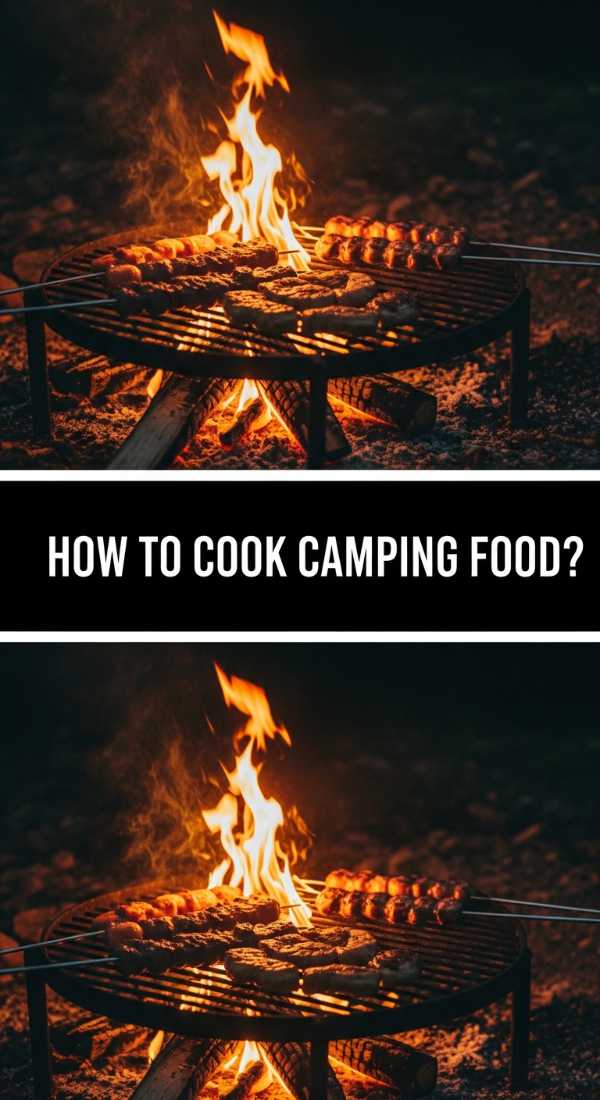
How to cook camping food

Why we love this
Cooking at a campsite is an exercise in mindfulness and creativity, turning the challenge of a single burner or a bed of coals into a delicious triumph. There is a specific joy in the sound of a cast-iron skillet sizzling over a fire and the rustic, charred aroma that fills the forest air. This style of cooking strips away the fluff and focuses on hearty, one-pot wonders that satisfy the deep hunger that comes from a day of outdoor activity. It’s about the communal experience of gathered around the fire, waiting for the coffee to percolate or the stew to thicken, making every bite taste like victory.
Ingredients
- Cast iron skillet or Dutch oven
- High-smoke point oil (like avocado or grapeseed oil)
- Pre-cooked sausages or thick-cut bacon
- Eggs or dehydrated hash browns
- Heavy-duty tongs and heat-resistant gloves
How to make it
- Prepare your heat source early. If cooking over wood, wait until the flames have died down and you have a thick bed of glowing red coals, which provide more consistent heat than an open flame.
- Preheat your cast iron skillet slowly. Place it on a grate over the coals for at least 5 minutes before adding any fat. This prevents food from sticking and ensures a proper sear.
- Add your oil and then your proteins. For camping, pre-cooked sausages are excellent because they only need to be heated through and browned, reducing the risk of undercooking over an uneven heat source.
- If making a hash, add your vegetables or potatoes once the meat has released its fats. Use a lid or a piece of foil to cover the skillet; this traps heat and helps cook the centers of denser foods like potatoes.
- Manage your heat by moving the skillet. If things are sizzling too violently, move the pan to the edge of the grate further from the center of the coals.
- Always use long-handled tools and a silicone or leather glove. The handle of a cast iron pan over a fire will become incredibly hot, and safety is paramount when cooking in a remote location.
How to make cheese dip
[IMAGE_10]
Why we love this
A truly great cheese dip is the heart and soul of any viral snack board, offering a gooey, molten center that everyone naturally gravitates toward. The texture should be silky and smooth, with a slow-flowing consistency that coats a chip or a pretzel perfectly without breaking. Its aroma is rich and buttery, often spiked with the sharp scent of cheddar or the smoky undertone of gouda. There is a primal satisfaction in the ‘cheese pull’ and the way a warm dip creates an instant sense of festivity and indulgence. It’s the ultimate social food, meant for sharing, dipping, and lingering over as the night goes on.
Ingredients
- 8 oz sharp cheddar cheese, freshly grated
- 4 oz cream cheese, softened
- 1/2 cup sour cream or Greek yogurt
- 1/4 cup milk (to adjust consistency)
- 1/2 teaspoon smoked paprika and a pinch of cayenne
- Green onions for garnish
How to make it
- Grate your cheese from a block rather than buying pre-shredded. Pre-shredded cheese is coated in potato starch to prevent clumping, which can result in a grainy, sandy texture when melted.
- In a medium saucepan over low heat, combine the softened cream cheese and sour cream. Whisk them together until they form a smooth, uniform base.
- Add the shredded cheddar one handful at a time. Stir constantly in a figure-eight motion, allowing each addition to melt completely before adding the next. This prevents the cheese from clumping or separating.
- Whisk in your spices—the smoked paprika adds a beautiful golden hue and a hint of woodsmoke flavor, while the cayenne provides a subtle back-of-the-throat warmth.
- If the dip is too thick, whisk in milk one tablespoon at a time until you reach your desired ‘dippable’ consistency. Keep the heat low; boiling the cheese will cause it to become oily and tough.
- Transfer the dip to a warm ceramic bowl immediately. Garnish with thinly sliced green onions and serve with a variety of textures: crunchy crackers, soft bread cubes, and crisp apple slices.
Bringing It All Together
Creating a viral-worthy snack board isn’t about perfection; it’s about the joy of assembly and the flavors of the season. By focusing on these simple yet elevated components, you can turn any night into a celebration. Remember to play with heights, colors, and textures to make your board visually enticing. Now, grab your favorite platter and get started—your 5 minutes to famous starts now!
Frequently Asked Questions
Got questions about your snack board? We’ve got answers!