

10 Viral Home & Garden Hacks for the Ultimate Weekend Glow Up
We’ve all been there—scrolling through endless feeds of perfectly curated spaces, feeling a little bit of ‘home envy’ while looking at our own tired walls or lackluster lawns. But here’s the secret: those magazine-worthy transformations aren’t always the result of a six-figure budget or a year-long construction project. Often, the most viral, jaw-dropping ‘glow ups’ come from clever, weekend-warrior hacks that focus on high-impact visual changes and a touch of creative soul.
This weekend, we’re reclaiming our spaces and turning the ordinary into the extraordinary. Whether you’re looking to breathe new life into a classic ranch-style home or you want to turn a simple rectangular patch of grass into a lush sanctuary, these ten hacks are designed to be approachable, stylish, and deeply satisfying. Get ready to fall in love with your home all over again as we dive into the textures, colors, and designs that are currently taking the design world by storm.
How to Remodel a Ranch Exterior for Instant Curb Appeal

Why we love this
There is a profound sense of satisfaction in taking a long, low-slung ranch house and giving it the architectural ‘lift’ it deserves. We love the way modern textures, like dark charcoal paint paired with warm cedar slats, catch the golden hour light, creating a facade that feels both grounded and incredibly sophisticated. The aroma of fresh wood stain mingling with the damp earth of new flower beds provides a sensory anchor to the project, while the visual contrast of crisp white trim against a moody siding color makes the entire property feel refreshed and intentional rather than dated.
Essential Elements:
- High-quality exterior matte paint in a modern neutral (Charcoal, Navy, or Sage)
- Cedar or pressure-treated wood slats for porch columns and shutters
- Black modern farmhouse style light fixtures
- Updated house numbers in a clean, sans-serif font
- Power washer and heavy-duty paint sprayers
How to make it
- Deep Clean and Prep: Start by power washing the entire exterior to remove decades of dirt and loose paint. Use a medium-pressure setting to avoid damaging the siding, and allow at least 24-48 hours of drying time until the surface is bone-dry to the touch.
- Detailed Masking: Use professional-grade blue painter’s tape and plastic sheeting to cover all windows, doors, and masonry. This step is tedious but crucial; a clean line is the difference between a DIY look and a professional finish.
- The Spray Application: Using an airless paint sprayer, apply your base color in long, overlapping vertical strokes. Keep the nozzle about 12 inches from the surface to prevent drips. Apply two thin coats rather than one thick one, allowing the paint to become ‘tacky’ before the second pass.
- Wood Accents: Measure and cut cedar slats to wrap existing structural columns. Secure them with stainless steel finishing nails to prevent rusting. Apply a clear UV-protectant sealer to the wood to maintain that rich, honey-colored glow.
- The Finishing Touches: Install your new modern light fixtures and house numbers. Ensure all hardware is level and tightened securely, providing that final ‘jewelry’ look to your home’s new face.
How to Style Glass Yard Art for a Magical Garden Glow

Why we love this
Nothing transforms a garden into a fairy-tale landscape quite like the interplay of light and glass. We are obsessed with the way hand-blown glass orbs and shimmering stakes catch the midday sun, casting dancing rainbows across the green leaves of your hostas. At twilight, these pieces take on a soulful, ethereal quality, reflecting the soft purple hues of the sky and making the garden feel like a private, enchanted gallery. The smooth, cool texture of the glass contrasts beautifully with the rugged bark of trees and the soft petals of nearby blooms, offering a multi-sensory delight.
Essential Elements:
- Hand-blown glass garden globes or colorful glass stakes
- Strategic solar-powered spotlights
- Sturdy metal support rods or decorative pedestals
- Mulch or river stones for a clean base
- Glass cleaner and microfiber cloths
How to make it
- Placement Mapping: Walk your garden during the brightest part of the day to identify ‘sun-trap’ areas where light naturally pools. These are the prime locations for glass art to ensure maximum shimmer and refraction.
- Leveling the Base: If using pedestals, dig a shallow hole and fill it with leveled river stones to prevent the art from tipping over during heavy winds. A stable base is essential for heavy glass pieces.
- Layering Heights: Arrange your glass pieces at varying heights—some low among the ground cover and others elevated on stakes—to create a sense of depth and movement that guides the eye through the garden.
- Nighttime Integration: Position a low-voltage solar spotlight at the base of each glass piece, angled upward at approximately 45 degrees. This ensures the glass ‘glows’ from within long after the sun has set.
- Maintenance Routine: Every two weeks, wipe down the glass with a mixture of distilled water and white vinegar. This prevents hard water spots from irrigation systems from dulling the vibrant colors of your art.
How to Design a Rectangular Backyard for Maximum Lounge Space
Why we love this
The challenge of a rectangular backyard is often making it feel like a series of cozy rooms rather than a boring hallway, and when done right, the result is pure magic. We love the feeling of ‘zoning’ a space with plush outdoor rugs that feel soft under bare feet and oversized sectional sofas that invite hours of deep conversation under the stars. The scent of lavender planted along the perimeter, combined with the warmth of a tabletop fire pit, creates an atmosphere of ultimate relaxation that rivals any high-end resort, turning a simple yard into a functional, luxurious extension of your home.
Essential Elements:
- Weather-resistant outdoor sectional or modular seating
- Large-scale outdoor area rugs to define zones
- Tabletop or portable propane fire pit
- String lights (Edison style) and heavy-duty poles
- Tall potted plants for vertical interest
How to make it
- The Rule of Thirds: Divide your rectangle into three distinct zones: a dining area closest to the house, a central lounge area, and a ‘destination’ zone (like a fire pit or garden) at the far end.
- Grounding the Space: Lay down a large outdoor rug in the central lounge zone. Ensure all legs of your sectional are resting on the rug to create a cohesive ‘living room’ feel that anchors the furniture.
- Vertical Lighting: Install 8-foot timber poles at the corners of your lounge zone. String Edison bulbs in a ‘zigzag’ or ‘X’ pattern across the space, keeping the tension tight so the lights hang at a consistent, safe height above head level.
- Softscaping: Place large ceramic pots filled with tall grasses or bamboo at the transitions between your three zones. This provides a visual ‘break’ and adds a lush, green texture that softens the hard lines of the rectangular layout.
- Comfort Layering: Add outdoor-rated throw pillows and blankets in varying textures like bouclé or heavy linen. Visual cue: The space should look so inviting that you’d be tempted to take a nap there immediately.
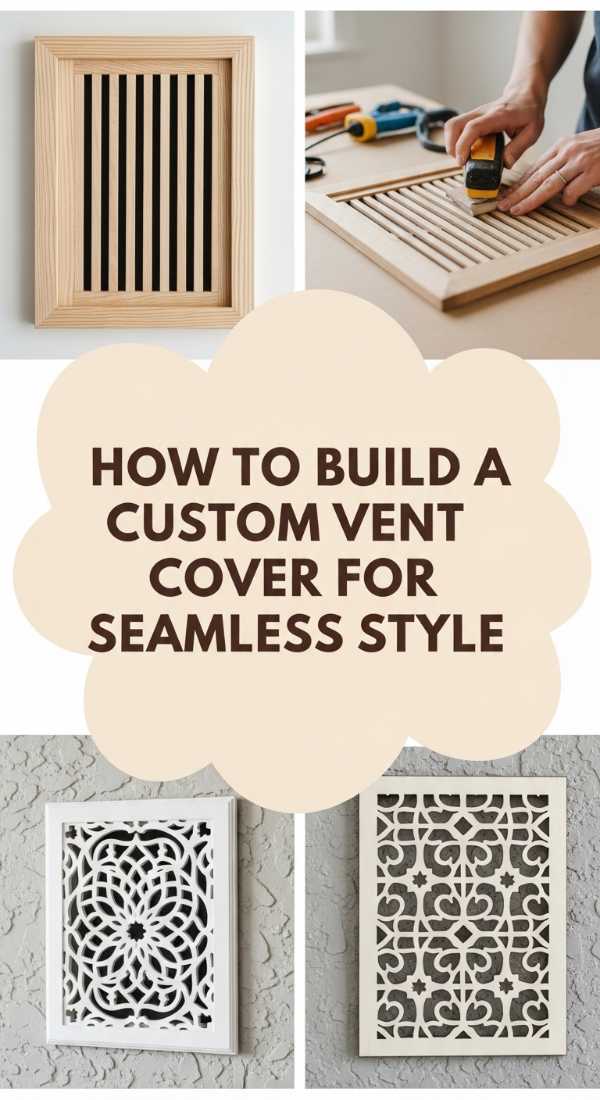
How to Build a Custom Vent Cover for a Seamless Interior Look

Why we love this
Standard metal vent covers are the ultimate design eyesore, but replacing them with custom wood versions is a game-changer for interior flow. We love the tactile warmth of smooth, sanded oak or walnut that sits perfectly flush with your flooring or walls. There is something incredibly satisfying about the way a custom cover disappears into the room’s design, removing a visual ‘clutter’ point and replacing it with a handcrafted detail that feels like high-end cabinetry. It’s a small change that yields a massive increase in the ‘finished’ feel of your home.
Essential Elements:
- Selected hardwood (matches your floor or trim)
- Router with a straight-cut bit
- Wood glue and miter saw
- Fine-grit sandpaper (220 and 400 grit)
- Magnetic strips or hidden clips for mounting
How to make it
- Precision Measurement: Measure the interior dimensions of your vent duct and the exterior ‘lip’ area. Visual cue: The wood frame should sit approximately 1/8 inch smaller than the duct for a snug but removable fit.
- The Lattice Cut: Using a router or a table saw, create a series of 1/4-inch wide slats. Space them evenly to ensure airflow isn’t restricted—aim for at least 60% open space within the frame.
- Assembly: Miter the corners of the outer frame at 45-degree angles. Use wood glue and a strap clamp to hold the frame together until the glue ‘sets’ (usually 30 minutes for initial bond, 24 hours for full cure).
- Sanding and Finishing: Sand the entire cover starting with 220-grit and finishing with 400-grit until it feels like silk. Apply a stain that perfectly matches your existing finishes, wiping away excess immediately to avoid ‘blotching.’
- Magnetic Mounting: Attach small, high-strength neodymium magnets to the corners of the vent duct and the back of the cover. This allows the cover to ‘snap’ into place and be easily removed for filter changes.
How to Install an Affordable Fence for Ultimate Backyard Privacy
![]()
Why we love this
There is nothing quite like the feeling of true privacy—that moment you step into your backyard and the rest of the world simply vanishes. We love the rustic, earthy scent of fresh cedar pickets and the architectural rhythm of a well-installed fence line. Using affordable materials in a modern horizontal orientation creates a high-end ‘slat wall’ look that feels contemporary and expensive. It’s about creating a boundary that doesn’t just close you in, but wraps you in a beautiful, textured cocoon where you can truly be yourself.
Essential Elements:
- Standard pressure-treated 1×6 pickets
- 4×4 pressure-treated posts
- Quick-set concrete mix
- Galvanized deck screws
- Laser level or string line
How to make it
- Post Setting: Dig holes 24 inches deep and 8 feet apart. Use a post-hole digger for clean, vertical sides. Fill with dry quick-set concrete, add water, and brace the post. Visual cue: The bubble on your level should be perfectly centered before the concrete begins to ‘flash set’ (usually 20-40 minutes).
- The Horizontal Framework: Instead of traditional vertical pickets, screw 2×4 stringers horizontally between the posts at the top, middle, and bottom. Ensure these are perfectly level to prevent a ‘stair-step’ look on uneven ground.
- Spacing the Pickets: Use a 1/2-inch spacer (a scrap piece of wood works perfectly) between each horizontal picket. This allows for air movement and wood expansion while maintaining privacy.
- Fastening Technique: Use two galvanized screws per post contact point. Drive them just slightly below the surface of the wood (‘countersinking’) to create a clean, professional appearance.
- Staining for Longevity: Wait 4-6 weeks for the pressure-treated wood to ‘dry out’ (it shouldn’t feel cool or damp). Apply a semi-transparent oil-based stain to protect the fibers from UV damage and moisture.
How to Transform a Ranch Home into a Modern Oasis

Why we love this
Turning a humble ranch into a modern oasis is like watching a butterfly emerge from a chrysalis; it’s a total reimagining of potential. We love the airy, open feel created by replacing small windows with large, black-framed glass panes that blur the line between indoor comfort and outdoor beauty. The juxtaposition of clean, minimalist lines with lush, organic landscaping creates a peaceful sanctuary that feels light-years away from the suburban hustle. It’s about embracing the ‘low and slow’ aesthetic of the ranch and elevating it with intentional, high-contrast design choices.
Essential Elements:
- Large-format black window frames
- Smooth-coat white or cream stucco/siding
- Minimalist landscaping (ornamental grasses, boxwoods)
- Modern front door with vertical glass lites
- Sleek, low-profile gutters
How to make it
- The Window Upgrade: Focus on the ‘eyes’ of the house. Replacing old double-hung windows with fixed-pane black aluminum frames instantly shifts the architecture toward a modern aesthetic. Ensure the seals are airtight to prevent energy loss.
- Siding Simplification: Remove any ‘fussy’ details like shutters or decorative scalloping. Apply a smooth finish to the exterior walls. If using paint, choose a high-quality ‘flat’ finish to minimize reflections and emphasize the home’s shape.
- Entryway Focus: The front door should be the ‘soul’ of the oasis. Install a heavy, solid-core door with a mid-century or modern profile. Use a matte black handle set with a heavy, tactile feel.
- Monochromatic Landscaping: Stick to a limited color palette for plants. Use varying shades of green with white flowers only. Visual cue: Mass-plant one species (like ‘Karl Foerster’ grass) to create a rhythmic, calming effect along the foundation.
- Low-Profile Accents: Replace bulky, traditional gutters with a box-style gutter system. This streamlines the roofline, making the house appear longer, lower, and more integrated into the landscape.
How to Incorporate Reflective Glass Art for Stunning Outdoor Vibes
Why we love this
Reflective glass art is the secret weapon of professional landscape designers, and we are absolutely enamored with its ability to ‘double’ the beauty of a garden. Whether it’s a mirrored mosaic or a polished glass monolith, these pieces catch the movement of clouds and the swaying of trees, bringing the sky down to earth. The way the cool, hard surface of reflective glass catches the flickering light of a nearby fire pit at night is nothing short of hypnotic, adding a layer of depth and ‘vibe’ that static ornaments simply can’t match.
Essential Elements:
- Mirrored glass spheres or mosaic panels
- High-strength outdoor adhesive (if creating mosaics)
- Sturdy, non-reflective mounting hardware
- Strategic placement near water features or colorful blooms
- Glass-safe polishing cloth
How to make it
- Reflective Mapping: Identify the most beautiful parts of your yard (a blooming rose bush, a waterfall, etc.). Place your reflective art so that it ‘captures’ these views from your primary seating area.
- Secure Installation: For heavy glass spheres, use a recessed ‘nest’ made of mortar or heavy stones to ensure they won’t roll. For panels, use Z-clips to mount them securely to fences or walls, ensuring a slight ’tilt’ to avoid blinding glare at certain hours.
- Angle Testing: During the installation, check the reflection from multiple vantage points. You want the glass to reflect greenery and sky, not the side of your neighbor’s garage or your trash cans.
- Creating Contrast: Surround highly reflective pieces with matte textures like moss, dark mulch, or weathered wood. This makes the ‘glow’ of the glass pop with much more intensity.
- Maintenance: Use a streak-free glass cleaner weekly. Dust and pollen can quickly turn a stunning reflection into a dull, muddy surface, so keep that ‘mirror’ finish bright and clear.
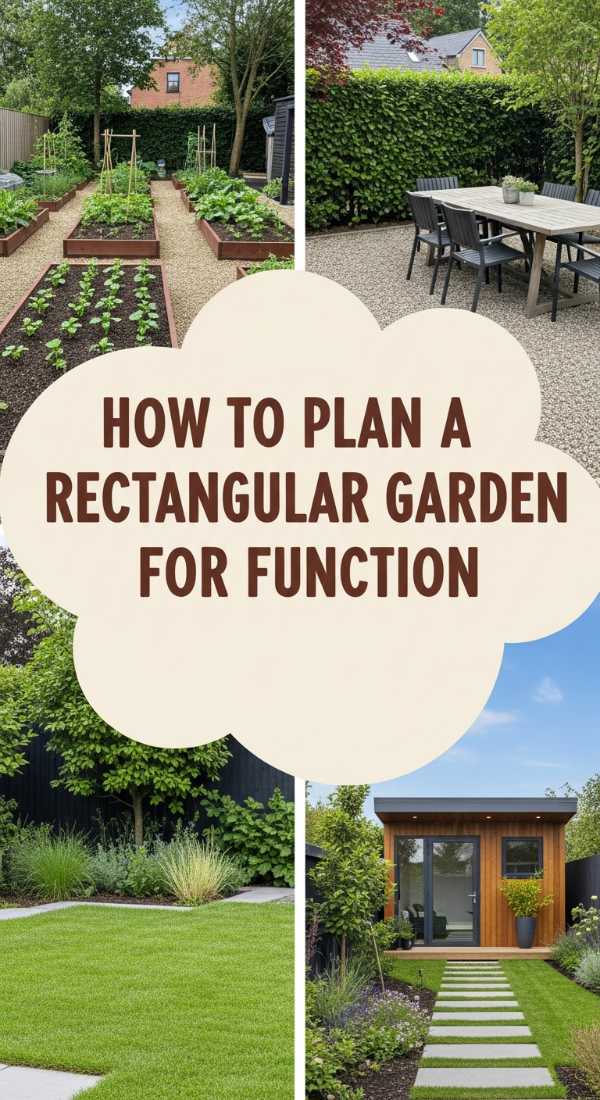
How to Plan a Rectangular Garden Layout for Total Functionality

Why we love this
A rectangular garden is a blank canvas for organization and productivity, and we love the clean, geometric harmony of a well-planned layout. There is something deeply grounding about walking down a straight, gravel path between perfectly aligned raised beds, the smell of damp cedar and ripening tomatoes filling the air. This layout maximizes every square inch, turning a simple yard into a high-functioning ‘homestead’ that looks as good as it performs. It’s the ultimate combination of form and function, where the beauty lies in the order and the abundance.
Essential Elements:
- 4×8 cedar raised bed kits
- Pea gravel or crushed stone for paths
- Landscape fabric for weed suppression
- Central focal point (like a birdbath or obelisk)
- Drip irrigation system
How to make it
- The Grid Design: Sketch your rectangle on graph paper. Aim for 4-foot wide beds with 2-foot wide paths. This ‘human-scale’ spacing ensures you can reach the center of any bed without stepping on the soil.
- Ground Prep: Scalp the grass in the entire area and lay down heavy-duty landscape fabric. Secure it with ‘U’ shaped staples every 12 inches to prevent shifting and ‘heaving’ during the winter.
- Bed Assembly: Build your cedar beds and position them according to your grid. Use a level to ensure the tops are even; a crooked bed will make the whole garden look ‘off.’ Fill with a 70/30 mix of topsoil and organic compost.
- Pathway Fill: Pour 2-3 inches of pea gravel into the paths. Visual cue: The gravel should be slightly below the top of the landscape fabric edge to keep it contained. Tamp it down firmly for a stable walking surface.
- The Vertical Anchor: Place a tall cedar obelisk or a decorative trellis in the very center of the rectangle. This breaks up the flat lines and provides a support for climbing plants like sweet peas or pole beans.
How to Craft Decorative Vent Covers for High End Home Style
Why we love this
Elevating your vents from ‘functional necessity’ to ‘decorative accent’ is the ultimate ‘quiet luxury’ home hack. We love the intricate patterns of laser-cut metal or woven wood that turn a floor or wall opening into a piece of jewelry for the room. The subtle way these covers catch the ambient light of a lamp, combined with the feeling of a home where no detail has been overlooked, creates an environment of immense polish. It’s a designer-level touch that guests might not notice immediately, but they will certainly ‘feel’ the high-end cohesive atmosphere it creates.
Essential Elements:
- Laser-cut metal sheets or decorative wood lattice
- L-shaped molding for the frame
- Spray paint (Champagne Bronze, Matte Black, or matching wall color)
- Epoxy or heavy-duty construction adhesive
- Small finishing nails
How to make it
- Design Selection: Choose a pattern that complements your home’s style—geometric for modern, or floral/scrollwork for traditional. Ensure the ‘openness’ of the pattern allows for at least 70% airflow to protect your HVAC system.
- Frame Construction: Cut your L-shaped molding to create a frame that fits precisely over your vent opening. Use a miter box for perfect 45-degree corners. Visual cue: The frame should hide the ‘rough’ edge of the vent hole completely.
- Insert Fitting: Cut the decorative metal or wood sheet to fit inside the ‘lip’ of your L-molding. Secure it with a bead of high-strength epoxy, and let it cure for at least 12 hours under a heavy weight to ensure it dries flat.
- Painting: Apply a high-quality metal primer followed by three light coats of spray paint. Use ‘sweeping’ motions to avoid pooling in the delicate pattern of the insert. Let dry until no longer ‘tacky’ (usually 4-6 hours).
- Installation: Secure the frame to the wall or floor using small finishing nails or a few dabs of clear silicone. If using on the floor, ensure the materials are ‘load-bearing’ or flush-mounted to prevent tripping.
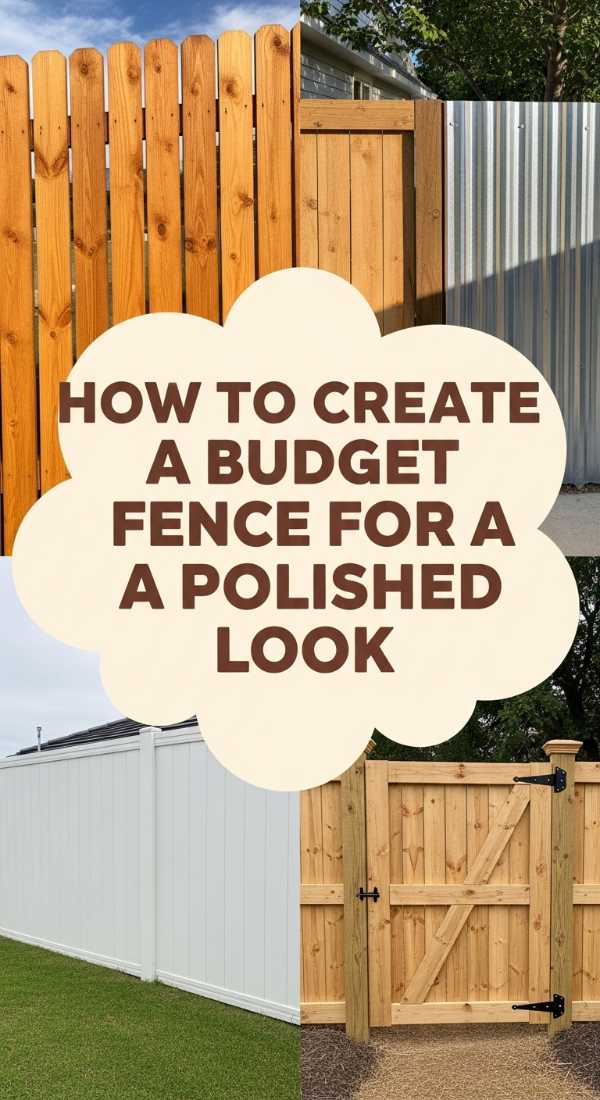
How to Create a Budget Friendly Fence for a Polished Perimeter
[IMAGE_10]
Why we love this
Creating a beautiful perimeter doesn’t have to break the bank, and we love the ingenuity of using unexpected materials like bamboo or wire mesh to create a ‘living’ fence. There is a breezy, coastal feeling to a light-colored bamboo screen, or a crisp, industrial-chic vibe to black wire mesh paired with heavy timber. The sound of wind rustling through a budget-friendly screen, combined with the visual ‘softening’ of your property lines, makes the entire yard feel like a curated retreat. It’s proof that style is about creativity, not just cash.
Essential Elements:
- Bamboo fencing rolls or ‘Hog Wire’ panels
- Pressure-treated 4×4 posts
- Heavy-duty zip ties or galvanized staples
- Exterior wood stain
- Post-hole digger and level
How to make it
- Structural Support: Set your 4×4 posts every 6 to 8 feet. For a ‘budget’ look to stay ‘polished,’ ensure every post is perfectly plumb. Use a string line stretched tight between the end posts to ensure the line is straight.
- Panel Prep: If using bamboo rolls, unroll them and allow them to ‘breathe’ for a day. If using wire panels, paint the metal a matte black before installation for an instant ‘high-end’ designer look.
- Mounting: For bamboo, use galvanized wire to ‘stitch’ the roll to horizontal 2×4 stringers. For wire panels, use galvanized ‘U’ staples to secure the mesh to the inside of the post frame. Visual cue: The mesh should be pulled ‘drum-tight’ to avoid sagging.
- Capping the Top: Add a horizontal 2×4 or 2×6 ‘cap’ across the top of the entire fence line. This protects the end-grain of your posts and gives the fence a finished, ‘architectural’ appearance.
- Landscaping Integration: Plant fast-growing vines like Clematis or Star Jasmine at the base of the fence. Within one season, the ‘budget’ materials will be partially covered in lush greenery, creating a million-dollar look for a fraction of the cost.
The Ultimate Transformation
As you step back and look at the results of your weekend ‘glow up,’ you’ll realize that the true magic wasn’t just in the paint or the glass or the wood—it was in the intentionality you brought to your home. These hacks prove that with a little sensory focus and some dedicated effort, any space can be transformed into a viral-worthy sanctuary. Your home is now a reflection of your best self: creative, polished, and ready for a long, beautiful season of outdoor living and indoor comfort.