

Your Private Oasis: Building the Ultimate Backyard Sanctuary on a Budget
There is a specific kind of magic that happens when you step out your back door and feel the weight of the world simply melt away. In our fast-paced lives, we often forget that the most profound healing happens in the quiet corners of our own property. You don’t need a million-dollar landscaping budget or a team of contractors to create a space that feels like a high-end retreat; you just need a bit of vision, a little dirt under your fingernails, and the desire to build something meaningful.
My journey into backyard bliss started with a single rickety chair and a dream of morning coffee surrounded by birdsong. Over time, I realized that a true sanctuary isn’t just about how things look—it’s about how they feel. It’s the scent of damp cedar after a rain, the rhythmic sound of a bird splashing in water, and the soft, ethereal glow of lights guiding you through the garden at dusk. This guide is your roadmap to transforming that patch of grass into a personal haven that reflects your soul.
How to Create a Chic Bird Bath for a Peaceful Garden Retreat
Why we love this
There is nothing quite as serene as the delicate sound of songbirds splashing in cool water on a sun-drenched afternoon. This chic bird bath adds a sophisticated architectural element to your garden while inviting nature to your doorstep. We love the way the tiered terra cotta catches the light, and the earthy, porous texture of the clay provides a safe, grippy surface for tiny feathered feet. It smells of wet stone and fresh garden air, creating a focal point that feels grounded, intentional, and deeply connected to the local ecosystem.
Essential Elements:
- Three terra cotta pots in graduating sizes (Large, Medium, Small)
- Three terra cotta saucers (one must fit the top pot)
- Exterior-grade waterproof construction adhesive
- Outdoor spray paint (optional, for a modern matte finish)
- River stones and a solar-powered fountain insert
How to make it
- Clean all terra cotta surfaces thoroughly with a damp cloth to ensure the adhesive bonds perfectly. If you are painting, apply two thin coats of outdoor matte spray paint and allow them to dry for at least 4 hours until the finish is no longer tacky.
- Invert the largest pot on a level surface in your garden; this serves as your base. Apply a generous bead of construction adhesive to the bottom (which is now the top) of the pot, ensuring you stay about an inch away from the edge to prevent messy squeeze-out.
- Press the second-largest pot onto the adhesive, making sure it is perfectly centered. Use a spirit level to check for evenness, as a tilted bath will drain unevenly. Repeat this process with the smallest pot to create a tiered pedestal.
- Affix the largest saucer to the top of the smallest pot using the same adhesive method. Let the entire structure cure for 24 hours. You’ll know it’s ready when the adhesive feels rock-solid and does not give when gently nudged.
- Fill the top saucer with fresh water and place smooth river stones inside to give the birds various depths to bathe. For an extra touch of luxury, float a small solar-powered fountain in the center; it will begin to bubble as soon as the sun hits it, providing that soothing white noise we all crave.
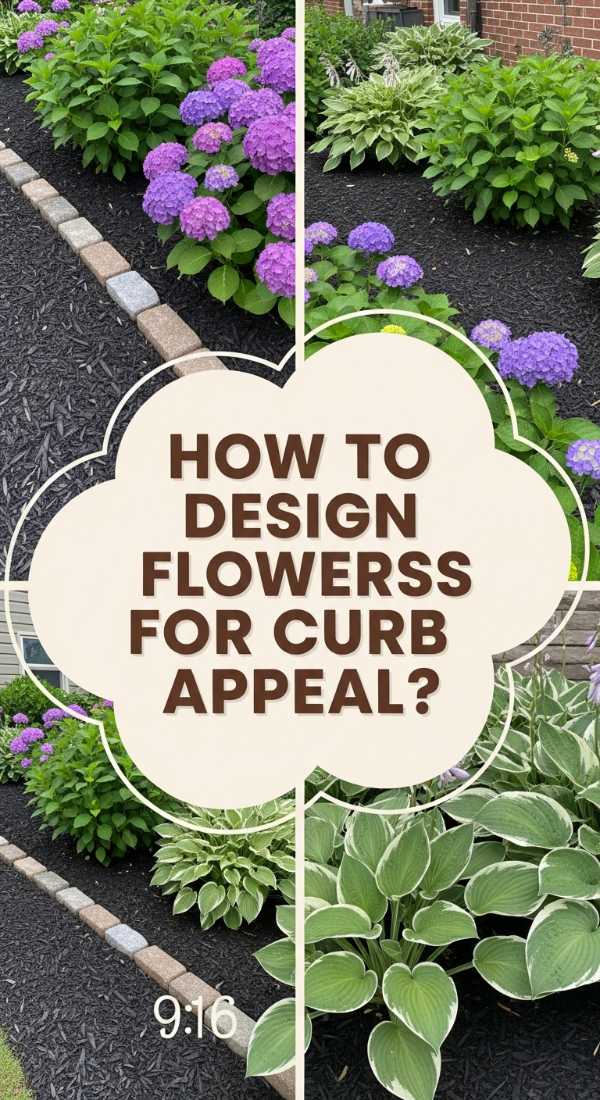
How to Design a Front Yard Flower Bed for Instant Curb Appeal
Why we love this
First impressions are everything, and a well-designed flower bed is like a warm hug for your home’s exterior. We love how a curated mix of textures—from the soft, silvery leaves of lamb’s ear to the vibrant, velvet petals of blooming perennials—creates a visual symphony that changes with the seasons. The aroma of lavender and mulch under the midday sun provides a sensory welcome every time you pull into your driveway. It’s a low-effort, high-impact way to make your house feel like an established, loved home rather than just a building.
Essential Elements:
- Garden hose or spray paint (for outlining shapes)
- Edging material (stone, brick, or plastic)
- High-quality garden soil and organic compost
- A mix of ‘thriller, filler, and spiller’ plants
- Natural cedar mulch
How to make it
- Begin by outlining your bed using a flexible garden hose to create soft, organic curves rather than rigid straight lines. Once satisfied with the flow, use landscape spray paint to mark the perimeter permanently before removing the sod with a sharp spade.
- Amend the existing soil by tilling in a 3-inch layer of organic compost. This is like ‘pre-heating’ your garden; the richer the soil, the more vibrant your blooms will be. Aim for a loamy texture that crumbles easily in your hand.
- Arrange your plants while they are still in their nursery pots. Place your ‘thrillers’ (tall, dramatic plants) in the back or center, ‘fillers’ (mounding plants) around them, and ‘spillers’ (vines or groundcover) at the very edges to soften the border.
- Dig holes twice as wide as the root balls. Gently tease the roots if they are circling the pot to encourage outward growth. Plant them at the same depth they were in the nursery container—planting too deep can suffocate the crown.
- Apply a 2-to-3-inch layer of cedar mulch across the entire bed, keeping it an inch away from the plant stems. This suppresses weeds and locks in moisture. Give everything a deep, long soak until the water penetrates several inches into the soil.
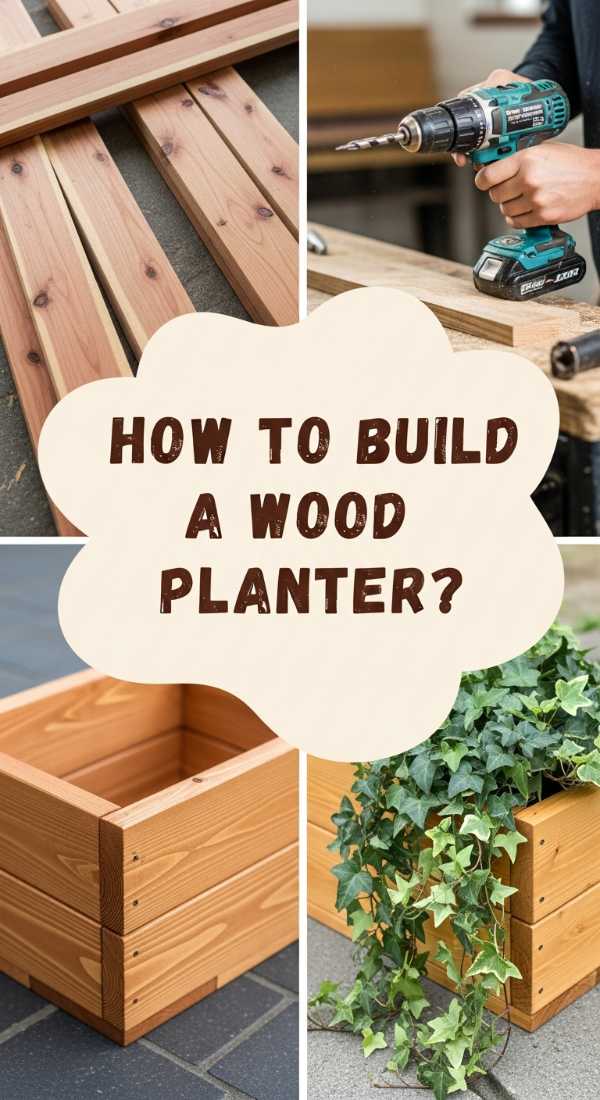
How to Build a Custom Wood Planter Box for Your Dream Porch
Why we love this
There is a rugged, tactile satisfaction in building your own wooden planters. The scent of freshly sawn cedar is intoxicating, and the way the wood grain glows under a coat of sealant adds a high-end, custom look to any porch or patio. We love that these boxes offer the perfect height for gardening without the back strain, and they provide a controlled environment for your favorite blooms to thrive. They feel sturdy, permanent, and possess a timeless craftsman charm that store-bought plastic versions simply cannot replicate.
Essential Elements:
- Cedar or pressure-treated pine boards (1×6 or 2×4)
- Exterior-grade wood screws and wood glue
- Power drill and miter saw
- Landscape fabric and staples
- Wood sealer or stain
How to make it
- Cut your boards into four equal lengths for the sides and two smaller widths for the ends. For a standard box, use a miter saw to create 45-degree angles on the ends if you want hidden joints, or simple butt joints for a more rustic, farmhouse look.
- Apply a thin line of waterproof wood glue to the edges before joining them. Pilot holes are essential here; drill small holes before driving in your exterior screws to prevent the wood from splitting. Visual cue: the screw head should be slightly countersunk (just below the surface).
- Measure and cut a piece of wood for the bottom of the box. Drill five to seven 1/2-inch drainage holes into this baseboard before attaching it to the frame. Without proper drainage, your plant roots will rot, and the wood will degrade faster.
- Sand the entire box with 120-grit sandpaper until the surface is smooth to the touch, removing any splinters. Apply a coat of weather-resistant stain or clear sealer to protect the wood from UV rays and moisture. Let it dry for 24 hours until the finish is no longer tacky.
- Line the interior with landscape fabric, stapling it to the top inner edge. This keeps the soil inside while allowing water to escape. Fill with a lightweight potting mix—never topsoil, which is too heavy for containers—and you are ready to plant.
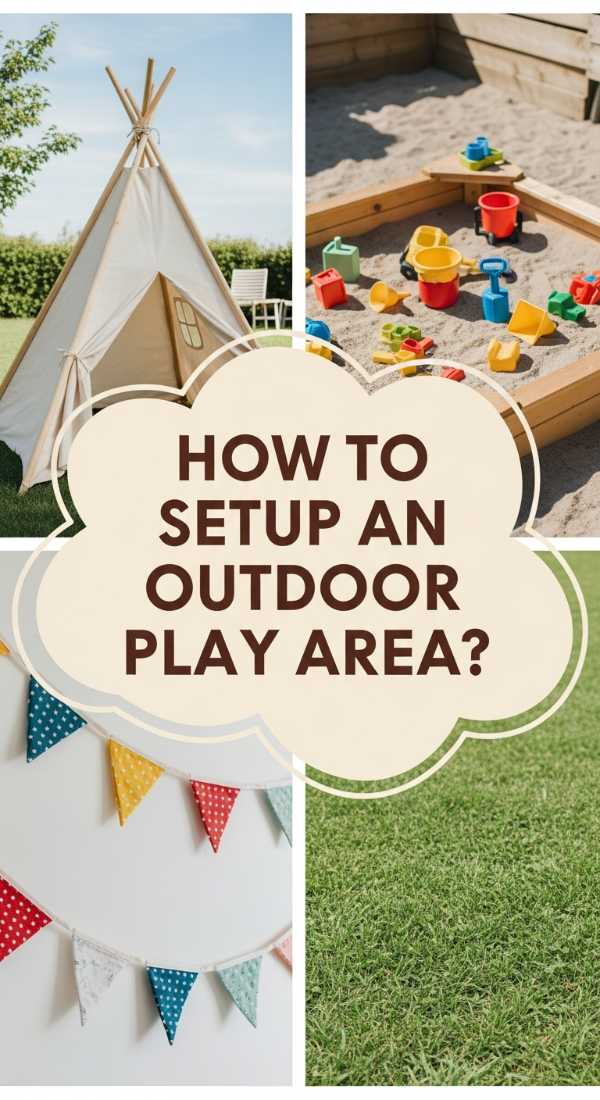
How to Set Up an Outdoor Play Area for Happy Little Explorers

Why we love this
Creating a dedicated space for children in the backyard transforms ‘outdoor time’ into an immersive adventure. We love the way this setup encourages tactile learning—the crunch of wood chips, the smoothness of sun-warmed plastic, and the thrill of discovery. It’s a sanctuary within a sanctuary, designed to withstand the energy of little feet while remaining aesthetically pleasing. The sound of carefree laughter echoing against the fence is the ultimate reward for a well-designed play zone that balances safety with wild, imaginative fun.
Essential Elements:
- Rubber mulch or engineered wood fiber (EWF)
- Landscape edging or timber borders
- Heavy-duty weed barrier
- Modular play equipment (slide, swing, or playhouse)
- Shade sail or umbrella
How to make it
- Select a level area in your yard that is visible from the house but far enough away to minimize noise. Excavate the top 3-4 inches of grass and soil to create a ‘pit’ for your safety surfacing. Visual cue: the ground should be flat and free of large rocks or roots.
- Lay down a heavy-duty weed barrier fabric, overlapping the seams by at least 6 inches. Secure the fabric with landscape staples. This step is crucial for keeping your play area clean and preventing pesky weeds from poking through your mulch.
- Install your border material—whether it’s timber beams or flexible plastic edging—around the perimeter. Secure these into the ground using long metal spikes or rebar to ensure the border doesn’t shift during high-energy play.
- Fill the area with at least 3-4 inches of rubber mulch or EWF. This depth provides the necessary impact absorption to protect against falls. Spread the material evenly using a garden rake until the surface is uniform.
- Assemble your play equipment according to the manufacturer’s instructions, ensuring all anchors are buried deep and tightened. Finally, install a shade sail overhead to protect delicate skin from the midday sun, checking that the tension is tight enough to prevent sagging or flapping in the wind.
How to Style Mud Kitchen Accessories for Creative Backyard Fun

Why we love this
The beauty of a mud kitchen lies in the details; it’s where the mundane becomes magical. We love the mismatched charm of thrifted stainless steel pots, the wooden spoons worn smooth by ‘soup’ stirring, and the pops of color from vintage measuring cups. It feels like a miniature, rustic bistro where the only currency is imagination. The sensory experience is unparalleled: the squelch of mud, the aroma of crushed mint leaves, and the visual delight of ‘potions’ decorated with dandelion petals make this the heartbeat of a creative backyard.
Essential Elements:
- Stainless steel bowls and pots (various sizes)
- Wooden spoons, whisks, and ladles
- Spice jars filled with flower petals and birdseed
- Small chalkboard for ‘menus’
- Metal hooks and a small shelf for organization
How to make it
- Source your accessories from thrift stores or your own ‘discard’ pile. Look for metal and wood rather than plastic; these materials feel more ‘real’ to children and hold up better to the elements. Scrub everything with hot, soapy water to remove grease.
- Install a series of small metal ‘S’ hooks along the backboard of your mud kitchen. This is the ‘prep’ phase—organizing by height makes the space feel like a professional chef’s station. Hang whisks and ladles where they are easily reachable.
- Dedicate a shelf for ‘ingredients.’ Use clear plastic or glass jars (if child-safe) to display natural elements like pinecones, dried lavender, or colorful pebbles. Visual cue: a well-styled kitchen has a balance of heights and textures on the shelves.
- Add a small chalkboard to the side. Use chalk markers to write a ‘Daily Special’ like ‘Mud Pie with Acorn Garnish.’ This encourages literacy and role-play, making the kitchen feel like a functioning little business.
- Finish the styling by adding a small herb planter (like mint or rosemary) directly onto the counter. This provides immediate ‘ingredients’ for the kids to harvest and use, adding a wonderful olfactory dimension to their play.
How to Decorate a Hot Tub Area for the Ultimate Spa Experience
Why we love this
A hot tub shouldn’t just be a plastic box in the yard; it should be a destination. We love how strategic decoration transforms a utility item into a high-end spa retreat. Imagine the soft steam rising into the cool night air, the warm flicker of lanterns reflected in the water, and the plush touch of a rolled towel waiting nearby. It’s about creating a cocoon of privacy and luxury that makes every Tuesday night feel like a vacation. The combination of warm lighting and lush greenery creates a sanctuary that appeals to every sense.
Essential Elements:
- Outdoor string lights (Edison bulbs)
- Tall potted plants (Bamboo or Grasses) for privacy
- Weatherproof outdoor rug
- Towel rack or decorative basket
- Scented outdoor candles or citronella coils
How to make it
- Define the ‘zone’ by laying down a durable, weather-resistant outdoor rug at the entry point of the hot tub. This provides a clean, soft place for bare feet and visually grounds the tub in the landscape.
- Create a ‘privacy screen’ using tall, narrow planters filled with clumping bamboo or ornamental grasses. Arrange them in a semi-circle around the tub to block views from neighbors while adding a lush, tropical rustle to the environment.
- String Edison-style lights overhead, but keep them on a dimmer. You want a ‘warm’ glow (around 2700K) rather than a harsh white light. Visual cue: the light should mimic the soft ambiance of a sunset.
- Set up a nearby ‘comfort station.’ Use a weather-proof wicker basket to hold rolled-up, oversized fluffy towels. Having them within arm’s reach ensures you don’t lose that ‘spa heat’ when you finally decide to climb out.
- Incorporate scent by placing a small table nearby with flameless LED candles and a bowl of citrus or eucalyptus leaves. The steam from the tub will help carry these light, refreshing scents, deepening the relaxation response.
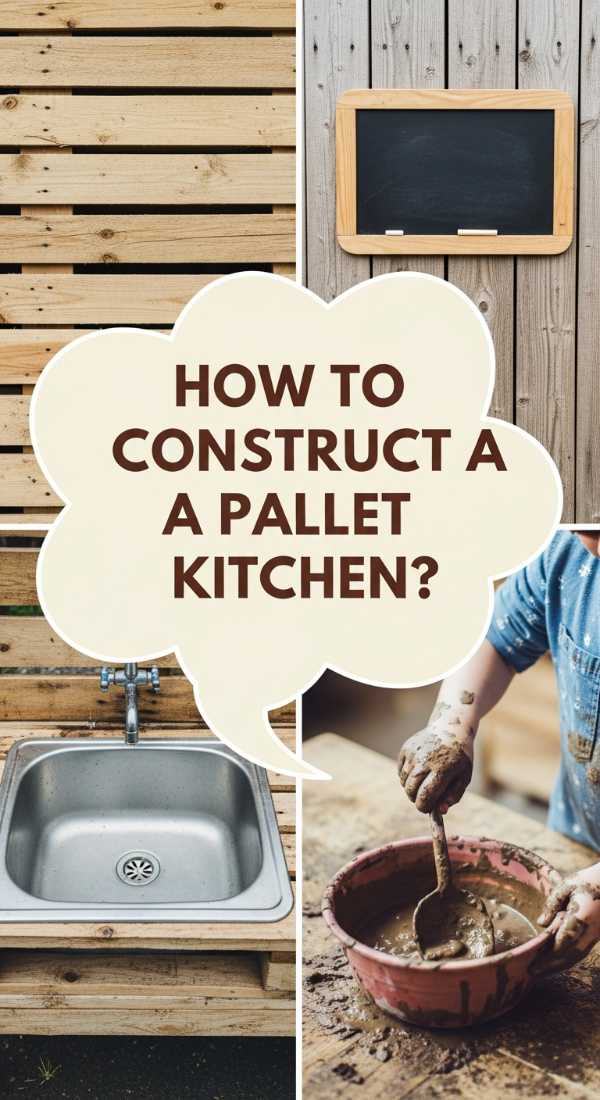
How to Construct a Pallet Mud Kitchen for Sustainable Child Play
Why we love this
There is a beautiful sustainability in giving a discarded pallet a second life as a center for childhood wonder. We love the rugged, industrial-meets-organic look of the weathered wood and the sturdy ‘blank canvas’ it provides for messy play. It’s a project that feels good for the planet and even better for the soul. The smell of sun-warmed wood and the sight of a functional ‘sink’ made from an old mixing bowl make this a piece of backyard furniture that tells a story of resourcefulness and joy.
Essential Elements:
- Two heat-treated pallets (look for ‘HT’ stamp)
- Stainless steel mixing bowl (for the sink)
- Jigsaw and power drill
- Sandpaper (60 and 120 grit)
- Non-toxic wood stain or outdoor paint
How to make it
- Inspect your pallets for the ‘HT’ (Heat Treated) stamp to ensure they haven’t been treated with harmful chemicals. Use a crowbar to remove any loose boards and a hammer to sink or remove any protruding nails. Safety is the ‘mise en place’ of this build.
- Sand the pallets vigorously. Start with 60-grit to remove the rough exterior and finish with 120-grit for a splinter-free surface. Visual cue: the wood should look significantly lighter and feel smooth when you run a gloved hand over it.
- Measure the diameter of your stainless steel bowl. On the top pallet (the ‘countertop’), use a compass to draw a circle slightly smaller than the bowl’s rim. Use a jigsaw to cut out the hole, then drop the bowl in to ensure it sits flush.
- Attach the ‘backboard’ pallet to the ‘base’ pallet using heavy-duty 3-inch exterior screws and L-brackets for stability. Ensure the structure is rock-solid and does not wobble; if it does, add a diagonal brace across the back.
- Apply a non-toxic outdoor sealant or a fun coat of ‘chalkboard paint’ to parts of the backboard. Allow 48 hours for the finish to fully cure before the first ‘mud cake’ is baked. This ensures the wood won’t absorb moisture and rot prematurely.
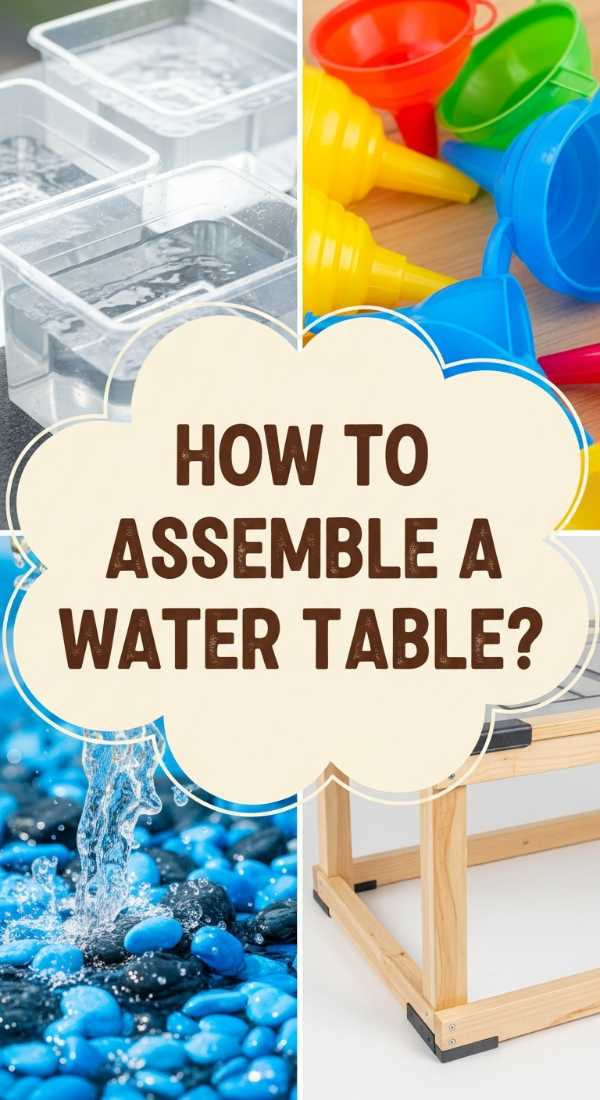
How to Assemble a DIY Water Table for Endless Summer Cool

Why we love this
When the heat of summer becomes a heavy blanket, a DIY water table is a shimmering oasis of relief. We love the simplicity of this build and the way it becomes a focal point for sensory exploration. The sound of pouring water, the sight of floating toys, and the cool touch of the spray provide instant regulation for energetic kids. It’s a clean, refreshing way to play that doesn’t require a full-sized pool, offering a tactile experience that keeps little hands busy and bodies cool for hours on end.
Essential Elements:
- Large, shallow plastic storage bin
- PVC pipes and connectors (1-inch diameter)
- PVC cement (glue)
- Waterproof silicone sealant
- A variety of funnels, tubes, and floating toys
How to make it
- Build the ‘chassis’ of the table using 1-inch PVC pipes. Measure the height of your child’s waist and cut four legs to that length. Connect them into a rectangular frame that perfectly supports the lip of your plastic bin.
- Dry-fit all the PVC pieces first to ensure the table is level. Once satisfied, use PVC cement to bond the joints permanently. This glue sets almost instantly, so work quickly and precisely! Let the frame dry for 1 hour.
- Place the bin into the frame. For extra security, you can use zip ties to lash the bin’s handles to the PVC frame. If you want a built-in drain, drill a hole in the bottom of the bin and install a standard PVC plug, sealing the edges with waterproof silicone.
- Wait 24 hours for the silicone to ‘doneness’ (it should be firm and rubbery, not tacky) before filling with water. This prevents leaks that would ruin the ‘staying power’ of your play session.
- Fill the table with fresh water and add a few drops of blue food coloring or some floating ice cubes for a ‘sensory chill.’ Add various levels of funnels and clear tubing so kids can experiment with gravity and water flow.
How to Install a Planter Privacy Wall for a Secluded Sanctuary

Why we love this
There is nothing quite like the feeling of being completely tucked away in your own world. A planter privacy wall offers a ‘living’ solution to nosy neighbors and unsightly views. We love the way the vertical greenery creates a wall of oxygen and vibrant color, turning a flat fence into a three-dimensional garden. The scent of jasmine or honeysuckle climbing the trellis, combined with the visual ‘quiet’ of a green screen, makes your backyard feel like a hidden glade in the middle of the suburbs.
Essential Elements:
- Long, rectangular wooden planters
- Tall wooden or metal trellises
- Fast-growing climbing plants (Star Jasmine or Clematis)
- High-quality potting mix with moisture-retention crystals
- Heavy-duty zip ties or brackets
How to make it
- Position your rectangular planters along the perimeter where you need the most privacy. Use a level to ensure the ground is flat; if not, use pavers to create a stable, even base for the heavy planters.
- Attach the trellises to the back of the planters using heavy-duty brackets or by screwing them directly into the planter frame. The trellis should stand at least 5-6 feet tall to provide effective eye-level privacy.
- Fill the planters with a premium potting mix. Because these planters will be ‘working hard’ to grow tall vines, add moisture-retention crystals to help the soil stay hydrated during the peak of summer heat.
- Plant your climbers—space them about 12 inches apart. Gently guide the existing vines onto the bottom of the trellis, securing them loosely with garden twine or soft plant ties. Don’t tie them too tight; they need room to thicken as they grow.
- Water deeply and apply a liquid seaweed fertilizer once every two weeks to jumpstart growth. Visual cue: once the vines reach the halfway point of the trellis, ‘pinch’ the tops to encourage the plant to branch out horizontally and fill in the gaps.
How to Hack Dollar Tree Solar Lights for a Glowing Midnight Path
[IMAGE_10]
Why we love this
Affordable luxury is the best kind of luxury. We love this hack because it takes basic, utilitarian solar lights and turns them into high-end landscape features. The soft, amber glow of these ‘pathway lanterns’ makes a garden feel expensive and curated. There’s a certain magic in watching them blink on one by one as the sun dips below the horizon, casting long, dancing shadows across the grass. It creates a romantic, safe, and inviting atmosphere that beckons you to take one last stroll before bed.
Essential Elements:
- Standard Dollar Tree solar stake lights
- Glass jars or decorative lanterns (clear or frosted)
- Clear waterproof silicone adhesive
- Frosted glass spray paint (optional)
- Pea gravel or decorative sand
How to make it
- Carefully pull the solar light assembly (the top part with the panel and bulb) off the plastic stake. Discard the stakes or save them for another project. Wipe the solar panels with a microfiber cloth to ensure they can absorb maximum sunlight.
- If you want a ‘soft focus’ look, spray the inside of your glass jars with frosted glass spray paint. Apply in thin, even ‘mists’ to avoid drips. Visual cue: the glass should look like it’s covered in a light morning frost.
- Apply a ring of clear waterproof silicone adhesive to the underside of the solar light assembly. Press it firmly onto the mouth of the glass jar. Hold it for 60 seconds to ensure a tight seal that will keep rain out of the jar.
- Allow the silicone to cure for a full 24 hours in a dry location. You’ll know it’s ‘done’ when the glue is completely transparent and feels like hard rubber. This seal is vital for protecting the electronics inside from morning dew.
- Place a layer of pea gravel or white sand at the bottom of the jars for weight so they don’t blow over in the wind. Arrange them along your path or on top of fence posts. As the sun sets, your budget-friendly lights will transform your yard into a glowing midnight wonderland.
Conclusion
Building your own backyard sanctuary is a labor of love that pays dividends in peace of mind. Whether you are listening to the soft splash of a bird bath or walking a glowing path under the stars, these small, budget-friendly projects create a home that truly nurtures your spirit. Your oasis is waiting—one pallet, one plant, and one solar light at a time.