

Your Next Party Must-Have: The Simple Board Going Viral
There is something undeniably magical about the moment your friends gather around a table, the air buzzing with laughter and the clinking of glasses. We’ve all been there—trying to host the perfect evening while stuck in the kitchen, missing the best jokes and the warmest memories. But lately, there’s a new trend taking over social media that has completely changed the way I entertain, and it’s all about the ‘Simple Board.’ It’s more than just a platter; it’s a tactile, visual, and flavor-packed experience that invites everyone to lean in and dig in together.
The beauty of this viral board concept is its versatility. Instead of a stiff three-course meal, you’re presenting a curated landscape of textures and temperatures that keeps the conversation flowing. Whether you’re piling up crispy, golden bites or decadent, melty treats, the board becomes the heartbeat of the room. It’s about creating a relaxed atmosphere where the food is the bridge between busy lives and meaningful connection. Trust me, once you try serving your favorites this way, you’ll never go back to individual plating again.
How to make crispy potatoes?

Why we love this
There is nothing quite like the audible crunch of a perfectly roasted potato giving way to a center that is as light and fluffy as a cloud. These potatoes are a sensory delight, filling your kitchen with the earthy, comforting scent of rosemary and toasted garlic as they sizzle in the oven. The contrast between the rugged, craggy exterior and the buttery interior creates a mouthfeel that is addictive, especially when the salt crystals hit your tongue just right. They are the ultimate crowd-pleaser, providing a warm, golden anchor for any board that feels both rustic and sophisticated at the same time.
Ingredients
- 2 lbs Yukon Gold potatoes
- 3 tbsp extra virgin olive oil
- 1 tsp sea salt
- 1/2 tsp cracked black pepper
- 2 sprigs fresh rosemary, chopped
- 1 tsp garlic powder
How to make it
- Start by peeling and cutting your potatoes into even 1-inch chunks to ensure they cook at the same rate; place them in a large pot of cold, salted water.
- Bring the water to a rolling boil and cook for about 8-10 minutes until the edges are tender but the centers are still firm—this parboiling step is crucial for that fluffy interior.
- Drain the potatoes and let them steam dry in the colander for 2 minutes, then give them a vigorous shake to roughen up the edges; these fuzzy bits turn into the ultimate crispy crust.
- Preheat your oven to 425°F (220°C) and place a large baking sheet inside to get piping hot, which prevents sticking and jumps-starts the browning process.
- In a bowl, toss the potatoes with olive oil, salt, pepper, rosemary, and garlic powder until every piece is evenly coated in a shimmering layer of seasoning.
- Carefully spread the potatoes onto the hot baking sheet in a single layer, ensuring they aren’t crowded, and roast for 45-50 minutes, flipping halfway through until they are a deep, mahogany gold.
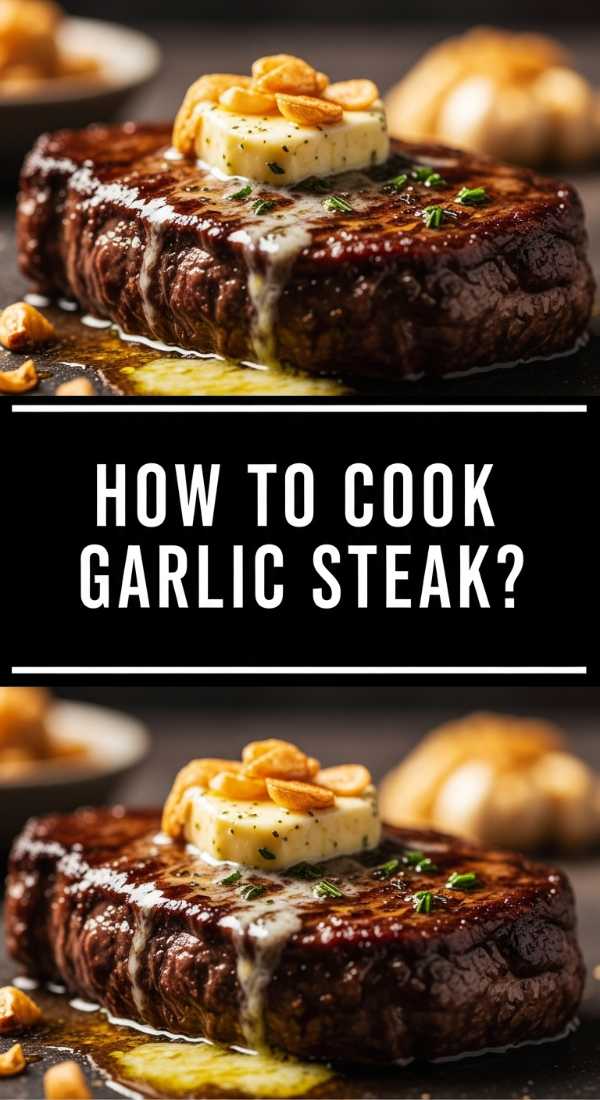
How to cook garlic steak?
Why we love this
The aroma of a steak searing in a hot pan is enough to stop anyone in their tracks, but when you add a mountain of crushed garlic and fresh thyme, it becomes intoxicating. As the butter melts and begins to brown, it creates a nutty, savory foam that coats the meat in a rich, velvety glaze. The sizzle of the fat rendering down and the sight of that deep, caramelized crust promise a bite that is explosively flavorful and incredibly tender. It’s a primal, luxurious experience that makes any gathering feel like a special occasion, leaving your guests reaching for ‘just one more slice.’
Ingredients
- 2 Ribeye or New York Strip steaks (room temperature)
- 4 tbsp unsalted butter
- 6 cloves garlic, smashed
- 3 sprigs fresh thyme
- Kosher salt and coarse black pepper
- 1 tbsp high-smoke point oil (like grapeseed)
How to make it
- Generously season your steaks with salt and pepper on all sides, including the edges, at least 30 minutes before cooking to allow the seasoning to penetrate the fibers.
- Heat a heavy cast-iron skillet over high heat until it is wisping with smoke; add the oil and swirl to coat the bottom of the pan evenly.
- Place the steaks in the pan and sear undisturbed for 3-4 minutes until a thick, dark brown crust forms, then flip them over using tongs.
- Immediately lower the heat to medium-high and add the butter, smashed garlic cloves, and thyme sprigs to the side of the pan.
- As the butter foams, tilt the pan slightly and use a large spoon to continuously baste the steaks with the hot, garlic-infused butter for the final 2-3 minutes of cooking.
- Remove the steaks when they reach an internal temperature of 130°F (54°C) for medium-rare and let them rest on a cutting board for at least 10 minutes to allow the juices to redistribute before slicing across the grain.
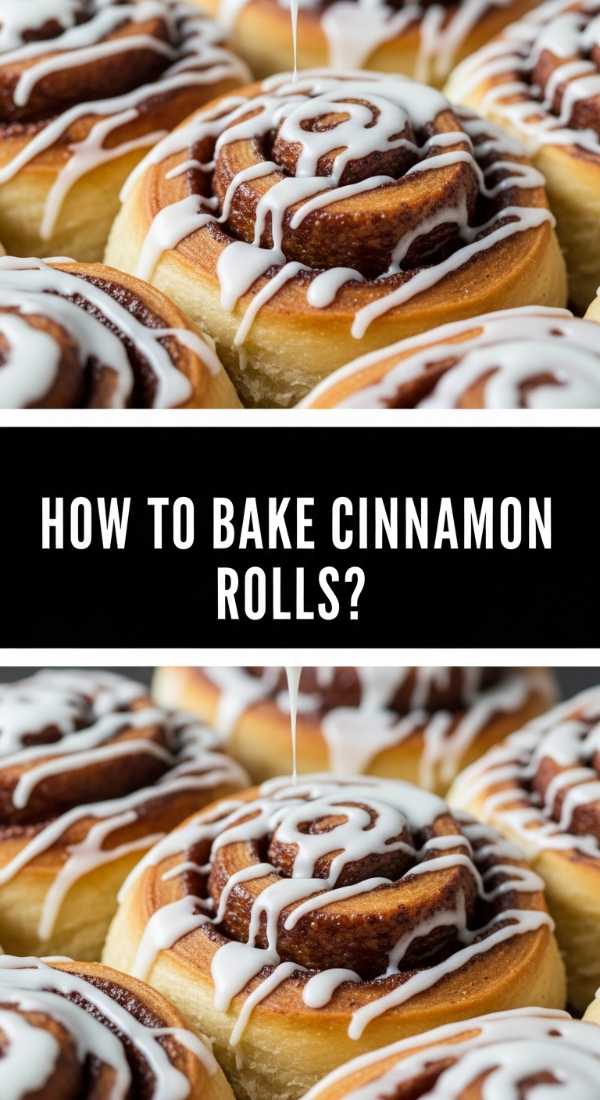
How to bake cinnamon rolls?
Why we love this
Walking into a home where cinnamon rolls are baking is like receiving a warm, sugary hug that instantly settles the soul. The scent of warm yeast and spicy cinnamon wafting through the air is powerful enough to draw everyone into the kitchen with expectant smiles. These rolls are a masterclass in texture, featuring a soft, pillowy dough that spirals around a gooey, molten center of dark sugar and spice. When topped with a melting cloud of cream cheese frosting that seeps into every crevice, they become a decadent centerpiece that feels like pure indulgence and childhood nostalgia.
Ingredients
- 4 cups all-purpose flour
- 1/4 cup granulated sugar
- 1 packet instant yeast
- 1 cup warm milk
- 1/4 cup melted butter
- 1 egg
- Filling: 1/2 cup softened butter, 1 cup brown sugar, 2 tbsp cinnamon
- Frosting: 4 oz cream cheese, 1/4 cup butter, 1 cup powdered sugar, vanilla
How to make it
- Combine the warm milk (around 110°F), sugar, and yeast in a bowl and let it sit for 5 minutes until it becomes frothy and active.
- Add the melted butter, egg, and flour, then knead the dough for about 8 minutes by hand or machine until it is smooth, elastic, and slightly tacky to the touch.
- Place the dough in a greased bowl, cover with a damp cloth, and let it rise in a warm, draft-free spot for 1-2 hours or until it has doubled in size.
- Punch the dough down and roll it out into a large rectangle on a floured surface; spread the softened butter across the entire surface and sprinkle generously with the cinnamon-sugar mixture.
- Roll the dough tightly into a long log starting from the long edge, then use unflavored dental floss or a sharp knife to cut into 12 even rolls.
- Place the rolls in a greased baking dish, let them rise for another 30 minutes, then bake at 350°F (175°C) for 20-25 minutes until light golden brown; frost while still warm.
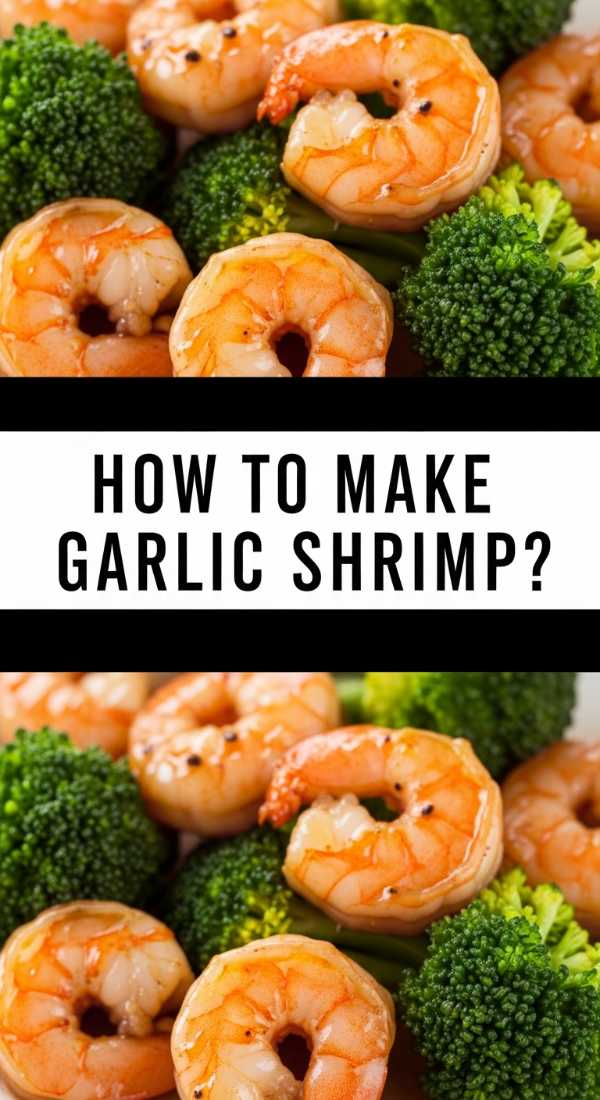
How to make garlic shrimp?
Why we love this
Garlic shrimp is the ultimate quick-fix luxury, offering a bright and zesty flavor profile that cuts through the richness of any board. The sight of the translucent pink shrimp curling into perfect ‘C’ shapes in a bubbling pool of golden butter and bright green parsley is visually stunning. Each bite delivers a satisfying snap, followed by a burst of savory garlic and a subtle kick of chili flakes that dances on the palate. The sauce itself is a liquid gold, perfect for soaking up with a piece of crusty bread, making it a communal experience that is as messy as it is delicious.
Ingredients
- 1 lb large shrimp, peeled and deveined
- 4 tbsp unsalted butter
- 5 cloves garlic, minced
- 1/2 tsp red pepper flakes
- 1/4 cup dry white wine or chicken broth
- Fresh lemon juice and chopped parsley
How to make it
- Pat your shrimp completely dry with paper towels; removing excess moisture is the secret to getting a good sear rather than just steaming the seafood.
- Heat a large skillet over medium-high heat and melt half of the butter until it starts to sizzle and move around the pan.
- Add the shrimp in a single layer, making sure not to overlap them, and sear for 1-2 minutes until the bottoms turn pink and opaque.
- Flip the shrimp and immediately add the minced garlic and red pepper flakes, sautéing for just 30 seconds to release the aroma without burning the delicate garlic.
- Pour in the white wine or broth to deglaze the pan, scraping up any flavorful brown bits, and let the liquid reduce by half for about 1 minute.
- Stir in the remaining butter, lemon juice, and parsley to create a thick, glossy sauce; remove from heat immediately so the shrimp remain tender and juicy.
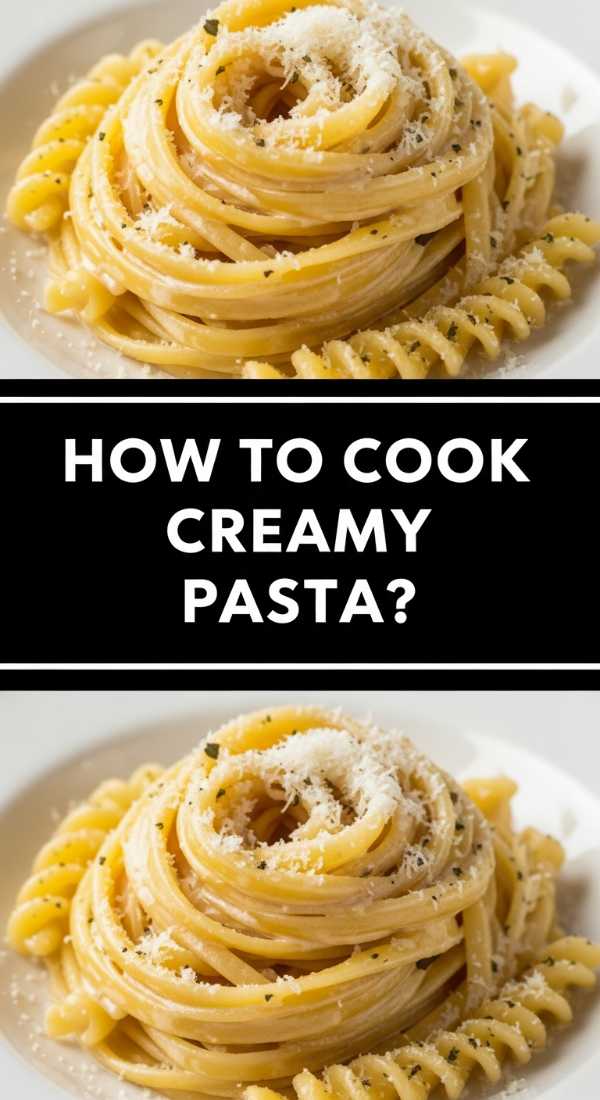
How to cook creamy pasta?
Why we love this
A great creamy pasta is like a silk ribbon for the soul, wrapping you in a blanket of rich, cheesy comfort that feels deeply satisfying. The way a well-emulsified sauce clings to every strand of noodle ensures that each forkful is a perfect balance of starch and velvet. The subtle notes of nutmeg or cracked black pepper cutting through the heavy cream create a complex flavor profile that isn’t just heavy, but thoughtfully balanced. It’s the kind of dish that encourages people to slow down, savoring the warmth and the gentle weight of a meal that feels like home on a plate.
Ingredients
- 12 oz fettuccine or penne
- 1 cup heavy cream
- 1/2 cup freshly grated Parmesan cheese
- 2 cloves garlic, minced
- 2 tbsp unsalted butter
- Salt, black pepper, and a pinch of nutmeg
How to make it
- Bring a large pot of water to a boil and season it heavily with salt—it should taste like the sea—then cook your pasta until it is just ‘al dente,’ about 2 minutes less than the package instructions.
- While the pasta cooks, melt butter in a wide skillet over medium heat and gently sauté the minced garlic until it is fragrant and translucent.
- Pour in the heavy cream and bring to a gentle simmer; let it bubble and reduce slightly for 3-4 minutes until it begins to thicken.
- Before draining the pasta, reserve 1 cup of the starchy pasta water; this liquid gold is the secret to a smooth, non-clumpy sauce.
- Transfer the pasta directly into the skillet with the cream and toss vigorously, adding the Parmesan cheese and the pinch of nutmeg.
- Slowly splash in some of the reserved pasta water while tossing until the cheese melts and the sauce transforms into a glossy, velvety coating that perfectly grips the noodles.
How to grill smashed burgers?

Why we love this
The smashed burger is a triumph of chemistry and flavor, relying on the Maillard reaction to create a lacy, ultra-crispy edge that is packed with concentrated beefy goodness. There is a primal satisfaction in the hiss of the cold beef hitting a scorching hot griddle and the physical act of pressing it flat to maximize surface area. The resulting patty is thin and irregularly shaped, with a juicy center that contrasts perfectly with the salty, charred perimeter. When topped with a slice of melting American cheese and tucked into a toasted brioche bun, it’s the quintessential burger experience that feels both nostalgic and chef-level.
Ingredients
- 1 lb ground beef (80/20 fat ratio is essential)
- 4 brioche buns
- 4 slices American cheese
- Salt and pepper
- 1 tbsp vegetable oil
- Thinly sliced onions (optional)
How to make it
- Divide your cold ground beef into 4 loose balls (about 4 oz each), being careful not to overwork the meat or pack it too tightly; keep them chilled until the moment they hit the pan.
- Heat a flat cast-iron griddle or heavy skillet over high heat for at least 5 minutes until it is intensely hot—you want to see a faint wisp of smoke.
- Lightly oil the surface and place the beef balls onto the griddle, then immediately use a heavy spatula (or a burger press) to smash them down as flat as possible into thin discs.
- Season the raw side generously with salt and pepper; if using onions, press them into the top of the meat now so they steam and char into the patty.
- Let the burger cook undisturbed for 2 minutes until the edges are dark brown and crispy, then use a sturdy scraper to get underneath the entire crust and flip.
- Add the cheese slice immediately and cook for only 30-45 seconds more until the cheese is gooey; serve on a toasted bun to maintain structural integrity.
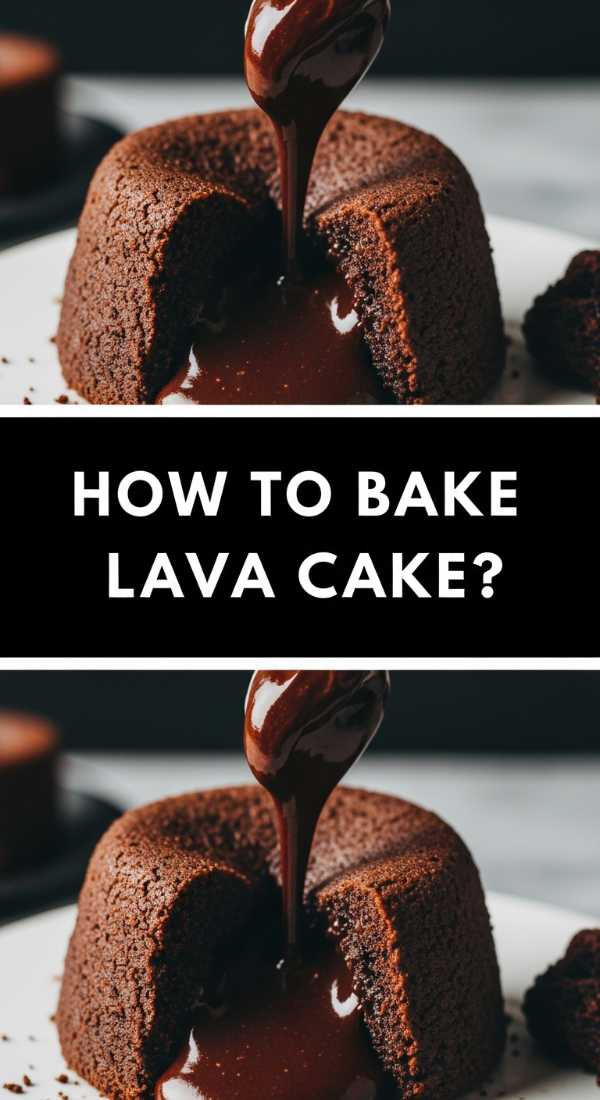
How to bake lava cake?
Why we love this
There is no dessert more dramatic or enticing than a lava cake, where a delicate, cakey exterior hides a secret heart of molten, flowing chocolate. As your spoon breaks the surface, the dark, glossy ganache spills out like liquid velvet, filling the plate with an aroma of roasted cocoa and sweet vanilla. The contrast between the warm, soft sponge and the rich, flowing center is a textural playground that feels incredibly sophisticated yet fundamentally indulgent. It is the ultimate finale for any food board, offering a small, personal portion of pure, unadulterated luxury that leaves everyone scraping their plates.
Ingredients
- 4 oz high-quality semi-sweet chocolate
- 1/2 cup unsalted butter
- 2 large eggs + 2 egg yolks
- 1/4 cup granulated sugar
- 2 tbsp all-purpose flour
- Pinch of salt
How to make it
- Preheat your oven to 425°F (220°C) and generously grease two or three 6-ounce ramekins with butter, then dust with cocoa powder to ensure the cakes slide out perfectly.
- Melt the chocolate and butter together in a double boiler or the microwave in 30-second increments, stirring until the mixture is smooth, glossy, and completely combined.
- In a separate bowl, whisk the eggs, egg yolks, sugar, and salt together for about 2 minutes until the mixture is pale, thick, and doubled in volume.
- Gently fold the chocolate mixture into the egg mixture using a spatula, being careful not to deflate the air, then sift the flour over the top and fold again until just combined.
- Divide the batter among the prepared ramekins and bake for exactly 12-14 minutes; the sides should be firm and set, but the center should still have a noticeable jiggle.
- Let them cool for only 1 minute before carefully inverting them onto a plate; the cake should slide out, ready to be dusted with powdered sugar and served immediately.
How to make loaded nachos?

Why we love this
Loaded nachos are a celebration of chaos and harmony, where every chip is a vehicle for a mountain of vibrant colors and bold, spicy flavors. The sight of a towering pile of golden corn chips dripping with ropes of melted cheese and dollops of cool sour cream is enough to make anyone’s mouth water. There’s a beautiful rhythm to eating them—searching for the perfect ‘fully loaded’ chip that has a bit of everything: the crunch of the base, the heat of the jalapeño, the creaminess of the avocado, and the savory punch of the beans. It’s a communal feast that brings people together, one messy, delicious handful at a time.
Ingredients
- 1 large bag sturdy corn tortilla chips
- 2 cups shredded Mexican blend cheese
- 1 can black beans, rinsed
- 1/2 cup pickled jalapeños
- 1/4 cup diced red onions
- Toppings: Guacamole, sour cream, cilantro, and salsa
How to make it
- Preheat your oven to 400°F (200°C) and line a large baking sheet with parchment paper to make clean-up easier and prevent the chips from sticking.
- The secret to perfect nachos is layering: start with a single layer of chips, then top with half of the cheese and half of the beans to ensure no chip is left bare.
- Repeat with a second layer of chips, the remaining cheese, and the remaining beans; this vertical stacking ensures that even the bottom chips are covered in goodness.
- Scatter the pickled jalapeños and red onions over the top to provide bursts of acidity and crunch throughout the tray.
- Bake for 8-12 minutes until the cheese is completely melted and bubbly, and the tips of the chips are just beginning to turn a deeper shade of brown.
- Remove from the oven and immediately dollop with guacamole, sour cream, and fresh cilantro, serving the salsa on the side to prevent the chips from getting soggy.
How to fry buffalo wings?

Why we love this
Buffalo wings are the king of finger foods, offering a sensory experience that hits every note: salty, spicy, tangy, and crunchy. The initial bite through the shatteringly crisp skin releases a puff of steam and the succulent, tender meat within, followed quickly by the vinegar-forward heat of the signature sauce. The bright orange glaze clings to the ridges of the wing, glistening under the lights and begging for a dip into cool, chunky blue cheese dressing. They are vibrant, messy, and unapologetically bold, making them the energetic centerpiece of any lively gathering or game-day board.
Ingredients
- 2 lbs chicken wings (drums and flats separated)
- 1 tsp salt and 1/2 tsp baking powder (the secret for crispiness)
- 1/2 cup Buffalo hot sauce
- 4 tbsp unsalted butter, melted
- 1 tbsp honey (optional, for balance)
- Oil for frying (peanut or canola)
How to make it
- Pat the wings extremely dry with paper towels; toss them in a bowl with salt and baking powder, then let them sit uncovered in the fridge for at least an hour to dehydrate the skin.
- Heat your oil in a deep pot to 350°F (175°C); use a thermometer to maintain this temperature, as too cold will result in greasy wings and too hot will burn them.
- Fry the wings in small batches for about 10-12 minutes, turning occasionally, until they reach an internal temperature of 165°F and the skin is a deep golden brown.
- While the wings fry, whisk together the hot sauce, melted butter, and honey in a large bowl until the sauce is emulsified and thick.
- As soon as the wings come out of the oil, drain them briefly on a wire rack for 30 seconds, then toss them immediately in the sauce while they are still piping hot.
- The heat from the wings helps the sauce bond to the skin; serve them immediately while the exterior is at its maximum crunchiness.
How to roast juicy chicken?

Why we love this
A perfectly roasted chicken is the hallmark of a confident cook, filling the home with a savory, herbaceous aroma that feels timeless and comforting. The skin should be a uniform, translucent gold, crackling at the touch of a knife to reveal meat that is incredibly moist and infused with the flavors of lemon and garlic. There is something deeply satisfying about the ritual of carving a whole bird, seeing the clear juices run onto the board and smelling the steam rise from the tender breast meat. It is a wholesome, impressive addition to a food board that provides a lean, flavorful protein everyone loves.
Ingredients
- 1 whole chicken (4-5 lbs)
- 3 tbsp softened butter
- 1 lemon, halved
- 1 head of garlic, sliced in half
- 4 sprigs fresh thyme or rosemary
- Kosher salt and cracked black pepper
How to make it
- Remove the chicken from the fridge 45 minutes before cooking to bring it to room temperature; this ensures the meat cooks evenly from the skin to the bone.
- Pat the entire bird dry with paper towels, including inside the cavity; moisture is the enemy of crispy skin, so take your time with this step.
- Season the cavity generously with salt, then stuff it with the lemon halves, the halved garlic head, and the fresh herb sprigs for internal aromatics.
- Rub the softened butter all over the exterior of the skin, getting into every nook and cranny, then season the entire bird heavily with salt and pepper.
- Place the chicken on a rack in a roasting pan and cook at 425°F (220°C) for the first 15 minutes to blast the skin with heat, then lower to 375°F (190°C).
- Continue roasting for another 45-60 minutes until the internal temperature reaches 165°F in the thickest part of the thigh; let the bird rest for 15 minutes before carving to lock in the juices.
The Final Word on Your Viral Board
Creating a viral-worthy board isn’t about being a professional chef; it’s about the love of the gather. When you bring these dishes together on one table, you’re not just serving food—you’re serving a memory. From the crunch of the potatoes to the sweetness of the lava cake, each element tells a story of comfort and care. So grab your biggest platter, choose your favorite recipes from this list, and get ready to be the host everyone talks about. Happy hosting!