
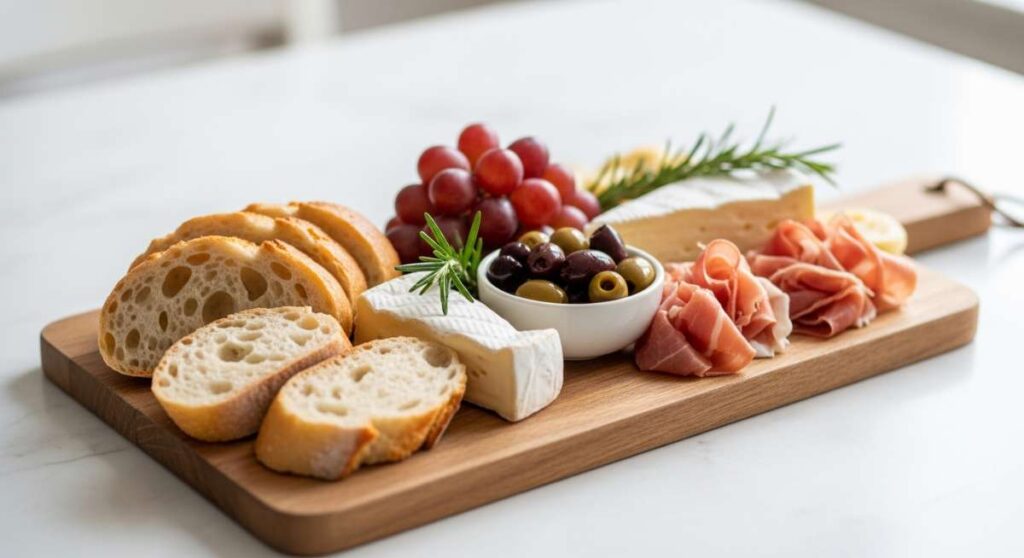
We’ve all been there—that frantic hour before guests arrive when the kitchen looks like a flour-dusted war zone and you’re still trying to time three different side dishes. For years, I thought hosting meant complex menus and individual plates, but I’ve recently discovered a secret that has completely transformed my dinner parties. It’s the ‘Simple Food Board,’ and trust me when I say it’s the viral lifestyle hack you didn’t know you needed.
The magic of a food board isn’t just in the aesthetics (though it looks incredible on a table); it’s in the shared experience. Instead of a stiff sit-down meal, your friends and family gather around a massive wooden board piled high with textures, colors, and comforting aromas. It creates an atmosphere that is inherently warm, casual, and deeply human. It’s about breaking bread—literally—and enjoying a little bit of everything without the pressure of a formal service.
In this guide, I’m sharing the ten core components that make my ultimate hosting board a success every single time. From melt-in-your-mouth slow beef to the crispest potatoes you’ve ever tasted, these recipes are designed to be served together, allowing your guests to graze, chat, and linger long after the food is gone. Let’s dive into how you can create this show-stopping centerpiece for your next gathering.
How to cook creamy steak?

Why we love this
There is something undeniably decadent about the way a perfectly seared steak yields to a rich, velvety cream sauce infused with the earthy notes of wild mushrooms and fresh thyme. As the steak rests, its juices mingle with the heavy cream to create a savory nectar that is both comforting and sophisticated. The aroma of sizzling butter and garlic will draw everyone to the kitchen, promising a meal that feels like a warm embrace on a chilly evening. It is the ultimate centerpiece for a board, offering a luxury that is meant to be shared and savored slowly.
Ingredients
- 2 lbs Ribeye or New York Strip steak
- 2 cups heavy cream
- 1 cup sliced cremini mushrooms
- 4 cloves minced garlic
- 3 tbsp unsalted butter
- 2 sprigs fresh thyme
- Kosher salt and cracked black pepper
How to make it
- Begin by removing your steaks from the refrigerator at least 30 minutes before cooking to ensure they reach room temperature for an even sear.
- Pat the meat completely dry with paper towels; moisture is the enemy of a good crust. Season aggressively with salt and pepper on all sides.
- Heat a heavy cast-iron skillet over high heat until it starts to wisps of smoke appear. Add a tablespoon of high-smoke-point oil.
- Place the steaks in the pan. For a medium-rare finish, sear for 3-4 minutes per side without moving them, allowing a deep mahogany crust to form.
- In the final 2 minutes of cooking, drop in the butter, garlic, and thyme. Tilt the pan and spoon the foaming, fragrant butter over the steaks repeatedly (this is called basting).
- Remove the steaks to a cutting board and let them rest for at least 10 minutes. This is crucial for juice retention.
- In the same skillet (don’t wash it!), add the mushrooms and sauté until browned. Pour in the heavy cream, scraping up the browned bits (fond) from the bottom of the pan.
- Simmer the cream over medium heat for 5-7 minutes until it thickens enough to coat the back of a spoon. Slice the steak against the grain and pour the sauce over the top just before serving on your board.
How to bake sweet rolls?

Why we love this
Nothing says ‘home’ quite like the scent of yeast and sugar wafting through the air as sweet rolls bake to a golden brown. These rolls are pillowy-soft, with a delicate crumb that practically melts on the tongue, especially when topped with a glistening, sticky glaze. The contrast between the warm, airy dough and the cool, sweet frosting creates a sensory experience that bridges the gap between dinner and dessert. They serve as the perfect vessel for soaking up savory sauces on the board or standing alone as a crowd-favorite treat.
Ingredients
- 4 cups all-purpose flour
- 1 packet active dry yeast
- 1 cup warm milk (110°F)
- 1/2 cup granulated sugar
- 1/3 cup melted butter
- 1 tsp salt
- 1/2 cup powdered sugar (for glaze)
- 2 tbsp heavy cream (for glaze)
How to make it
- In a large bowl, whisk together the warm milk, sugar, and yeast. Let it sit for about 5-10 minutes until it becomes frothy and activated.
- Add the melted butter and salt, then gradually stir in the flour one cup at a time until a soft dough forms.
- Turn the dough onto a floured surface and knead by hand for 8-10 minutes. You are looking for a smooth, elastic texture that bounces back when poked.
- Place the dough in a greased bowl, cover with a damp cloth, and let it rise in a warm, draft-free spot for 1 hour or until it has doubled in size.
- Punch the dough down and divide it into 12-15 equal-sized balls. Arrange them in a greased baking dish, touching slightly.
- Cover again and let them rise for a second time (about 30 minutes). This second rise is the secret to that ethereal, light texture.
- Preheat your oven to 350°F (175°C) and bake for 20-25 minutes until the tops are a beautiful light golden brown.
- Whisk the powdered sugar and cream together to make a thick glaze. Drizzle it over the rolls while they are still slightly warm so it seeps into the crevices.
How to roast garlic chicken?
Why we love this
The beauty of roasted garlic chicken lies in its simplicity and the incredible transformation of the garlic cloves into sweet, spreadable pearls of flavor. The skin of the chicken becomes incredibly crisp and crackly, while the meat remains succulent and infused with the bright notes of lemon and woody rosemary. It’s a rustic dish that feels elegant on a food board, providing a satisfying protein that pairs perfectly with almost any side. The aroma alone—a heady mix of roasting poultry and caramelized garlic—is enough to make any guest feel instantly welcome.
Ingredients
- 3 lbs chicken thighs (skin-on, bone-in)
- 2 whole heads of garlic, halved crosswise
- 1 large lemon, sliced into rounds
- 3 tbsp olive oil
- 4 sprigs fresh rosemary
- Salt and pepper to taste
How to make it
- Preheat your oven to 400°F (200°C). This high temperature is essential for rendering the fat and achieving that elusive crispy skin.
- Pat the chicken thighs dry with paper towels. Rub each piece thoroughly with olive oil and season generously with salt and pepper on both sides.
- Arrange the chicken in a large roasting pan or cast-iron skillet, skin-side up. Nestle the halved garlic heads (cut side down) and lemon slices between the chicken pieces.
- Tuck the rosemary sprigs into the gaps to infuse the oil and fat as it renders.
- Roast for 35-45 minutes. You are looking for an internal temperature of 165°F and skin that is deep golden brown and audible when tapped with a fork.
- Halfway through, use a spoon to baste the chicken with the juices collecting at the bottom of the pan to enhance the flavor and color.
- Let the chicken rest for 5 minutes before moving it to your board. Squeeze the softened garlic out of their skins and spread them directly onto the chicken or bread.
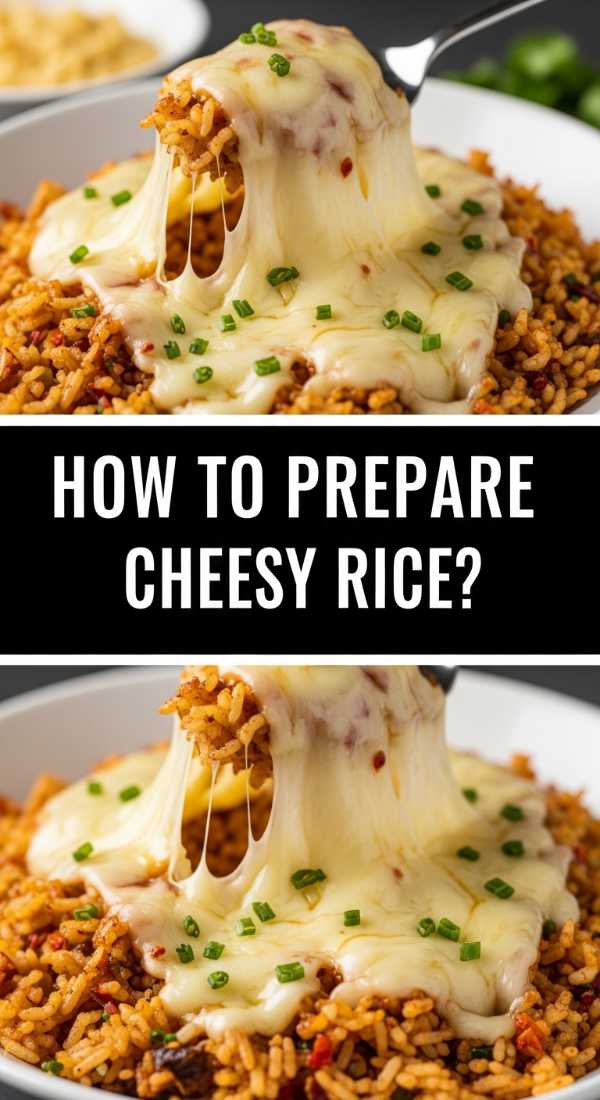
How to prepare cheesy rice?

Why we love this
Cheesy rice is the ultimate comfort food upgrade, turning a humble grain into a molten, savory masterpiece that everyone gravitates toward. The texture is creamy and rich, reminiscent of a risotto but with the sharp, familiar tang of melted cheddar and the salty bite of parmesan. It acts as a perfect base on your food board, soaking up the juices from meats while providing a satisfying, toothsome bite. The golden hue and the way the cheese stretches with every spoonful make it a visual and culinary delight that appeals to all ages.
Ingredients
- 1.5 cups long-grain white rice or Arborio rice
- 3 cups chicken or vegetable broth
- 2 cups shredded sharp cheddar cheese
- 1/2 cup grated parmesan
- 2 tbsp butter
- 1/2 small onion, finely diced
- Salt and smoked paprika to taste
How to make it
- In a medium saucepan, melt the butter over medium heat and sauté the finely diced onions until they are translucent and fragrant (about 4 minutes).
- Add the dry rice to the pan and toast it for 2 minutes, stirring constantly. This adds a nutty depth of flavor and prevents the rice from becoming mushy.
- Pour in the broth and bring the mixture to a boil. Once boiling, reduce the heat to low, cover the pot tightly, and simmer for 15-18 minutes until the liquid is fully absorbed.
- Remove from heat and let the rice sit, covered, for 5 minutes to steam. This ensures the fluffiest texture.
- Fluff the rice with a fork and immediately stir in the shredded cheddar and parmesan while the rice is still piping hot.
- Keep stirring until the cheese is completely melted and the rice is coated in a uniform, creamy sauce.
- Season with a pinch of salt and a dusting of smoked paprika for color and a hint of heat before scooping it onto the board.
How to grill spicy shrimp?
Why we love this
Spicy grilled shrimp add a vibrant, zesty pop of color and flavor to your board that cuts through the richer, heavier dishes. The high heat of the grill imparts a smoky char to the tender seafood, while the chili-lime marinade creates a tantalizing tingle on the palate. Each bite is a burst of freshness—the snap of the shrimp followed by the lingering warmth of the spices and the brightness of fresh lime juice. They are light, fun to eat, and serve as a fantastic finger food for guests who love a little bit of heat.
Ingredients
- 1 lb jumbo shrimp (peeled and deveined)
- 2 tbsp olive oil
- 1 tsp smoked paprika
- 1/2 tsp cayenne pepper
- 2 cloves garlic, minced
- Zest and juice of 1 lime
- Fresh cilantro for garnish
How to make it
- In a bowl, whisk together the olive oil, paprika, cayenne, minced garlic, lime zest, and juice. This creates a punchy marinade that will caramelize on the grill.
- Add the shrimp to the bowl and toss to coat thoroughly. Let them marinate for at least 15-20 minutes, but no longer than 30 (the lime juice can ‘cook’ the shrimp if left too long).
- Preheat your grill or grill pan to medium-high heat. Ensure the grates are clean and lightly oiled to prevent sticking.
- Thread the shrimp onto skewers for easier handling, or place them directly on the grates.
- Grill for 2-3 minutes per side. You will know they are done when they turn opaque and form a distinct ‘C’ shape with beautiful char marks.
- Do not overcook, as shrimp can become rubbery quickly. Remove them as soon as they are firm and pink.
- Garnish with a handful of chopped cilantro and an extra squeeze of lime juice before nestling them onto the board next to the creamy elements.
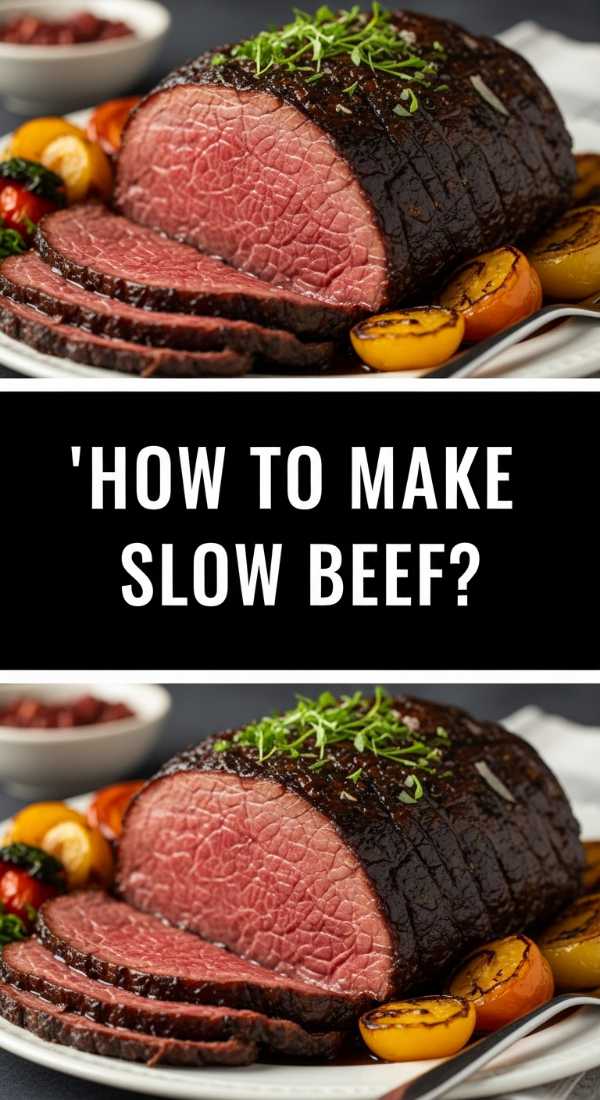
How to make slow beef?

Why we love this
Slow-cooked beef is the epitome of patience rewarded, resulting in meat so tender it falls apart at the mere suggestion of a fork. The deep, complex flavors of red wine and beef stock concentrate over hours, creating a rich gravy that is almost chocolatey in its intensity. It brings a soulful, rustic quality to the food board, offering a hearty contrast to the lighter sides. The aroma of braising beef is a hallmark of a cozy home, signaling to your guests that a truly special, time-honored meal is waiting for them.
Ingredients
- 3 lbs beef chuck roast, cut into large chunks
- 1 cup dry red wine (like Cabernet)
- 2 cups beef bone broth
- 2 carrots, roughly chopped
- 1 yellow onion, quartered
- 3 tbsp tomato paste
- 2 bay leaves
- Flour for dredging
How to make it
- Season the beef chunks generously with salt and pepper, then dredge them lightly in flour, shaking off the excess.
- In a large Dutch oven, heat oil over medium-high heat and sear the beef in batches. It is vital to get a dark brown crust on all sides; this is where the flavor lives.
- Remove the beef and add the onion and carrots. Sauté for 5 minutes, then stir in the tomato paste, cooking it for 2 minutes until it turns a brick-red color.
- Deglaze the pan with the red wine, scraping the bottom to release the savory bits. Let the wine reduce by half.
- Return the beef to the pot and pour in the beef broth until the meat is mostly submerged. Add the bay leaves.
- Cover and place in a 300°F (150°C) oven, or transfer to a slow cooker on low. Cook for 6-8 hours (oven) or 8-10 hours (slow cooker).
- The beef is ready when it is completely fork-tender. Skim any excess fat from the surface and shred the meat slightly into large, succulent chunks before serving.
How to bake crispy potatoes?

Why we love this
There is a specific, joyful sound to the crunch of a perfectly roasted potato that just makes a meal feel complete. These aren’t just any potatoes; they are fluffy and cloud-like on the inside, encased in a glass-like shell of golden-brown crispness. Seasoned with flaky sea salt and aromatic rosemary, they provide a satisfying textural contrast to the softer elements on the board. They are the ultimate crowd-pleaser, the dish that guests will keep reaching for until the very last one is gone.
Ingredients
- 2 lbs Yukon Gold or Russet potatoes
- 1/4 cup extra virgin olive oil or duck fat
- 1 tbsp chopped fresh rosemary
- 2 tsp flaky sea salt
- 1/2 tsp baking soda
How to make it
- Peel and cut the potatoes into 2-inch chunks. Place them in a pot of cold salted water and add the baking soda.
- The baking soda breaks down the potato’s pectin, creating a starchy slurry on the surface that eventually becomes the extra-crispy crust.
- Boil the potatoes for about 10 minutes until the outsides are soft but the centers are still firm. Drain them thoroughly.
- Let the potatoes sit in the colander for 2 minutes to steam-dry, then shake them vigorously. You want the edges to look ‘fuzzy’ and battered.
- Preheat your oven to 425°F (220°C). Pour the oil or fat onto a large rimmed baking sheet and place it in the oven for 5 minutes to get hot.
- Carefully spread the potatoes onto the hot tray in a single layer. Roast for 45-50 minutes, turning them with a spatula every 15 minutes.
- Once they are deep gold and incredibly crunchy, toss them with fresh rosemary and sea salt while they are still hot so the herbs release their oils.
How to whip creamy pasta?

Why we love this
Whipping up a creamy pasta is like performing a culinary magic trick—transforming simple ingredients like eggs and cheese into a luxurious, silk-like sauce that clings to every strand of noodle. The texture is decadent and smooth, with a savory depth that feels both light and incredibly satisfying. Served on a board, it acts as a communal comfort food that encourages people to twirl and share. The subtle glisten of the sauce and the aroma of aged parmesan make it an irresistible addition to any hosting spread.
Ingredients
- 1 lb Fettuccine or Pappardelle pasta
- 3 large egg yolks
- 1 cup heavy cream
- 1 cup freshly grated Parmesan cheese
- 2 cloves garlic, finely grated
- 1/2 cup reserved pasta water
- Black pepper and fresh parsley
How to make it
- Bring a large pot of water to a boil and salt it heavily—it should taste like the sea. Cook the pasta until just shy of al dente (usually 1-2 minutes less than the package instructions).
- While the pasta cooks, whisk together the egg yolks, heavy cream, grated parmesan, and garlic in a small bowl until smooth.
- Crucial Step: Before draining the pasta, reserve at least 1 cup of the starchy pasta water. This is the ‘liquid gold’ that emulsifies the sauce.
- Drain the pasta and return it to the warm pot (which should be off the heat to avoid scrambling the eggs).
- Slowly pour the cream mixture over the pasta, tossing constantly with tongs. Add the reserved pasta water a tablespoon at a time.
- The residual heat from the pasta will cook the egg yolks gently, creating a thick, glossy sauce that coats the noodles perfectly.
- Keep tossing until the sauce reaches your desired consistency. Season with plenty of cracked black pepper and a handful of chopped parsley.
How to cook glazed salmon?

Why we love this
Glazed salmon brings a beautiful, sophisticated flair to the food board, offering a sweet and savory profile that balances the heavier meats. The honey-soy glaze caramelizes under the heat, creating a stunning mahogany sheen and a slightly tacky, delicious crust. Inside, the fish remains buttery and flaky, pulling apart effortlessly. It’s a dish that looks like it took hours of preparation but is surprisingly quick to master, providing a bright, healthy, and visually striking centerpiece that guests will adore.
Ingredients
- 4 salmon fillets (6 oz each)
- 1/4 cup honey
- 2 tbsp soy sauce
- 1 tbsp fresh ginger, grated
- 1 tsp sriracha (optional for heat)
- 1 tbsp olive oil
- Sesame seeds and sliced green onions for garnish
How to make it
- Whisk together the honey, soy sauce, grated ginger, and sriracha in a small bowl. This is your glaze; it should be thick and fragrant.
- Pat the salmon fillets dry with a paper towel. Season the flesh side lightly with salt (keep in mind the soy sauce is already salty).
- Heat the olive oil in a non-stick or well-seasoned cast-iron skillet over medium-high heat.
- Place the salmon in the pan, skin-side up. Sear for 3-4 minutes until a golden crust forms on the flesh.
- Flip the fillets carefully. Pour the glaze into the pan, allowing it to bubble and thicken around the fish.
- Use a spoon to continuously baste the salmon with the glaze for the final 2-3 minutes of cooking. The glaze should reduce into a sticky syrup.
- Once the salmon is opaque and flakes easily with a fork, remove it from the heat. Garnish with sesame seeds and green onions for a professional, viral-ready look.
How to saute green beans?
[IMAGE_10]
Why we love this
Sautéed green beans are the vibrant, crunchy backbone of a great food board, providing a much-needed hit of green and a satisfying snap. When tossed in browned butter and topped with toasted almonds, they transcend being a ‘side dish’ and become a highlight in their own right. The flash of the meal. The brightness of lemon zest cuts through the richness of the butter, making each bite refreshing. They add a beautiful structural element to the board, filling in the gaps with their long, elegant shapes and bright emerald color.
Ingredients
- 1 lb fresh green beans, trimmed
- 2 tbsp unsalted butter
- 1/4 cup sliced almonds
- Zest of 1/2 lemon
- 1 clove garlic, sliced thin
- Salt and pepper
How to make it
- Blanch the green beans first: Drop them into a pot of boiling salted water for exactly 3 minutes.
- Immediately transfer them to an ice bath (a bowl of cold water and ice). This stops the cooking process and ‘shocks’ them, locking in that brilliant green color.
- Dry the beans thoroughly with a clean kitchen towel. Any excess water will cause the butter to splatter and prevent them from sautéing.
- In a large skillet, melt the butter over medium heat until it begins to foam and turn a light nut-brown color.
- Add the sliced almonds and garlic, stirring for about 1 minute until the almonds are toasted and the garlic is fragrant.
- Increase the heat to medium-high and add the green beans. Sauté for 3-4 minutes, tossing them in the almond butter until they are heated through and slightly blistered.
- Remove from heat and toss with fresh lemon zest, salt, and pepper. Serve them in a neat pile on the board to add height and color.
Bringing It All Together
Hosting doesn’t have to be a high-stress performance; it should be a celebration of the people you love. By centering your evening around a Simple Food Board, you remove the barriers of formal dining and replace them with a tactile, engaging experience. Each of these ten recipes is designed to complement the others, creating a landscape of flavors that ensures there is something for everyone. So, grab your largest wooden board, pour some wine, and let the food do the talking. Your guests will leave full, happy, and asking when the next ‘board night’ is!