

We have all been there: that 5 PM slump where the thought of standing over a hot stove for an hour feels less like cooking and more like a Herculean labor. Recently, my social feeds have been flooded with the ultimate solution—the ‘Lazy Girl Food Board.’ It’s that perfect, effortless intersection of a charcuterie spread and a curated meal that feels incredibly indulgent without the fuss. It’s about celebrating the seasons, focusing on assembly over intense labor, and making your Tuesday night dinner look like a Pinterest-worthy event.
This aesthetic isn’t just about being ‘lazy’; it’s about being intentional with our time and energy. It’s the art of the graze, the beauty of fresh produce, and the joy of sharing a communal board with friends under the golden glow of a setting sun. Whether you are hosting a last-minute patio hang or just want to treat yourself to a beautiful solo dinner, these simple food board inspirations are about to become your new personality trait.
How to make summer pasta?

Why we love this
There is something fundamentally magical about the scent of fresh basil and sun-ripened tomatoes hitting a warm pan. This summer pasta is the definition of low-effort, high-reward, offering a vibrant explosion of color that mirrors a July sunset. Every bite is a harmonious blend of silky olive oil, the slight acidic snap of cherry tomatoes, and the creamy richness of melted parmesan. It feels light enough for a humid evening yet satisfying enough to feel like a true celebration of the garden’s bounty.
Ingredients
- 1 lb Spaghetti or Linguine
- 2 pints Cherry tomatoes, halved
- 4 cloves Garlic, thinly sliced
- 1/2 cup Extra virgin olive oil
- 1 bunch Fresh basil leaves
- 1/2 tsp Red pepper flakes
- Freshly grated Parmesan cheese
- Sea salt and cracked black pepper
How to make it
- Fill a large pot with heavily salted water—it should taste like the sea—and bring it to a rolling boil over high heat. Cook your pasta until it is ‘al dente,’ usually 1-2 minutes less than the package instructions suggest, as it will finish cooking in the sauce.
- While the pasta boils, place a large skillet over medium-low heat. Add the olive oil and sliced garlic. Sauté gently for about 2-3 minutes until the garlic is fragrant and translucent, but be careful not to let it brown or turn bitter.
- Increase the heat to medium and toss in the halved cherry tomatoes and red pepper flakes. Cook for 5-7 minutes, stirring occasionally, until the tomatoes begin to burst and release their juices, creating a natural, chunky sauce.
- Before draining the pasta, reserve exactly one cup of the starchy pasta water. This is the secret to a glossy sauce. Drain the pasta and add it directly into the skillet with the tomatoes.
- Toss the pasta vigorously with the tomatoes and oil, adding the reserved pasta water a splash at a time. The starch will emulsify with the oil to create a silky coating. Tear the basil leaves by hand and stir them in at the very last second, then top with a mountain of Parmesan.
How to prepare spring brunch?

Why we love this
Spring brunch is all about the transition from cozy winter comfort to light, airy textures and pastel hues. Imagine a spread featuring tender asparagus, bright citrus, and soft-boiled eggs that look like little gems on the plate. It’s an evocative experience that smells like fresh-cut flowers and brewing espresso, providing a slow, soulful start to a sunny Sunday. The combination of savory greens and bright, zesty fruits creates a balanced palate that feels both refreshing and deeply nourishing.
Ingredients
- 1 bunch Thin asparagus spears
- 6 Large organic eggs
- 1 loaf Crusty sourdough bread
- 1 cup Smoked salmon
- Fresh dill and chives
- 1 cup Greek yogurt
- Assorted citrus (Blood oranges, grapefruits)
- Prosciutto slices
How to make it
- Start by soft-boiling your eggs. Bring a pot of water to a gentle simmer, lower the eggs in carefully, and cook for exactly 6 and a half minutes. Immediately transfer them to an ice bath for 5 minutes; this ensures a jammy yolk and makes them incredibly easy to peel.
- Prepare the asparagus by snapping off the woody ends. Heat a griddle or cast iron pan over medium-high heat with a drizzle of oil. Grill the spears for 3-4 minutes until they are bright green with slight char marks, seasoning with salt and lemon zest.
- Slice the sourdough into thick rounds and toast them until the edges are golden brown and crunchy, while the center remains slightly chewy.
- Assemble the board by spreading a thin layer of Greek yogurt on a platter, topping it with the grilled asparagus and prosciutto ribbons.
- Arrange the smoked salmon in small rosettes, peel and halve the eggs to reveal the golden centers, and scatter the fresh herbs over everything. Finish with sliced citrus rounds to provide a bright, acidic pop to the spread.
How to decorate spring cookies?

Why we love this
Decorating cookies in the spring feels like a form of edible meditation, where the kitchen becomes an art studio filled with soft pinks, mint greens, and lavender tones. There is a tactile joy in feeling the smooth royal icing glide over a crisp shortbread base, creating delicate floral patterns that look almost too good to eat. The aroma of vanilla bean and sweet sugar fills the air, evoking memories of garden parties and new beginnings. It is a creative outlet that results in a stunning visual centerpiece for any dessert board.
Ingredients
- Batch of sugar cookies (flower and leaf shapes)
- 4 cups Powdered sugar
- 3 tbsp Meringue powder
- 1/2 cup Warm water
- Gel food coloring (pastel shades)
- Edible dried flowers
- Pearl sprinkles
- Piping bags and small round tips
How to make it
- Begin by making the royal icing. In a stand mixer, whisk the powdered sugar, meringue powder, and water on low speed for 7-10 minutes until stiff, glossy peaks form. The icing should look like thick marshmallow fluff.
- Divide the icing into separate bowls and add a tiny drop of gel coloring to each. For spring, aim for muted, earthy pastels. Add water drop by drop until you reach ’15-second consistency’—meaning a line drawn in the icing disappears in 15 seconds.
- Transfer the icing to piping bags. Start by outlining the edge of your cooled cookie, then immediately ‘flood’ the center with more icing. Use a toothpick or scribe tool to pop any tiny air bubbles and push the icing into the corners.
- While the icing is still wet (the ‘wet-on-wet’ technique), add dots of a contrasting color and drag a toothpick through them to create hearts or leaf shapes.
- For a modern look, let the icing dry for one hour, then use a tiny dab of corn syrup to adhere delicate edible dried pansies or lavender sprigs to the center. Let the cookies dry completely overnight before stacking.
How to cook summer soups?

Why we love this
Summer soups are a revelation, defying the idea that soup must be heavy or piping hot. These chilled or light broths are a cooling sanctuary during a heatwave, focusing on the hydrating essence of cucumbers, melons, or vine-ripened tomatoes. The texture is often silky and refreshing, with a clean finish that leaves you feeling energized rather than weighed down. Topped with crunchy croutons or a swirl of herb oil, they bring a sophisticated, spa-like elegance to your dinner table.
Ingredients
- 6 Large ripe tomatoes (for Gazpacho)
- 1 English cucumber
- 1 Red bell pepper
- 1 small Red onion
- 2 cloves Garlic
- 3 tbsp Sherry vinegar
- 1/2 cup Extra virgin olive oil
- Croutons and microgreens for garnish
How to make it
- Roughly chop the tomatoes, cucumber, bell pepper, and red onion. Do not worry about perfect cuts, as everything will be blended together.
- Place the vegetables and garlic into a high-powered blender. Add the sherry vinegar and a generous pinch of sea salt. Blend on high until the mixture is completely liquefied and smooth.
- While the blender is running on a low setting, slowly stream in the olive oil. This creates an emulsion, giving the soup a creamy, luxurious mouthfeel without any actual dairy.
- Pour the soup through a fine-mesh sieve into a large glass pitcher. Use the back of a spoon to press all the liquid through, discarding the skins and seeds left behind for a perfectly refined texture.
- Chill the soup in the refrigerator for at least 4 hours—this is crucial for the flavors to meld and for the soup to be truly refreshing. Serve in chilled bowls topped with a drizzle of oil and crunchy toppings.
How to master grilling recipes?

Why we love this
Mastering the grill is about tapping into the primal, smoky essence of summer cooking where char and caramelization do all the heavy lifting. There is an intoxicating aroma of woodsmoke and searing protein that signals the start of the season like nothing else. The outdoor setting, the hiss of the grates, and the beautiful grill marks create a sensory experience that is both rugged and refined. It’s the ultimate way to cook for a crowd while keeping the heat—and the mess—entirely outside.
Ingredients
- Assorted proteins (Chicken thighs, Shrimp skewers, Corn)
- 1/2 cup Olive oil
- 3 tbsp Balsamic vinegar
- 4 cloves Minced garlic
- 1 tbsp Smoked paprika
- 1 tsp Dried oregano
- Lemon wedges
- Fresh parsley
How to make it
- Prepare your marinade by whisking together olive oil, balsamic, garlic, paprika, and oregano. Place your proteins in a resealable bag with the marinade for at least 30 minutes, or up to 4 hours for chicken, to ensure deep flavor penetration.
- Clean your grill grates thoroughly with a wire brush. Preheat the grill to medium-high heat (about 400°F). To test the heat, hold your hand 5 inches above the grate; you should only be able to hold it there for 3-4 seconds.
- Oil the grates using a folded paper towel dipped in oil held by tongs. This prevents sticking and helps create those professional-looking sear marks.
- Place your proteins on the grill. For chicken, cook for 6-8 minutes per side. For shrimp, only 2-3 minutes per side. The key visual cue: the food will ‘release’ from the grate easily once a proper crust has formed. If it sticks, give it another minute.
- Use a meat thermometer to ensure chicken reaches an internal temperature of 165°F. Once removed, let the meat rest on a platter covered with foil for 5-10 minutes. This allows the juices to redistribute, ensuring every bite is moist and tender.
How to bake spring cupcakes?

Why we love this
Spring cupcakes are like little edible bouquets, light as air and bursting with floral or citrus notes. The texture of a perfect spring cupcake should be fine-crumbed and moist, acting as the perfect vessel for a cloud-like swirl of buttercream. We love them because they allow for individual portions of joy, decorated with soft hues that mimic the first blossoms of the season. They are the quintessential treat for garden parties, showers, or simply making a weekday feel a little more poetic.
Ingredients
- 1 1/2 cups Cake flour
- 1 cup Granulated sugar
- 1 1/2 tsp Baking powder
- 1/2 cup Unsalted butter, softened
- 1/2 cup Whole milk
- 2 Large eggs
- 1 tsp Lemon extract
- 1 tbsp Dried culinary lavender (optional)
How to make it
- Preheat your oven to 350°F (175°C) and line a cupcake tin with high-quality paper liners. Sift your cake flour and baking powder together; sifting is the secret to that airy, professional spring texture.
- In a large bowl, cream the softened butter and sugar together using an electric mixer for at least 3-5 minutes. The mixture should become pale and noticeably fluffy—this incorporates air into the batter.
- Add the eggs one at a time, beating well after each addition. Mix in the lemon extract.
- Alternating between the two, add the dry ingredients and the milk in three batches. Mix only until ‘just’ combined; over-mixing at this stage will lead to a tough, bready cupcake.
- Fill the liners only 2/3 full to allow for an even rise. Bake for 18-22 minutes. You’ll know they are done when a toothpick inserted into the center comes out clean and the tops spring back when lightly touched. Let them cool completely before frosting to prevent the butter from melting.
How to bake spring cake?
Why we love this
A spring cake is a majestic centerpiece that embodies the brightness of the season, often featuring layers of sponge infused with vanilla and filled with fresh macerated berries. It’s the kind of dessert that looks breathtaking on a pedestal, with its rustic, ‘naked’ frosting style and a crowning glory of fresh fruit. The smell of baking cake combined with the scent of fresh strawberries is purely nostalgic, reminding us of sunny afternoons and kitchen tables covered in flour and laughter.
Ingredients
- 2 1/4 cups All-purpose flour
- 1 1/2 cups Sugar
- 3 1/2 tsp Baking powder
- 1 cup Milk
- 1/2 cup Butter
- 1 tsp Vanilla bean paste
- 3 Eggs
- 2 cups Fresh strawberries, sliced
How to make it
- Preheat oven to 350°F. Grease and flour two 8-inch round cake pans, lining the bottoms with parchment paper for a flawless release.
- Combine the flour, sugar, and baking powder in a large bowl. Add the butter, milk, and vanilla. Beat on low speed for 30 seconds, then increase to medium for 2 minutes. The batter should be smooth and thick.
- Add the eggs and beat for another 2 minutes. Divide the batter equally between the two prepared pans. To ensure level layers, drop the pans onto the counter from a height of 2 inches to release large air bubbles.
- Bake for 30-35 minutes. Visual cue: the edges should just be starting to pull away from the sides of the pan. Cool in the pans for 10 minutes, then invert onto wire racks.
- Once cool, place one layer on a stand. Spread a generous layer of whipped cream and a thick mound of sliced strawberries. Place the second layer on top. Apply a very thin layer of frosting to the outside (a crumb coat) to achieve that trendy spring ‘naked cake’ look, then top with even more whole berries.
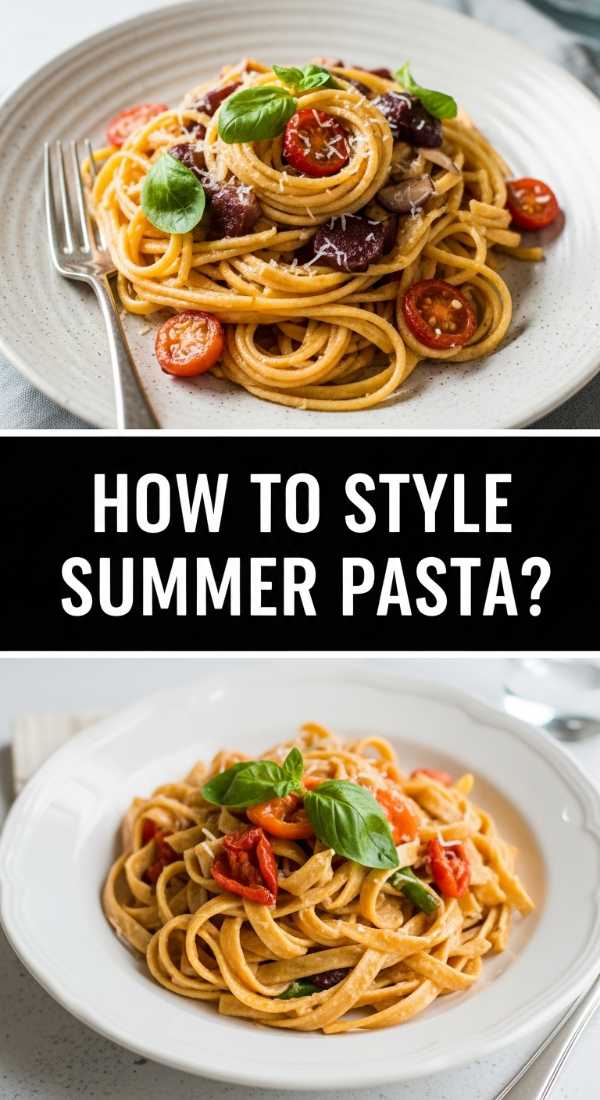
How to style summer pasta?

Why we love this
Styling summer pasta is an art form that transforms a simple meal into a visual feast, making it the star of your social media feed. It’s about more than just food; it’s about creating a vibe that feels like an Italian villa dinner under the stars. By focusing on textures—the glistening oil, the vibrant green of the herbs, and the rustic crumble of cheese—you elevate the dining experience into something sensory and luxurious. A well-styled bowl of pasta invites people to linger, talk, and enjoy the moment.
Ingredients
- Prepared Summer Pasta
- Extra Fresh Basil (small leaves)
- High-quality finishing Olive Oil
- Block of Pecorino or Parmesan
- Lemon zest
- Edible gold flakes (optional)
- Hand-thrown ceramic bowls
How to make it
- Start with the base. Instead of dumping the pasta into a bowl, use a large kitchen fork or tongs to ‘twirl’ the pasta into a high, tight nest in the center of the dish. This creates height and looks much more professional.
- Spoon the chunky tomato bits and garlic from the pan directly onto the top of the nest, allowing some of the sauce to naturally cascade down the sides.
- Use a microplane to grate a very fine, snow-like layer of cheese over the entire dish. This fine texture catches the light differently than thick shreds and looks more elegant.
- Place 3-5 very small, whole basil leaves (the ‘heart’ of the plant) near the top. Adding them whole rather than chopped prevents them from oxidizing and turning brown.
- Finish with a ‘glossy’ touch: a final drizzle of bright green finishing oil and a light dusting of lemon zest. Serve on a linen tablecloth with a glass of chilled white wine to complete the aesthetic.
How to grill summer steak?

Why we love this
Nothing says summer indulgence like a perfectly grilled steak, featuring a salty, caramelized crust and a tender, melt-in-your-mouth interior. It’s the ultimate center-piece for a ‘Lazy Girl’ board when sliced thin and served with chimichurri. We love the contrast between the hot, savory meat and the cool, zesty sauces that usually accompany it. It’s a dish that commands attention, smelling of charred oak and garlic butter, making it the perfect focal point for a sophisticated outdoor dinner party.
Ingredients
- 2 Ribeye or New York Strip steaks (1.5 inches thick)
- 2 tbsp Kosher salt
- 1 tbsp Cracked black pepper
- 3 tbsp Butter
- 3 cloves Garlic, smashed
- 2 sprigs Fresh rosemary
- Flaky sea salt for finishing
How to make it
- Remove the steaks from the refrigerator at least 45 minutes before cooking. Bringing them to room temperature is the most critical step for an even cook. Pat them completely dry with paper towels; moisture is the enemy of a good sear.
- Season aggressively with kosher salt and pepper. Because the steaks are thick, you need more seasoning than you think. Preheat your grill to high heat (450°F+).
- Place steaks on the hottest part of the grill. For a medium-rare finish, grill for 4-5 minutes per side. Do not move them once they touch the grates; this allows the Maillard reaction to create that beautiful crust.
- In the final 2 minutes of cooking, place a small cast iron pan on the grill grate. Melt the butter with the garlic and rosemary. Using a heat-proof glove, briefly dip the steaks into this herb butter or brush it on generously.
- Remove the steaks when the internal temp reaches 130°F (for medium-rare). Transfer to a cutting board and let them rest for a full 10 minutes. This is non-negotiable! Slice against the grain into 1/2 inch strips to serve on your board.
How to make brunch toast?
[IMAGE_10]
Why we love this
Brunch toast is the quintessential ‘Lazy Girl’ food—it looks like a million bucks but takes only minutes to assemble. Whether it’s loaded with smashed avocado, whipped ricotta, or heirloom tomatoes, it’s a canvas for seasonal flavors and beautiful colors. We love the satisfying ‘crunch’ of high-quality sourdough followed by the creamy, complex toppings. It’s a versatile dish that transitions perfectly from a quiet morning breakfast to a sophisticated addition to a large brunch board.
Ingredients
- 4 thick slices Sourdough bread
- 1 cup Whole milk ricotta
- 1 tbsp Honey
- 1 cup Fresh blackberries or figs
- Fresh mint leaves
- Toasted pistachios, crushed
- Lemon juice
How to make it
- Toast your sourdough slices in a pan with a little butter rather than a toaster. This creates a more even, golden-brown ‘fry’ on the bread that can support heavy toppings without getting soggy.
- In a small bowl, whip the ricotta with a squeeze of lemon juice and a pinch of salt until it’s light and airy. This changes the texture from grainy to velvet-smooth.
- Spread a very thick layer of the whipped ricotta onto the warm toast, creating ‘swooshes’ with the back of your spoon for visual interest.
- Top with halved blackberries or sliced figs, nesting them into the cheese. Scatter the crushed pistachios over the top for a necessary textural contrast.
- Finish with a generous drizzle of honey and a few torn mint leaves. The combination of salty bread, creamy cheese, tart fruit, and sweet honey is a perfect four-part harmony of flavor.
The Final Word on Food Boards
The beauty of the viral food board movement is that it removes the pressure of formal plating while keeping the glamour of a well-made meal. It’s about the textures, the colors, and the ease of the ‘lazy girl’ lifestyle—where we spend less time at the stove and more time enjoying the people we love. So, grab your largest wooden platter, pick a few of these seasonal favorites, and start building your own masterpiece. Your feed (and your appetite) will thank you.