

Why Everyone is Obsessed with This Simple Viral Food Board
There is something inherently magical about a shared meal that transcends the simple act of eating. I remember the first time I set out a massive, overflowing board on my reclaimed wood dining table; the way my friends’ eyes lit up as they reached for different textures and colors was better than any gift I could have given. In our fast-paced digital world, these boards have become more than just a trend—they are an invitation to slow down, linger over a glass of wine, and truly connect with the people sitting across from us.
The beauty of the viral food board is its lack of rules. It’s a canvas for your cravings, blending high-end cheeses with humble comfort foods and seasonal produce. Whether you are hosting a boisterous summer backyard bash or a quiet spring evening in, these recipes are designed to be the stars of your next gathering. Let’s dive into the components that make this board the most talked-about centerpiece of the season.
How to make a healthy spring dinner?

Why we love this
This spring dinner brings the vibrant essence of the garden directly to your plate with a freshness that feels like a warm breeze. Imagine the delicate, flaky texture of wild-caught salmon paired with the crisp, earthy snap of young asparagus, all brightened by a zesty lemon-dill emulsion. The aroma of roasted garlic and fresh herbs wafting from the oven fills the kitchen with a sense of renewal, making every bite feel light yet deeply nourishing.
Ingredients
- 2 large salmon fillets (6 oz each)
- 1 bunch fresh thin asparagus
- 2 tablespoons extra virgin olive oil
- 1 organic lemon, thinly sliced
- 2 cloves garlic, minced
- Fresh dill and parsley, finely chopped
- Sea salt and cracked black pepper to taste
How to make it
- Preheat your oven to 400°F (200°C). Prepare a large rimmed baking sheet by lining it with parchment paper to ensure easy cleanup and to prevent the delicate fish from sticking.
- Trim the woody ends off the asparagus by snapping them where they naturally break. Arrange the asparagus on one side of the tray and place the salmon fillets on the other side, skin-side down.
- In a small bowl, whisk together the olive oil, minced garlic, and half of the fresh herbs. Drizzle this mixture generously over both the salmon and the asparagus, using a pastry brush to ensure even coverage.
- Top the salmon with the lemon slices. These will caramelize in the oven, releasing sweet, tart juices that infuse the fish. Sprinkle everything with a liberal amount of sea salt and pepper.
- Slide the tray into the center rack of the oven. Roast for 12 to 15 minutes. You will know the salmon is perfectly done when it reaches an internal temperature of 145°F and the flesh flakes easily with a fork, while the asparagus should be tender but still retain a vibrant green hue and a slight crunch.
How to make creamy rotel dip?

Why we love this
This is the ultimate crowd-pleaser that bridges the gap between sophisticated snacking and pure, unadulterated comfort. The texture is impossibly velvety, clinging to every curve of a salty tortilla chip, while the diced tomatoes and green chilies provide a bright, acidic pop that cuts through the richness of the cheese. It is the kind of warm, gooey dip that disappears within minutes of being set on the table, leaving everyone asking for the recipe.
Ingredients
- 16 oz high-quality melting cheese (like Velveeta or a blend of sharp cheddar and Monterey Jack)
- 1 can (10 oz) Ro-Tel Diced Tomatoes and Green Chilies
- 1/2 lb ground breakfast sausage or spicy chorizo
- 1/4 cup whole milk (optional, for thinning)
- Fresh cilantro for garnish
How to make it
- Begin by browning your choice of sausage in a skillet over medium-high heat. Use a wooden spoon to crumble the meat into small, uniform pieces. Cook until it is deeply browned and slightly crispy, then drain the excess grease thoroughly.
- Cut your melting cheese into 1-inch cubes. This ensures that the cheese melts evenly and prevents the bottom from burning while the top remains solid.
- In a slow cooker on low heat or a heavy-bottomed saucepan over low flame, combine the cheese cubes and the undrained can of Ro-Tel. The juices from the tomatoes are essential for the final consistency.
- Stir constantly if using a saucepan to prevent scorching. Once the cheese is 75% melted, fold in the cooked sausage. Continue to stir until the mixture is smooth and glossy.
- If the dip feels too thick, whisk in a tablespoon of milk at a time until it reaches your desired silky consistency. Serve immediately in a heated bowl to keep it fluid, garnished with fresh cilantro for a pop of color.
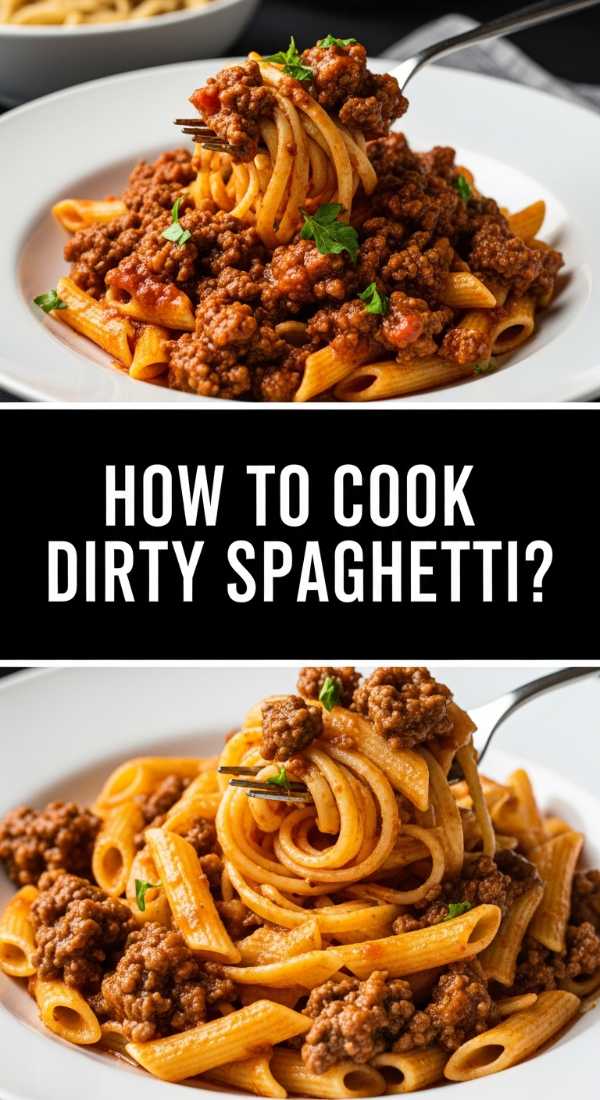
How to cook dirty spaghetti?
Why we love this
Dirty spaghetti is a soulful, flavor-packed twist on a classic that brings a deep, umami-rich complexity to your pasta night. The ‘dirty’ element comes from the beautifully browned bits of seasoned meat and sautéed aromatics that coat every strand of pasta in a savory, slightly spicy embrace. It’s a rustic, comforting dish that smells of toasted garlic and caramelized onions, offering a satisfying mouthfeel that is much more robust than your standard marinara.
Ingredients
- 1 lb spaghetti noodles
- 1 lb ground beef or pork
- 1 green bell pepper, finely diced
- 1 medium yellow onion, minced
- 2 stalks celery, finely chopped
- 3 cloves garlic, pressed
- 1 tablespoon Cajun seasoning
- 1/2 cup beef broth
- Fresh parsley and parmesan for topping
How to make it
- Bring a large pot of heavily salted water to a rolling boil. Cook the spaghetti until it is just ‘al dente’—usually about 1 minute less than the package directions. Reserve 1/2 cup of the starchy pasta water before draining.
- In a large deep skillet, brown the ground meat over medium-high heat. Allow the meat to sit undisturbed for a few minutes at first to develop a dark, flavorful crust (the ‘fond’) on the bottom of the pan.
- Add the diced peppers, onions, and celery to the meat. Sauté for 5-7 minutes until the vegetables have softened and the onions are translucent. Stir in the garlic and Cajun seasoning, cooking for another minute until the spices are fragrant.
- Deglaze the pan with the beef broth, scraping up all those flavorful brown bits from the bottom. Lower the heat to a simmer and let the liquid reduce by half.
- Toss the cooked spaghetti into the skillet. Add the reserved pasta water and toss vigorously with tongs. The starch in the water will help the ‘dirty’ sauce emulsify and cling perfectly to the noodles. Finish with a shower of parsley and parmesan.
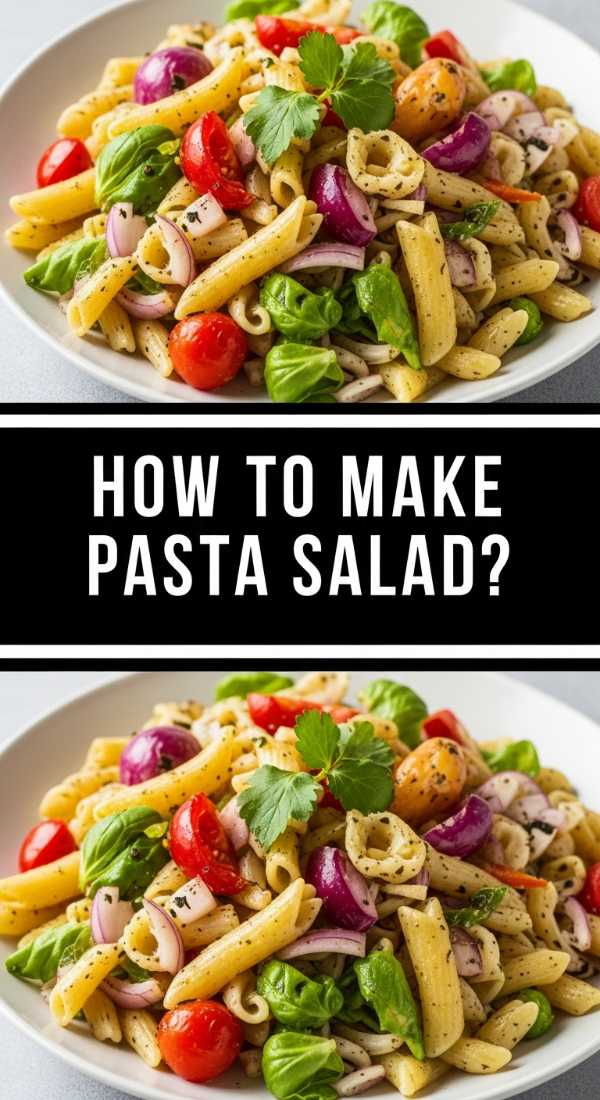
How to make summer pasta salad?
Why we love this
Nothing screams summer like a bowl of pasta salad glistening with a tangy vinaigrette and loaded with the season’s most colorful produce. This dish is a celebration of textures: the chewy bite of rotini, the snap of fresh bell peppers, and the creamy richness of fresh mozzarella pearls. It’s refreshing, zesty, and actually tastes better as it sits, making it the perfect make-ahead addition to any outdoor food board.
Ingredients
- 1 lb rotini or fusilli pasta
- 1 cup cherry tomatoes, halved
- 1 English cucumber, diced
- 1/2 red onion, finely sliced
- 1 cup fresh mozzarella pearls
- 1/2 cup black olives, sliced
- 1 cup Italian vinaigrette (homemade or store-bought)
- Fresh basil leaves, torn
How to make it
- Cook your pasta in boiling salted water. For pasta salad, it is crucial to cook the pasta all the way through (not al dente), as the starch firms up once chilled. Drain and rinse under cold water immediately to stop the cooking process and remove excess starch.
- In a massive mixing bowl, combine the cooled pasta with the cherry tomatoes, cucumbers, red onions, and olives. The variety of colors here is what makes the dish visually stunning on your board.
- Add the mozzarella pearls and pour over about 3/4 of the Italian dressing. Toss thoroughly with large spoons to ensure every nook and cranny of the rotini is coated.
- Cover the bowl and refrigerate for at least two hours. This chilling period allows the pasta to absorb the flavors of the vinaigrette and the juices from the vegetables.
- Just before serving, add the remaining dressing and the fresh basil. Tossing it one last time ensures the salad looks glossy and tastes vibrant.
How to bake a fresh strawberry pie?

Why we love this
A fresh strawberry pie is like a slice of pure sunshine, featuring a mountain of ruby-red berries encased in a buttery, flaky crust. The aroma is intoxicatingly sweet and floral, reminiscent of strawberry fields in late June. Each bite offers a contrast between the crisp, salty pastry and the cool, jammy sweetness of the fruit, often topped with a cloud of whipped cream that melts into the warm glaze.
Ingredients
- 1 pre-baked 9-inch pie crust
- 6 cups fresh strawberries, hulled
- 1 cup sugar
- 3 tablespoons cornstarch
- 1 cup water
- 1 small box (3 oz) strawberry gelatin
- Whipped cream for serving
How to make it
- Prepare your pie crust in advance by blind-baking it until it is golden brown and completely crisp. Let it cool entirely before adding the filling to prevent a soggy bottom.
- Take about 2 cups of the smaller or less attractive strawberries and mash them in a medium saucepan. Add the sugar, cornstarch, and water.
- Cook the mashed strawberry mixture over medium heat, stirring constantly. Bring it to a boil and let it simmer for about 2-3 minutes until the mixture becomes thick, translucent, and glossy.
- Remove the pan from the heat and stir in the strawberry gelatin powder until completely dissolved. This provides both the vibrant color and the structural integrity needed for the pie to slice cleanly. Let the glaze cool for 10 minutes.
- Arrange the remaining 4 cups of whole or halved fresh strawberries into the cooled pie shell. Pour the warm glaze evenly over the berries, ensuring they are all coated. Refrigerate for at least 4 hours until the filling is firm and set.
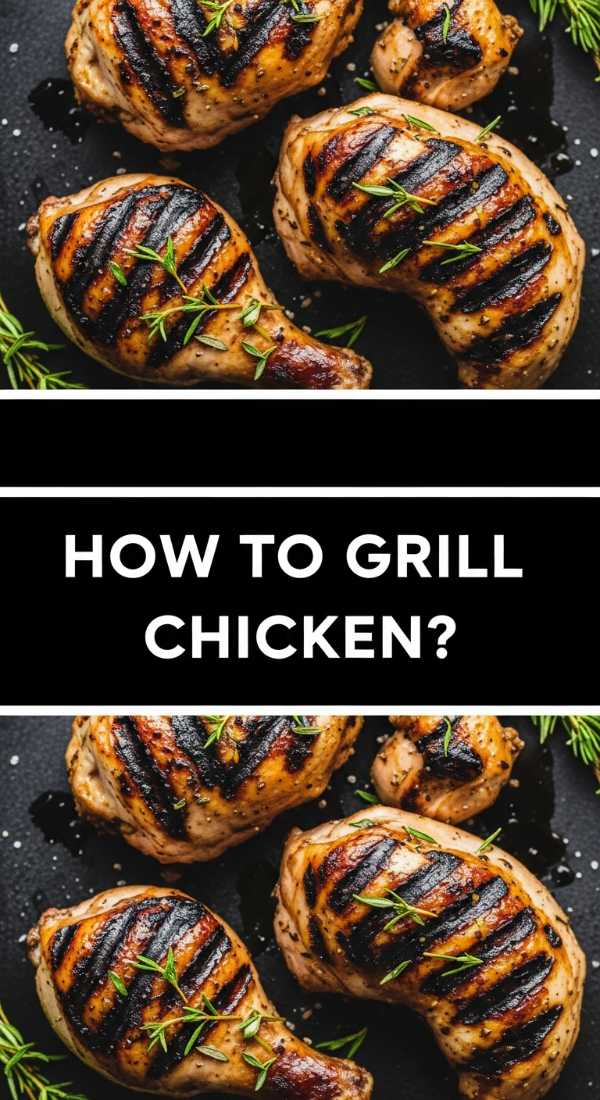
How to grill chicken marinade?
Why we love this
The perfect grilled chicken marinade is a masterclass in balancing acid, fat, and aromatics to transform a simple protein into a succulent masterpiece. This recipe ensures the meat remains incredibly juicy inside while developing a charred, caramelized exterior over the open flame. The scent of rosemary and lemon hitting the hot grates is enough to bring neighbors over the fence, promising a savory, herbaceous flavor that pairs with everything.
Ingredients
- 1/2 cup extra virgin olive oil
- 1/4 cup fresh lemon juice
- 3 tablespoons soy sauce
- 2 tablespoons honey or balsamic glaze
- 4 cloves garlic, smashed
- 1 tablespoon fresh rosemary, chopped
- 1 teaspoon red pepper flakes
How to make it
- In a gallon-sized zip-top bag or a shallow glass dish, whisk together the olive oil, lemon juice, soy sauce, and honey. The oil carries flavor, the lemon tenderizes, and the honey assists in the caramelization process.
- Add the smashed garlic, rosemary, and red pepper flakes. Smashing the garlic instead of mincing it allows the oils to release without the bits burning on the grill.
- Place your chicken breasts or thighs into the marinade. Seal the bag and massage the liquid into the meat. Place in the refrigerator for at least 30 minutes, but 4 to 6 hours is ideal for maximum flavor penetration.
- Preheat your grill to medium-high heat (about 400°F). Clean the grates thoroughly and lightly oil them to prevent sticking.
- Remove chicken from the marinade and shake off excess liquid. Grill for 6-8 minutes per side. Use a meat thermometer to ensure the thickest part of the chicken reaches 165°F. Let the meat rest for 5 minutes before slicing to allow the juices to redistribute.
How to make a virgin pina colada?

Why we love this
This virgin pina colada is a vacation in a glass, offering a frothy, tropical escape that is as creamy as it is refreshing. The smooth blend of rich coconut cream and sweet pineapple juice creates a velvety texture that coats the palate, while the icy slush keeps you cool on the hottest afternoons. It’s a sophisticated, non-alcoholic treat that feels celebratory, especially when garnished with a bright maraschino cherry and a wedge of fresh fruit.
Ingredients
- 1 cup pineapple juice
- 1/2 cup cream of coconut (like Coco Lopez)
- 2 cups ice cubes
- 1/4 cup heavy cream or coconut milk (for extra richness)
- Fresh pineapple wedges and cherries for garnish
How to make it
- Start with a high-powered blender. This is key to achieving that smooth, restaurant-quality slushy consistency without large chunks of ice.
- Pour the pineapple juice, cream of coconut, and heavy cream into the blender base. Using cream of coconut rather than coconut milk provides that signature thick, sweet profile.
- Add the ice cubes. For a thicker drink, use slightly more ice; for a more liquid consistency, use a little less.
- Pulse the blender a few times to break up the large ice, then blend on high speed for about 30 to 45 seconds. The mixture should look snowy white and completely uniform.
- Pour the mixture into chilled hurricane glasses. Immediately garnish with a pineapple wedge on the rim and a cherry on top. Serve with a straw and enjoy while frosty.
How to use sourdough discard recipes?

Why we love this
Sourdough discard recipes are a beautiful way to minimize waste while adding a unique, tangy depth of flavor to your baking. These crackers or pancakes have a complex, fermented aroma and a slight acidity that elevates the simple ingredients. The texture is often surprisingly light and crisp, offering a rustic homemade feel that store-bought versions simply cannot replicate, making them a standout addition to any food board.
Ingredients
- 1 cup sourdough discard (unfed)
- 1/4 cup melted butter or olive oil
- 1 cup all-purpose flour
- 1/2 teaspoon sea salt
- 2 tablespoons dried herbs (rosemary, thyme, or za’atar)
- Flaky salt for topping
How to make it
- In a medium bowl, combine the sourdough discard and the melted butter. Stir until the mixture is smooth. The discard adds the moisture and the tang, while the fat ensures a tender crumb.
- Gradually fold in the flour, sea salt, and dried herbs. Work the dough until it comes together into a smooth, slightly tacky ball. If it’s too sticky, add a tablespoon of flour at a time.
- Divide the dough in half. Place one half on a sheet of parchment paper and roll it out until it is paper-thin (about 1/16th of an inch). The thinner you roll it, the crispier your crackers will be.
- Transfer the parchment to a baking sheet. Lightly brush the surface with a tiny bit of water or oil and sprinkle with flaky salt. Use a pizza cutter to score the dough into squares or diamonds.
- Bake at 350°F (175°C) for 15-20 minutes, or until the edges are golden brown and the centers are firm. Let them cool completely on the pan to finish crisping up before breaking them apart.
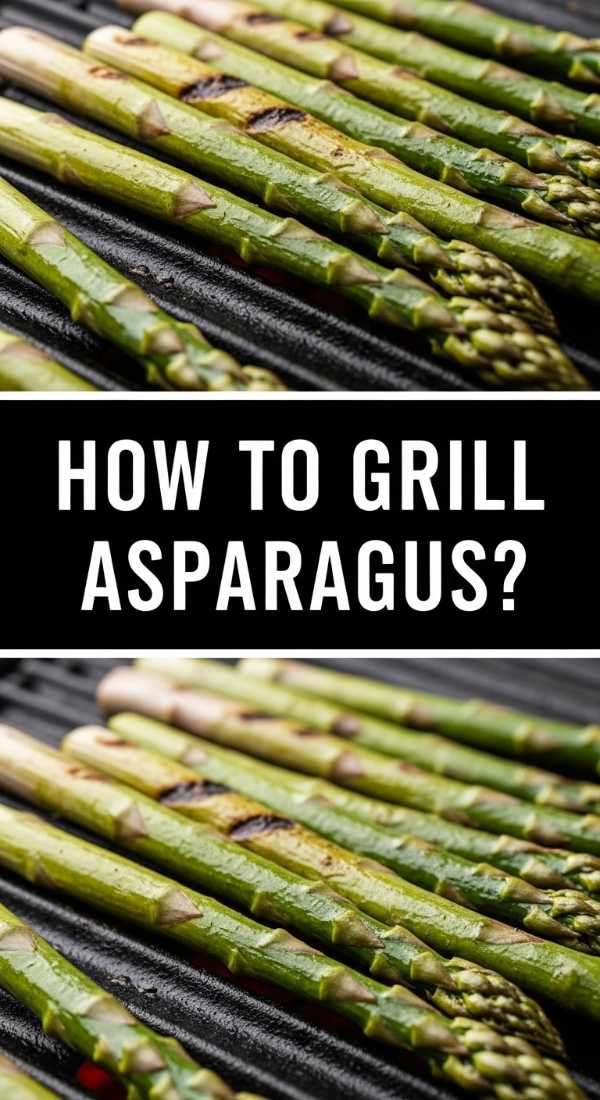
How to make grilled asparagus?
Why we love this
Grilled asparagus is the quintessential side dish that proves simplicity is often the height of sophistication. When exposed to the high heat of the grill, the tips become wonderfully crispy and charred, while the stalks remain tender with a concentrated, sweet-savory flavor. The subtle smokiness from the fire enhances the natural earthiness of the vegetable, creating a side that is both elegant and addictive.
Ingredients
- 1 lb fresh asparagus, tough ends trimmed
- 1.5 tablespoons extra virgin olive oil
- 1 teaspoon garlic powder
- 1/2 teaspoon smoked paprika
- Salt and pepper to taste
- Fresh lemon wedges and shaved parmesan
How to make it
- Prepare the asparagus by washing and drying it thoroughly. Moisture on the surface will cause the vegetable to steam rather than sear, so pat it down with a paper towel.
- In a shallow dish, toss the stalks with olive oil, garlic powder, smoked paprika, salt, and pepper. Use your hands to ensure every inch of the asparagus is lightly coated in oil and seasoning.
- Preheat your grill to medium-high. To prevent the stalks from falling through the grates, lay them perpendicular to the grill lines, or use a perforated grill basket.
- Grill for 3 to 5 minutes total. Use tongs to roll the stalks occasionally so they develop beautiful char marks on all sides. You are looking for a vibrant green color with blackened, crispy tips.
- Remove from the heat and immediately squeeze fresh lemon juice over the hot stalks. The acidity wakes up the flavors. Top with shaved parmesan while still warm so the cheese slightly softens.
How to make cold pea salad?
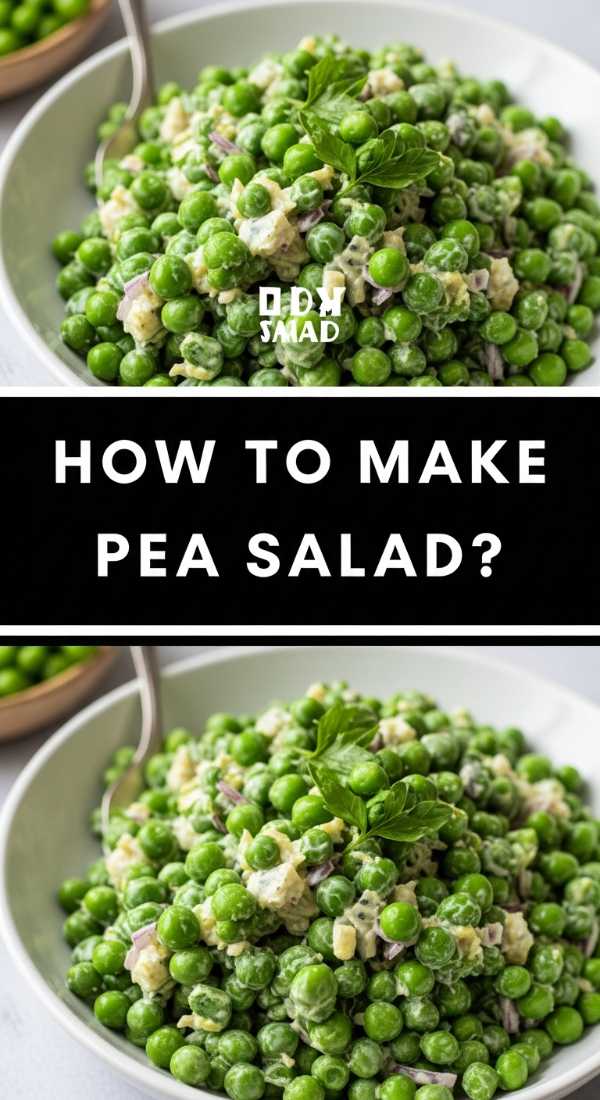
Why we love this
This cold pea salad is a nostalgic, retro classic that brings a surprising burst of sweetness and crunch to your spread. The tiny, cold peas pop in your mouth, contrasted by the sharp bite of red onion and the salty, smoky crunch of real bacon bits. All of this is enveloped in a creamy, tangy dressing that ties the disparate elements together into a harmonious, refreshing bite that feels both vintage and timeless.
Ingredients
- 16 oz frozen petite peas (thawed)
- 1/2 cup sharp cheddar cheese, cubed or shredded
- 1/4 cup red onion, finely minced
- 1/2 cup crispy bacon, crumbled
- 1/2 cup mayonnaise
- 1 tablespoon apple cider vinegar
- 1 teaspoon sugar
- Salt and pepper to taste
How to make it
- Ensure your frozen peas are completely thawed but still cold. Drain any excess liquid from the bag so the dressing doesn’t become watery. Use petite peas if possible, as they are sweeter and more tender.
- In a large bowl, whisk together the mayonnaise, apple cider vinegar, sugar, salt, and pepper. This creates a balanced dressing that is creamy but with a distinct tang to cut through the mayo.
- Add the peas, cheddar cheese, and red onion to the bowl. If you are using cubed cheddar, keep the cubes small (about the size of a pea) for the best textural experience in every bite.
- Fold the ingredients together gently using a rubber spatula to avoid crushing the peas. Fold in half of the bacon crumbles now.
- Chill the salad in the refrigerator for at least one hour. Just before serving, sprinkle the remaining bacon on top. This ensures that half the bacon stays crispy while the other half infuses its smoky flavor into the dressing.
Final Thoughts on the Viral Board
Creating a food board isn’t just about the recipes; it’s about the joy of curation. By combining these ten diverse dishes—from the smoky charred asparagus to the sweet, glossy strawberry pie—you create a landscape of flavors that encourages guests to explore and enjoy. These dishes are simple enough for a weeknight but special enough to go viral at your next big event. Happy hosting!