

There is something almost magical about the way a simple wooden board can transform a kitchen gathering into a core memory. We have all seen the viral food boards taking over our feeds—those sprawling, vibrant canvases of texture and color that seem almost too beautiful to eat. But the real secret to the obsession isn’t just the arrangement; it is the soul-stirring freshness of the ingredients that makes every bite feel like a celebration of the senses.
Lately, I have found myself leaning into the ‘Botanical Grazing’ trend, where the star of the show isn’t just the cheese or the charcuterie, but the living, breathing herbs that bring a burst of life to the table. Whether you are hosting a cozy dinner or just treating yourself to a quiet afternoon snack, incorporating home-grown greenery into your food board elevates the experience from a simple meal to a curated sensory journey that smells as heavenly as it tastes.
How to Grow Indoor Herbs for Fresh Culinary Flavors

Why we love this
Imagine the heady, aromatic scent of fresh-picked basil and woodsy rosemary permeating your kitchen as you prepare your favorite viral food board. There is a tactile joy in running your fingers over the fuzzy leaves of sage or the delicate, lace-like fronds of dill, feeling the essential oils coat your skin with a fragrance that no grocery store plastic-clamshell herb could ever replicate. It’s about the crunch of the leaf, the vibrant pop of emerald green against a rustic wooden board, and the soul-satisfying knowledge that you nurtured this flavor from a tiny, hopeful seed in the comfort of your own home.
Essential Elements:
- High-quality organic potting mix
- Small terracotta or ceramic pots with drainage holes
- Herb seeds (Basil, Mint, Cilantro, Parsley)
- A sunny south-facing windowsill
- A spray bottle for gentle misting
How to make it
- Select your pots and ensure they have at least one large drainage hole; place a small piece of mesh or a coffee filter over the hole to prevent soil loss while allowing water to escape freely.
- Fill your containers with organic potting soil, leaving about an inch of space at the top. Use your fingers to lightly press the soil down to remove large air pockets without compacting it too tightly, as roots need oxygen to thrive.
- Sow your seeds according to the depth listed on the packet—typically twice the diameter of the seed—and lightly cover them with a dusting of soil. For tiny seeds like mint, simply press them onto the surface as they require light to germinate.
- Mist the surface gently with room-temperature water until the soil is damp but not muddy. Placing a piece of plastic wrap over the top can create a mini-greenhouse effect to speed up germination; remove it once you see the first sprouts (the cotyledons) emerge.
- Place the pots in a spot that receives 6 to 8 hours of indirect sunlight daily. Rotate the pots a quarter turn every few days to ensure the plants grow straight rather than leaning toward the light source.
How to Design an Outdoor Herb Garden for Lush Backyard Beauty

Why we love this
There is an undeniable romance in stepping out into a sun-drenched backyard to harvest sprigs of oregano and thyme for your evening spread. The outdoor herb garden acts as a living tapestry, where the silver-green of lavender mingles with the deep forest hues of rosemary, creating a visual feast that rivals the most expensive floral arrangements. The air in an outdoor garden is heavy with the perfume of blooming herbs, attracting butterflies and bees, and providing a grounded, earthy atmosphere that makes the act of ‘farm-to-table’ dining a daily reality right in your own sanctuary.
Essential Elements:
- Designated garden bed or raised planter
- Soil amendments (compost, aged manure)
- Perennial herbs (Lavender, Rosemary, Sage)
- Garden trowel and bypass pruners
- Mulch (straw or cedar chips)
How to make it
- Identify a location in your backyard that receives at least six hours of full sun; check for level ground and ensure the area has excellent drainage to prevent ‘wet feet’ which can kill Mediterranean herbs.
- Prepare the earth by tilling the top 8 to 10 inches of soil and mixing in a 3-inch layer of organic compost to provide a nutrient-rich foundation that mimics a natural meadow environment.
- Arrange your plants while they are still in their nursery pots to visualize the heights and colors; place taller herbs like rosemary in the back and trailing varieties like creeping thyme near the edges for a cascading effect.
- Dig a hole for each plant that is twice as wide as the root ball and just as deep. Gently tease the roots if they are circling the pot, place the plant in the hole, and backfill with soil, tamping down firmly to eliminate air gaps.
- Apply a 2-inch layer of mulch around the base of the plants, keeping it a few inches away from the stems to prevent rot. Water deeply at the base of the plant immediately after planting to settle the soil and reduce transplant shock.
How to Build a DIY Herb Planter for Sustainable Living
Why we love this
Building something with your own hands adds a layer of intentionality to your lifestyle that is incredibly rewarding. A DIY herb planter, crafted from reclaimed wood or sustainable cedar, becomes more than just a container; it is a centerpiece of your culinary journey. The rough-hewn texture of the wood contrasts beautifully with the soft, delicate leaves of the herbs, creating a rustic-chic aesthetic that looks stunning on a patio or kitchen counter. Every time you pluck a leaf of cilantro for your food board, you are reminded of the craftsmanship and care that went into creating its home.
Essential Elements:
- Untreated cedar boards (naturally rot-resistant)
- Galvanized screws and a power drill
- Landscaping fabric for lining
- Sandpaper and wood sealant (optional)
- Electric saw or hand saw
How to make it
- Measure and cut your cedar boards into four side pieces and one bottom piece; for a standard rectangular planter, use two 24-inch pieces for the long sides and two 8-inch pieces for the ends.
- Pre-drill pilot holes at the ends of the boards to prevent the wood from splitting. Align the corners and use the galvanized screws to join the sides together into a box frame.
- Attach the bottom board by screwing it into the frame, then drill five to six 1/2-inch drainage holes through the bottom to ensure water can flow out freely.
- Cut a piece of landscaping fabric to fit the interior and staple it to the sides; this acts as a filter, keeping the soil inside while allowing water to pass through.
- Sand any rough edges until smooth to the touch. Fill the planter with a mixture of potting soil and perlite, then plant your chosen herbs, spacing them 4-6 inches apart to allow for mature growth.
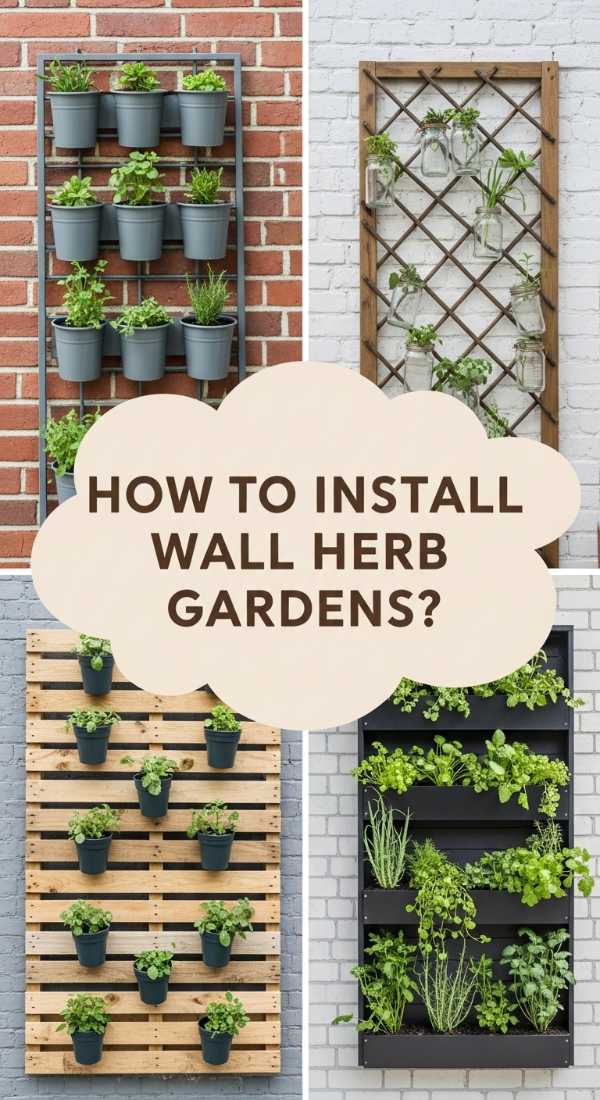
How to Install a Vertical Wall Herb Garden for Space Saving Greenery
Why we love this
For those of us living in cozy spaces, the vertical herb garden is a literal breath of fresh air, turning a blank wall into a cascading waterfall of edible emeralds. It’s a design marvel that draws the eye upward, making a small kitchen feel like a lush conservatory. The sight of mint, chives, and parsley hanging in vertical tiers is not only visually stunning but also incredibly practical, keeping your favorite flavors at eye level and within arm’s reach while you assemble your viral board. It brings a touch of modern urban jungle vibes to any interior decor.
Essential Elements:
- Vertical planter kit or wall-mounted pockets
- Wall anchors and screws
- Level and measuring tape
- Lightweight potting mix
- Moisture-loving herbs (Mint, Chives, Lemon Balm)
How to make it
- Determine the structural integrity of the wall you intend to use; find the studs using a stud finder to ensure the vertical garden is securely anchored, as wet soil can be very heavy.
- Use a level and pencil to mark the mounting points for your hardware. Install the wall anchors and secure the mounting brackets or the main frame of the vertical system according to the manufacturer’s instructions.
- Prepare the individual pockets or containers by adding a layer of small pebbles at the bottom for drainage if they do not have separate trays. Fill with a lightweight, peat-based potting mix that won’t weigh down the structure.
- Transplant your herbs into the pockets, being careful not to overstuff them; leave room for air circulation between the plants to prevent powdery mildew in the vertical environment.
- Hook or snap the containers onto the wall frame. Water the top row first, as many vertical systems are designed to allow excess water to drip down to the lower tiers, maximizing efficiency.
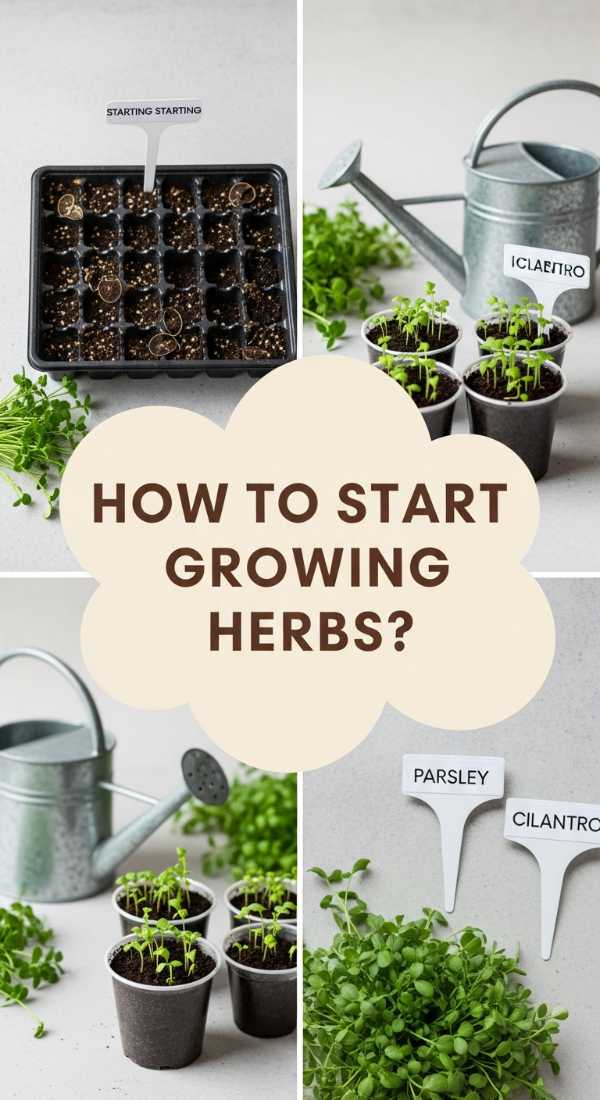
How to Start Growing Herbs Indoors for Year Round Harvests
Why we love this
There is nothing quite like the defiance of a lush, green herb garden thriving indoors while snow falls outside the window. Growing herbs year-round ensures that your viral food boards never lose their vibrant, seasonal spark, even in the depths of winter. The soft glow of grow lights creates a cozy, laboratory-like sanctuary in your home, where the spicy scent of Thai basil and the citrusy notes of lemon thyme provide a constant reminder of warmer days. It turns the act of cooking into a perpetual spring, keeping your palate and your home feeling alive and fresh.
Essential Elements:
- Full-spectrum LED grow lights
- Automatic timer for lighting cycles
- Self-watering pots or capillary mats
- Liquid seaweed fertilizer
- Small oscillating fan for air circulation
How to make it
- Set up your grow lights in a dedicated area; position the lamps so they are 4 to 6 inches above the tops of the plants. Use an adjustable stand so you can raise the lights as the herbs grow taller.
- Connect your lights to an automatic timer set for 14 to 16 hours of light per day. Plants need a ‘dark period’ to rest and process nutrients, so do not leave the lights on for 24 hours.
- Use self-watering containers to maintain a consistent moisture level. Fill the reservoir with water and a half-strength solution of liquid seaweed fertilizer every two weeks to provide the minerals usually found in outdoor soil.
- Place a small oscillating fan nearby on a low setting for 2 hours a day. This mimics natural wind, which strengthens the stems of the herbs and prevents stagnant air where pests like spider mites might thrive.
- Harvest regularly by pinching off the top leaves just above a leaf node; this encourages the plant to branch out and become bushier rather than leggy, ensuring a continuous supply for your kitchen.
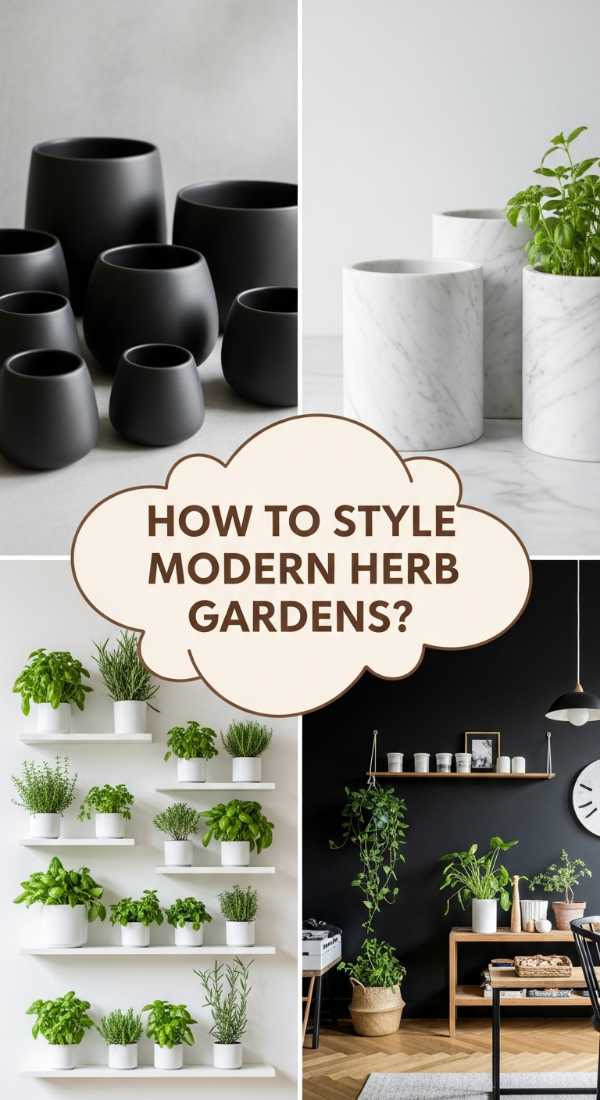
How to Style a Modern Herb Garden Design for Chic Home Decor
Why we love this
A modern herb garden is where functionality meets high-end aesthetics. It’s about choosing sleek, minimalist vessels—think matte black ceramics, brushed gold accents, or clean white marble—to house your botanical treasures. When styled correctly, an herb garden becomes a living piece of art that complements your interior design. The contrast between the structured, man-made containers and the wild, organic growth of the herbs creates a sophisticated balance that makes your kitchen feel like a page out of a luxury lifestyle magazine, perfect for those ‘Instagrammable’ board prep moments.
Essential Elements:
- Uniform ceramic or metallic pots
- Minimalist plant labels or a chalk marker
- Decorative tray or marble slab for grouping
- Top-dressing (white pebbles or polished river stones)
- Pruning snips with a vintage aesthetic
How to make it
- Select a cohesive color palette for your pots that matches your kitchen hardware; for a modern look, stick to monochromatic tones or natural textures like concrete.
- Repot your herbs into these vessels using a high-quality mix. To maintain the ‘clean’ look, add a layer of white pebbles or decorative top-dressing over the soil surface to hide the dirt and retain moisture.
- Group your pots in odd numbers (the ‘rule of three’) on a decorative tray or a marble slab. This creates a focal point rather than a cluttered collection of scattered plants.
- Use a chalk marker to write the names of the herbs directly onto the pots or use sleek, acrylic labels for a professional, organized appearance.
- Maintain the aesthetic by pruning any yellowing leaves immediately. Keep your vintage snips on the tray as a functional decor piece, allowing you to harvest with style whenever you need a garnish.
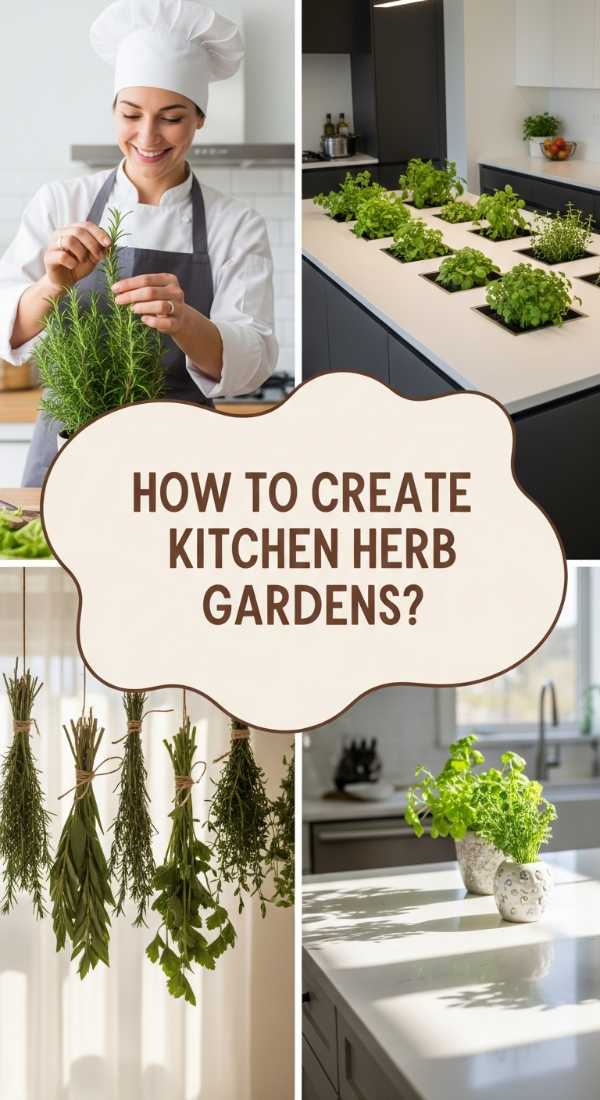
How to Create an Indoor Herb Garden DIY Project for Kitchen Convenience
Why we love this
Convenience is the ultimate luxury, and having a dedicated herb station right next to your cutting board is a game-changer for any home cook. This DIY project is all about streamlining your workflow while adding a charming, ‘lived-in’ feel to your kitchen. The scent of fresh oregano hitting the air as you chop it for a herb-infused oil is intoxicating, and the convenience of reaching over for a sprig of mint for your cocktail or board display makes hosting feel effortless. It’s the perfect blend of utility and beauty that makes your kitchen the heart of the home.
Essential Elements:
- Hanging rail or wall grid
- S-hooks and small metal pails
- Potting soil and activated charcoal
- Assorted herbs (Oregano, Thyme, Rosemary)
- Watering can with a narrow spout
How to make it
- Install a heavy-duty metal rail or a copper pipe on the backsplash area or under a kitchen cabinet, ensuring it is at a comfortable height for reaching while standing at the counter.
- Prepare your hanging pails. If they don’t have holes, add a 1-inch layer of activated charcoal at the bottom to absorb excess water and prevent the soil from becoming sour.
- Plant your herbs into the pails, leaving a bit of room at the top to prevent water from splashing out when you tend to them. Use a mix of upright and trailing herbs for visual interest.
- Use S-hooks to hang the pails from the rail. Space them out so that each plant has enough room to receive light and so that the leaves aren’t touching the wall.
- Use a narrow-spout watering can to deliver water directly to the soil without getting the leaves wet, which keeps the kitchen area clean and prevents leaf diseases.
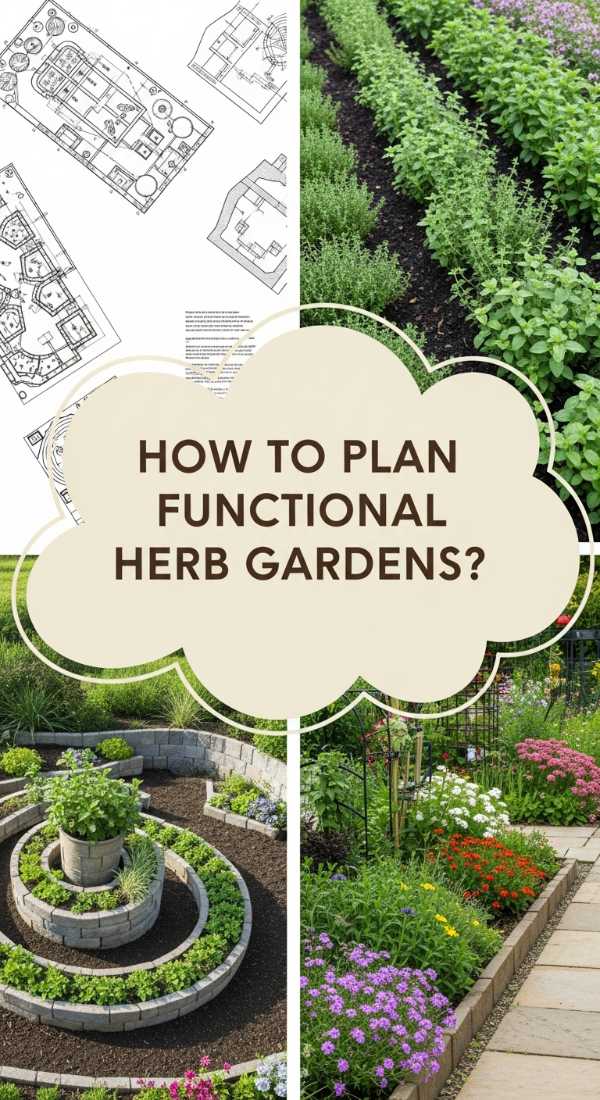
How to Plan a Functional Herb Garden for a Productive Home Landscape
Why we love this
A functional herb garden is a masterpiece of efficiency and abundance. It’s designed not just for looks, but for a high-yield harvest that can sustain a busy kitchen. The beauty of a productive landscape lies in its organized chaos—the way the chamomile flowers dance among the sturdy stalks of rosemary. It provides a sense of security and connection to the earth, knowing that you have a ‘grocery store’ in your own backyard that produces ingredients with superior flavor and zero food miles. It’s the ultimate foundation for creating those viral boards that people can’t stop talking about.
Essential Elements:
- Graph paper or garden planning app
- Sun map of your yard
- Succession planting schedule
- Organic fertilizers and pest control (Neem oil)
- Pathway materials (gravel or stepping stones)
- Companion planting guide
How to make it
- Observe your outdoor space for a full day to map out the ‘sun zones.’ Plan to place heat-loving herbs like basil in the hottest spots and delicate herbs like cilantro in areas with afternoon shade.
- Sketch a layout that includes easy-access pathways. Use the ‘zone’ method: place the herbs you use most frequently (like parsley) closest to the kitchen door and the perennials (like sage) further out.
- Utilize companion planting by placing marigolds near your herbs to naturally deter pests, and plant basil near tomatoes to improve the flavor of both.
- Create a succession planting schedule. For short-lived herbs like cilantro, sow a new row of seeds every two weeks so that as one batch goes to seed (bolts), the next is ready for harvest.
- Install a simple drip irrigation system on a timer to provide consistent deep watering, which encourages the roots to grow deep into the soil for a more resilient and productive garden.
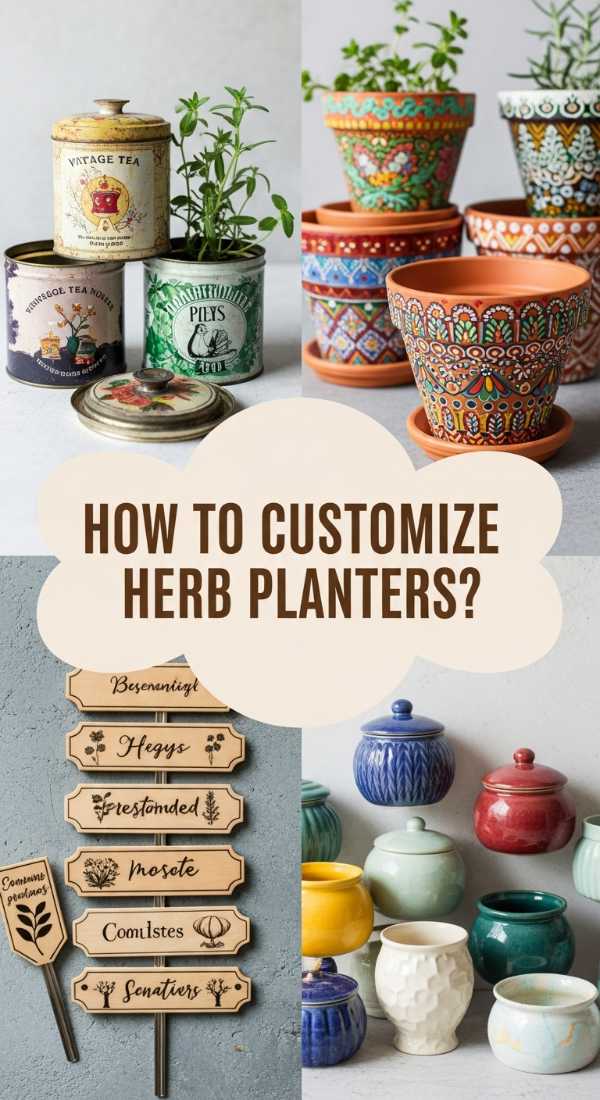
How to Customize Unique Herb Planter Ideas for Personalized Charm
Why we love this
There is a whimsical charm in repurposing unexpected items into herb planters—it tells a story about your personality and creativity. Whether it’s a vintage tea tin, an old wooden crate, or a ceramic pitcher, these unique vessels add a layer of soulful character to your home. The sight of vibrant green chives peeking out of a rustic, weathered container creates a nostalgic, farmhouse-chic vibe that is incredibly cozy. It turns your herb garden into a conversation piece, sparking joy and curiosity in everyone who visits your kitchen and sees your beautiful food board setups.
Essential Elements:
- Vintage containers (tins, crates, teapots)
- Metal drill bit or hammer and nail
- Fine gravel or perlite
- Potting soil
- Personalized plant markers (stamped spoons or painted stones)
- Clear coat spray (to protect vintage labels)
How to make it
- Inspect your vintage find for any cracks or leaks. If using an old tin, spray the inside with a clear, food-safe sealant to prevent rust from leaching into the soil.
- Carefully drill three to four drainage holes in the bottom using a drill bit appropriate for the material (metal, ceramic, or wood). If the item is too delicate to drill, you must use it as a ‘cachepot’—placing a plastic nursery pot inside it.
- Add a 1-inch layer of fine gravel to the bottom to improve drainage and weight the container so it doesn’t tip over.
- Fill with potting mix and plant your herbs. Choose herbs that match the ‘vibe’ of the container—for example, wild-looking dill looks wonderful in an old wooden crate, while delicate mint suits a vintage teapot.
- Create personalized markers using old silver spoons stamped with the herb names to complete the charming, one-of-a-kind look.
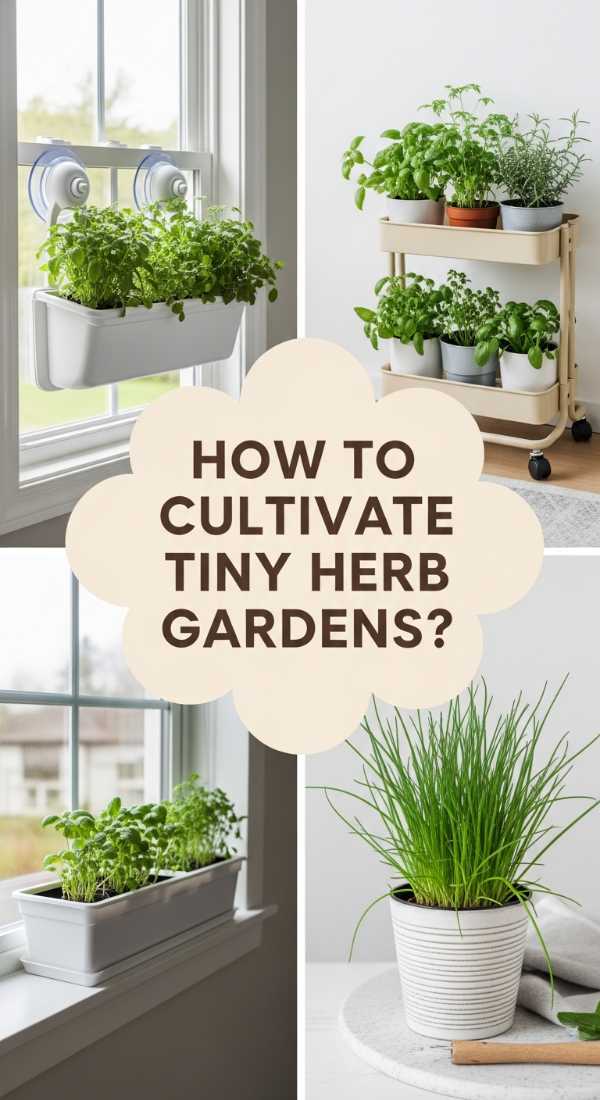
How to Cultivate a Tiny Indoor Herb Garden for Urban Apartment Dwellers
[IMAGE_10]
Why we love this
Urban living shouldn’t mean sacrificing the joy of fresh flavors, and a tiny indoor herb garden is the perfect solution for even the smallest studio apartment. There is a profound sense of peace in tending to a miniature forest on your windowsill while the city hums outside. The bright, zingy scent of a single pot of mint can transform the atmosphere of a room, making it feel fresh and expansive. It proves that you don’t need an acre of land to be a gardener; you just need a little light, a little water, and a lot of love to create a gourmet experience on your own small table.
Essential Elements:
- Micro-planters or 4-inch pots
- Compact herb varieties (Boxwood Basil, Chives)
- A ‘smart’ indoor garden base (optional)
- Small watering mister
- Reflective surfaces (mirrors) to bounce light
How to make it
- Select the ‘brightest’ spot in your apartment, usually a window ledge. If space is tight, use a suction-cup shelf that attaches directly to the window glass to maximize light exposure without taking up floor space.
- Choose compact or ‘dwarf’ varieties of herbs that won’t outgrow their small pots too quickly. Boxwood basil is a great choice as it naturally grows into a tiny, dense ball.
- Use a high-quality, moisture-retentive potting mix, as smaller pots dry out much faster than larger ones. Check the soil daily by sticking your finger an inch deep; if it feels dry, it’s time to water.
- Maximize available light by placing a small mirror behind the plants to reflect the sunlight back onto the leaves that face away from the window.
- Harvest frequently and lightly. Instead of taking whole stems, just pinch off the very tips to keep the plants small, bushy, and productive in their limited environment.
The Secret to the Perfect Viral Food Board
At the end of the day, the reason everyone is obsessed with these simple boards isn’t just about the aesthetics—it’s about the connection. It’s about slowing down, harvesting a few sprigs of herbs you grew yourself, and sharing a beautiful, tactile meal with the people you love. Whether you have a sprawling backyard or a tiny windowsill, I hope this inspires you to bring a little more green into your home and onto your plate. Happy gardening and happy grazing!