
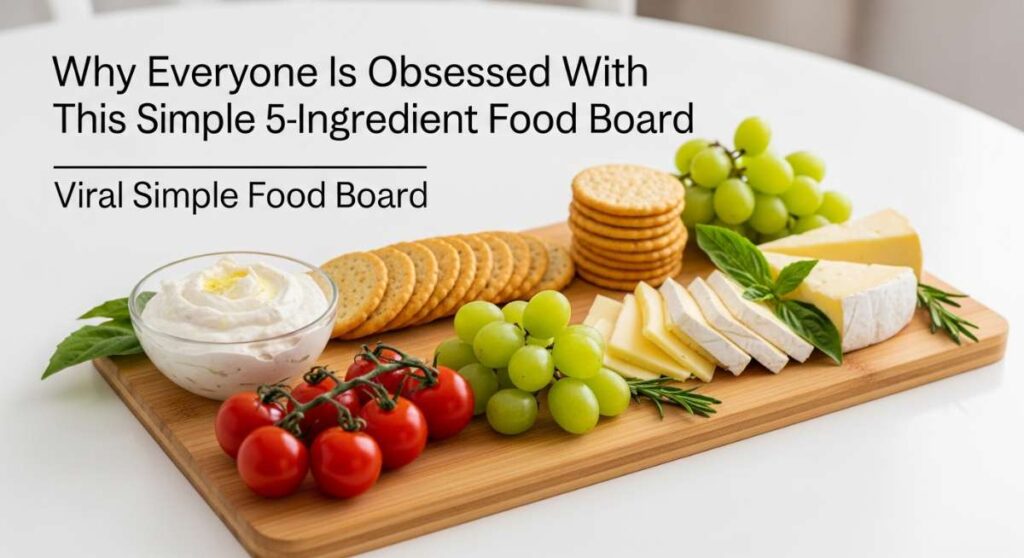
There is a certain magic that happens when the sun starts to linger just a little longer in the evening, and the air turns sweet with the scent of blooming jasmine. We all want to host those picture-perfect gatherings, but the reality of spending hours in a hot kitchen while everyone else is laughing on the patio is less than ideal. That is exactly why I became obsessed with the concept of the 5-ingredient food board—it is the ultimate low-stress, high-impact way to feed the soul and the stomach without missing a single moment of the golden hour.
This isn’t just about putting food on a tray; it’s about creating a tactile, sensory experience that encourages people to linger, pick, and choose their own adventure. Whether you are hosting a backyard bash or just want to make a Tuesday night feel like a vacation, these simple combinations are the secret sauce. Join me as we dive into my favorite summer staples that transform humble ingredients into a viral-worthy spread that your friends will be talking about for weeks.
How to make strawberry pie?

Why we love this
There is nothing quite like the vibrant, ruby-red shimmer of a fresh strawberry pie to signal that summer has truly arrived. Each bite is a symphony of textures: the flaky, buttery crunch of the crust gives way to a succulent, jammy center that bursts with the natural sweetness of sun-ripened berries. The aroma is intoxicating, reminiscent of childhood picnics and warm kitchen counters, while the cool temperature of the filling provides a refreshing contrast to a humid afternoon. It’s a dessert that feels both nostalgic and sophisticated, especially when topped with a cloud of real whipped cream that slowly melts into the glossy glaze.
Ingredients
- 2 pounds fresh strawberries, hulled and sliced
- 1 pre-baked 9-inch pie crust
- 1 cup granulated sugar
- 3 tablespoons cornstarch
- 1/2 cup water
How to make it
- Prepare your pie crust by blind-baking it until it is a deep golden brown; allow it to cool completely on a wire rack to ensure it stays crisp under the fruit.
- Select about one-third of your least attractive strawberries and mash them in a small saucepan to release their juices.
- Whisk the sugar and cornstarch into the mashed berries and add the water, stirring constantly over medium heat until the mixture reaches a boil.
- Continue to simmer the glaze for 2-3 minutes, stirring vigorously until it transforms from cloudy to a translucent, thick syrup that coats the back of a spoon.
- Remove from heat and let the glaze cool slightly; meanwhile, arrange the remaining fresh, whole, or sliced strawberries into the cooled crust in a decorative mound.
- Pour the warm glaze evenly over the fresh berries, ensuring every crevice is filled, then refrigerate for at least 3-4 hours until the pie is firmly set and easy to slice.
How to make rotel dip?

Why we love this
Rotel dip is the undisputed king of the snack board, offering a creamy, molten embrace that is impossible to resist once you’ve had that first salty chip-dip. The velvet-smooth texture of the melted cheese carries a gentle heat from the green chilies, while the acidity of the tomatoes cuts through the richness to keep you coming back for more. It’s the ultimate comfort food that feels festive and approachable, filling the room with a savory, spicy aroma that acts like a siren song for guests. There’s something deeply satisfying about the way it clings to a tortilla chip, creating a perfect, messy bite that embodies the spirit of casual summer entertaining.
Ingredients
- 16 oz Velveeta or processed cheese, cubed
- 1 can (10 oz) Ro-Tel Diced Tomatoes and Green Chilies
- 1/2 lb ground breakfast sausage or beef
- 1/4 cup whole milk (optional for creaminess)
- Fresh cilantro for garnish
How to make it
- In a large skillet over medium-high heat, brown your ground meat thoroughly, breaking it into very small crumbles until no pink remains and the edges are slightly crispy.
- Drain the excess fat from the skillet carefully to ensure the dip isn’t greasy, then transfer the meat to a slow cooker or a heavy-bottomed pot.
- Add the cubed cheese and the entire can of Ro-Tel (do not drain the liquid, as it provides essential flavor and moisture) to the meat.
- Set your heat to low—this is crucial to prevent the cheese from scorching or becoming grainy—and stir frequently as the cheese begins to melt.
- Once the mixture is completely smooth and bubbling gently, stir in the milk if you prefer a thinner consistency that stays dip-able for longer periods.
- Garnish with fresh cilantro and serve immediately in a heated bowl to maintain that perfect, gooey texture throughout the party.
How to make summer salad?

Why we love this
A true summer salad is less of a side dish and more of a celebration of the garden’s bounty, vibrating with colors that look like a watercolor painting. The crunch of fresh greens paired with the explosive sweetness of seasonal fruit—like peaches or berries—creates a complex profile that dances on the palate. Every forkful offers a new sensation: the tang of a zesty vinaigrette, the creamy crumble of goat cheese, and the earthy snap of toasted nuts. It’s a dish that leaves you feeling light and energized, smelling of fresh-cut herbs and citrus, making it the perfect centerpiece for a hot day under the sun.
Ingredients
- 4 cups mixed baby greens or arugula
- 1 cup fresh blueberries or sliced peaches
- 1/2 cup crumbled feta or goat cheese
- 1/4 cup toasted pecans or walnuts
- 3 tablespoons balsamic vinaigrette
How to make it
- Start with the freshest greens possible; wash them in ice-cold water and use a salad spinner to ensure they are bone-dry, which allows the dressing to adhere perfectly.
- In a large chilled glass bowl, layer the greens loosely rather than packing them down to maintain a light, airy volume.
- Scatter your choice of seasonal fruit evenly over the top, taking care not to bruise delicate berries or over-handle soft peach slices.
- Toast your nuts in a dry pan over medium heat for 3-5 minutes until they smell fragrant and toasted; let them cool before adding to the salad to prevent wilting the leaves.
- Drizzle the vinaigrette around the edges of the bowl rather than directly in the center, then use salad tongs to gently lift and turn the ingredients until lightly coated.
- Top with the cheese crumbles at the very last second to ensure they stay distinct and don’t disappear into the dressing.
How to make chicken wraps?

Why we love this
Chicken wraps are the ultimate portable feast, offering a tidy package of savory satisfaction that is as convenient as it is delicious. The contrast between the warm, seasoned chicken and the cold, crisp vegetables wrapped in a soft, floury tortilla creates a multi-layered eating experience that never gets boring. There is a tactile joy in holding a well-rolled wrap, feeling the weight of the ingredients nestled together in harmony. The aroma of grilled poultry mixed with a creamy ranch or spicy mayo makes every bite feel like a gourmet deli treat, whether you’re at a park or your own kitchen table.
Ingredients
- 2 large flour tortillas
- 1 cup cooked chicken breast, shredded or sliced
- 1/2 cup shredded romaine lettuce
- 1/4 cup diced tomatoes
- 2 tablespoons Caesar or Ranch dressing
How to make it
- Warm your tortillas for 10-15 seconds in a dry skillet or microwave; this makes them pliable and prevents them from tearing during the folding process.
- Lay the tortilla flat and spread a thin layer of your chosen dressing across the center, leaving about an inch of the border clean.
- Place a generous handful of crisp lettuce in a line down the middle, followed by a layer of chicken and the diced tomatoes.
- For a professional tuck, fold the left and right sides of the tortilla inward about two inches, then grab the bottom edge and roll tightly over the filling.
- Keep tension on the roll as you move upward to ensure the wrap is dense and won’t fall apart when you bite into it.
- Slice the wrap on a sharp diagonal to showcase the colorful cross-section of ingredients before serving.
How to grill summer vegetables?
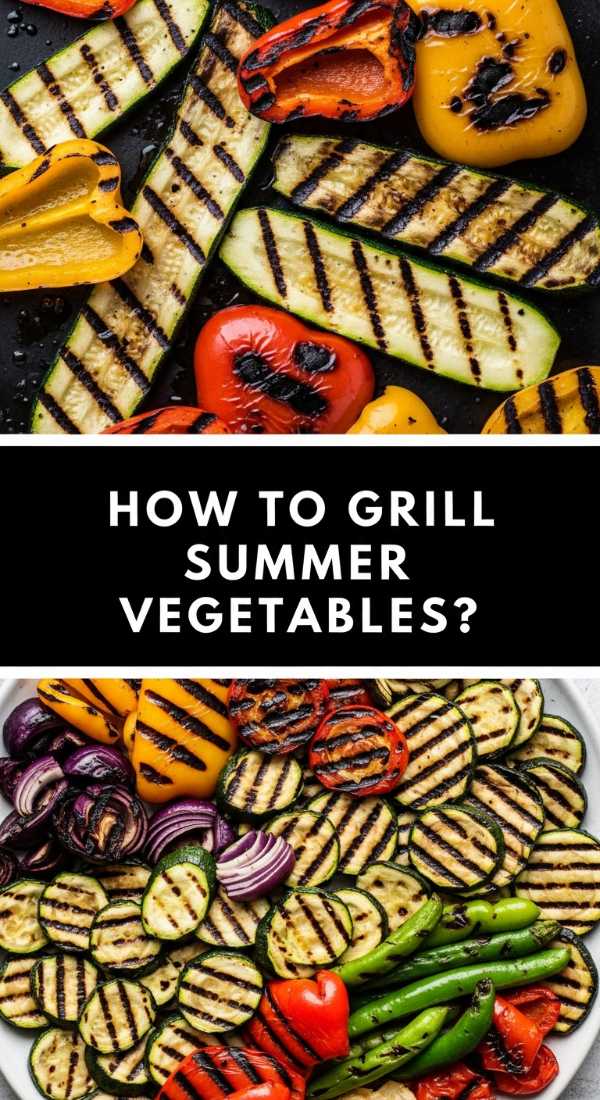
Why we love this
Grilling vegetables transforms them from simple produce into charred, caramelized masterpieces that carry the smoky soul of outdoor cooking. The high heat of the grates coaxes out the natural sugars, creating a sweet and savory depth that you just can’t achieve in an oven. The visual of dark grill marks against vibrant green asparagus, bright yellow squash, and deep purple onions is a feast for the eyes before you even take a bite. There is something primal and satisfying about the sizzle of the veggies hitting the hot metal and the subsequent aroma of woodsmoke and charred herbs that fills the backyard air.
Ingredients
- 2 zucchini or yellow squash, sliced lengthwise
- 1 bell pepper, cut into wide strips
- 1 bunch thick asparagus, ends trimmed
- 3 tablespoons olive oil
- 1 tablespoon Italian seasoning and sea salt
How to make it
- Preheat your grill to medium-high heat (about 400°F) and ensure the grates are scraped clean and lightly oiled to prevent sticking.
- In a large bowl, toss your prepared vegetables with olive oil and spices until every surface is glistening; this oil is what creates those iconic sear marks.
- Place the vegetables across the grates—perpendicular to the bars so they don’t fall through—and leave them undisturbed for at least 3-4 minutes.
- Use long-handled tongs to flip the vegetables once you see a distinct char forming on the underside; avoid flipping them multiple times which can lead to mushiness.
- Cook for an additional 3-5 minutes on the second side until the vegetables are tender but still retain a slight “snap” or bite.
- Remove from the grill and immediately finish with a squeeze of fresh lemon juice or a drizzle of balsamic glaze to brighten the smoky flavors.
How to make pasta salad?

Why we love this
Pasta salad is the versatile workhorse of the summer food board, offering a tangy, herbaceous bite that only gets better as it sits. The al dente pasta acts as a perfect vessel for a zesty vinaigrette, while the addition of crunchy peppers, briny olives, and sharp cheeses creates a complex flavor profile that satisfies every craving. It feels substantial yet refreshing, making it an ideal companion to grilled meats or a standalone vegetarian lunch. The bright, acidic scent of red wine vinegar and dried oregano evokes memories of Mediterranean shores and sunny garden parties where the food is as vibrant as the conversation.
Ingredients
- 1 lb rotini or fusilli pasta
- 1/2 cup Italian dressing
- 1 cup cherry tomatoes, halved
- 1/2 cup diced cucumbers
- 1/2 cup cubed provolone or mozzarella
How to make it
- Cook the pasta in a large pot of heavily salted water until it is just past al dente; for cold salads, a slightly softer noodle absorbs the dressing more effectively.
- Drain the pasta and immediately rinse it under cold running water to stop the cooking process and wash away excess starch, which prevents clumping.
- In a large mixing bowl, combine the cooled pasta with half of the dressing while the noodles are still slightly damp to help the flavors penetrate.
- Add your chopped vegetables and cheese, tossing gently with a large spoon to ensure an even distribution of colors and textures.
- Cover and refrigerate the salad for at least 2 hours; this resting period is vital as the pasta will soak up the dressing and the flavors will meld together.
- Just before serving, toss the salad with the remaining dressing to revive the moisture and add a final pinch of salt or fresh herbs for a pop of flavor.
How to make hummingbird food?

Why we love this
Making your own hummingbird food is a simple, meditative act that connects you directly to the heartbeat of nature in your own backyard. Watching these tiny, iridescent jewels dart and hover around a feeder you’ve prepared is a source of pure, quiet joy. The mixture itself is clean and clear, mimicking the natural nectar found in flowers without the need for harmful artificial dyes or preservatives. There is a profound sense of satisfaction in knowing you are providing essential energy for these incredible migrators, turning your garden into a bustling sanctuary of movement and life.
Ingredients
- 1 cup white granulated sugar
- 4 cups filtered water
- No red dye or honey (harmful to birds)
How to make it
- Combine the sugar and water in a medium saucepan, using the precise 1:4 ratio to ensure the concentration matches natural flower nectar.
- Heat the mixture over medium-high, stirring occasionally until the liquid reaches a boil; this ensures the sugar is completely dissolved and kills any bacteria.
- Boil for only 1-2 minutes—any longer and too much water will evaporate, making the solution too sweet and potentially harmful to the birds’ kidneys.
- Remove from the heat and allow the nectar to cool to room temperature; never put hot liquid into a plastic feeder as it can warp the material and leach chemicals.
- Fill your clean hummingbird feeder and store any leftover nectar in a sealed glass jar in the refrigerator for up to two weeks.
- Clean your feeder every 3-5 days with hot water (no soap) to prevent mold growth, especially during the peak heat of summer.
How to make perfect kabobs?
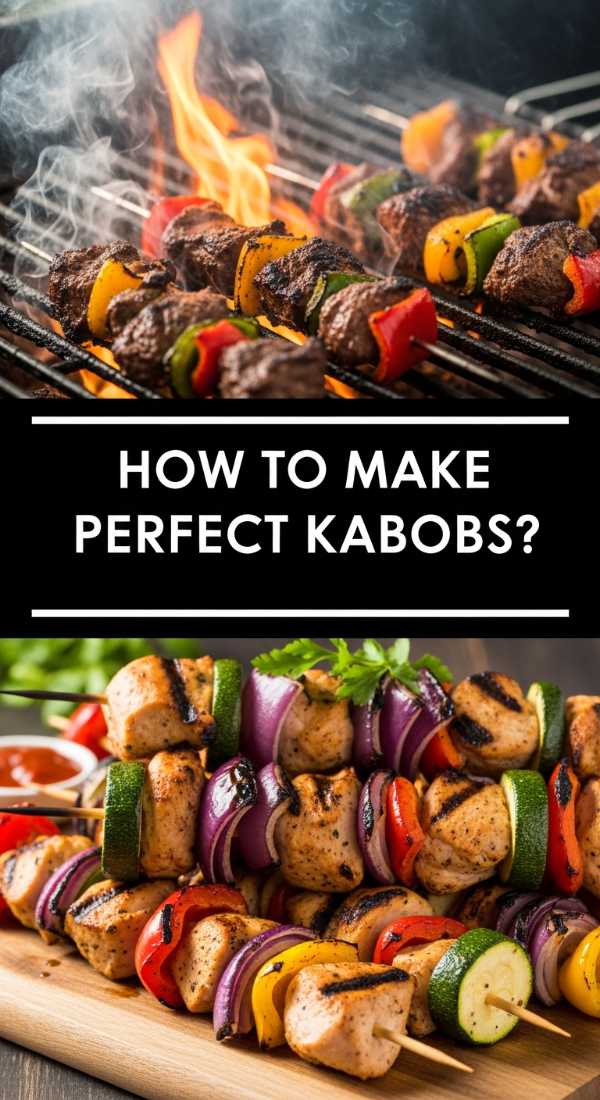
Why we love this
Kabobs are the ultimate interactive meal, a colorful parade of ingredients on a stick that makes dining feel like an event. There is a wonderful contrast between the juicy, marinated protein and the slightly charred, sweet vegetables that have been basted in their own juices. The aroma of searing meat and caramelized onions wafting from the grill is enough to bring the whole neighborhood to your gate. Eating food off a skewer is inherently fun and communal, encouraging a relaxed, hands-on atmosphere where the focus is on the simple pleasure of well-cooked, vibrant food shared among friends.
Ingredients
- 1 lb steak or chicken, cut into 1.5-inch cubes
- 1 red onion, cut into chunks
- 1 large bell pepper, cut into squares
- 1/2 cup soy sauce or balsamic marinade
- Wooden or metal skewers
How to make it
- If using wooden skewers, soak them in water for at least 30 minutes prior to grilling to prevent them from igniting over the open flame.
- Marinate your protein cubes for at least 1 hour (or up to 4) in the refrigerator to ensure deep flavor penetration and tenderization.
- Thread the ingredients onto the skewers, alternating between meat and vegetables; leave a tiny bit of space between each item to allow the heat to circulate and cook everything evenly.
- Preheat the grill to medium-high and lightly grease the grates with a rolled-up paper towel dipped in vegetable oil.
- Place the kabobs on the grill and cook for 8-12 minutes, turning them a quarter-turn every 3 minutes to achieve even browning and beautiful grill marks on all sides.
- Let the kabobs rest for 5 minutes after removing them from the grill to allow the juices to redistribute within the meat before serving.
How to cook summer dinners?
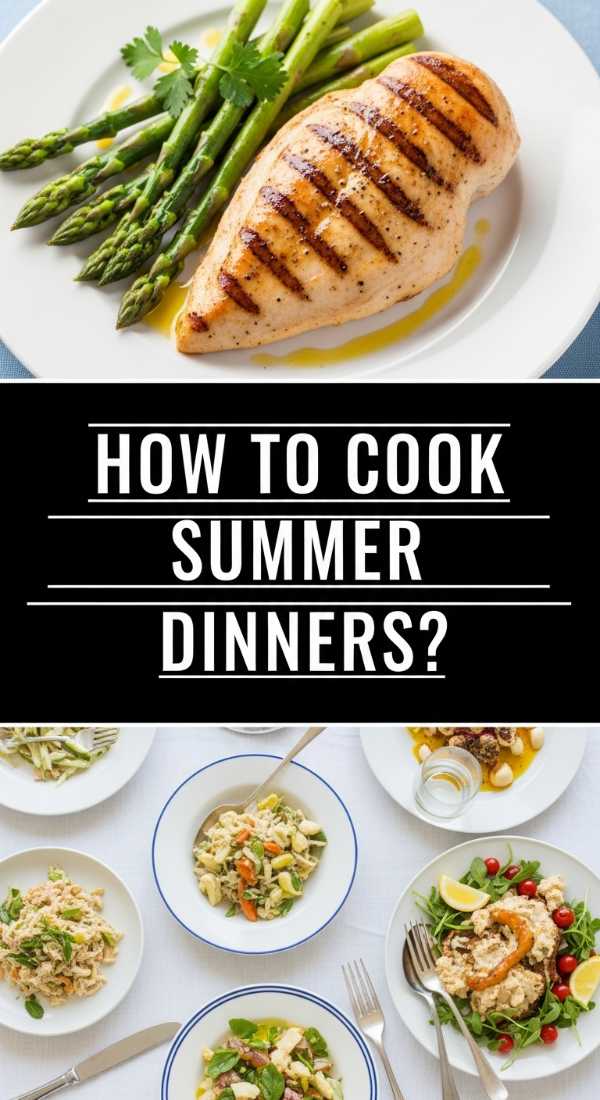
Why we love this
Summer dinners should feel like an escape, a departure from the heavy, complex meals of winter toward something light, breezy, and effortlessly chic. The goal is minimal time over a stove and maximum flavor from fresh, seasonal produce that needs very little intervention. These meals are often served family-style on large platters, encouraging passing, sharing, and a slower pace of life. The scent of fresh basil, lemon zest, and grilled seafood creates a relaxed ambiance that makes even a simple Wednesday night feel like an al fresco dinner in the Mediterranean, where the food is secondary to the company and the sunset.
Ingredients
- 1 lb thin-cut protein (shrimp, fish, or cutlets)
- 2 cups seasonal vegetables (corn, tomatoes, greens)
- A handful of fresh herbs (parsley, basil, mint)
- Citrus (lemons or limes)
- High-quality olive oil
How to make it
- Focus on high-heat, quick-cooking methods like searing or broiling to keep the kitchen cool and the food vibrant.
- Prep all your ingredients before you start any cooking; summer dinners move fast, and having your herbs chopped and citrus sliced is essential.
- Season your protein aggressively with salt and pepper, then sear in a hot pan with a splash of oil for just 2-3 minutes per side until golden.
- Flash-cook your vegetables in the same pan to pick up the fond (the brown bits) left behind by the meat, adding a splash of wine or broth to deglaze.
- Assemble the meal on a large, room-temperature platter, piling the greens or grains at the bottom and topping with the protein and sautéed veggies.
- Finish the entire dish with a heavy hand of fresh herbs and a final squeeze of citrus to provide that signature bright, summer acidity.
How to make summer cocktails?

Why we love this
A perfectly crafted summer cocktail is like a vacation in a glass, offering an effervescent, icy reprieve from the afternoon heat. The clinking of ice against crystal, the vibrant hues of muddled fruit, and the sparkle of tonic or soda create a sensory experience that is immediately uplifting. These drinks are all about balance—the sharpness of citrus, the sweetness of agave or simple syrup, and the botanical notes of spirits like gin or tequila. Sipping a cold drink as the condensation beads on the glass is the universal sign to slow down, breathe in the summer air, and celebrate the moment.
Ingredients
- 2 oz of your favorite spirit (Gin, Vodka, or Tequila)
- 1 oz fresh-squeezed lime or lemon juice
- 3/4 oz simple syrup or agave
- 4-5 fresh mint leaves or berries
- Club soda to top
How to make it
- Begin by chilling your glassware in the freezer for 10 minutes; a frosted glass is the secret to a professional-feeling cocktail.
- In a cocktail shaker, muddle your fresh fruit or herbs with the simple syrup to release the essential oils and juices without pulverizing them into a paste.
- Add your spirit and fresh citrus juice to the shaker, then fill it to the brim with large, solid ice cubes.
- Shake vigorously for at least 15 seconds; you want the shaker to become painfully cold to the touch, which indicates proper aeration and dilution.
- Double-strain the mixture into your chilled glass over fresh ice to ensure no bits of muddled fruit or herb shards end up in the final drink.
- Top with a splash of club soda for fizz and garnish with a sprig of slapped mint (slapping the mint releases the aroma) or a thin citrus wheel.
Wrapping Up Your Summer Spread
Creating the perfect viral food board isn’t about perfection; it’s about the joy of assembly and the freedom to mix and match these incredible summer staples. From the smoky depth of grilled kabobs to the sweet, nostalgic finish of a strawberry pie, these dishes are designed to be shared and celebrated. So, grab a large wooden board, pick your favorites, and get ready to host the most effortless and delicious gathering of the season. Your guests will love the variety, and you’ll love how easy it is to be the star of the show.