
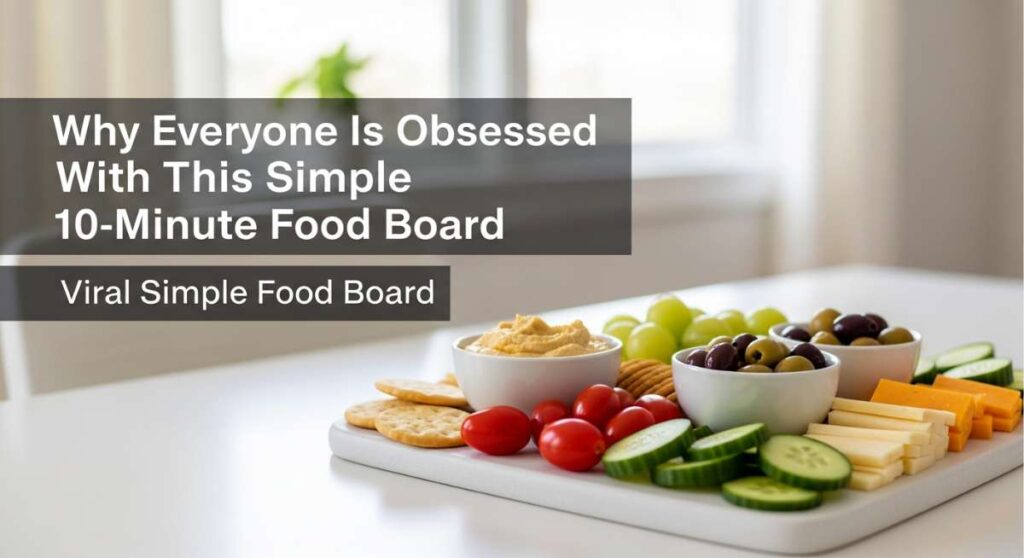
We’ve all been there: the sun is setting, the wine is chilled, and friends are about to walk through the door, but the thought of a formal three-course meal feels like a mountain you’re just not ready to climb. That’s exactly how the ’10-Minute Food Board’ obsession started in my kitchen. It’s less about frantic cooking and more about the art of the assembly, creating a centerpiece that feels indulgent, rustic, and incredibly welcoming without the stress of a professional kitchen. It’s about that sigh of relief when you realize you can host a gorgeous gathering and still actually enjoy the conversation.
The secret to this viral trend isn’t just the aesthetic; it’s the way it brings people together. There is something primal and joyful about tearing into perfectly seasoned chicken, dipping it into artisan sauces, and sharing a board overflowing with textures and flavors. Whether you’re celebrating a small win or just surviving a long Tuesday, this board is the ultimate hug in culinary form. Today, I’m breaking down every single way to master the star of the board—the chicken—so you can create your own viral-worthy spread tonight.
How to bake juicy chicken thighs

Why we love this
There is nothing quite as satisfying as biting into a chicken thigh that has been roasted to succulent perfection, where the meat practically melts away from the bone. The aroma of garlic and herbs fills the kitchen, promising a meal that is both comforting and sophisticated. When done right, the juices should run clear, shimmering against the golden exterior and pooling slightly on the board, inviting everyone to grab a piece. It’s the ultimate texture-and-flavor win that makes guests reach for seconds before they’ve even finished their first bite.
Ingredients
- 4-6 bone-in, skin-on chicken thighs
- 2 tablespoons extra virgin olive oil
- 1 teaspoon sea salt
- 1/2 teaspoon cracked black pepper
- 1 teaspoon garlic powder
- 1/2 teaspoon dried thyme
How to make it
- Preheat your oven to 400°F (200°C), ensuring the rack is in the center position for even heat distribution.
- Pat the chicken thighs bone-dry with paper towels; removing surface moisture is the most critical step for achieving a beautiful sear rather than a steam.
- In a small bowl, whisk together the olive oil, salt, pepper, garlic powder, and thyme to create a thick rub.
- Rub the mixture thoroughly over every inch of the chicken, making sure to get some under the skin for maximum flavor infusion into the meat.
- Place the thighs on a wire rack set over a rimmed baking sheet; this allows hot air to circulate around the entire piece of meat.
- Bake for 35 to 45 minutes, or until an instant-read thermometer hits 165°F (74°C) at the thickest part. The visual cue is a deep, honey-gold skin and clear running juices.
How to get crispy chicken skin

Why we love this
The sound of a crisp, crackling chicken skin is the true siren song of a food board, offering that addictive salty crunch that perfectly offsets the tender meat beneath. It feels like a decadent treat, reminiscent of high-end rotisserie chicken but with an even more intense, localized texture. When you tap it with a fork, it should sound hollow and firm, promising a sensory experience that transitions from a sharp snap to a rich, fatty melt-in-your-mouth finish. It is the gold standard of home cooking that turns a simple meal into a viral sensation.
Ingredients
- Skin-on chicken pieces (thighs or legs)
- 1/2 teaspoon baking powder (the secret ingredient!)
- 1 teaspoon kosher salt
- High-smoke point oil (like avocado oil)
How to make it
- Remove your chicken from the fridge 30 minutes prior to cooking to take the chill off, which helps the fat render more effectively.
- Dry the skin obsessively with paper towels until it feels like parchment paper.
- Mix the baking powder with your salt; the baking powder raises the pH level on the skin, breaking down the peptide bonds and allowing it to crisp up faster.
- Lightly coat the skin with a very thin layer of avocado oil, then sprinkle the salt/baking powder mixture evenly over the top.
- Place in a 425°F (220°C) oven. The higher heat is essential here to blast the moisture out of the skin quickly.
- Roast for 25-30 minutes until the skin is blistered and mahogany brown. If it isn’t quite there, flick the broiler on for 60-90 seconds, watching like a hawk to prevent burning.
How to roast chicken legs

Why we love this
Chicken legs are the underrated heroes of the food board, offering a rustic look that feels both playful and elegant when stacked high. The dark meat stays incredibly moist during the roasting process, absorbing whatever spices you throw its way while maintaining a robust, savory depth of flavor. Holding a perfectly roasted leg by the bone is a tactile joy, making it the ultimate finger food for a casual gathering. The smell of roasting poultry fat mingling with rosemary or lemon is enough to make anyone’s mouth water instantly.
Ingredients
- 6-8 whole chicken legs (drumsticks)
- 3 tablespoons melted butter
- 1 teaspoon smoked paprika
- 1/2 teaspoon onion powder
- Fresh rosemary sprigs
How to make it
- Set your oven to 425°F (220°C). High heat is vital for legs to ensure the meat cooks through without becoming rubbery.
- Line a heavy-duty baking sheet with parchment paper to catch the rendered fat and make cleanup effortless.
- Toss the legs in a large bowl with the melted butter, paprika, and onion powder until they are vibrantly orange and fully coated.
- Arrange the legs on the sheet with space between each; crowding them will cause them to steam rather than roast.
- Scatter the fresh rosemary sprigs among the chicken pieces to infuse the rendered fat with herbal notes.
- Bake for 30-35 minutes. You’ll know they are ready when the meat begins to pull back from the bone at the ‘ankle’ and the skin is taut and sizzling.
How to slow cook chicken thighs

Why we love this
There is a specific kind of magic that happens when chicken thighs are bathed in a slow cooker for hours, transforming into tender shreds that soak up every drop of sauce. The result is a texture so soft it requires nothing more than a gentle pull of a fork to fall apart, making it the perfect topping for crusty bread or crackers on your board. The aroma develops slowly, building a complex, rich scent that permeates the whole house, signaling that something truly soulful is being prepared. It’s the ultimate “set it and forget it” luxury that yields professional-level results.
Ingredients
- 2 lbs boneless chicken thighs
- 1/2 cup chicken bone broth
- 2 cloves smashed garlic
- 1 bay leaf
- Salt and pepper to taste
How to make it
- Place the chicken thighs in the bottom of the slow cooker in a single layer if possible.
- Season generously with salt and pepper, then add the smashed garlic cloves and the bay leaf for a subtle aromatic backbone.
- Pour the bone broth over the chicken; you don’t want to submerge it, just provide enough liquid to create a humid environment.
- Set the slow cooker to ‘Low’ for 6-7 hours or ‘High’ for 3-4 hours. Cooking on ‘Low’ is preferred for the most tender, silky results.
- Check for doneness by seeing if the meat flakes easily with a fork. Once tender, remove the chicken and shred it on a separate plate.
- Pro-tip: Pour some of the leftover cooking liquid over the shredded meat before serving on the board to keep it incredibly moist.
How to season boneless thighs

Why we love this
Seasoning boneless thighs is like painting on a blank canvas; because they lack the bone, you have more surface area to coat with bold, punchy flavors. The lack of bone also allows for a more even distribution of spice, ensuring that every single bite is an explosion of taste. Whether you go for a zesty citrus rub or a deep, earthy spice blend, the thighs act as a sponge, locking in those aromatics. It’s the easiest way to customize your food board to a specific theme, like Mediterranean, BBQ, or spicy Nashville style.
Ingredients
- 1.5 lbs boneless, skinless chicken thighs
- 1 tablespoon olive oil
- 1 teaspoon cumin
- 1 teaspoon chili powder
- 1/2 teaspoon brown sugar (for caramelization)
- Zest of one lime
How to make it
- In a large mixing bowl, combine the olive oil, cumin, chili powder, brown sugar, and lime zest to form a fragrant paste.
- Trim any excessive overhanging fat from the boneless thighs to ensure they cook evenly and don’t become greasy.
- Massage the spice paste into the meat, ensuring you get into all the nooks and crannies of the folded thigh meat.
- For the best flavor, let the seasoned chicken marinate in the fridge for at least 30 minutes, or up to 4 hours.
- When ready to cook, sear them in a hot cast-iron skillet for 5-6 minutes per side. The brown sugar will create a beautiful, dark crust that is slightly sweet and smoky.
- Rest the meat for 5 minutes before slicing it into strips for the board.
How to bake perfect chicken legs

Why we love this
Perfectly baked chicken legs are a nostalgia trip, reminding us of Sunday dinners and family gatherings, but with a modern, viral twist. They should have a uniform, chestnut-brown color and a skin that is tight and savory, housing meat that is steaming and succulent. The balance of the dark meat’s richness against a well-seasoned exterior creates a harmonious bite that doesn’t need much else. When they are lined up on a board with some fresh herbs and a dipping sauce, they look like a rustic feast fit for a magazine cover.
Ingredients
- 6 chicken drumsticks
- 2 tablespoons olive oil
- 1 teaspoon dried oregano
- 1/2 teaspoon lemon pepper
- 1/2 teaspoon kosher salt
How to make it
- Preheat the oven to 400°F (200°C). Prepare a baking sheet with a silicone mat or parchment paper.
- Pat the drumsticks dry. Moisture is the enemy of ‘perfect’—if they are wet, they will steam and the skin will be flabby.
- Coat the legs in oil and the dry seasoning blend, ensuring the lemon pepper is distributed evenly for that citrusy zing.
- Arrange the drumsticks on the sheet, alternating the direction of the bone ends to save space and ensure even airflow.
- Bake for 35 minutes. At the 20-minute mark, use tongs to rotate each leg 180 degrees. This ensures the bottom doesn’t get soggy and the whole leg gets that ‘perfect’ golden tan.
- Let them rest for 5 minutes before moving them to the board; this allows the juices to redistribute so they don’t run out when someone takes a bite.
How to make tender chicken thighs

Why we love this
Tenderness is the ultimate goal for any chicken dish, and thighs are the perfect candidate because of their higher fat content. When prepared with care, the meat should have a buttery consistency that melts on the tongue, offering a luxurious mouthfeel that boneless breasts simply can’t match. It feels like an indulgence, a treat for the senses that makes the simple act of eating feel like a celebration. Paired with a creamy dip or a bright chimichurri, these tender morsels become the star of any food board they grace.
Ingredients
- 4-6 boneless chicken thighs
- 1/4 cup plain Greek yogurt (the tenderizing secret!)
- 1 tablespoon lemon juice
- 2 cloves minced garlic
- Salt and white pepper
How to make it
- Whisk the yogurt, lemon juice, garlic, salt, and white pepper in a bowl. The lactic acid in the yogurt gently breaks down the muscle fibers without making the meat mushy.
- Coat the thighs in the yogurt mixture and let them sit for at least 1 hour in the refrigerator.
- Wipe off the excess marinade before cooking so the chicken sears rather than boils in the yogurt.
- Heat a skillet over medium heat. Do not go too high; we want a gentle cook to preserve that tender texture.
- Cook for about 6-7 minutes per side. Use a meat thermometer to pull them at exactly 165°F (74°C).
- Cover loosely with foil and let them rest for a full 10 minutes. This ‘carry-over’ cooking time is when the tenderness really sets in.
How to glaze oven baked chicken

Why we love this
A glossy, sticky glaze is the crown jewel of a viral food board, catching the light and promising a sticky-sweet-savory punch. It transforms the chicken into a jewel-toned masterpiece that looks professionally catered. The way the glaze bubbles and caramelizes in the oven creates those charred, sweet edges that everyone fights over. It’s a sensory delight that starts with the visual shimmer and ends with a complex flavor profile that lingers on the palate, making it impossible to stop at just one piece.
Ingredients
- 8 chicken wings or 4 thighs
- 1/4 cup honey or maple syrup
- 2 tablespoons soy sauce
- 1 tablespoon sriracha
- 1 teaspoon grated ginger
How to make it
- Bake your chicken as usual (at 400°F) until it is about 5-10 minutes away from being fully cooked.
- While the chicken cooks, simmer the honey, soy sauce, sriracha, and ginger in a small saucepan over medium heat until it thickens into a syrupy consistency.
- Remove the chicken from the oven and use a pastry brush to apply a thick layer of the glaze over each piece.
- Return to the oven for 5 minutes. The high sugar content will cause the glaze to bubble and ‘set.’
- Remove, apply a second coat of glaze for that ultra-shiny look, and broil for 1-2 minutes until you see small charred spots.
- Garnish with sesame seeds or scallions immediately so they stick to the glaze.
How to cook boneless chicken thighs

Why we love this
Boneless chicken thighs are the ultimate convenience food that doesn’t sacrifice an ounce of flavor. They cook incredibly fast, making them the perfect solution for a last-minute board when you’re short on time but still want to impress. Because they lay flat, they develop a beautiful, even sear across the entire surface, creating a savory ‘crust’ that is packed with umami. They are versatile, easy to eat, and can be sliced into elegant medallions that showcase the juicy, dark meat within.
Ingredients
- 1 lb boneless, skinless chicken thighs
- 1 tablespoon avocado oil
- 1 teaspoon poultry seasoning
- 1/2 teaspoon garlic salt
How to make it
- Flatten the thighs slightly with a meat mallet so they are an even thickness; this ensures the whole piece finishes cooking at the exact same time.
- Season both sides generously with poultry seasoning and garlic salt.
- Heat a heavy stainless steel or cast-iron pan over medium-high heat. Add the oil and wait until it shimmers.
- Lay the thighs in the pan, moving them away from you to avoid oil splatter. Don’t touch them for 5 minutes to allow a crust to form.
- Flip and cook for another 5 minutes. The internal temperature should reach 165°F (74°C).
- Remove to a cutting board and let them sit for 3 minutes before slicing. This prevents the juices from escaping onto your food board.
How to prepare crispy chicken legs
[IMAGE_10]
Why we love this
There is a rustic, campfire-esque charm to crispy chicken legs that makes them irresistible on a communal board. That deep, crunchable exterior gives way to a steaming interior that is rich and flavorful. It’s the kind of food that encourages you to get your hands a little dirty, fostering a relaxed and fun atmosphere. The contrast between the salty, seasoned skin and the succulent dark meat is a classic pairing that never goes out of style, making these a guaranteed hit for kids and adults alike.
Ingredients
- 6-8 chicken drumsticks
- 2 tablespoons cornstarch (the crunch factor!)
- 1 teaspoon paprika
- 1 teaspoon garlic powder
- Cooking spray
How to make it
- Preheat your oven to 425°F (220°C) and place a wire rack on top of a baking sheet.
- In a large Ziploc bag, combine the cornstarch, paprika, and garlic powder.
- Pat the legs dry, place them in the bag, and shake vigorously until every leg is lightly dusted in the cornstarch mixture.
- Arrange the legs on the wire rack. Spray them lightly with cooking spray; the oil will react with the cornstarch to create a ‘fried’ texture without the grease.
- Bake for 40-45 minutes, turning them halfway through. The cornstarch creates a micro-thin, ultra-crispy shell.
- Serve immediately while the ‘crunch’ is at its peak.
Conclusion: The Art of the Board
Creating a viral food board is less about following a strict recipe and more about embracing the joy of variety. By mastering these different ways to prepare chicken, you can mix and match textures—shredded, glazed, crispy, and juicy—to create a platter that keeps everyone coming back for more. Pile your chicken in the center, surround it with fresh veggies, artisanal cheeses, and a few signature dips, and watch as your simple 10-minute assembly becomes the talk of the night. Happy hosting!