

Why Everyone Is Obsessed With This Easy Viral Food Board
There is something almost magical about the way food brings us together, especially when it’s served in a way that feels intentional yet effortless. I remember the first time I set out a sprawling food board for my closest friends; the room immediately filled with a different kind of energy, one of shared discovery and relaxed joy. It’s not just about the sustenance; it’s about the aesthetic harmony of colors and the tactile experience of reaching for a crisp cracker or a succulent piece of fruit. This viral trend has taken over our feeds for a reason: it turns a simple meal into an interactive centerpiece that celebrates the season’s best flavors.
As we lean into the warmer months, the desire for light, vibrant, and shareable dishes only grows. Whether you are hosting a backyard soirée or just looking to elevate a quiet Tuesday night at home, the ‘Viral Simple Food Board’ is your secret weapon. It allows you to curate a story on a wooden plank, mixing sweet and savory, hot and cold, and soft and crunchy in a way that feels like a warm hug for your guests. Let’s dive into the essential components that make these boards so irresistible and how you can recreate this viral magic in your own kitchen.
How to make strawberry pie?

Why we love this
There is nothing quite like the scent of a fresh strawberry pie cooling on a windowsill to signal that summer has truly arrived. Each bite is a symphony of textures, from the buttery, shattering flakes of the golden-brown crust to the lush, jammy sweetness of sun-ripened berries that have been macerated to perfection. The vibrant red filling glistens like rubies, offering a burst of tartness that is perfectly balanced by a touch of sugar and perhaps a dollop of cold, whipped cream. It’s a nostalgic dessert that evokes memories of garden parties and simpler times, feeling both incredibly elegant and deeply comforting at the same time.
Ingredients
- 2 pints fresh strawberries, hulled and sliced
- 1 cup granulated sugar
- 3 tablespoons cornstarch
- 1 teaspoon vanilla extract
- 1 tablespoon lemon juice
- Double crust pie dough (homemade or store-bought)
- 1 egg (for egg wash)
- Turbinado sugar for topping
How to make it
- Preheat your oven to 400°F (200°C). Prepare your pie dough by rolling it out on a lightly floured surface until it is about 12 inches in diameter. Carefully drape it over a 9-inch pie plate, ensuring there are no air bubbles, and trim the excess to leave a 1-inch overhang.
- In a large mixing bowl, combine the sliced strawberries, granulated sugar, cornstarch, vanilla, and lemon juice. Toss gently with a spatula until every berry is evenly coated. The cornstarch is crucial here; it will thicken the juices as they bake, preventing a soggy bottom.
- Pour the berry mixture into the prepared bottom crust, mounding them slightly in the center for a beautiful dome effect.
- Roll out the second piece of dough and cut into strips for a lattice top or place it whole over the berries, cutting several large slits to allow steam to escape. Crimp the edges of the top and bottom crusts together to seal in the goodness.
- Whisk the egg with a teaspoon of water and brush the mixture over the entire top crust. This creates that professional, glossy, golden-brown finish. Sprinkle generously with turbinado sugar for a delightful crunch.
- Bake for 45-50 minutes. Watch for the filling to bubble thick and slow through the vents, and the crust to reach a deep, toasted gold. If the edges brown too quickly, tent them with foil. Let the pie cool completely—at least 4 hours—to allow the filling to set before slicing.
How to cook rotel dip?

Why we love this
Rotel dip is the ultimate crowd-pleaser, a creamy, spicy, and deeply savory concoction that seems to disappear the moment it hits the table. There is a primal satisfaction in the way the warm, melted cheese clings to a salty tortilla chip, carrying with it the zesty kick of diced tomatoes and green chilies. The aroma is instantly recognizable—rich, smoky, and inviting—making it the quintessential snack for game days or casual get-togethers. It’s a dish that doesn’t take itself too seriously but delivers a massive punch of flavor that keeps everyone coming back for “just one more” dip.
Ingredients
- 1 lb ground beef or pork sausage
- 1 block (32 oz) Velveeta cheese, cubed
- 2 cans (10 oz each) Ro-Tel Diced Tomatoes and Green Chilies, undrained
- 1/2 teaspoon garlic powder
- 1/4 teaspoon cumin
- Fresh cilantro for garnish
How to make it
- Place a large skillet or Dutch oven over medium-high heat. Add the ground meat and cook, breaking it apart with a wooden spoon, until it is fully browned and no pink remains. Drain the excess fat thoroughly to ensure the dip isn’t greasy.
- Reduce the heat to low. Add the cubed Velveeta cheese to the skillet with the meat. It’s important to keep the heat low during this stage to prevent the cheese from scorching or becoming grainy.
- Pour in both cans of Ro-Tel, including the juices. The liquid from the cans is essential for achieving the perfect dipping consistency.
- Stir the mixture constantly with a heat-resistant spatula. As the cheese begins to melt, add the garlic powder and cumin to deepen the flavor profile.
- Continue stirring until the mixture is completely smooth, glossy, and the meat is evenly distributed throughout the cheese. This usually takes about 5-8 minutes of gentle heating.
- Transfer the dip to a warm serving bowl or a small slow cooker set to the “warm” setting to maintain that perfect, pourable texture throughout your party. Garnish with fresh cilantro for a pop of color and freshness.
How to pack beach snacks?
Why we love this
Packing the perfect beach snack box is an art form that balances hydration, nutrition, and pure seaside indulgence. There is something uniquely satisfying about opening a crisp, cool container while your toes are tucked into the warm sand and the salty breeze tickles your face. The contrast of cold, juicy grapes or crunchy cucumber slices against the heat of the sun provides an instant refresh that keeps your energy up for swimming and lounging. It’s about creating a portable feast that feels organized and elevated, turning a simple day at the shore into a gourmet experience without the mess of sandy sandwiches.
Ingredients
- Firm fruits (grapes, blueberries, apple slices with lemon)
- Crunchy vegetables (baby carrots, snap peas, Persian cucumbers)
- Individual hummus or guacamole pods
- Hard cheeses (cheddar cubes, gouda)
- Pretzels or thick-cut crackers
- Nuts or trail mix
How to make it
- Select a high-quality, airtight multi-compartment container or individual bento boxes. This prevents flavors from mingling and keeps the “crunchy” items from getting soft.
- Wash and thoroughly dry all produce. Moisture is the enemy of a beach bag, so use a paper towel to ensure your grapes and veggies are bone-dry before packing.
- Place heavier, firmer items like cheese cubes and carrot sticks at the bottom of the compartments. Layer more delicate items, like crackers or berries, on top.
- For items that might brown, like apples, toss them in a quick bath of lemon juice and water before packing to keep them looking vibrant and appetizing.
- Nestle dip pods (like hummus) in the center of the veggies to save space and provide easy access for dipping.
- Crucial Step: Use frozen water bottles or juice boxes as your “ice packs” inside an insulated cooler bag. As they melt throughout the day, you’ll have ice-cold drinks to accompany your perfectly chilled snacks. Always keep the container upright and shaded under an umbrella to maintain the best texture.
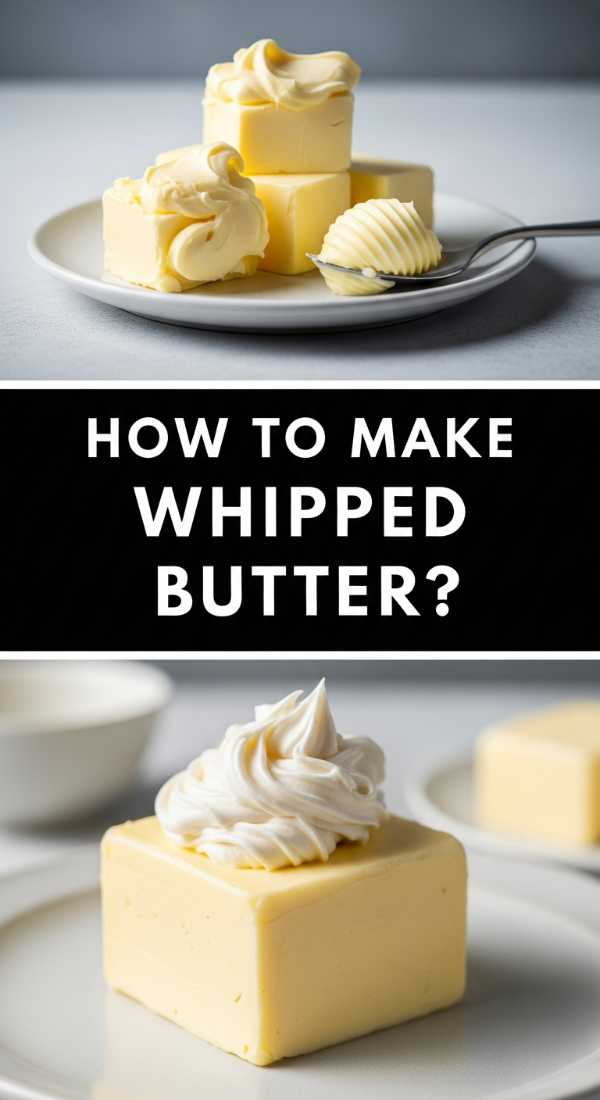
How to make whipped butter?

Why we love this
Whipped butter is the culinary equivalent of a soft, silken cloud, transforming a humble staple into a luxurious spread that melts effortlessly into warm bread. The process of aerating the butter changes its density, making it light, fluffy, and incredibly easy to spread without tearing your delicate pastries or toast. When you hit it with a pinch of flaky sea salt or a drizzle of honey, it becomes a sensory delight—salty, creamy, and decadently smooth. It elevates any breakfast or dinner table, making even a simple loaf of bread feel like a special occasion treat from a high-end bistro.
Ingredients
- 1 cup (2 sticks) high-quality unsalted butter, softened to room temperature
- 2 tablespoons whole milk or heavy cream
- 1/2 teaspoon flaky sea salt (optional)
- Optional mix-ins: Honey, minced herbs, or lemon zest
How to make it
- Ensure your butter is truly at room temperature. It should be soft enough that your finger leaves an indentation easily, but it shouldn’t be melting or oily. This is the most critical factor for achieving volume.
- Place the butter in the bowl of a stand mixer fitted with the whisk attachment (or use a hand mixer in a deep bowl).
- Begin whisking on low speed to break up the butter, then gradually increase to high. Beat the butter for about 2-3 minutes until it starts to look pale and slightly increased in volume.
- With the mixer running on medium-high, slowly drizzle in the milk or heavy cream. This adds moisture and helps create that ultra-creamy, spreadable texture.
- Continue to whip on high for another 2-4 minutes. You are looking for the butter to turn almost white and double in size, appearing light and airy like whipped cream.
- Fold in your salt or any optional flavors using a spatula. Transfer the butter to a decorative crock or bowl. If not serving immediately, store in the fridge, but let it sit at room temperature for 15 minutes before serving to regain its fluffiness.
How to prep camping meals?
Why we love this
There is a rugged, soul-warming beauty in a meal prepared over an open flame, surrounded by the whispering pines and the crackle of a campfire. Prepping these meals ahead of time takes the stress out of outdoor cooking, allowing you to focus on the stars and the company rather than chopping onions in the dark. The aroma of seasoned meats and vegetables caramelizing inside a foil packet is intoxicating, promising a hearty, smoky dinner that tastes better than anything cooked in a conventional kitchen. It’s about the simplicity of good food and the primal joy of eating under the vast, open sky.
Ingredients
- Protein of choice (chicken breast, smoked sausage, or shrimp)
- Starchy base (par-boiled baby potatoes or quick-cook rice)
- Vegetables (bell peppers, zucchini, corn on the cob)
- Olive oil or butter
- Heavy-duty aluminum foil
- Signature seasoning blend (garlic powder, smoked paprika, salt, pepper)
How to make it
- The secret to successful camping meals is “The Prep.” Do all your washing, peeling, and chopping at home. Cut all ingredients into uniform, bite-sized pieces so they cook evenly at the same rate.
- For potatoes or hard root vegetables, par-boil them for 5 minutes at home. This ensures they are tender by the time your protein is cooked through over the uneven heat of a fire.
- Create your “foil packs” at home. Lay out a large square of heavy-duty foil. Place a portion of protein, veggies, and potatoes in the center. Drizzle generously with olive oil and add a pat of butter for richness.
- Season aggressively. Campfire cooking can handle bold flavors, so don’t be shy with the herbs and spices.
- Fold the foil over the food and crimp the edges tightly to create a sealed pouch. This traps the steam, which cooks the food quickly and keeps it moist.
- Store the pouches in a leak-proof gallon bag inside your cooler. When the fire has burned down to glowing coals (not licking flames), place the packs on a grate or nestled near the edges of the heat. Cook for 15-20 minutes, flipping once with tongs. Use a meat thermometer to ensure the protein has reached a safe internal temperature before opening carefully to avoid the steam.
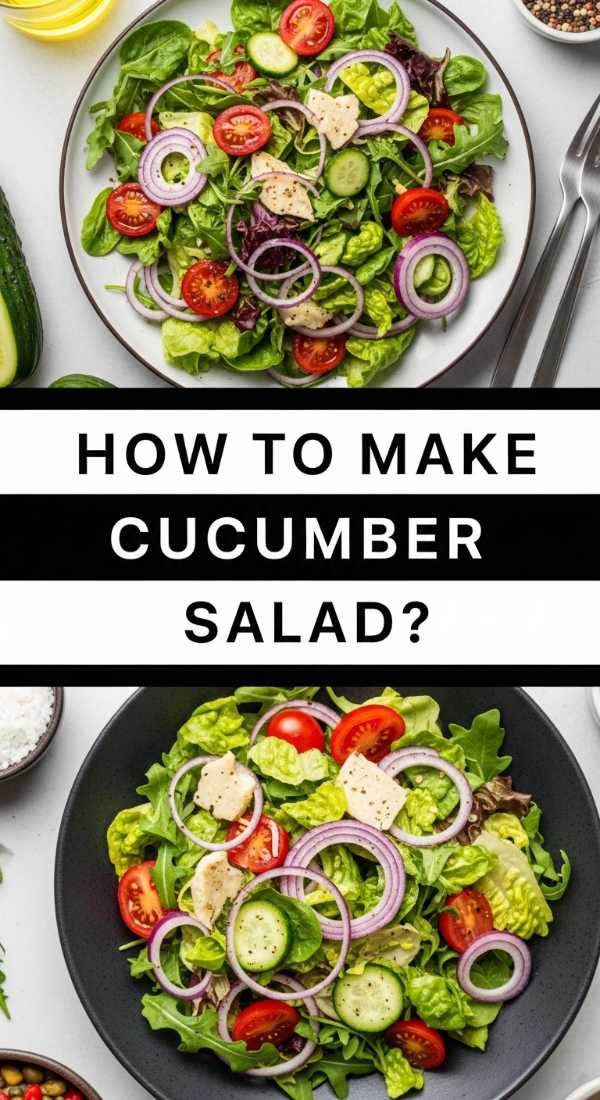
How to make cucumber salad?
Why we love this
A crisp cucumber salad is the ultimate palate cleanser, offering a refreshing, vinegary snap that cuts through the richness of any summer BBQ. The thin, translucent slices of cucumber, paired with the sharp bite of red onion and the herbal brightness of fresh dill, create a dish that is as beautiful to look at as it is to eat. It feels incredibly light and hydrating, making it the perfect accompaniment to heavy grilled meats. The way the cool juice of the cucumber mingles with the tangy dressing creates a savory brine that you’ll want to drink straight from the bowl—it’s pure, uncomplicated summer in every bite.
Ingredients
- 2 large English cucumbers, thinly sliced
- 1/2 small red onion, very thinly sliced into half-moons
- 1/2 cup white wine vinegar or apple cider vinegar
- 2 tablespoons granulated sugar
- 1 teaspoon salt
- 1/4 cup fresh dill, chopped
- 1/2 teaspoon cracked black pepper
How to make it
- Use a mandoline or a very sharp chef’s knife to slice the cucumbers into uniform, thin rounds. If using standard garden cucumbers, you may want to peel them partially in a striped pattern to reduce bitterness from the skin.
- Place the sliced cucumbers in a colander and sprinkle with the teaspoon of salt. Let them sit for 15-20 minutes. This “sweating” process draws out excess water, ensuring your salad stays crunchy and the dressing doesn’t get diluted.
- While the cucumbers rest, whisk together the vinegar, sugar, and black pepper in a small bowl until the sugar is completely dissolved.
- Gently pat the cucumbers dry with a paper towel and place them in a large glass bowl along with the sliced red onions.
- Pour the dressing over the vegetables and toss gently to coat. The onions will soften slightly in the vinegar, losing their harsh bite and becoming sweet and tangy.
- Add the fresh dill last to preserve its vibrant green color and aromatic punch. Chill the salad in the refrigerator for at least 30 minutes before serving. This allows the flavors to meld and the cucumbers to become perfectly marinated.
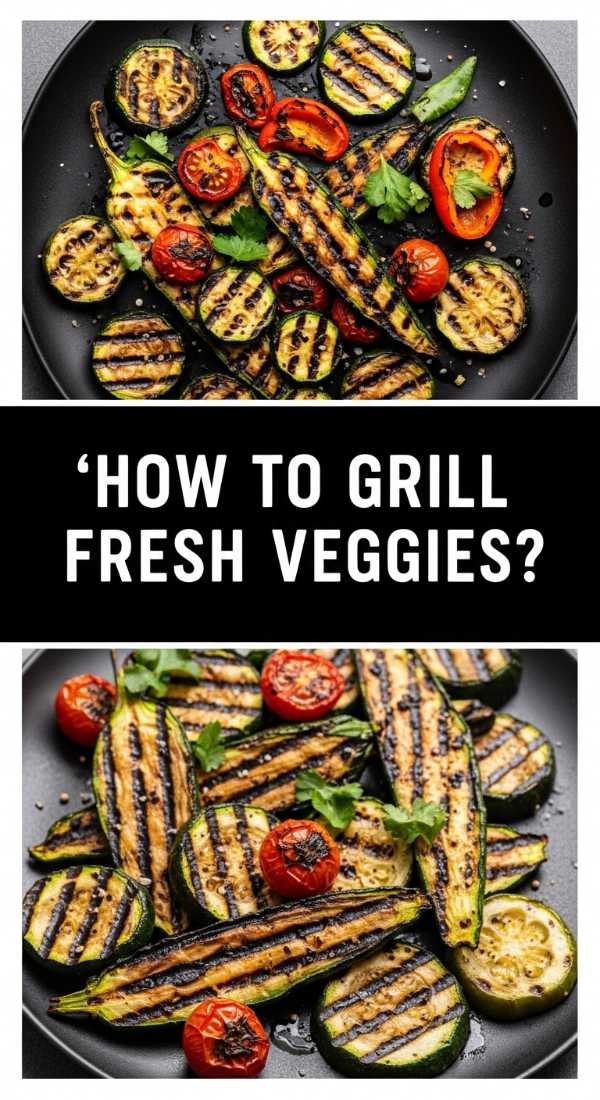
How to grill fresh veggies?
Why we love this
Grilling fresh vegetables transforms them from simple garden sides into smoky, charred masterpieces with a concentrated, natural sweetness. There is a specific visual appeal to the bold, dark grill marks against the bright greens of asparagus or the deep purples of eggplant. The high heat of the grill caramelizes the sugars within the vegetables, giving them a tender-crisp texture that is far superior to steaming or boiling. It’s a sensory experience that combines the outdoor aroma of charcoal with the earthy, fresh scents of the harvest, making healthy eating feel like a true indulgence.
Ingredients
- Assorted seasonal veggies (bell peppers, zucchini, asparagus, portobello mushrooms)
- 3 tablespoons extra virgin olive oil
- 2 tablespoons balsamic glaze
- 1 teaspoon dried oregano
- Salt and pepper to taste
- Lemon wedges for serving
How to make it
- Prepare your grill for medium-high heat (about 400°F). Ensure the grates are scrubbed clean and lightly oiled to prevent sticking.
- Cut your vegetables into large, sturdy pieces. Asparagus can stay whole, but zucchini should be sliced into thick planks and peppers into wide strips. This prevents them from falling through the grates.
- In a large bowl, toss the vegetables with olive oil, oregano, salt, and pepper. Do not add the balsamic glaze yet, as the sugar in it will burn too quickly over direct heat.
- Place the vegetables on the grill in a single layer. Start with the denser veggies like peppers and mushrooms, which take longer to cook.
- Grill for 3-5 minutes per side. Look for clear, charred grill marks and a slight softening of the texture. Use tongs to flip them carefully; they should release easily from the grate when they are ready.
- Once removed from the grill, drizzle immediately with the balsamic glaze and a squeeze of fresh lemon juice. The heat from the veggies will thin the glaze, allowing it to coat every nook and cranny for a sweet and tangy finish.
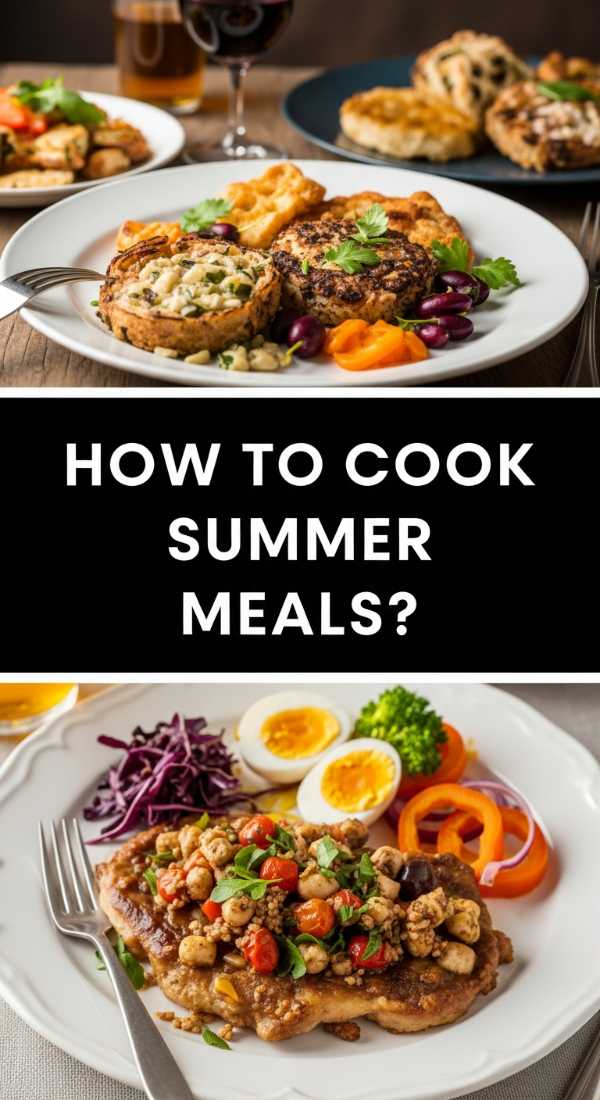
How to cook summer meals?

Why we love this
Summer cooking is all about honoring the ingredient and doing as little to it as possible to let its natural brilliance shine. It’s a season of vibrant salads, quick sears, and cold platters that celebrate the abundance of the farmer’s market without heating up the entire house. There is a relaxed, sun-drenched quality to these meals—they feel light enough to enjoy before a twilight walk but satisfying enough to fuel a day of adventure. We love summer meals because they encourage us to eat with our eyes first, filling our plates with a rainbow of produce and enjoying the simple, clean flavors of the earth.
Ingredients
- Fresh heirloom tomatoes
- Burrata or fresh mozzarella cheese
- Prosciutto or cold-cured meats
- Artisan sourdough or baguette
- Fresh basil and arugula
- High-quality olive oil and sea salt
How to make it
- Focus on assembly rather than intense cooking. The goal of a great summer meal is to minimize time at the stove. Start by sourcing the highest quality, ripest produce you can find.
- Slice heirloom tomatoes into thick rounds and arrange them on a large platter. Season them immediately with flaky sea salt to draw out their juices.
- Tear a ball of fresh burrata and place it in the center of the tomatoes, letting the creamy interior spill out. This creates an instant sauce for your bread.
- Artfully drape ribbons of prosciutto around the cheese and tomatoes. The saltiness of the meat perfectly complements the sweetness of the fruit.
- Toast thick slices of sourdough with a bit of olive oil on a grill pan or in a toaster until the edges are charred and crispy.
- Finish the entire platter with a heavy handed drizzle of your best olive oil, a scatter of fresh basil leaves, and a handful of peppery arugula. Serve family-style in the center of the table with chilled glasses of rosé for the ultimate effortless summer dinner.
How to bake fresh pie?

Why we love this
Baking a pie from scratch is a labor of love that fills the kitchen with an intoxicating aroma of toasted butter and caramelizing fruit. There is a deep, tactile satisfaction in working the dough—feeling the cold bits of butter under your fingers and watching it transform into a flaky, golden vessel for seasonal treasures. A perfectly baked pie is a work of art, with its bubbling juices escaping through the vents and a crust that shatters with a crisp, musical sound at the touch of a fork. It’s the ultimate centerpiece for any gathering, representing warmth, home, and the timeless joy of baking.
Ingredients
- 2 1/2 cups all-purpose flour
- 1 cup (2 sticks) cold unsalted butter, cubed
- 1 teaspoon salt
- 1 tablespoon sugar
- 6-8 tablespoons ice water
- Fruit filling of choice (apple, peach, or berry)
How to make it
- Keep everything cold. This is the golden rule of pie baking. Chill your flour and your butter in the freezer for 15 minutes before starting.
- In a food processor or bowl, pulse/cut the butter into the flour, salt, and sugar until the mixture resembles coarse crumbs with some pea-sized chunks of butter remaining. These chunks create the steam pockets that result in a flaky crust.
- Add ice water one tablespoon at a time, mixing until the dough just holds together when squeezed. Do not overwork the dough, or it will become tough. Divide into two discs, wrap in plastic, and chill for at least 1 hour.
- Roll out your bottom crust and fit it into the pie tin. For the best texture, “blind bake” the bottom crust if your filling is very wet. Line with parchment, fill with pie weights, and bake at 375°F for 12 minutes.
- Add your prepared fruit filling. Ensure your top crust has adequate venting (slits or lattice) to allow moisture to escape, preventing the crust from becoming soggy.
- Bake on the lowest rack of the oven. This ensures the bottom crust gets enough direct heat to crisp up. Bake until the crust is a deep, mahogany brown and the filling has been bubbling for at least 5-10 minutes to ensure the thickeners have activated. Always allow the pie to cool completely on a wire rack to set the structure.
How to serve party dip?
[IMAGE_10]
Why we love this
The way you serve a party dip can elevate it from a simple snack to the sophisticated star of your food board. Presentation is everything; a beautifully garnished dip surrounded by an architectural arrangement of dippers invites guests to dive in and enjoy. We love the communal nature of a well-served dip—it’s a focal point where conversations happen and connections are made. When served in the right vessel with a thoughtful variety of textures for dipping, it shows your guests that you’ve considered every detail of their experience, making the gathering feel truly special and curated.
Ingredients
- Your favorite hot or cold dip
- Varied dippers (proustini, endive leaves, colorful bell pepper strips, pita chips)
- Garnishes (microgreens, red pepper flakes, olive oil swirl, toasted nuts)
- A hollowed-out bread bowl or decorative ceramic dish
How to make it
- Choose your vessel based on the dip’s temperature. Use a pre-warmed ceramic dish for hot dips to retain heat, or a chilled marble bowl for cold yogurt or sour cream-based dips.
- For a rustic, viral look, hollow out a round loaf of sourdough bread and pour the dip inside. Place the removed bread cubes around the base for dipping.
- The “Swirl and Garnish” technique: Use the back of a spoon to create a deep decorative swirl on the surface of the dip. Drizzle high-quality olive oil into the grooves and sprinkle with a contrasting spice like paprika or sumac.
- Arrange your dippers in a “fan” or “river” pattern leading toward the dip. Group them by color to create a rainbow effect on your board, which is highly photogenic and appetizing.
- Incorporate “functional garnishes.” If it’s a crab dip, top with a dusting of Old Bay and fresh chives. If it’s hummus, add a pile of crispy chickpeas in the center for added texture.
- Always provide a small spreading knife or a dedicated spoon so guests don’t have to rely solely on their crackers, which can break in thicker dips. This keeps the presentation neat throughout the entire party.
The Final Touch: Bringing It All Together
The beauty of the viral food board lies in its flexibility and the joy it sparks in both the maker and the eater. By combining these detailed recipes—from the sweet crunch of a strawberry pie to the smoky depth of grilled veggies—you create a tapestry of flavors that caters to every craving. Remember, there are no strict rules here; the goal is to create a moment of connection. So, pour a glass of something sparkling, arrange your favorite bites with care, and enjoy the effortless elegance of your very own viral-inspired spread. Happy hosting!