

There is something truly magical about the way our homes can evolve alongside us, shifting from mere living spaces into true reflections of our souls. I remember the first time I picked up a power drill; my hands were shaking, but the vision of a transformed sunroom kept me going. That spark of creativity—the moment you realize your own two hands can turn a Pinterest board into a physical reality—is exactly why we’re all here today. It’s about more than just aesthetics; it’s about crafting a sanctuary that makes you exhale with relief the moment you step through the door.
This year, the viral trends aren’t just about what looks good on a screen; they are deeply rooted in functionality, serenity, and a touch of nostalgic whimsy. Whether you are looking to reclaim your backyard for summer evenings or finally tackle that pantry that’s been haunting your dreams, these projects are designed to be approachable yet high-impact. Grab a cup of coffee (or a glass of wine!), and let’s dive into the DIY projects that will make your home the most talked-about spot on the block.
How to Build a Wood Trellis for a Vertical Garden Oasis

Why we love this
Imagine stepping onto your patio and being greeted by the sweet, intoxicating scent of jasmine or the vibrant, climbing petals of a clematis. A vertical trellis doesn’t just save space; it creates a living wall of texture that softens the hard lines of your architecture and brings a lush, woodland feel to even the smallest urban balcony. The way the sunlight filters through the crisscrossed cedar slats, casting dancing shadows on the ground below, provides a sensory experience that feels like a private escape into nature every single morning.
Essential Elements:
- 8-foot Cedar or Pressure-Treated 2x2s
- Exterior grade wood screws
- Wood stain or sealant (outdoor rated)
- Galvanized wire (optional for extra support)
- Drill and miter saw
- Climbing plants like Star Jasmine, Honeysuckle, or Mandevilla
How to make it
- Begin by measuring your intended space to determine the height and width of your trellis; standard dimensions are usually 6 feet tall by 2 feet wide. Use a miter saw to cut your 2×2 cedar posts into two long vertical rails and several horizontal rungs spaced 10-12 inches apart.
- Lay your vertical rails flat on a level surface and mark the placement for each horizontal rung with a pencil to ensure they are perfectly parallel. Pre-drill pilot holes at every intersection to prevent the cedar from splitting when you drive the screws in.
- Secure the horizontal rungs to the vertical rails using exterior-grade wood screws, checking for squareness with a carpenter’s square as you go. For a modern look, consider an asymmetrical grid pattern rather than a standard ladder design.
- Apply a high-quality outdoor wood stain or a clear UV-protectant sealant to preserve the wood’s color and protect it from moisture and sun damage. Allow it to dry completely for at least 24 hours.
- Mount the trellis to your wall or fence using spacers to leave at least a 2-inch gap behind it; this allows air to circulate and gives the plant tendrils room to wrap around the wood. Plant your climbers at the base and gently weave the first few vines into the lower rungs to guide their growth.
How to Update a Retro Ranch Exterior for Modern Curb Appeal

Why we love this
There is a unique charm to a mid-century ranch, but giving it a modern face-lift feels like watching a classic movie get a high-definition remaster. By blending the organic warmth of natural wood with the bold, sophisticated punch of matte black hardware, you create a facade that feels both grounded and incredibly current. The tactile contrast of smooth painted brick against the rough-hewn texture of cedar accents creates a visual rhythm that draws the eye and makes your home the undisputed star of the neighborhood.
Essential Elements:
- High-quality exterior paint (Matte Charcoal or Navy)
- Cedar siding planks or slats for accents
- Modern house numbers (floating style)
- Large-scale matte black wall sconces
- Power washer and high-grit sandpaper
- Paint sprayer for a professional finish
How to make it
- Start with a thorough power wash of the entire exterior to remove decades of dirt, mildew, and loose paint; this is the most critical step for ensuring your new finish adheres properly. Scrape away any remaining flakes and sand rough spots until the surface is uniform.
- Tape off windows, doors, and trim with heavy-duty painter’s tape and plastic sheeting. Use an airless paint sprayer to apply a high-quality exterior primer, followed by two coats of a deep, modern hue like charcoal or midnight blue, which instantly updates the dated brick or siding.
- Select a focal point, such as the entryway or a specific bump-out, to install horizontal cedar slats. Use a pneumatic nail gun to secure the slats over a waterproof barrier, spacing them 1/4 inch apart for a clean, architectural shadow line.
- Swap out dated, small porch lights for oversized, linear matte black lanterns. The scale is key here—larger lights make the home feel more substantial and luxurious. Mount them at eye level to flank the front door.
- Finish the look by installing large, vertical floating house numbers in a brushed nickel or matte black finish. Ensure they are placed in a well-lit area where they are easily visible from the street, providing that final polished touch of modern elegance.
How to Design Rock Flower Beds for a Maintenance Free Yard
Why we love this
Say goodbye to the endless cycle of weeding and mulching and hello to the serene, sculptural beauty of a rock flower bed. There is a profound sense of calm in the crunch of river stones underfoot and the way they gleam after a light rain, highlighting the deep greens of hardy succulents and grasses. This design offers a sophisticated, Zen-like aesthetic that stays crisp and clean through every season, providing a permanent structure to your landscape that never fades or washes away.
Essential Elements:
- Commercial-grade landscape fabric
- River rocks, lava rocks, or pea gravel
- Steel or heavy-duty plastic edging
- Drought-tolerant plants (Agave, Lavender, Blue Fescue)
- Landscape pins or staples
- A heavy rake and wheelbarrow
How to make it
- Clear the designated area of all grass, weeds, and debris, digging down about 3-4 inches to create a recessed bed that will hold the rocks in place. Ensure the soil is leveled and slightly sloped away from your home’s foundation to prevent water pooling.
- Install your edging material along the perimeter of the bed. If using steel edging, use a rubber mallet to drive the stakes into the ground, ensuring a smooth, flowing curve or a sharp, geometric line depending on your style preference.
- Lay down a double layer of professional-grade landscape fabric, overlapping the seams by at least 6 inches. Secure the fabric tightly to the ground using landscape staples every 12 inches to prevent any future weed growth from pushing through.
- Cut “X” shapes into the fabric where you want to place your plants. Dig a hole through the fabric, enrich the soil with compost, and set your drought-tolerant plants into the ground, tucking the fabric back around the base of the stems.
- Pour your chosen stones into the bed, starting from the center and working outward. Use a heavy rake to distribute the rocks to a depth of at least 2-3 inches, ensuring the landscape fabric is completely hidden and the surface is level and uniform.
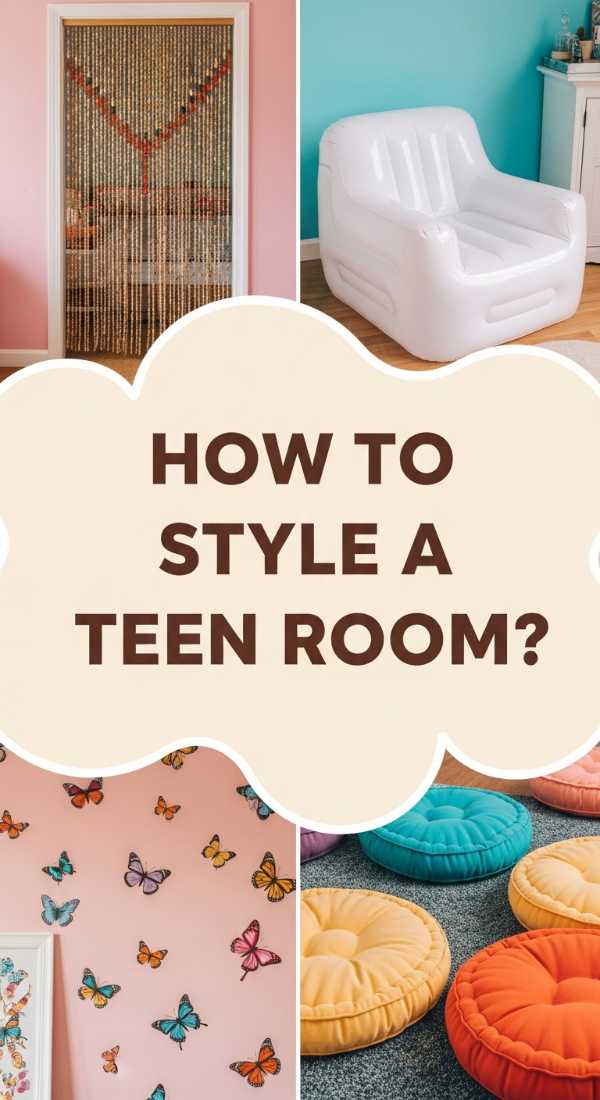
How to Style a Nostalgic Room for the Ultimate Teen Hangout

Why we love this
Designing a teen hangout is all about capturing that elusive balance between childhood comfort and emerging independence. A nostalgic theme—think 90s neon meets cozy retro textures—creates a space that feels like a warm hug, filled with velvet floor cushions, glowing lava lamps, and the soft crackle of a vinyl record. It’s a sensory retreat where the lighting is always low and vibey, encouraging hours of deep conversation, gaming marathons, and creative expression in a world that feels entirely their own.
Essential Elements:
- LED strip lights or neon wall signs
- Modular floor seating or bean bag chairs
- Gallery wall of vintage posters or polaroids
- Faux fur rugs and chunky knit throws
- A dedicated record player station
- Floating shelves for collectibles
How to make it
- Establish a color palette that leans into retro-cool, such as sage green, burnt orange, and cream, or a more vibrant palette of electric blue and magenta. Paint a focal wall in a matte finish to provide a backdrop for the decor without overwhelming the senses.
- Install smart LED light strips along the ceiling perimeter or under the bed frame. These allow the teen to change the entire mood of the room from a phone app, shifting from a bright study environment to a low-lit “lo-fi” hangout vibe in seconds.
- Create a “conversation pit” by layering a plush faux fur rug with several oversized velvet floor cushions and a low coffee table. This encourages lounging and makes the room feel less like a bedroom and more like a private lounge.
- Curate a gallery wall that mixes textures. Combine framed vintage band posters with a grid of polaroid photos clipped to a wire mesh, adding a neon sign in the center for a bright, focal pop of nostalgic light.
- Organize a dedicated hobby zone, such as a vinyl listening station or a gaming desk. Use floating shelves to display prized possessions like sneakers, vinyl records, or figurines, keeping the floor clear while personalizing the vertical space.
How to Create a Private Hot Tub Area for a Backyard Sanctuary

Why we love this
The ultimate luxury isn’t just owning a hot tub; it’s the feeling of total seclusion as you soak under the stars. By surrounding your spa with tall, whispering privacy screens and the soft glow of Edison bulbs, you transform a simple appliance into a five-star spa experience. The steam rising into the cool night air, the sound of bubbling water, and the scent of nearby cedar wood combine to create a therapeutic sanctuary that washes away the stress of the day before you even step foot back inside.
Essential Elements:
- Pre-fabricated privacy lattice or DIY wood screens
- Outdoor string lights (shatterproof)
- All-weather outdoor rug
- Potted tall grasses or bamboo for natural screening
- Towel rack and waterproof storage bench
- Level concrete pad or reinforced deck
How to make it
- Ensure your hot tub is placed on a perfectly level, reinforced surface that can support the immense weight of the water. If placing on a patio, check for any cracks; if building a new area, a 4-inch thick concrete pad is the gold standard for stability.
- Erect privacy barriers on at least two sides of the tub. You can use pre-made decorative metal screens for a modern look or build 7-foot tall cedar slat walls. Position them to block views from neighbors’ windows while still allowing for a pleasant breeze.
- Hang heavy-duty, outdoor-rated string lights in a zig-zag pattern above the tub area. Use 4×4 posts anchored in planters if you don’t have existing structures to attach them to, ensuring the lights are high enough to stay away from the rising steam.
- Place a large, polypropylene outdoor rug around the base of the hot tub. This provides a soft, non-slip surface for wet feet and helps define the “spa zone” as a distinct room within your backyard.
- Add functional accessories like a wall-mounted wooden towel rack and a weather-resistant bench. Surround the perimeter with large planters filled with tall Horsetail Reed or Bamboo to create a secondary “green” layer of privacy and a lush, tropical atmosphere.
How to Craft a Budget Grill Station for Epic Summer Cookouts

Why we love this
There is nothing quite like the sizzle of a steak hitting a hot grate while the sun sets on a warm Friday evening. A dedicated grill station elevates the outdoor cooking experience from a chore to a theatrical event, providing the counter space you need for prepping veggies and resting meats without running back and forth to the kitchen. The organization of gleaming stainless steel tools against a rugged wood frame makes the backyard feel like a professional outdoor kitchen, inviting everyone to gather ’round with a cold drink and enjoy the process.
Essential Elements:
- Two weather-resistant base cabinets or DIY 2×4 frames
- Stone or concrete countertop remnants
- Stainless steel hooks and magnetic tool strips
- Heavy-duty locking casters
- Exterior grade wood stain
- Built-in bottle opener
How to make it
- Build two identical rectangular frames using pressure-treated 2x4s, sized to match the height of your grill (standard is 36 inches). Reinforce the corners with metal brackets to ensure the station can handle the weight of a stone countertop and heavy cast-iron cookware.
- Clad the sides of the frames with cedar fence pickets for an affordable, moisture-resistant finish. Sand the wood smooth and apply a dark walnut or weathered gray exterior stain to give the station a high-end, custom-built look.
- Attach four heavy-duty, 3-inch locking casters to the bottom of each unit. This allows you to roll the station into a configuration that works for your crowd, or tuck it away against the house during the winter months.
- Secure a durable countertop surface to the top of the frames. Visit a local stone yard to find “remnants” of granite or quartz—these are often sold at a steep discount and provide a heat-proof, easy-to-clean prep surface.
- Install a magnetic tool strip on the front for spatulas and tongs, and mount a vintage-style bottle opener on the side. Finish with a lower shelf made of 1×4 slats to store your charcoal bags or extra propane tanks, keeping everything organized and within arm’s reach.
How to Master Realistic Pantry Organization for a Functional Kitchen
Why we love this
A perfectly organized pantry is like a deep breath for your brain. The visual harmony of uniform glass jars, the satisfying ‘pop’ of an airtight seal, and the ease of seeing exactly what you have at a glance transforms meal prep from a chaotic scramble into a rhythmic joy. It’s not about perfection; it’s about a system that works for your life, where every snack has a home and the “expired can” graveyard becomes a thing of the past. The clean, minimalist aesthetic also makes your kitchen feel twice as large and significantly more luxurious.
Essential Elements:
- Airtight glass or BPA-free plastic canisters
- Tiered shelf risers for canned goods
- Woven or wire baskets for bulk items
- Uniform labels (chalkboard or vinyl)
- Lazy Susans for oils and vinegars
- Over-the-door rack for spices or wraps
How to make it
- Empty the entire pantry and wipe down every shelf. This is the time to check expiration dates and donate unexpired items you know you won’t use. Categorize your items on the floor (e.g., baking, breakfast, snacks, grains) to see the volume of each category.
- Decant dry goods like flour, sugar, pasta, and cereal into airtight clear containers. This not only keeps food fresher for longer but allows you to see when you are running low. Use uniform labels placed at the same height on every jar for a professional, cohesive look.
- Utilize tiered risers for canned goods so that the back row is elevated and visible. Place taller items in the back and shorter items in the front. Group cans by type (veggies together, soups together) to make finding ingredients instantaneous.
- Place “grab-and-go” items like kid’s snacks or protein bars into open woven baskets. This hides the messy, colorful packaging while keeping the items easily accessible. Use clip-on labels for the baskets so everyone in the family knows where things belong.
- Install a Lazy Susan in the corners or on eye-level shelves for oils, vinegars, and sauces. Being able to spin the tray to find the balsamic vinegar prevents you from having to knock over three other bottles to reach it. Reserve the floor space for heavy bulk items stored in large, rolling bins.
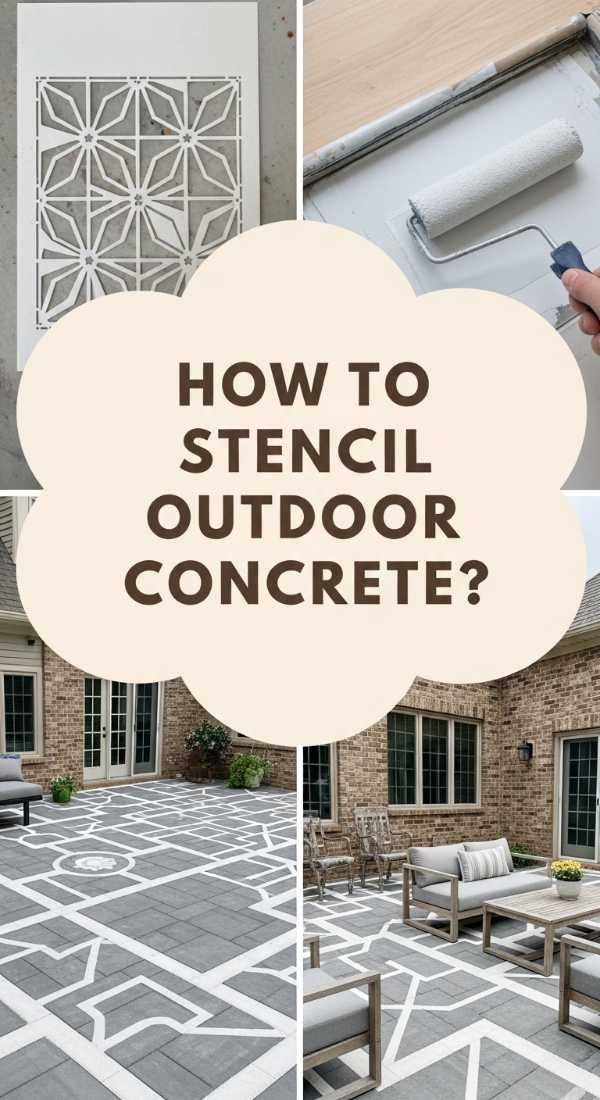
How to Use a Concrete Stencil for a Faux Tile Patio Look

Why we love this
Why spend thousands on intricate Mediterranean tiles when you can create the same breathtaking look with a stencil and a bit of paint? This project is a total game-changer for dated, gray concrete patios, turning a boring slab into a high-design focal point. The intricate patterns and cool, muted tones of a well-executed stencil provide a sophisticated backdrop for your outdoor furniture, making the entire space feel like a designer courtyard in the heart of Morocco or Italy.
Essential Elements:
- Large-scale floor stencil (Mandala or Tile pattern)
- Concrete-grade floor paint (Base and Pattern colors)
- Small foam rollers and stencil brushes
- Painter’s tape and measuring tape
- Concrete cleaner and degreaser
- Outdoor clear-coat sealer
How to make it
- Thoroughly scrub your concrete patio with a heavy-duty degreaser and a stiff brush, then power wash it to ensure every speck of dust is gone. If the concrete is very smooth, apply a concrete etch to create a “tooth” for the paint to grip onto.
- Apply two coats of your base color (a light gray or creamy white works best) using a long-handled roller. Allow each coat to dry for at least 6-8 hours before walking on it. This will be your “grout line” color.
- Find the exact center of your patio and lay your first stencil down, securing the edges with painter’s tape. Use a high-density foam roller to apply the pattern color, using the “dry roller” technique—dip it in paint, then roll most of it off onto a paper towel so the roller is almost dry. This prevents paint from bleeding under the stencil.
- Carefully lift the stencil and move it to the next section, aligning the registration marks built into the stencil design. Repeat the process across the entire surface, working from the center out to the edges. Use a small artist brush to touch up any imperfections or edges.
- Once the pattern is completely dry (24 hours), apply two coats of a high-quality, slip-resistant outdoor concrete sealer. This protects your hard work from UV rays, rain, and foot traffic, ensuring the “tile” look remains vibrant for years to come.
How to Curate Mud Kitchen Accessories for Creative Outdoor Play

Why we love this
A mud kitchen is the ultimate childhood dream—a place where the only limit is imagination and the mess is part of the masterpiece. There is a primal joy in the squishing of mud, the pouring of water, and the “baking” of pinecone pies. By curating a collection of real-world accessories rather than plastic toys, you provide a rich sensory environment that smells like damp earth and fresh herbs, fostering a deep connection to nature and hours of screen-free, creative play in the fresh air.
Essential Elements:
- Wooden mud kitchen frame (repurposed potting bench works well)
- Stainless steel bowls, pots, and pans
- Old whisks, ladles, and wooden spoons
- A dedicated water source (a small beverage dispenser)
- Natural “ingredients” (dried lavender, smooth stones, acorns)
- Wall-mounted rack for hanging utensils
How to make it
- Set up a sturdy wooden station in a shaded part of the yard. If you don’t have a purpose-built mud kitchen, an old potting bench or a low table made of pallets works perfectly. Ensure the surface is at a height where children can comfortably stand and reach the back.
- Source your “cookware” from thrift stores. Real stainless steel pots and pans are far more durable than plastic and provide a satisfying “clink” and weight that kids love. Mount a magnetic strip or hooks to the backboard of the kitchen to keep utensils organized.
- Install a functional water dispenser—a simple glass or plastic beverage tank with a spigot works wonders. This allows children to control the “flow” of their cooking and teaches them about volume and conservation while they play.
- Create a “spice rack” using small jars filled with natural textures: sand, birdseed, dried flower petals, and crushed eggshells. These safe, natural materials provide different tactile and visual elements for their mud concoctions.
- Define the play area with a border of logs or large stones. Add a “chalkboard menu” nearby where they can write out the daily specials, like “Dandelion Soup” or “Mud Brownies,” encouraging literacy and role-play as they serve their creations to the family.
How to Incorporate Glass Yard Art for a Whimsical Garden Glow
[IMAGE_10]
Why we love this
Adding glass art to your garden is like scattering jewels across the landscape. During the day, the glass catches the sunlight, sending prismatic flashes of color across the leaves and flowers; at night, it glows with a soft, ethereal light that feels like something out of a fairy tale. The smooth, cool texture of the glass offers a stunning contrast to the organic shapes of the plants, creating a whimsical, curated feel that makes your garden look like an outdoor gallery and a place of pure enchantment.
Essential Elements:
- Hand-blown glass orbs or recycled glass bottles
- Copper or rebar stakes for mounting
- Weatherproof glass adhesive
- Solar-powered fairy lights or puck lights
- Drill with a glass-cutting bit (if needed)
- Decorative pebbles or sea glass for bases
How to make it
- Select your glass pieces based on color and transparency. Cobalt blues, emerald greens, and amber yellows work beautifully against green foliage. You can use anything from professional garden orbs to uniquely shaped vintage bottles found at flea markets.
- For a floating orb look, use a piece of copper tubing or rebar as a stake. Apply a generous amount of high-strength, weatherproof glass adhesive to the top of the stake and press it firmly into the indentation or bottom of the glass piece. Let it cure for 48 hours in a dry place.
- To create a “glowing” effect, thread a strand of solar-powered fairy lights into the neck of a colored glass bottle or place a small solar puck light directly underneath a glass orb. As the sun sets, the glass will illuminate from within, casting a soft, colored glow into the surrounding plants.
- Arrange your glass art in clusters of three at varying heights. This mimics natural growth patterns and creates a more professional, intentional design. Place them near paths or tucked behind hostas so they are a delightful surprise as you walk through the garden.
- For a “river of glass” effect, dig a shallow trench and fill it with recycled tumbled sea glass or blue glass cullet. This provides a permanent pop of color that looks like flowing water, catching the light even on overcast days and adding a modern, artistic edge to your flower beds.
Final Thoughts on Your Home Transformation
As you embark on these projects, remember that the most beautiful homes are never truly “finished.” They are living, breathing spaces that grow with you. Whether you start small with an organized pantry or go big with a revamped exterior, each step is an act of love for the place you call home. Don’t be afraid to make mistakes, to change your mind, or to add that extra bit of whimsical glass art just because it makes you smile. Your home is your canvas—happy creating!