
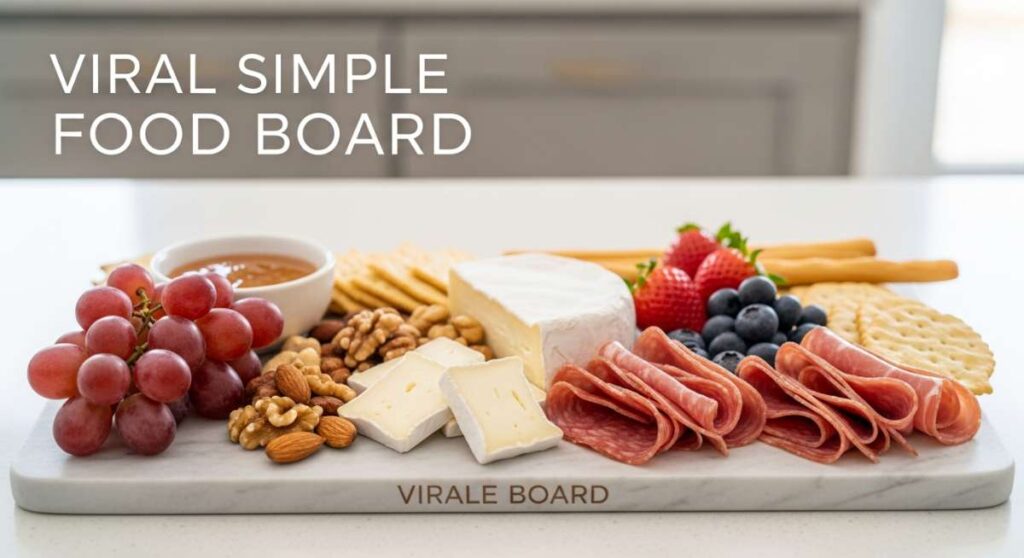
The Viral Food Board Trend You Can Make in 5 Minutes
There is something almost magical about the way a beautifully arranged spread brings people together. Whether it’s a quiet Friday night with your partner or a bustling celebration for a major milestone, the art of the ‘food board’ has transformed from a simple snack plate into a viral sensation that celebrates the joy of shared flavors. I remember the first time I set out a board; the room’s energy shifted from frantic to focused, as everyone hovered over the colors and textures, lingering long after the food was gone.
Today, we are taking that viral inspiration and elevating it with components that range from tart, nostalgic rhubarb to the celebratory sweetness of graduation season. It’s not just about putting food on a platter; it’s about creating an experience that feels curated and soulful. These elements are designed to be the stars of your next board, offering a mix of homemade warmth and professional-looking flair that you can actually achieve in your own kitchen.
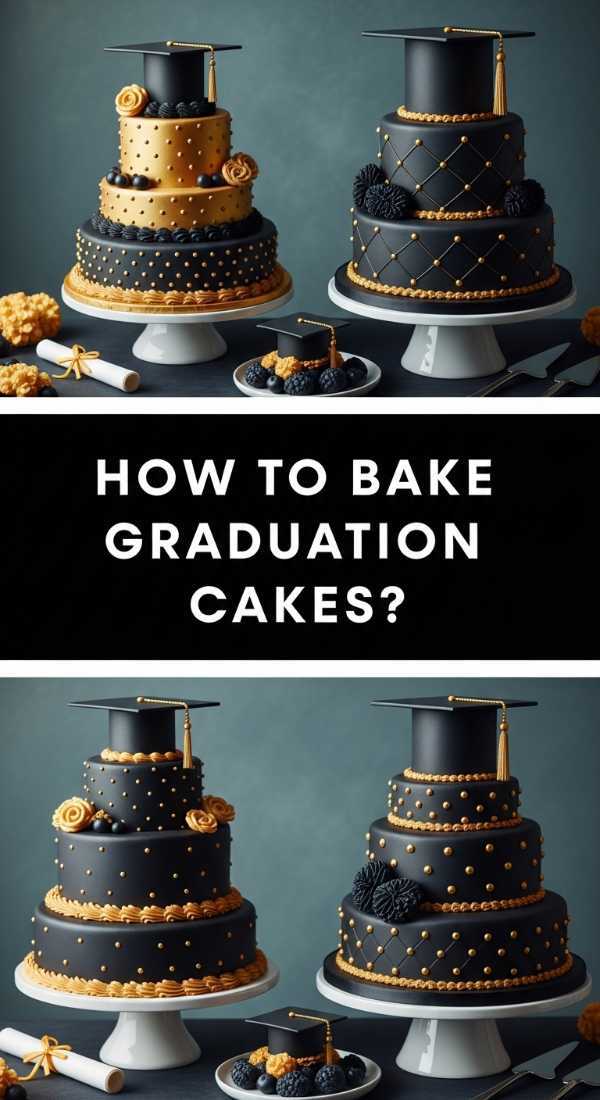
How to bake graduation cakes?
Why we love this
There is nothing quite like the smell of a buttery vanilla sponge wafting through the house to signal a massive life achievement. A graduation cake is more than just dessert; it is a centerpiece of pride, featuring a moist, tight crumb that holds up perfectly under layers of silky buttercream. Imagine the golden, slightly caramelized edges of the cake layers contrasting with a snowy white frosting that melts on the tongue, leaving a hint of high-quality vanilla bean behind to dance on your palate.
Ingredients
- 2 1/2 cups all-purpose flour
- 1 1/2 cups granulated sugar
- 1 cup unsalted butter, softened
- 4 large eggs, room temperature
- 1 cup whole milk
- 1 tbsp baking powder
- 1 tsp salt
- 2 tsp vanilla bean paste
How to make it
- Preheat your oven to 350°F (175°C) and grease two 8-inch round cake pans, lining the bottoms with parchment paper to ensure an effortless release.
- In a large bowl, cream the softened butter and sugar together using a stand mixer on medium-high speed for at least 5 minutes until the mixture is pale, light, and incredibly fluffy.
- Add eggs one at a time, beating well after each addition to emulsify the fats and liquids; if the mixture looks curdled, add a tablespoon of flour.
- Sift together the flour, baking powder, and salt, then alternate adding the dry ingredients and the milk to the butter mixture, starting and ending with the flour to maintain the batter’s structure.
- Divide the batter evenly between the pans and bake for 30-35 minutes; look for a springy center and a toothpick to come out clean before cooling in the pans for 10 minutes.
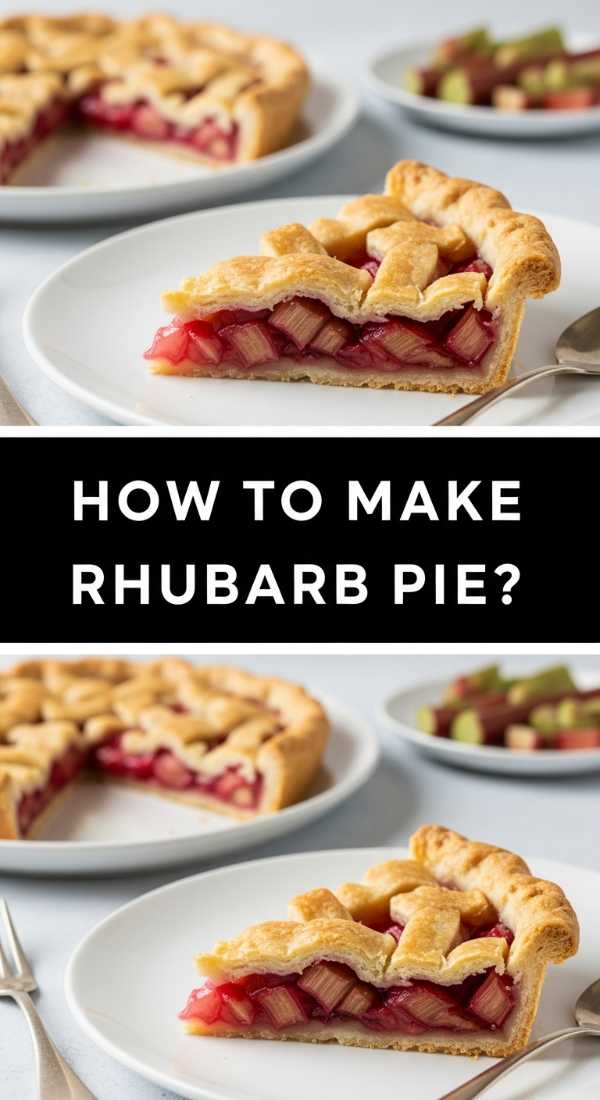
How to make rhubarb pie?
Why we love this
Rhubarb pie is the ultimate herald of spring, offering a sophisticated tartness that cuts through a flaky, lard-infused crust like nothing else. Each bite is a symphony of textures: the crisp, shattering layers of the pastry give way to a jammy, ruby-red filling that is both sharp and sweet. The aroma is intoxicatingly earthy and floral, reminding us of garden-side picnics and the simple luxury of seasonal produce harvested at its absolute peak of freshness.
Ingredients
- 4 cups fresh rhubarb, chopped into 1/2 inch pieces
- 1 1/4 cups granulated sugar
- 1/4 cup cornstarch
- 1/2 tsp ground cinnamon
- Double crust pie pastry
- 1 tbsp cold butter, cubed
- 1 egg (for egg wash)
How to make it
- Roll out your chilled pie dough on a lightly floured surface until it’s about 12 inches in diameter, then gently drape it into a 9-inch pie plate.
- In a large mixing bowl, toss the chopped rhubarb with sugar, cornstarch, and cinnamon, ensuring every piece of fruit is evenly coated to prevent a watery filling.
- Pour the rhubarb mixture into the prepared bottom crust and dot the top with small cubes of cold butter to add richness and a silky mouthfeel to the juices.
- Cover with the second crust (either solid with vents or a lattice), crimp the edges tightly to seal, and brush the top with a whisked egg wash for a glossy, golden finish.
- Bake at 425°F for the first 15 minutes to set the crust, then reduce heat to 375°F and bake for another 40-45 minutes until the filling is bubbling thick and the crust is deep mahogany.
How to style graduation cupcakes?

Why we love this
Cupcakes are the perfect bite-sized canvas for celebration, and styling them for a graduation brings a sense of whimsical sophistication to any food board. We love the way a tall, piped swirl of Swiss meringue buttercream creates a professional silhouette, especially when topped with tiny, handcrafted chocolate mortarboards. The visual appeal of a dozen perfectly uniform cakes, glistening with edible gold dust, creates an instant focal point that feels both intimate and grand.
Ingredients
- Baked vanilla or chocolate cupcakes
- Stiff buttercream frosting
- Chocolate squares (Ghirardelli works well)
- Mini peanut butter cups
- Sour belt candy (for tassels)
- Edible gold glitter
How to make it
- Fit a piping bag with a large open star tip (like a 1M) and fill it with chilled, stiff buttercream to ensure the swirls hold their height and definition.
- Start in the center of the cupcake, move to the outer edge, and spiral upward in three concentric circles, releasing pressure at the very top for a clean peak.
- To create the “cap,” use a tiny dab of frosting to stick a flat chocolate square onto an upside-down mini peanut butter cup.
- Cut a thin strip of sour belt or fruit leather to act as the tassel, securing it to the center of the chocolate square with another dot of frosting or a gold sprinkle.
- Place the completed cap assembly gently onto the buttercream swirl and finish with a light dusting of edible gold glitter for a festive, viral-ready look.
How to cook rhubarb jam?

Why we love this
There is a rustic elegance to homemade rhubarb jam that store-bought versions simply cannot replicate. The slow simmer transforms the fibrous stalks into a glowing, translucent preserve that tastes like concentrated sunshine and tart berries. Spreading this vibrant pink jam over a warm scone or a slice of crusty baguette provides a sensory explosion—the heat of the bread softening the cool, sweet-tart spread, releasing a fragrance that is pure nostalgia.
Ingredients
- 6 cups rhubarb, finely chopped
- 4 cups granulated sugar
- 2 tbsp lemon juice
- 1 tsp lemon zest
- 1/2 tsp vanilla extract
How to make it
- Combine the chopped rhubarb and sugar in a heavy-bottomed Dutch oven or jam pot, letting it sit for 30 minutes until the sugar begins to draw out the bright juices.
- Bring the mixture to a boil over medium-high heat, stirring constantly with a wooden spoon to prevent the sugar from scorching on the bottom of the pot.
- Add the lemon juice and zest, which provides the necessary acidity to help the natural pectins set while brightening the overall flavor profile.
- Reduce heat to medium and simmer for 20-30 minutes, skimming off any foam that rises to the top, until the mixture reaches 220°F (104°C) or passes the “plate test” (it wrinkles when pushed on a cold plate).
- Stir in the vanilla extract, then ladle the hot jam into sterilized jars, leaving 1/4 inch of headspace before sealing and processing in a water bath.
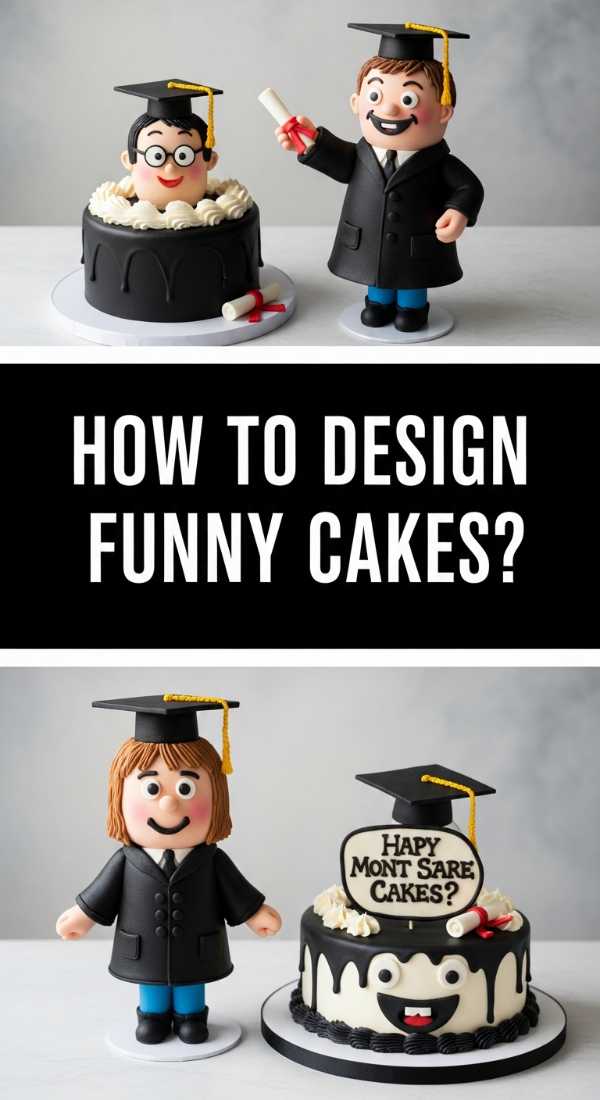
How to design funny cakes?
Why we love this
Funny cakes break the ice and turn a standard dessert into a conversation piece that lightens the mood of any gathering. We love the “expectation vs. reality” or “ugly-cute” cake trend because it prioritizes personality and humor over clinical perfection. Whether it’s a cake that looks like a giant taco or one with a sassy fondant message, the joy comes from the laughter it provokes and the creative freedom it allows the baker to express.
Ingredients
- Multi-layer round cake
- Fondant in various colors
- Food coloring gels
- Edible markers
- Piping gel (for “spills” or “slime”)
How to make it
- Start with a crumb-coated cake that has been chilled for at least two hours; a firm surface is essential for applying heavy decorations or carving shapes.
- If creating a “character” cake, use a serrated knife to gently shave the edges of the sponge to create a dome or an offset shape before applying the final layer of frosting.
- Roll out your fondant to a 1/8 inch thickness and drape it over the cake, using a fondant smoother to eliminate air bubbles and create a clean, cartoonish base.
- Use edible markers to draw exaggerated facial expressions or write pun-heavy messages directly onto the surface for a sharp, graphic effect.
- Apply “special effects” like piping gel tinted with neon colors to simulate spilled drinks or melted ice cream, giving the cake a sense of movement and humor.
How to bake strawberry pie?
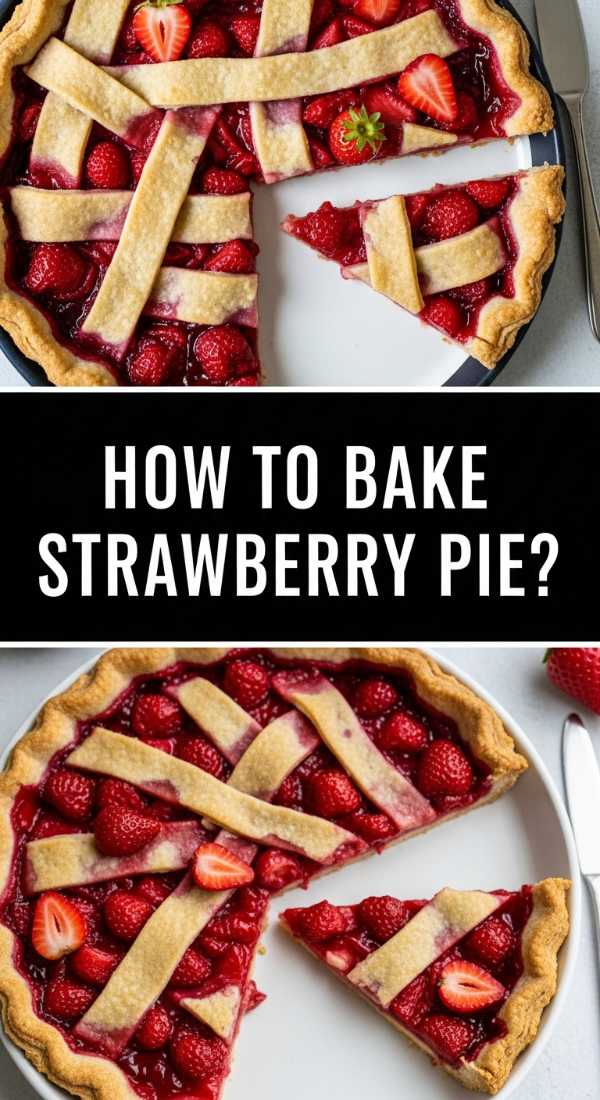
Why we love this
Strawberry pie is the quintessential summer dessert, boasting a flavor that is unapologetically bold and sweet. When baked, the strawberries soften and release their deep crimson juices, creating a natural syrup that pools beautifully in a buttery, salted crust. The contrast between the warm, yielding fruit and a cold dollop of chantilly cream is a textural delight that feels like a warm hug for your taste buds, perfect for any outdoor food board.
Ingredients
- 6 cups fresh strawberries, hulled and halved
- 3/4 cup granulated sugar
- 1/3 cup cornstarch
- 1 tbsp lemon juice
- Pinch of salt
- 9-inch double pie crust
How to make it
- Preheat your oven to 400°F (200°C) and place a baking sheet on the bottom rack to catch any berry drips that may bubble over.
- In a large bowl, gently fold the strawberries with sugar, cornstarch, lemon juice, and salt; do this just before baking to prevent the fruit from macerating too much and becoming mushy.
- Transfer the filling into your bottom crust, mounding the berries slightly in the center to account for the shrinkage that happens during the cooking process.
- Top with a lattice crust, which allows steam to escape efficiently, ensuring the bottom crust stays crisp rather than soggy.
- Bake for 45-55 minutes; you want the crust to be a dark golden brown and the strawberry juices to be thick, slow-moving bubbles before removing from the oven.
How to decorate grad cookies?

Why we love this
Graduation cookies offer a bite-sized way to celebrate big achievements, and the decorating process is where the real magic happens. We love the crisp snap of a chilled sugar cookie paired with the smooth, matte finish of royal icing. The ability to customize colors to match a school’s palette makes these cookies feel incredibly personal, while the addition of silver or gold dragees adds a touch of sophisticated sparkle that looks stunning under party lights.
Ingredients
- Baked sugar cookies (cap or diploma shapes)
- Royal icing (stiff and flooding consistencies)
- Gel food coloring
- Fine-tip piping bags
- Scribe tool or toothpick
How to make it
- Outline the edge of your cooled cookie with stiff-consistency icing to create a “dam” that will hold the thinner icing in place.
- Wait about 5 minutes for the outline to set, then use flooding-consistency icing (similar to the texture of honey) to fill in the center of the cookie.
- Use a scribe tool or a toothpick to pop any tiny air bubbles and to gently push the icing into the corners for a perfectly smooth surface.
- Allow the base layer to dry completely (usually 6-12 hours) before piping detailed text, like the graduation year or the student’s name, using the stiff icing.
- Add final flourishes like a small fondant tassel or a line of metallic sprinkles while the decorative piping is still slightly wet to ensure they stick.
How to make rhubarb crumble?
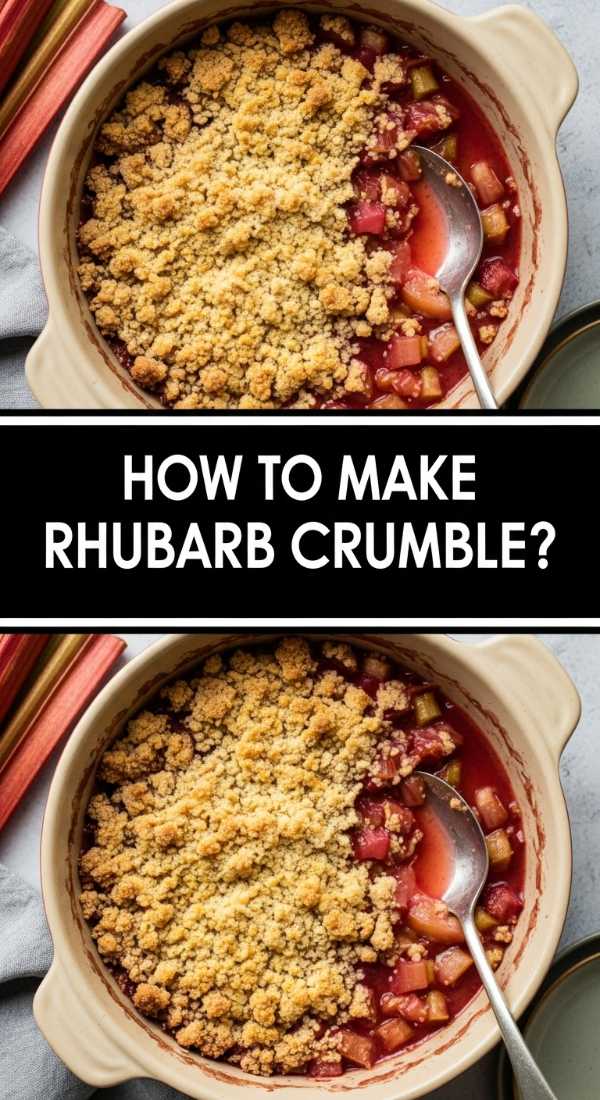
Why we love this
The rhubarb crumble is the effortless, rustic cousin of the pie, and we love it for its unpretentious, cozy vibes. The topping is a crunchy, golden blanket of oats, brown sugar, and butter that provides the perfect foil to the sharp, acidic punch of the rhubarb underneath. There is something deeply satisfying about digging a spoon through a crisp, caramelized crust into a steaming, magenta-hued fruit base that smells of cinnamon and melted butter.
Ingredients
- 5 cups rhubarb, chopped
- 1/2 cup granulated sugar
- 1 tbsp flour (for the fruit)
- 1 cup rolled oats
- 1 cup brown sugar
- 1 cup all-purpose flour
- 1/2 cup cold butter, cubed
How to make it
- Toss the chopped rhubarb with the granulated sugar and the single tablespoon of flour in an 8×8 inch baking dish until the fruit is well-coated.
- In a separate bowl, combine the oats, brown sugar, and flour, then use your fingers or a pastry cutter to rub in the cold butter until the mixture resembles coarse crumbs.
- Ensure the butter is kept cold during this process; small pea-sized lumps of butter are what create the signature “crunch” once they melt and fry the oats in the oven.
- Spread the crumble topping evenly over the rhubarb, pressing down very lightly to ensure it stays in place but remains airy.
- Bake at 375°F for 35-40 minutes until the fruit is bubbling up the sides and the topping is a deep, toasted tan.
How to prepare lemon pesto?
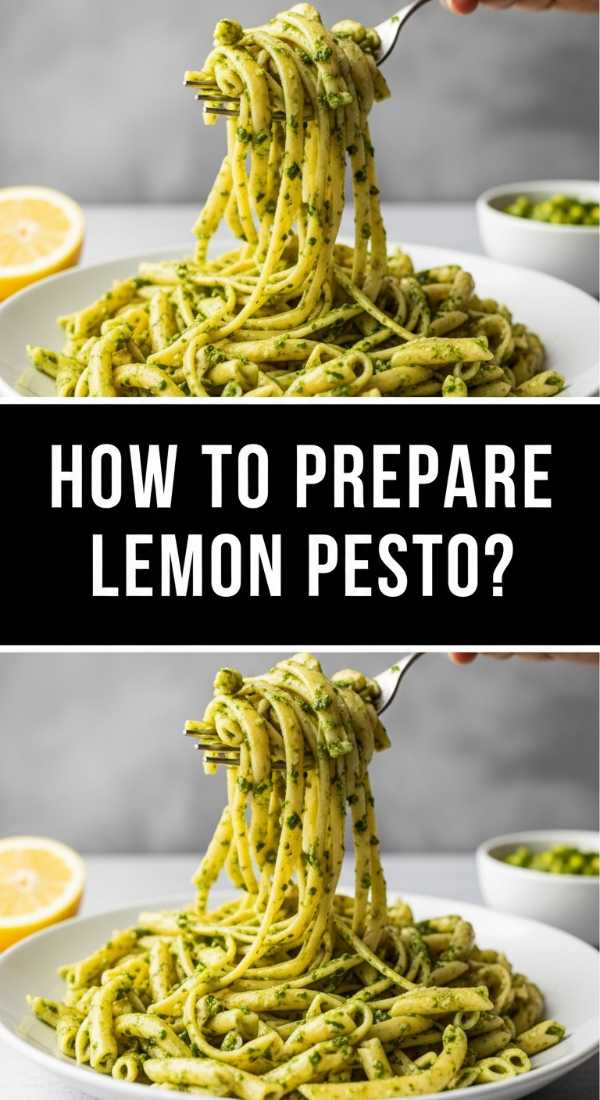
Why we love this
Lemon pesto is a vibrant, zesty twist on the classic basil version that brings a bright acidity to any food board spread. We love the way the sharp citrus notes interact with the creamy richness of pine nuts and the salty punch of Parmigiano-Reggiano. It is an aromatic powerhouse—the smell of freshly grated lemon zest mixed with toasted nuts is enough to make anyone’s mouth water, making it a perfect dip for crackers or a spread for crostini.
Ingredients
- 2 cups fresh basil leaves, packed
- 1/2 cup grated Parmesan cheese
- 1/3 cup pine nuts, toasted
- 2 cloves garlic, minced
- 1/2 cup extra virgin olive oil
- Zest and juice of 1 large lemon
- Salt and pepper to taste
How to make it
- Place the pine nuts in a dry skillet over medium heat for 3-5 minutes, tossing frequently until they are golden and fragrant to release their natural oils.
- In a food processor, pulse the basil, garlic, and toasted pine nuts until they are coarsely chopped but not yet a paste.
- Add the Parmesan cheese, lemon zest, and lemon juice, then pulse a few more times to incorporate the flavors without over-processing the greens.
- With the processor running on low, slowly drizzle in the olive oil in a steady stream to emulsify the sauce into a smooth, thick consistency.
- Season with salt and pepper to taste, and serve immediately or store with a thin layer of oil on top to prevent the vibrant green color from oxidizing.
How to dip cake pops?
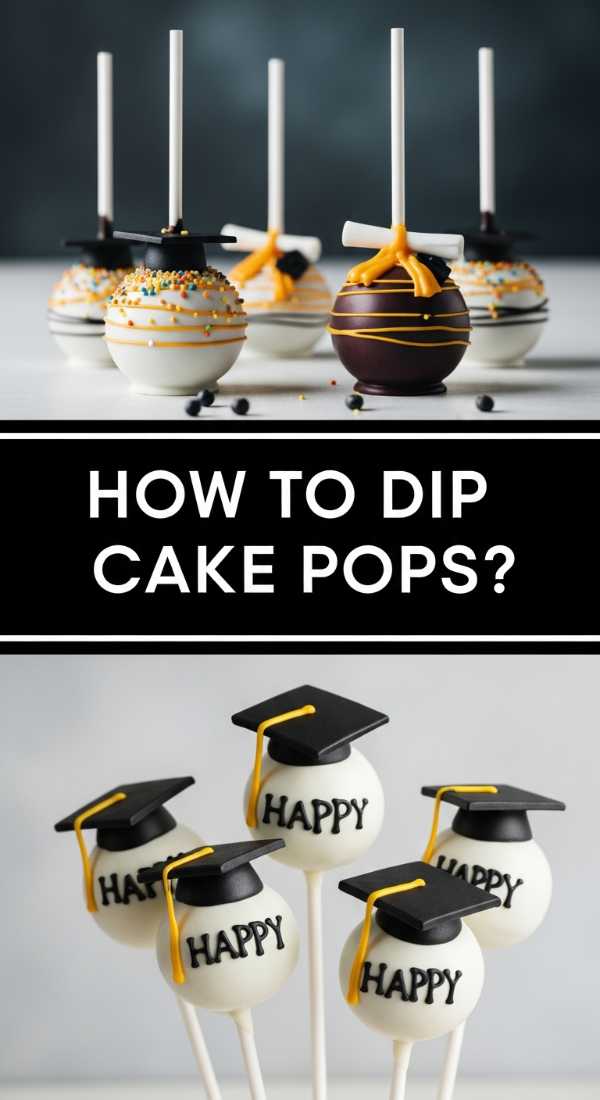
Why we love this
Cake pops are the ultimate portable treat, and there is a specific satisfaction in achieving that perfectly smooth, glass-like outer shell. We love the way a well-dipped cake pop feels substantial and indulgent, with a snap of chocolate giving way to a dense, fudgy cake center. They are the jewelry of the food board, offering endless opportunities for color coordination and sparkling toppings that catch the light beautifully.
Ingredients
- Chilled cake balls (cake crumbs mixed with frosting)
- Candy melts or high-quality white chocolate
- Coconut oil or paramount crystals (for thinning)
- Lollipop sticks
- Sprinkles
How to make it
- Melt your candy wafers in a deep, narrow microwave-safe bowl in 30-second intervals, stirring thoroughly between each to prevent burning.
- Add a teaspoon of coconut oil to the melted chocolate to thin it out until it reaches the consistency of heavy cream; this ensures a thin, even coating that won’t crack.
- Dip the tip of a lollipop stick into the chocolate, then insert it halfway into a chilled cake ball to act as a “glue” that prevents the ball from falling off.
- Submerge the cake ball completely in the chocolate, pulling it straight up and gently tapping your wrist to let the excess drip back into the bowl.
- Twirl the pop slowly to level the coating, then add sprinkles immediately before the chocolate sets, and place in a styrofoam block to dry upright.
Wrapping Up Your Viral Board
Creating a viral food board isn’t about stress; it’s about the harmony of flavors and the beauty of the presentation. By mixing these homemade elements—from the tartness of a rhubarb crumble to the celebratory flair of graduation cupcakes—you create a spread that is as delicious as it is photogenic. Remember, the best boards are the ones that reflect your personality, so don’t be afraid to experiment with layouts and colors!