

The Viral Food Board Everyone is Talking About (And How to Make It)
There is something truly magical about gathering around a table with people you love, but lately, the traditional cheese board has felt a bit, well, expected. I wanted something that felt more like a warm hug—something vibrant, healthy, and absolutely bursting with the deep, caramelized flavors of home. That is how the ‘Roasted Harvest Board’ was born, and let me tell you, it has completely taken over my social feed and my dinner parties alike.
The beauty of this viral food board isn’t just in the colors, though the rainbow of charred purples, bright oranges, and deep greens is a literal feast for the eyes. It’s about the transformation that happens in the oven. Taking simple, humble root vegetables and brassicas and turning them into candy-like morsels of joy is a kitchen superpower. It’s the kind of meal that makes your house smell like a cozy bistro and leaves everyone reaching for ‘just one more’ piece of charred broccoli.
How to roast seasonal vegetables perfectly

Why we love this
Perfectly roasted seasonal vegetables are the backbone of any great food board because they offer a symphony of textures and a natural sweetness that you just can’t get from steaming or sautéing. There is nothing quite like the contrast between a crisp, salty exterior and a buttery, melt-in-your-mouth interior that releases a burst of earthy aroma as you take a bite. It feels like capturing the very essence of the season on a single sheet pan, bringing a sense of grounded, rustic luxury to your dining table that satisfies both the soul and the palate.
Ingredients
- 2 lbs Mixed seasonal vegetables (Brussels sprouts, parsnips, squash)
- 3 tbsp Extra virgin olive oil
- 1 tsp Sea salt
- 1/2 tsp Cracked black pepper
- 2 sprigs Fresh rosemary
How to make it
- Preheat your oven to 425°F (220°C). A hot oven is the most critical factor in ensuring your vegetables roast rather than steam, so give it at least 20 minutes to fully reach temperature.
- Prep your vegetables by cutting them into uniform sizes, roughly 1-inch chunks. Uniformity is key because it ensures that everything finishes cooking at the exact same time, preventing the dreaded mix of burnt and raw pieces.
- In a large mixing bowl, toss the vegetables with high-quality olive oil until every surface is glistening. This oil acts as a heat conductor, helping the dry heat of the oven penetrate the vegetables and create that golden crust.
- Spread the vegetables in a single layer on a heavy-duty rimmed baking sheet. Do not crowd the pan; if the vegetables are touching, they will release moisture and steam each other. Use two pans if necessary.
- Roast for 25-35 minutes, tossing halfway through with a wide spatula. You are looking for a deep golden brown color and a tender center when pierced with a fork.
How to make crispy roasted broccoli

Why we love this
Crispy roasted broccoli is the ultimate game-changer for anyone who thinks they don’t like greens, as the high heat transforms the florets into delicate, crunchy blossoms. The tips of the broccoli become almost like savory popcorn, infused with the nutty aroma of toasted brassica and a hint of char that balances perfectly with a squeeze of lemon. It’s a sensory delight to hear that distinct crunch and then experience the tender, juicy stem, making it an addictive addition to your viral food board that disappears faster than the main course.
Ingredients
- 2 large heads of Broccoli
- 4 tbsp Avocado oil (high smoke point)
- 1 tsp Garlic powder
- 1/2 tsp Red pepper flakes
- Zest of one lemon
How to make it
- Dry your broccoli thoroughly after washing. Any residual water will turn into steam in the oven, preventing that sought-after crispiness, so use a salad spinner or pat them dry with a clean kitchen towel.
- Cut the florets into medium-sized pieces, keeping a bit of the stem attached for structure. Try to create at least one flat surface on each floret to maximize contact with the hot pan.
- Toss the florets in a bowl with avocado oil and spices. Avocado oil is preferred here because it can withstand the 425°F heat without smoking or breaking down, ensuring a clean flavor.
- Place the pan in the oven and roast for 20-25 minutes. Do not move them for the first 15 minutes; this allows the side touching the pan to develop a dark, crispy crust.
- Remove when the ‘leaves’ are dark brown and crisp. Immediately toss with fresh lemon zest while hot to let the citrus oils bloom over the roasted florets.
How to glaze roasted honey carrots

Why we love this
These honey-glazed carrots are the sparkling jewels of the board, offering a sticky-sweet exterior that clings to the fork and fills the air with the scent of caramelized sugar and earth. When the honey hits the high heat of the oven, it creates a lacquer-like finish that intensifies the carrot’s natural sugars, resulting in a flavor profile that is both sophisticated and nostalgic. Each bite is a luxurious experience, starting with a tacky, sweet glaze and ending with the soft, velvety texture of a perfectly cooked root vegetable.
Ingredients
- 1 lb Whole small carrots (top trimmed)
- 2 tbsp Clover honey
- 1 tbsp Melted butter
- 1/2 tsp Smoked paprika
- Flaky sea salt for finishing
How to make it
- Clean the carrots but leave them whole if they are slender; if they are thick, slice them lengthwise to ensure they cook through at the same rate as the glaze caramelizes.
- Whisk together the honey, melted butter, and smoked paprika in a small ramekin until it forms a smooth, emulsified syrup.
- Lay the carrots on a parchment-lined baking sheet (parchment is essential here to prevent the honey from burning onto the pan) and brush them generously with two-thirds of the honey mixture.
- Roast at 400°F (200°C) for 20 minutes. At this point, the carrots should be softening but not yet fully glazed.
- Pull the pan out, brush with the remaining honey mixture to build a thick layer of glaze, and return to the oven for another 10 minutes until the edges are bubbly and slightly charred. Finish with a sprinkle of flaky sea salt.
How to make creamy vegetable soup

Why we love this
A creamy vegetable soup served in small bowls alongside your roasted board adds a layer of comfort and warmth that ties the whole meal together. The texture is like pure velvet, sliding over the palate with a rich, complex flavor that tells the story of every vegetable that went into the pot. It’s the ultimate soul-soother, with an aroma of simmered leeks and cream that invites everyone to slow down, dip a piece of roasted veg or crusty bread, and savor the creamy, savory depth.
Ingredients
- 4 cups Roasted mixed vegetables
- 3 cups Vegetable broth
- 1/2 cup Heavy cream (or coconut milk)
- 2 cloves Sauteed garlic
- Fresh thyme
How to make it
- Transfer your pre-roasted vegetables into a heavy-bottomed Dutch oven or a large soup pot. Using roasted veggies instead of raw ones adds a massive head start on flavor depth.
- Add the vegetable broth and bring the mixture to a gentle simmer over medium heat. Let it bubble for about 10 minutes so the roasted flavors can infuse into the liquid.
- Use a high-speed immersion blender directly in the pot to puree the mixture. Move the blender in a slow, circular motion to ensure every chunk is pulverized into a silky, smooth consistency.
- Lower the heat to low and stir in your cream or coconut milk. This adds the fat necessary to carry the flavors across your tongue and creates that signature luxurious mouthfeel.
- Taste and adjust seasoning. If the soup is too thick, add a splash more broth. Serve warm with a drizzle of olive oil on top for a professional finish.
How to season roasted veggies properly
Why we love this
Proper seasoning is the secret language of a great cook, and when applied to roasted vegetables, it elevates them from a simple side dish to the star of the show. The way salt draws out moisture to help with browning, and how dried herbs rehydrate in the oil to release their essential oils, creates a fragrant crust that is absolutely irresistible. It’s the difference between a bland potato and one that tastes like a seasoned masterpiece, filling the kitchen with the pungent, woody scent of dried oregano and toasted garlic.
Ingredients
- Mixed vegetables
- Kosher salt (coarse grain)
- Dried oregano and thyme
- Onion powder
- Extra virgin olive oil
How to make it
- Start with a dry vegetable surface. This allows the oil to coat the vegetable properly, which in turn acts as the ‘glue’ for your seasonings.
- Use a large bowl for seasoning rather than doing it on the pan. This allows you to toss the vegetables vigorously, ensuring the salt and herbs are distributed into every nook and cranny.
- Season from a height. Hold your hand about 10-12 inches above the bowl when sprinkling salt; this ensures an even ‘snowfall’ of seasoning rather than concentrated clumps in one spot.
- Don’t be afraid of salt. Root vegetables, in particular, need a generous amount of salt to balance their natural sweetness and starchiness. Use about 1/2 teaspoon per pound of veg.
- Add dried herbs at the beginning so they can toast in the oven, but save fresh herbs (like parsley or cilantro) for the very end to preserve their bright color and delicate flavor.
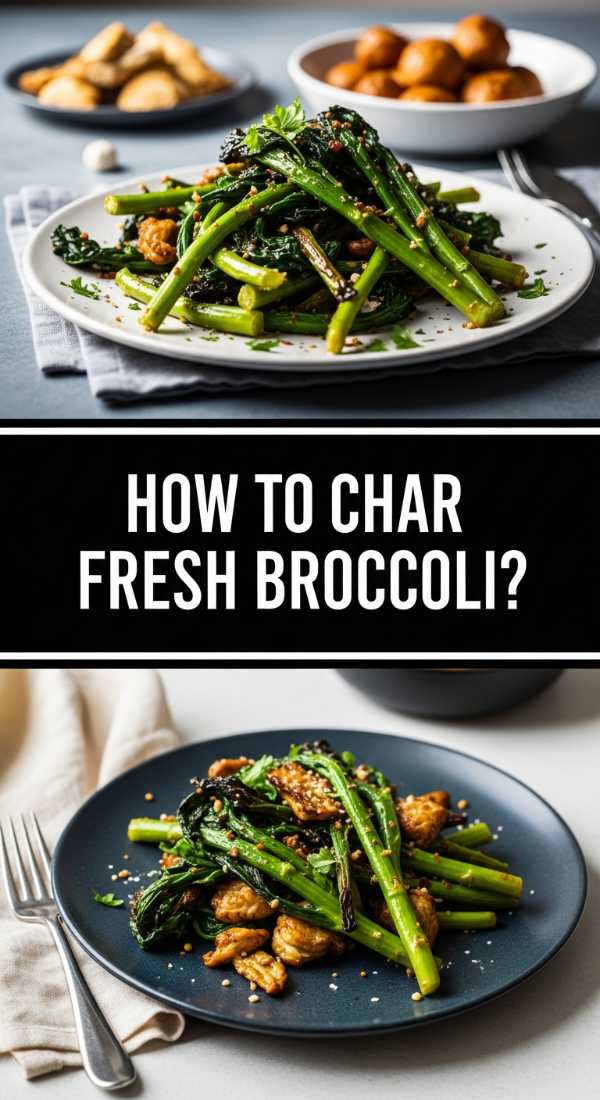
How to char fresh roasted broccoli
Why we love this
There is a specific, smoky allure to charred broccoli that feels sophisticated and bold, providing a bitter-sweet contrast that is essential for a well-rounded food board. The char adds a layer of ‘umami’—that savory richness that satisfies the deepest cravings—while the bright green interior remains tender and fresh. Looking at those blackened edges, you can almost taste the fire-kissed flavor before it even hits your tongue, making it a dramatic and delicious highlight for your guests.
Ingredients
- 2 heads Fresh broccoli
- 3 tbsp Grapeseed oil
- 1 tsp Flaky sea salt
- 1/2 tsp Black pepper
- Optional: Shaved parmesan
How to make it
- Place your empty baking sheet in the oven while it preheats to 450°F (230°C). This ‘pre-heating the pan’ method ensures immediate searing the moment the broccoli touches the metal.
- Cut your broccoli into flat ‘steaks’ or large florets with at least one wide, flat side. The more surface area hitting the pan, the more char you will achieve.
- Lightly coat the broccoli in grapeseed oil. Grapeseed is excellent for charring because it has a very high smoke point, allowing you to reach high temps without the oil tasting burnt.
- Carefully pull out the hot tray and arrange the broccoli flat-side down. You should hear a distinct sizzle—that is the sound of flavor developing!
- Roast for 15-18 minutes without flipping. You want the bottom to be significantly darkened (almost black in spots) while the tops are still vibrant green.
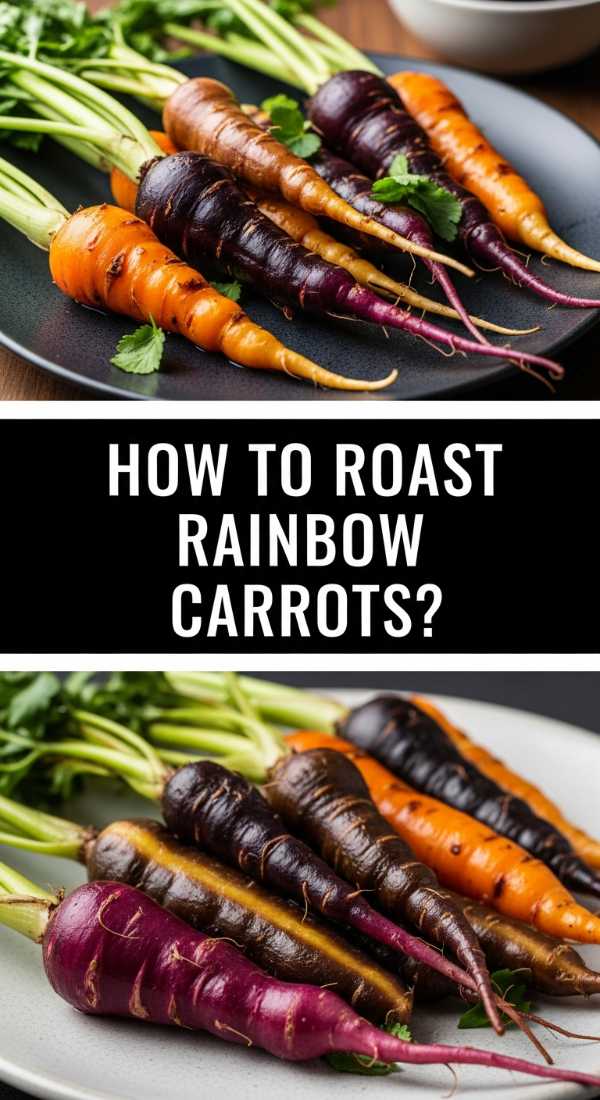
How to roast sweet rainbow carrots

Why we love this
Rainbow carrots bring an undeniable ‘wow’ factor to any board, with their striking shades of deep purple, sun-drenched yellow, and classic orange. As they roast, their colors deepen and intensify, creating a visual mosaic that is as beautiful as it is tasty. They possess a delicate, floral sweetness that is more nuanced than standard carrots, and when roasted whole, they maintain a satisfying snap that makes them feel like a rustic, sophisticated treat harvested straight from a fantasy garden.
Ingredients
- 1 bunch Rainbow carrots
- 2 tbsp Olive oil
- 1 tsp Cumin seeds
- 1/2 tsp Kosher salt
- 1 tbsp Fresh parsley, chopped
How to make it
- Scrub the carrots well rather than peeling them. The skin of rainbow carrots holds much of the vibrant pigment, especially the purple ones which are often bright orange inside.
- Leave about an inch of the green tops on for an artisanal, farm-to-table look that adds height and texture to your board.
- Toss the carrots with olive oil and whole cumin seeds. The seeds will toast in the oven, releasing an earthy, warm aroma that perfectly complements the sweetness of the carrots.
- Arrange them on the tray so they aren’t overlapping. Because they are often different thicknesses, place the thinner yellow carrots toward the edges of the pan where it is slightly cooler.
- Roast at 400°F (200°C) for 25 minutes. They are done when the skin looks slightly wrinkled and the tips are starting to caramelize.
How to cook roasted soup base

Why we love this
The roasted soup base is the secret weapon of pro chefs, providing a concentrated explosion of flavor that you simply can’t get from boiling vegetables in water. By roasting the onions, celery, and squash until they are browned and bubbly, you are creating a foundation of complex sugars and caramelized notes that turn a simple broth into a masterpiece. The aroma is intoxicating—a mixture of sweet alliums and concentrated earthiness that promises a soup of incredible depth and character.
Ingredients
- 1 Butternut squash, halved
- 2 Onions, quartered
- 3 Carrots, chopped
- 1 head of Garlic, top cut off
- Olive oil and salt
How to make it
- Prepare a large roasting pan by drizzling it with oil. Place your squash cut-side down to trap steam inside the cavity, which makes the flesh incredibly tender while the skin browns.
- Scatter the onions and carrots around the squash. These ‘aromatics’ will release their juices, which will brown on the bottom of the pan and create a flavorful ‘fond.’
- Wrap the head of garlic in foil with a drizzle of oil and place it on the same tray. This ensures the garlic roasts into a sweet paste rather than burning.
- Roast at 400°F (200°C) for 45-60 minutes. You want the vegetables to be very soft, and the onions should be dark brown on the edges.
- Once cooled slightly, scoop the squash flesh into your blender, squeeze the roasted garlic out of its skins, and add all the pan drippings. This concentrated mixture is your ‘base’—just add hot broth and blend!
How to bake Mediterranean roasted vegetables
Why we love this
Transport your senses to the sun-drenched coast of the Mediterranean with this mix of peppers, zucchini, and red onions. The smell of roasting bell peppers is iconic—sweet, smoky, and slightly charred—while the zucchini becomes tender and soaks up the herbaceous oils like a sponge. This section of the board provides a juicy, bright contrast to the heartier root vegetables, offering a burst of summer warmth and a texture that is light, silky, and utterly refreshing.
Ingredients
- 1 Red bell pepper, sliced
- 1 Yellow bell pepper, sliced
- 2 Zucchini, sliced into rounds
- 1 Red onion, wedged
- 2 tbsp Dried oregano and basil
- 3 tbsp Olive oil
How to make it
- Slice your peppers into wide strips and your zucchini into 1/2 inch rounds. Thicker slices are better here because these vegetables have a high water content and can turn to mush if cut too thin.
- Keep the red onion wedges intact at the root so they don’t fall apart during roasting; this creates beautiful charred petals of onion.
- Toss everything in a large bowl with a generous amount of dried herbs. The dried herbs will bloom in the heat, infusing the vegetables with the classic flavors of the Mediterranean.
- Bake at 425°F (220°C) for 20 minutes. These vegetables cook faster than roots, so they are perfect for a quick addition to your board.
- In the last 2 minutes, turn the broiler on to high. Watch closely! You want the skins of the peppers to just start to blister and blacken for that authentic roasted pepper flavor.
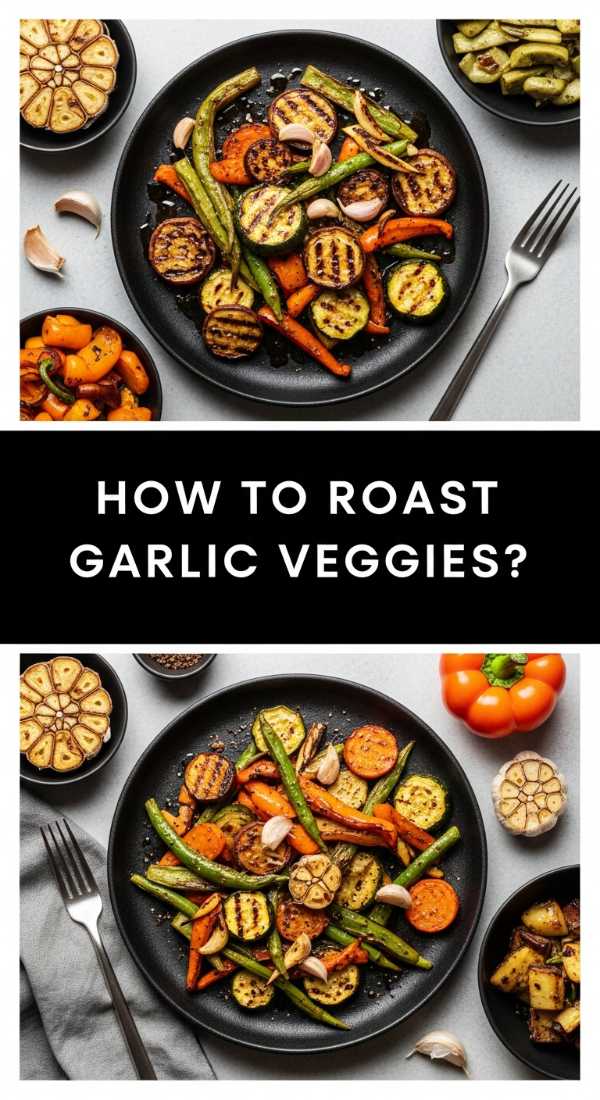
How to roast fragrant garlic veggies
[IMAGE_10]
Why we love this
There is no aroma in the world quite as inviting as garlic roasting in olive oil; it creates an immediate sense of home and hunger. When garlic is roasted alongside vegetables, it loses its sharp bite and transforms into a mellow, buttery spread that coats every piece of produce in a layer of savory gold. This is the heart of the board—the flavor that everyone recognizes and loves, providing a pungent, aromatic punch that lingers on the tongue and makes every single vegetable taste like a five-star meal.
Ingredients
- Mixed vegetables (Potatoes, cauliflower, or beans)
- 6 cloves Garlic, smashed but skin on
- 1/4 cup Olive oil
- 1 tsp Coarse sea salt
- Fresh rosemary sprigs
How to make it
- Smash your garlic cloves with the flat side of a knife. Leaving the skins on is a pro tip—it protects the garlic from burning and turning bitter during the long roast time while still infusing the oil.
- In a small saucepan, slightly warm your olive oil with the smashed garlic and rosemary for 5 minutes over low heat before tossing with the vegetables. This ‘infused oil’ technique ensures the garlic flavor is deep-seated.
- Toss your chosen vegetables with the garlic-infused oil and spread them on your roasting sheet, making sure to include the garlic cloves themselves in the mix.
- Roast at 400°F (200°C) for 30-40 minutes. The garlic cloves will become soft and caramelized inside their skins.
- Before serving, you can squeeze the softened garlic out of the skins and toss it back with the vegetables so that every bite has a piece of that ‘liquid gold’ garlic paste.
Conclusion
Creating this viral food board is more than just a recipe; it’s an act of love and a celebration of simple ingredients. Whether you are hosting a big holiday gathering or just want to elevate a Tuesday night dinner, these techniques will ensure your vegetables are the talk of the table. Remember to play with colors, don’t be afraid of the char, and always serve it with a smile. Happy roasting!