
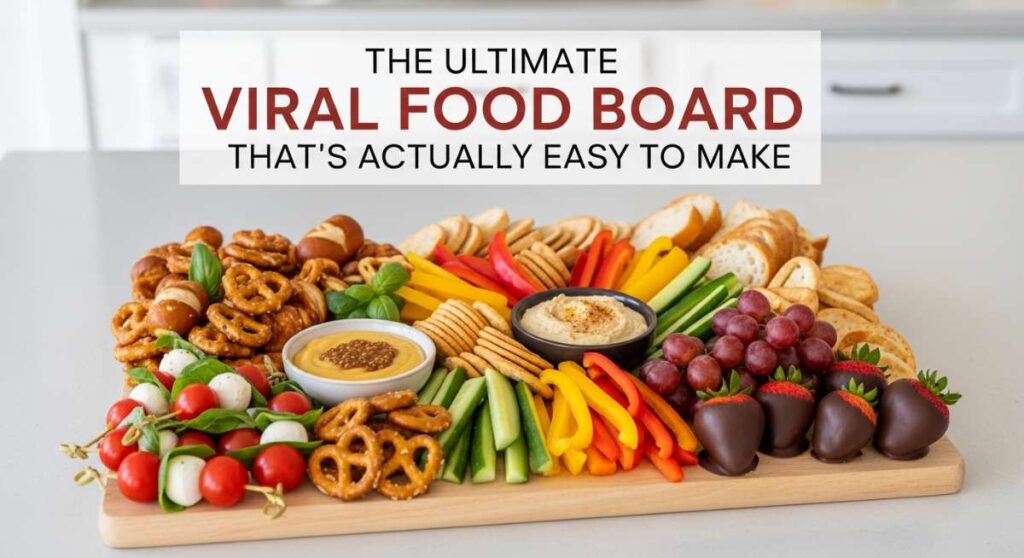
The Ultimate Viral Food Board That’s Actually Easy to Make
There is a specific kind of magic that happens when you set a beautifully curated board in the center of a table. It’s that collective intake of breath from your guests, the immediate reach for phones to snap a photo, and the lingering warmth of a conversation that starts before the first bite is even taken. For years, I thought these viral-worthy spreads required a culinary degree or a professional styling kit, but I’ve learned that the secret lies in the balance of textures, colors, and the heart you put into the preparation.
As graduation season approaches and the spring sun brings that familiar itch to host garden parties, I wanted to share the ultimate guide to creating a spread that captures every mood—from the sophisticated tartness of seasonal rhubarb to the whimsical joy of a graduation celebration. This isn’t just about food; it’s about creating a centerpiece that tells a story of achievement, growth, and the simple pleasure of a shared meal. Let’s dive into the components that will make your next gathering absolutely unforgettable.
How to style beautiful graduation cakes
Why we love this
There is something deeply soulful about a cake that looks like a work of art but tastes like home. We love styling these cakes because they serve as the crowning jewel of the celebration, with smooth-as-silk buttercream acting as a canvas for elegant gold leaf and fresh, fragrant blooms. The aroma of sweet vanilla bean and rich butter wafts through the air, while the visual contrast of sharp, clean edges against organic floral textures creates a sophisticated vibe that makes every graduate feel like royalty.
Ingredients
- Three 8-inch round sponge cakes
- Silky Swiss meringue buttercream
- Edible gold leaf flakes
- Fresh organic flowers (roses or peonies)
- Cardstock for custom toppers
- Acrylic cake dowels
How to make it
- Level your chilled cake layers using a serrated knife to ensure a perfectly flat surface; professional tip: chill the cakes for 2 hours before cutting to prevent crumbling.
- Apply a thin ‘crumb coat’ of buttercream to trap any loose particles, then refrigerate for 30 minutes until the frosting is firm to the touch.
- Apply the final layer of frosting using an offset spatula, then use a tall metal bench scraper held at a 45-degree angle against the turntable to create a flawless, glass-like finish.
- Gently press edible gold leaf onto the sides using a dry, soft-bristled brush; the natural oils in the frosting will help it adhere without needing extra liquid.
- Insert dowels if stacking, then arrange your cleaned and stem-wrapped flowers in a cascading ‘S’ shape from the top down to the base for a dynamic, professional look.
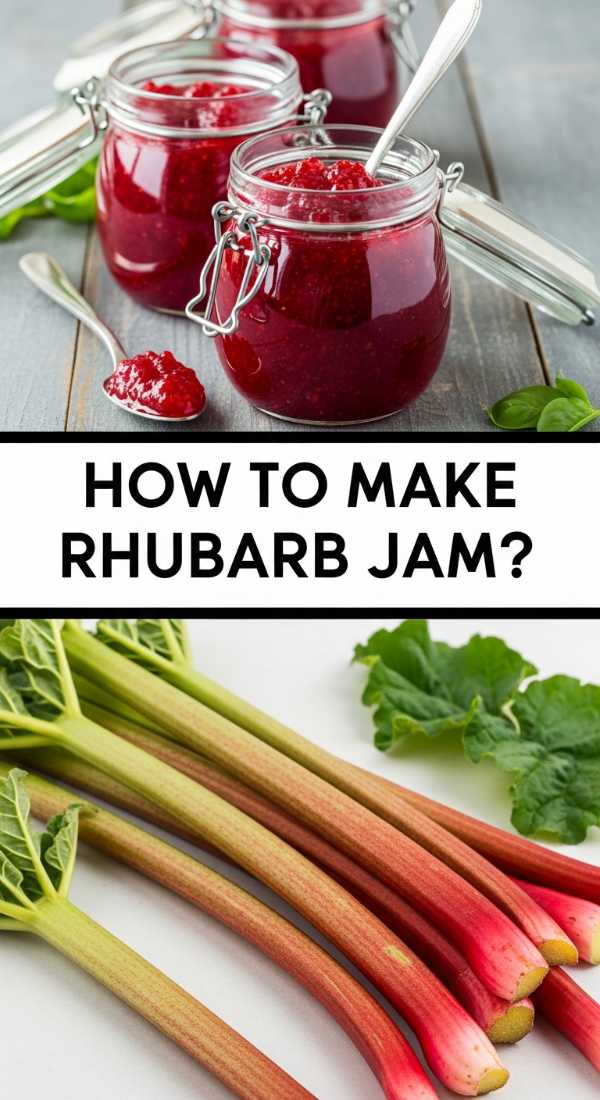
How to make homemade rhubarb jam

Why we love this
This jam is like bottling the very essence of springtime sunshine. We love the way the tart, fibrous stalks of rhubarb break down into a shimmering, ruby-red preserve that strikes the perfect chord between electric acidity and mellow sweetness. As it simmers on the stove, your kitchen fills with a bright, fruity fragrance that feels both nostalgic and fresh, offering a velvety texture that glides over warm toast or pairs beautifully with sharp, aged cheeses on a viral board.
Ingredients
- 2 lbs fresh rhubarb, chopped into 1-inch pieces
- 3 cups granulated sugar
- 1/4 cup fresh lemon juice
- 1 tsp lemon zest
- 1 vanilla bean, split and scraped
How to make it
- In a large, heavy-bottomed non-reactive pot, toss the rhubarb pieces with sugar and let them macerate for at least 2 hours until a thick syrup forms at the bottom.
- Bring the mixture to a rolling boil over medium-high heat, stirring constantly with a wooden spoon to prevent the sugar from scorching.
- Add the lemon juice, zest, and vanilla seeds; the acidity from the lemon is crucial for activating the natural pectin in the rhubarb.
- Cook for 15-20 minutes, skimming off any foam that rises to the top; you’ll know it’s ready when the mixture reaches 220°F (105°C) on a candy thermometer.
- Perform the ‘plate test’ by placing a spoonful of jam on a frozen plate; if it wrinkles when pushed with a finger, it’s perfectly set and ready for jarring.
How to decorate graduation sugar cookies
Why we love this
Decorating these cookies is a meditative process that yields high-impact visual rewards. We love the satisfying snap of a perfectly baked shortbread base hidden beneath a smooth, matte layer of royal icing that yields to a soft, sweet bite. The ability to customize colors to match school spirits makes these the ultimate personalized gift, and the scent of almond extract and powdered sugar makes the decorating process feel like a true celebration of the graduate’s hard work.
Ingredients
- Batch of chilled sugar cookie cutouts
- Royal icing (stiff and flood consistencies)
- Gel food coloring
- Fine-tip piping bags
- Scribe tool or toothpick
- Edible silver pearls
How to make it
- Outline the edge of your graduation cap or diploma-shaped cookies using stiff-consistency icing to create a border; this acts as a dam to hold the thinner icing in place.
- Thin out your remaining icing with drops of water until it reaches ’15-second consistency’ (meaning a line drawn in the bowl disappears in 15 seconds) for flooding.
- Carefully fill the centers of the cookies with the flood icing, using a scribe tool to pop any air bubbles and push the icing into the corners for a seamless finish.
- Let the base layer dry for at least 6-8 hours in a cool, dry place; professional tip: use a small desk fan to speed up drying and add a professional shine to the icing.
- Once dry, pipe details like tassels or the year ‘2024’ using the stiff icing, then immediately drop silver pearls onto the wet accents for a 3D effect.
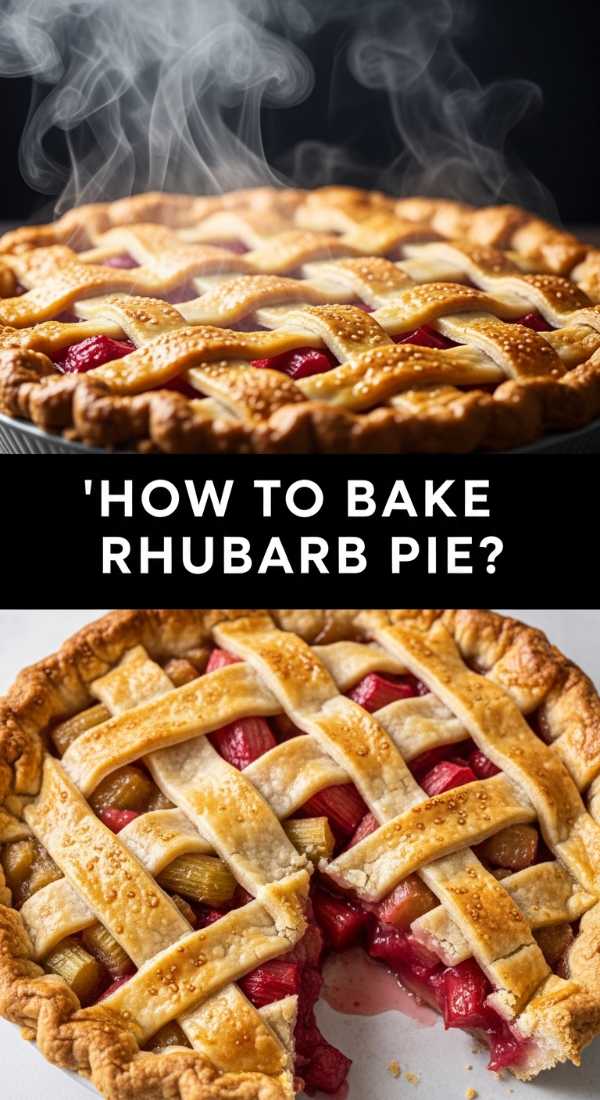
How to bake strawberry rhubarb pie
Why we love this
There is no pairing quite as iconic as the marriage of sweet, jammy strawberries and the bold, assertive tang of rhubarb. We love this pie for its rustic elegance and the way the juices bubble up through a golden, flaky lattice crust like molten fruit lava. Each bite is a multi-sensory experience: the crunch of sugar-dusted pastry, the warmth of the filling, and that intoxicating aroma of toasted butter and sun-ripened berries that lingers in the air long after the pie leaves the oven.
Ingredients
- Double pie crust (homemade or store-bought)
- 3 cups sliced rhubarb
- 3 cups sliced strawberries
- 1 cup sugar
- 1/4 cup cornstarch
- 1 tbsp lemon juice
- 1 egg (for wash) and coarse sanding sugar
How to make it
- Preheat your oven to 400°F (200°C) and place a baking sheet on the lower rack to catch any drips from the bubbling fruit.
- Toss the rhubarb and strawberries with sugar, cornstarch, and lemon juice; the cornstarch is essential here to thicken the juices and prevent a ‘soggy bottom’ crust.
- Roll out your bottom crust and fit it into a 9-inch pie plate, then pour in the fruit mixture, mounding it slightly in the center for a full look.
- Cut the second crust into 1-inch strips and weave them over the fruit to create a classic lattice; crimp the edges tightly to seal the juices inside.
- Brush the lattice with a beaten egg wash and sprinkle generously with coarse sugar; bake for 45-55 minutes until the crust is deep golden brown and the filling bubbles slowly.
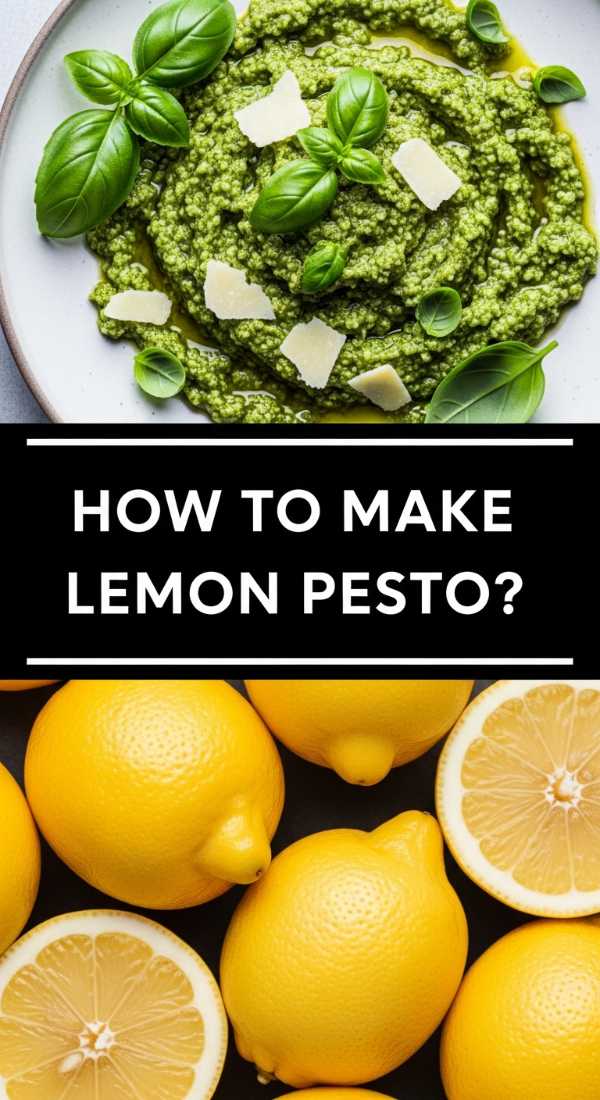
How to prepare zesty lemon pesto

Why we love this
Traditional pesto gets a bright, electric makeover that we absolutely adore for its versatility on any food board. We love the punchy, herbaceous notes of fresh basil combined with the sharp, citrusy zing of lemon zest that cuts through the richness of pine nuts and parmesan. It has a vibrant, emerald-green hue that pops against crackers or bread, and the fragrance of crushed garlic and lemon oil is enough to make anyone’s mouth water instantly.
Ingredients
- 2 cups fresh basil leaves, packed
- 1/2 cup grated Parmesan cheese
- 1/3 cup toasted pine nuts
- 2 cloves garlic, smashed
- 1/2 cup extra virgin olive oil
- Zest and juice of 1 large lemon
- Pinch of sea salt
How to make it
- Toast the pine nuts in a dry pan over medium heat for 3-5 minutes until golden and fragrant; professional tip: stay vigilant, as pine nuts can burn in seconds.
- In a food processor, pulse the garlic, toasted nuts, and lemon zest until coarsely chopped to create a textured base.
- Add the fresh basil leaves and half of the olive oil, then pulse in short bursts to maintain a vibrant green color; over-processing can oxidize the basil and turn it brown.
- Slowly stream in the remaining olive oil while the motor is running, then stir in the Parmesan and lemon juice by hand to keep the texture interesting.
- Taste and adjust with sea salt; if the pesto is too thick, add a tablespoon of warm water or more oil until it reaches a spreadable, silky consistency.
How to frost graduation cupcakes

Why we love this
Cupcakes are the perfect vessel for individual celebration, and we love how a professional frosting technique can turn a simple cake into a sophisticated handheld treat. The tactile pleasure of biting into a mountain of airy, whipped frosting that holds its shape perfectly is unmatched. Whether you use a classic swirl or a modern flat-top, the visual of a perfectly frosted batch of cupcakes creates a sense of abundance and joy that is essential for any graduation spread.
Ingredients
- 24 pre-baked cupcakes (cooled completely)
- 4 cups crusting buttercream frosting
- Large open-star piping tip (1M or 2D)
- Miniature chocolate graduation caps
- School-colored sprinkles
How to make it
- Ensure your cupcakes are entirely cool to the touch; even a hint of warmth will cause the butter in the frosting to melt and slide off.
- Fill your piping bag with frosting, making sure to massage the bag to remove any large air pockets that could cause ‘burps’ while piping.
- Hold the piping bag vertically at a 90-degree angle about half an inch above the center of the cupcake.
- Apply steady pressure and move in a tight spiral from the outside edge inward, overlapping the layers slightly to build height and a professional ‘bakery swirl’.
- Finish with a quick flick of the wrist at the center to create a clean peak, then immediately add your sprinkles and chocolate cap topper so they stick to the fresh icing.
How to design funny graduation cakes
Why we love this
While elegant cakes are beautiful, we love the personality and humor that a ‘funny’ cake brings to the party. It breaks the ice and celebrates the reality of the student experience—the late nights, the caffeine addiction, and the ‘I finally did it’ relief. The combination of playful fondant characters and witty puns creates a memorable centerpiece that guests will talk about (and laugh over) long after the last slice is served, proving that graduation is as much about joy as it is about prestige.
Ingredients
- Stacked and frosted rectangular cake
- Colored fondant (skin tones, black, white)
- Edible ink markers
- Piping gel
- Modeling chocolate for figures
How to make it
- Choose a relatable theme, such as a ‘student sleeping on a pile of books’ or a ‘graduating from Zoom University’ laptop design.
- Sculpt small figures using modeling chocolate; it’s more stable than fondant and easier to shape for beginners.
- Use edible ink markers to write witty phrases like “The Tassel Was Worth The Hassle” or “I’m 100% Done” in a stylized, modern font.
- Apply small accents using piping gel as an ‘adhesive’—this is much stronger than water and won’t dissolve the sugar in your decorations.
- Focus on the details: add tiny ‘coffee cups’ or ‘discarded pens’ made of fondant around the base of the cake to complete the humorous narrative.
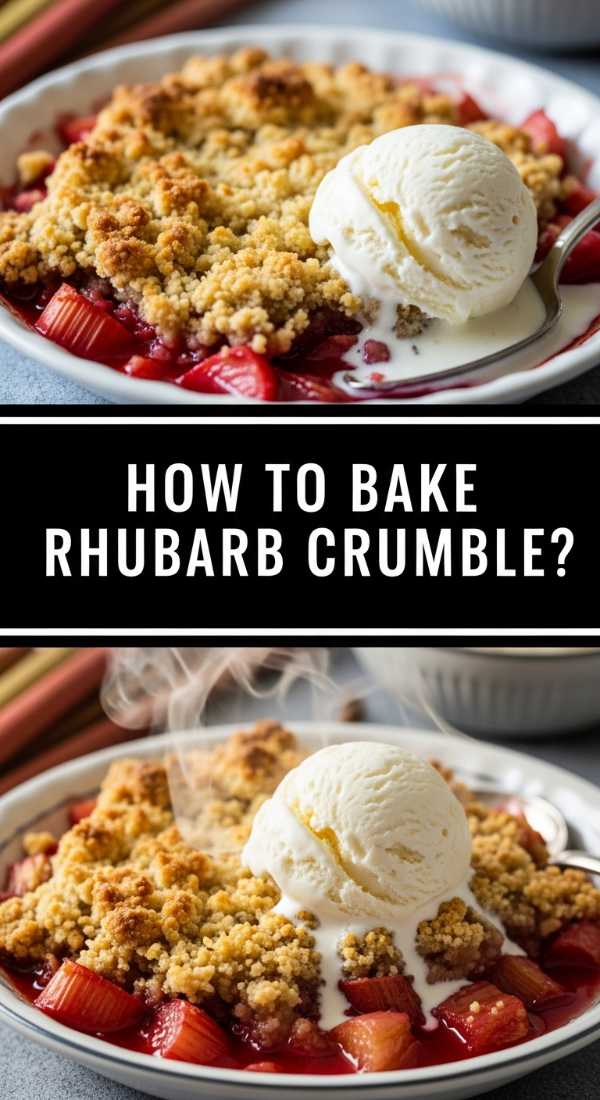
How to bake a classic rhubarb crumble
Why we love this
There is a rustic, unpretentious comfort in a rhubarb crumble that makes it a perennial favorite. We love the contrast between the sharp, molten fruit base and the buttery, oat-filled topping that crunches satisfyingly with every spoonful. The scent of cinnamon and nutmeg baking into the fruit creates an olfactory experience that feels like a warm hug, making it the perfect dessert for a relaxed family gathering where the only requirement is a large scoop of melting vanilla bean ice cream on top.
Ingredients
- 5 cups chopped rhubarb
- 3/4 cup sugar
- 1 tbsp orange zest
- 1 cup all-purpose flour
- 1 cup rolled oats
- 1 cup brown sugar, packed
- 1/2 cup cold butter, cubed
- 1 tsp cinnamon
How to make it
- Preheat your oven to 375°F (190°C) and grease a 9×9 inch baking dish with butter to ensure the fruit doesn’t stick to the edges.
- Toss the rhubarb with the granulated sugar and orange zest directly in the dish; the orange zest provides a floral bridge between the sugar and the tart rhubarb.
- In a separate bowl, combine the flour, oats, brown sugar, and cinnamon, mixing thoroughly so the spices are evenly distributed.
- Using a pastry cutter or your fingertips, rub the cold butter into the flour mixture until it resembles coarse crumbs with some pea-sized chunks remaining for extra crunch.
- Sprinkle the crumble topping evenly over the rhubarb and bake for 35-40 minutes; look for the fruit to be bubbling at the edges and the top to be a deep, golden brown.
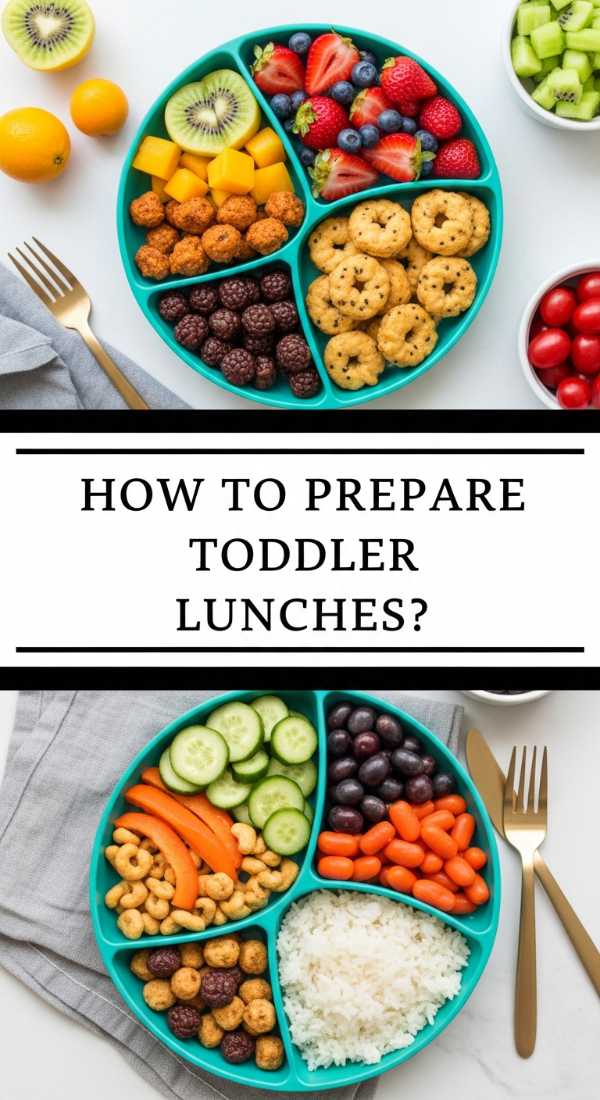
How to prepare healthy toddler lunches
Why we love this
Providing nutritious, vibrant lunches for the little ones shouldn’t be a chore, and we love the creative challenge of making healthy food look exciting. It’s about the bright pops of orange carrots, the creamy texture of avocado, and the fun of ‘finger foods’ that empower toddlers to explore new flavors. A well-prepared toddler lunch is a mini-charcuterie board in itself, offering a balanced mix of proteins and vitamins that looks so good, the adults might just want to snack on it too.
Ingredients
- Whole grain wrap or pita bread
- Hummus or mashed avocado
- Thinly sliced turkey or chickpeas
- Cucumber moons and cherry tomato halves
- Steamed broccoli florets
- Small cubes of mild cheddar cheese
How to make it
- Use small cookie cutters to cut the wraps or cheese into fun shapes like stars or hearts; professional tip: toddlers are statistically more likely to eat shapes than ‘normal’ food.
- Spread a thin layer of hummus on the wrap as a binder, then roll it tightly with the turkey and slice into small ‘sushi-style’ rounds for easy gripping.
- Lightly steam the broccoli for only 2-3 minutes so it retains its vibrant green color and a slight crunch while still being safe for young teeth.
- Arrange the components in a bento-style box with separate compartments to keep textures distinct; this prevents the ‘soggy cracker’ syndrome.
- Include a small ‘dip’ section with Greek yogurt mixed with a little honey to encourage the exploration of different textures and flavors.
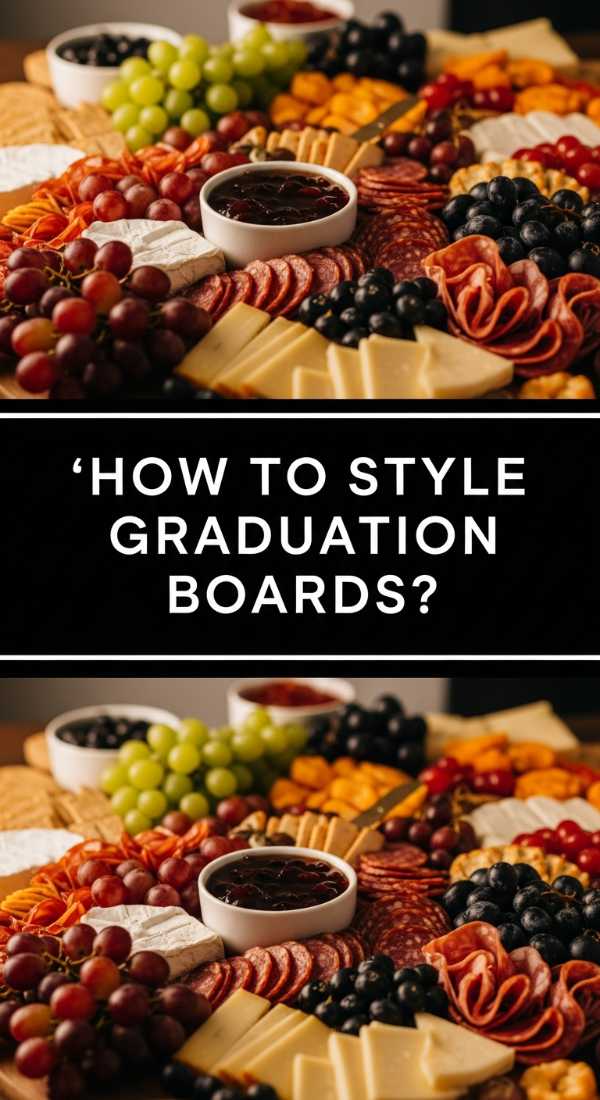
How to style a graduation charcuterie board
[IMAGE_10]
Why we love this
The charcuterie board is the ultimate expression of hospitality, and we love the ‘wow factor’ it brings to a graduation party. It’s a tapestry of flavors: the saltiness of cured meats, the creaminess of brie, the crunch of nuts, and the sweetness of fresh grapes. Styling it is like composing a painting, where every gap is filled with color and every element is placed to invite the guest to linger, snack, and celebrate the graduate’s achievements in a relaxed, communal atmosphere.
Ingredients
- 3 types of cheese (Soft brie, aged cheddar, tangy goat)
- 3 types of meat (Prosciutto, salami, capicola)
- Fresh fruits (Grapes, berries, sliced apples)
- Nuts and dried apricots
- Artisan crackers and sliced baguette
- Small bowls of honey and lemon pesto
How to make it
- Start by placing your largest items first—the bowls of pesto and honey and the blocks of cheese—to create ‘anchor points’ on the board.
- Create ‘salami roses’ by folding circles of meat over the rim of a wine glass, overlapping them, then flipping the glass onto the board for a floral effect.
- Fan out your crackers and baguette slices in winding ‘rivers’ that guide the eye across the board and connect the different flavor zones.
- Fill the larger remaining gaps with clusters of grapes and piles of nuts, ensuring that colors are distributed evenly (don’t put all the green items in one corner).
- The final ‘pro’ step is the ‘garnish fill’: tuck sprigs of fresh rosemary or edible flowers into the tiniest cracks to give the board a lush, overflowing, and viral-ready appearance.
The Final Flourish
Creating a viral-worthy food board isn’t about perfection; it’s about the joy of the process and the love you share with those around you. Whether you’re celebrating a high school graduation or simply the arrival of rhubarb season, these recipes and styling tips are designed to help you host with confidence and ease. So grab your favorite wooden board, start prepping those strawberries, and get ready to be the host everyone talks about. Happy hosting!