

We’ve all been there: the group chat is buzzing, your friends are coming over in two hours, and you’re still in your favorite oversized hoodie wondering how you’re going to pull off a ‘hostess with the mostest’ vibe without spending your entire weekend in the kitchen. Enter the viral food board. It’s the ultimate lazy girl’s secret weapon because it looks like a curated masterpiece but is actually just a clever assembly of delicious, protein-packed components that guests can graze on all night long.
The magic of a viral board lies in the variety. Instead of one heavy main course, we’re talking about a sprawling landscape of textures and flavors. Think succulent, crispy chicken prepared ten different ways, nestled between colorful dips and fresh herbs. It’s an effortless way to cater to everyone’s palate while keeping the mood relaxed, chic, and totally Instagram-worthy. Let’s dive into the ultimate guide to mastering the chicken components that will make your board the talk of the town.
How to bake crispy chicken thighs
Why we love this
There is nothing quite as satisfying as the audible crunch of perfectly rendered chicken skin giving way to a burst of savory, salty juice. When you bake these thighs to crispy perfection, the kitchen fills with a warm, roasting aroma that smells like home and comfort. The texture is a beautiful contrast between the crackling golden exterior and the velvety, tender meat underneath, making it the undeniable star of any party board platter.
Ingredients
- 6-8 bone-in, skin-on chicken thighs
- 2 tablespoons olive oil
- 1 tablespoon sea salt
- 1 teaspoon cracked black pepper
- 1 teaspoon garlic powder
- 1 teaspoon smoked paprika
How to make it
- Preheat your oven to 425°F (218°C). This high heat is crucial for achieving that signature ‘shatter-crisp’ skin without overcooking the center.
- Pat the chicken thighs extremely dry with paper towels. Any moisture on the skin will cause it to steam rather than crisp, so be thorough here.
- In a small bowl, whisk together the sea salt, pepper, garlic powder, and smoked paprika until well combined.
- Drizzle the olive oil over the thighs and rub it in, then generously coat each piece with the spice mixture, ensuring you get under the skin folds.
- Place a wire rack over a rimmed baking sheet and arrange the chicken on top. This allows hot air to circulate under the meat, crisping the bottom as well.
- Bake for 35-45 minutes. You are looking for a deep mahogany gold color and an internal temperature of 165°F (74°C). Let them rest for 5 minutes before serving to lock in the juices.
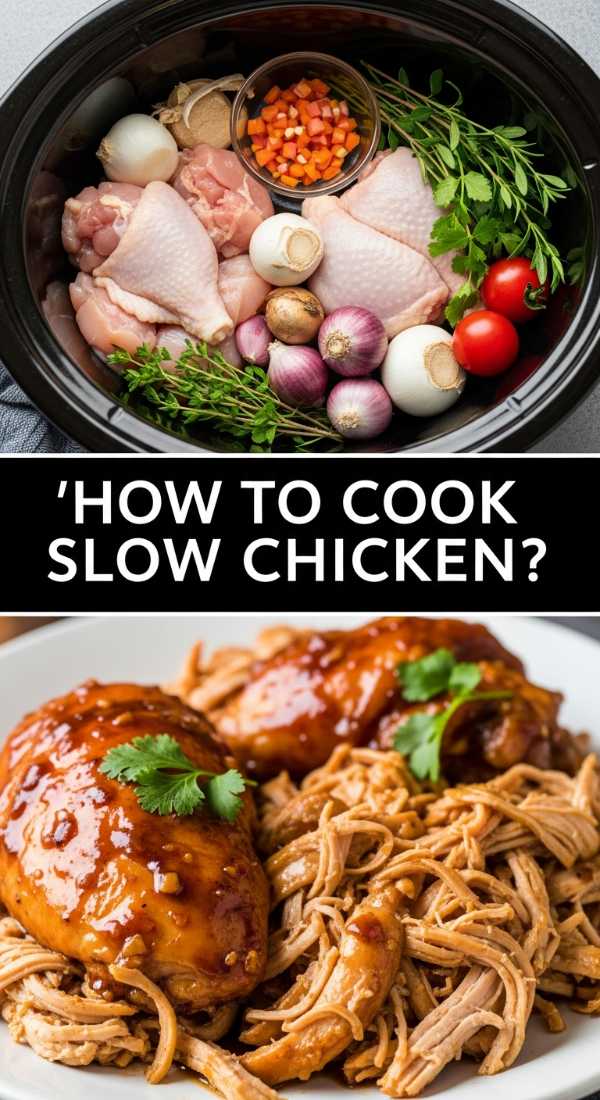
How to cook slow cooker chicken thighs

Why we love this
This is the ultimate ‘set it and forget it’ method that produces meat so tender it practically melts off the bone at the mere suggestion of a fork. The slow, gentle heat allows the collagen to break down into a rich, silky sauce that coats every fiber of the chicken. It’s a warm, soulful dish that fills the air with a deep, savory fragrance, making your guests feel immediately cozy and welcomed as soon as they step through your door.
Ingredients
- 2 lbs boneless, skinless chicken thighs
- 1 cup low-sodium chicken broth
- 1 yellow onion, sliced
- 3 cloves garlic, smashed
- 1 tablespoon Italian seasoning
- Salt and pepper to taste
How to make it
- Layer the sliced onions and smashed garlic at the bottom of your slow cooker to create a flavor base and prevent the meat from sticking to the bottom.
- Season both sides of the chicken thighs generously with salt, pepper, and the Italian seasoning.
- Place the chicken on top of the onions. Do not worry about overlapping; they will shrink as they cook.
- Pour the chicken broth around the sides of the meat so you don’t wash off the seasoning you just applied.
- Cover and cook on Low for 6 to 7 hours, or on High for 3 to 4 hours. Low and slow is always better for the most succulent results.
- Once finished, use two forks to gently pull the meat apart into large chunks. The chicken should be incredibly moist and opaque throughout.
How to grill boneless chicken thighs

Why we love this
Grilling brings an elemental, smoky charred flavor that you just can’t replicate in an oven. There is something primal and exciting about those dark, caramelized grill marks and the way the fat sizzles against the grates, sending up plumes of aromatic smoke. The meat remains incredibly bouncy and juicy, offering a light, charred exterior that pairs perfectly with a cold glass of rosé and a summer evening breeze.
Ingredients
- 1.5 lbs boneless chicken thighs
- 1/4 cup avocado oil (high smoke point)
- 2 tablespoons soy sauce
- 1 tablespoon honey
- 1 teaspoon onion powder
- 1/2 teaspoon cayenne pepper
How to make it
- Whisk the oil, soy sauce, honey, and spices in a large bowl. Toss the chicken thighs in the marinade and let them sit for at least 30 minutes at room temperature.
- Clean your grill grates thoroughly and preheat the grill to medium-high heat (about 400°F). Lightly oil the grates using a folded paper towel dipped in oil.
- Lay the chicken thighs flat across the grates. Close the lid and cook undisturbed for 5-6 minutes. Resist the urge to flip early; the chicken will release naturally once a crust has formed.
- Flip the chicken. The underside should have distinct, dark brown grill marks. Cook for another 5-7 minutes.
- Check for doneness. The meat should feel firm to the touch and the internal temperature should reach 165°F (74°C).
- Remove from the heat and tent with foil for 5 minutes. This prevents the moisture from evaporating, ensuring the first bite is incredibly juicy.
How to roast juicy chicken legs

Why we love this
Chicken legs are the underrated heroes of the party board—they come with a built-in handle! Roasting them transforms the skin into a translucent, golden parchment while the dark meat inside becomes exceptionally tender and rich. The aroma is classic Sunday roast, evoking a sense of nostalgia and hearty satisfaction. Each bite is a perfect balance of salty, roasted skin and succulent, steaming meat.
Ingredients
- 6-10 whole chicken legs (drumsticks)
- 3 tablespoons melted butter
- 1 tablespoon dried thyme
- 1 tablespoon lemon zest
- 2 teaspoons kosher salt
How to make it
- Preheat your oven to 400°F (200°C). Prepare a baking dish by lining it with parchment paper for easy cleanup.
- In a small bowl, combine the melted butter, thyme, lemon zest, and salt. The butter helps the skin brown while the lemon adds a bright top note.
- Brush the butter mixture all over the chicken legs, ensuring they are coated from top to bottom.
- Arrange the legs in the pan so they are not touching. This prevents them from ‘sweating’ and ensures the heat hits every surface.
- Roast for 35 to 40 minutes. Halfway through, rotate the pan in the oven to ensure even browning.
- The legs are done when the juices run clear when pierced with a knife and the skin is a deep, honey-gold. Let them rest for 5 minutes so the juices redistribute.
How to sear golden chicken thighs

Why we love this
Searing is all about that beautiful Maillard reaction—the chemical process that creates a savory, umami-rich crust on the meat. The sound of the sizzle as the chicken hits the hot cast iron is pure kitchen music. The result is a concentrated flavor profile with a texture that is crisp on the outside and buttery soft on the inside. It looks incredibly professional and elevated on a serving board.
Ingredients
- 4 large boneless, skin-on chicken thighs
- 1 tablespoon neutral oil (like grapeseed)
- Flaky sea salt
- 1/2 teaspoon white pepper
How to make it
- Place a heavy-bottomed skillet (preferably cast iron) over medium-high heat for at least 3-5 minutes until it is shimmering hot.
- Season only the skin side of the chicken with salt and white pepper.
- Add the oil to the pan. Carefully place the chicken skin-side down into the hot oil. You should hear a loud, aggressive sizzle immediately.
- Use a weight or a heavy press to push the chicken down for the first 2 minutes. This ensures the entire surface area of the skin makes contact with the heat.
- Lower the heat to medium and cook for 8-10 minutes without moving the chicken. You will see the fat rendering out and the edges turning golden.
- Flip once the skin is deep golden and releases easily from the pan. Cook for another 4-5 minutes on the flesh side until cooked through. Remove and slice into thick strips.
How to make garlic butter chicken

Why we love this
Garlic and butter are the ultimate power couple of the culinary world. As the butter browns in the pan, it takes on a nutty, toasted fragrance that marries perfectly with the pungent, sweet aroma of sautéed garlic. The chicken becomes bathed in a glossy, golden sauce that is so rich and flavorful you’ll want to dip everything on your board into it. It’s decadent, comforting, and absolutely irresistible.
Ingredients
- 1 lb chicken thigh pieces (bite-sized)
- 4 tablespoons unsalted butter
- 5 cloves garlic, minced
- 1 tablespoon fresh parsley, chopped
- Salt and pepper
How to make it
- Season the chicken pieces with salt and pepper. In a large skillet, melt 1 tablespoon of butter over medium-high heat.
- Add the chicken to the pan in a single layer. Sear for about 3-4 minutes per side until they have a nice golden color and are cooked through. Remove the chicken and set aside.
- Lower the heat to medium. Add the remaining 3 tablespoons of butter to the same pan.
- Once the butter is foaming, add the minced garlic. Stir constantly for about 1 minute until the garlic is fragrant and just beginning to turn golden (do not let it burn).
- Add the chicken back into the pan and toss vigorously to coat every piece in the garlic butter.
- Finish with a sprinkle of fresh parsley for a pop of color and freshness before transferring to your board.
How to season baked chicken thighs

Why we love this
The right seasoning can take a simple piece of chicken and turn it into a flavor explosion. We love this method because it’s all about the ‘dry rub’—creating a textured, spice-heavy crust that locks in moisture while providing a punchy, complex taste. It’s an easy way to add a variety of cultural flair to your board, whether you go for Mediterranean, BBQ, or spicy notes. The aroma of toasted spices is intoxicating.
Ingredients
- 6 chicken thighs
- 1 tablespoon paprika
- 1 teaspoon cumin
- 1 teaspoon coriander
- 1 teaspoon chili powder
- 1 teaspoon brown sugar
- 2 teaspoons salt
How to make it
- Preheat your oven to 400°F. In a small jar, shake together the paprika, cumin, coriander, chili powder, brown sugar, and salt until perfectly blended.
- Lightly coat the chicken thighs in a tiny bit of oil to help the spices stick.
- Generously sprinkle the spice rub over both sides of the chicken. Use your hands to press the spices into the meat so they don’t fall off during baking.
- Place the chicken on a parchment-lined baking sheet.
- Bake for 30-35 minutes. The brown sugar in the rub will caramelize, creating a slightly sticky, deeply flavorful exterior.
- Let the chicken rest for a few minutes. The spices will have formed a beautiful, dark crust that looks stunning against a colorful board.
How to glaze honey chicken thighs

Why we love this
There is something so addictive about the combination of sweet and savory. This glaze transforms the chicken into a sticky, shiny masterpiece that glimmers under the dining room lights. The honey caramelizes into a thick, jammy consistency that clings to the meat, offering a velvety mouthfeel and a lingering sweetness that is perfectly balanced by the natural juices of the chicken. It’s the finger-licking favorite of any gathering.
Ingredients
- 1 lb boneless chicken thighs
- 1/3 cup honey
- 2 tablespoons dijon mustard
- 1 tablespoon apple cider vinegar
- Salt and pepper
How to make it
- Season the chicken with salt and pepper. Sear them in a hot skillet for 5 minutes per side until almost cooked through.
- In a bowl, whisk together the honey, dijon mustard, and apple cider vinegar. The vinegar provides the necessary acidity to cut through the sugar.
- Pour the honey mixture directly into the skillet over the chicken.
- Turn the heat down to medium-low. As the sauce begins to bubble, use a spoon to continuously baste the chicken with the glaze.
- Continue cooking for 5-8 minutes until the sauce has reduced by half and is thick enough to coat the back of a spoon.
- The chicken should be completely glazed and sticky. Remove from the pan and let the glaze set for a minute before serving.
How to fry crunchy chicken legs

Why we love this
Frying is the gold standard of ‘indulgence.’ That thick, rugged, craggy crust provides an incredible textural experience—the kind of crunch that you can hear from across the room. Inside, the meat remains steaming hot and impossibly moist. The smell of frying chicken is the ultimate party signal, promising a savory, salty treat that feels like a total celebration of flavor. It’s the ultimate comfort food for a crowd.
Ingredients
- 8 chicken drumsticks
- 2 cups buttermilk
- 2 cups all-purpose flour
- 1 tablespoon salt
- 1 tablespoon black pepper
- 1 teaspoon cayenne
- Neutral oil for frying
How to make it
- Marinate the chicken in buttermilk for at least 1 hour. The acidity in the buttermilk tenderizes the meat.
- In a large bowl, mix the flour with salt, pepper, and cayenne. This is your seasoned dredge.
- Heat 2 inches of oil in a heavy pot to 350°F (175°C). Use a thermometer; temperature control is vital for a non-greasy finish.
- Take a piece of chicken from the buttermilk, let the excess drip off, and coat it thoroughly in the flour mixture. Press the flour in to create those ‘craggy’ bits.
- Carefully lower 3-4 pieces into the oil. Do not overcrowd the pot or the oil temperature will drop.
- Fry for 12-15 minutes, turning occasionally, until the crust is a deep golden brown and the internal temp is 165°F. Drain on a wire rack to keep the bottom from getting soggy.
How to prep lemon chicken thighs
[IMAGE_10]
Why we love this
Lemon chicken is the ‘bright’ note your board needs to feel balanced. The sharp, citrusy tang of the lemon cuts through the richness of the chicken fat, creating a flavor profile that is clean, refreshing, and vibrant. It feels light and healthy while still being incredibly satisfying. The zest adds tiny flecks of sunshine to the meat, making it look as fresh as it tastes. It’s the perfect palate cleanser between heavier bites.
Ingredients
- 1.5 lbs boneless chicken thighs
- Juice and zest of 2 large lemons
- 3 tablespoons olive oil
- 2 cloves garlic, minced
- 1 teaspoon dried oregano
- Salt and pepper
How to make it
- In a zip-top bag, combine the lemon juice, lemon zest, olive oil, garlic, and oregano. Shake to mix.
- Add the chicken thighs to the bag and massage the marinade into the meat. Let it marinate in the fridge for at least 30 minutes (but no longer than 2 hours, as the acid can change the meat’s texture).
- Preheat a skillet over medium heat. Add a tiny splash of oil.
- Remove the chicken from the marinade and shake off the excess. Place in the skillet.
- Cook for 6-7 minutes per side. The lemon juice will naturally caramelize slightly, giving the chicken a beautiful, pale golden hue.
- Pour any remaining juices from the pan over the chicken once it’s on the board for an extra punch of citrus flavor.
The Finishing Touch: Assembling Your Masterpiece
Now that you have your chicken prepared, it’s time for the fun part: assembly! Grab your largest wooden board or even a clean parchment-lined countertop. Start by placing your chicken varieties in clusters around the board. Fill the gaps with small bowls of dipping sauces like honey mustard, spicy aioli, or cooling tzatziki. Add some ‘lazy’ fillers like pre-washed grapes, sliced cucumbers, and a handful of crackers. The key to a viral board is abundance—don’t be afraid to pile things high. Sprinkle some fresh herbs over everything at the end to give it that professional, ‘just-shot-this-for-a-magazine’ look!
Frequently Asked Questions
Everything you need to know about hosting the perfect party board.