
The Ultimate Lazy-Girl Guide to Viral Snack Boards
We’ve all been there—scrolling through TikTok at 11 PM, mesmerized by those perfectly curated snack boards that look like they belong in a high-end gallery. You want that aesthetic life, but you also just spent eight hours at your desk and the thought of ‘cooking’ feels like a marathon. That’s exactly why the ‘Lazy-Girl Snack Board’ became a viral sensation; it’s about maximum vibes with minimum effort, proving that you don’t need a culinary degree to create a feast that’s both Instagrammable and soul-soothing.
The secret isn’t in the complexity of the dishes, but in the variety and the presentation. It’s about taking those simple, viral comfort foods—the ones that make your house smell like a Five-Star bistro—and arranging them in a way that feels intentional and indulgent. Whether you’re hosting a last-minute girl’s night or just treating yourself to a solo ‘everything’ board, this guide will show you how to master the staples that define the modern food board aesthetic.
How to make Greek bowls

Why we love this
There is something incredibly refreshing about a Greek bowl that hits every single sensory note: the crisp, watery crunch of Persian cucumbers, the salty tang of crumbled feta that melts on your tongue, and the aromatic punch of fresh dill and dried oregano. As you assemble it, the scent of lemon zest and cold-pressed olive oil fills the air, creating a bright, Mediterranean atmosphere in your kitchen. It’s a texture-rich experience where every bite offers a different combination of creamy hummus, juicy tomatoes, and warm, fluffy grains, making it the perfect vibrant centerpiece for any board.
Ingredients
- Cooked quinoa or jasmine rice
- Diced cucumbers and cherry tomatoes
- Sliced Kalamata olives and red onion
- Feta cheese crumbles
- Hummus and Tzatziki
- Lemon wedges and fresh parsley
How to make it
- Start by preparing your grain base; if using quinoa, rinse it thoroughly under cold water to remove bitterness, then simmer with a 2:1 water-to-grain ratio until the ‘tails’ pop out and the liquid is fully absorbed.
- While the grains fluff, finely dice your vegetables into uniform half-inch pieces to ensure you get a bit of everything in each spoonful.
- Prepare a quick dressing by whisking three parts olive oil to one part fresh lemon juice, adding a pinch of salt and dried oregano until emulsified and cloudy.
- Layer the warm grains at the bottom of a shallow bowl, then arrange the vegetables in distinct piles around the perimeter to maintain that clean, viral aesthetic.
- Add a generous dollop of hummus and tzatziki in the center, sprinkle heavily with feta and herbs, and finish with a drizzle of the lemon dressing just before serving.
How to cook garlic noodles

Why we love this
Garlic noodles are the ultimate comfort food, wrapping you in a warm, buttery embrace that feels like a hug from the inside out. The aroma is intoxicating—a heady mix of toasted garlic cloves and the savory, umami depth of oyster sauce and parmesan cheese. As you toss the noodles, they take on a glossy, shimmering sheen that catches the light, while the steam carries the scent of browned butter and scallions across the room. It’s a rich, decadent experience that balances salty, sweet, and pungent flavors in every chewy, silken strand.
Ingredients
- Thick wheat noodles or spaghetti
- 6-8 cloves of fresh garlic, minced
- Unsalted butter
- Oyster sauce and soy sauce
- Grated Parmesan cheese
- Chopped scallions
How to make it
- Boil your noodles in salted water, pulling them out exactly one minute before the ‘al dente’ package instructions recommend to ensure they maintain a chewy texture during the stir-fry phase.
- In a wide pan or wok over medium-low heat, melt a generous knob of butter until it begins to foam and turn a light nut-brown color.
- Add the minced garlic to the butter, stirring constantly for about 2 minutes; watch for the garlic to turn a pale golden hue and become fragrant without letting it turn dark brown or bitter.
- Whisk together two tablespoons of oyster sauce, one tablespoon of soy sauce, and a teaspoon of sugar, then pour this into the garlic butter, stirring until it bubbles and thickens slightly.
- Transfer the noodles directly from the pot into the pan, tossing vigorously to coat every strand in the glossy sauce, then remove from heat and fold in the parmesan cheese and scallions until the cheese creates a creamy, cohesive emulsion.
How to prepare street tacos
Why we love this
Street tacos are a celebration of high-heat cooking and fresh, vibrant garnishes that make every bite feel like a mini-party. The sound of marinated meat hitting a searing hot cast-iron skillet is immediately satisfying, followed by the smoky, charred aroma of caramelized spices and toasted corn. There’s a beautiful contrast between the hot, juicy protein and the cold, sharp bite of raw white onions and cilantro, all brought together by a squeeze of lime that cuts through the richness. It’s a tactile, messy, and deeply rewarding way to eat that looks stunning when piled high on a platter.
Ingredients
- Thinly sliced flank steak or chicken thighs
- Corn tortillas
- Diced white onion and fresh cilantro
- Lime wedges
- Chili powder, cumin, and garlic powder
- Radish slices for crunch
How to make it
- Toss your meat in a mixture of oil, lime juice, and spices, letting it marinate for at least 20 minutes to tenderize the fibers and build a deep flavor profile.
- Heat a heavy skillet over high heat until it’s nearly smoking; add the meat in a single layer to ensure it sears and develops a dark, crispy crust rather than steaming in its own juices.
- While the meat rests, heat a dry pan or use an open flame on your stove to toast the corn tortillas until they show charred ‘leopard spots’ and become pliable and fragrant.
- Finely mince your white onion and cilantro, mixing them together in a small bowl to create the classic ‘street taco’ topping that provides a sharp, fresh contrast to the meat.
- Assemble by doubling up the tortillas for strength, adding a heap of meat, a generous sprinkle of the onion-cilantro mix, and serving immediately with plenty of lime wedges for that essential acidic finish.
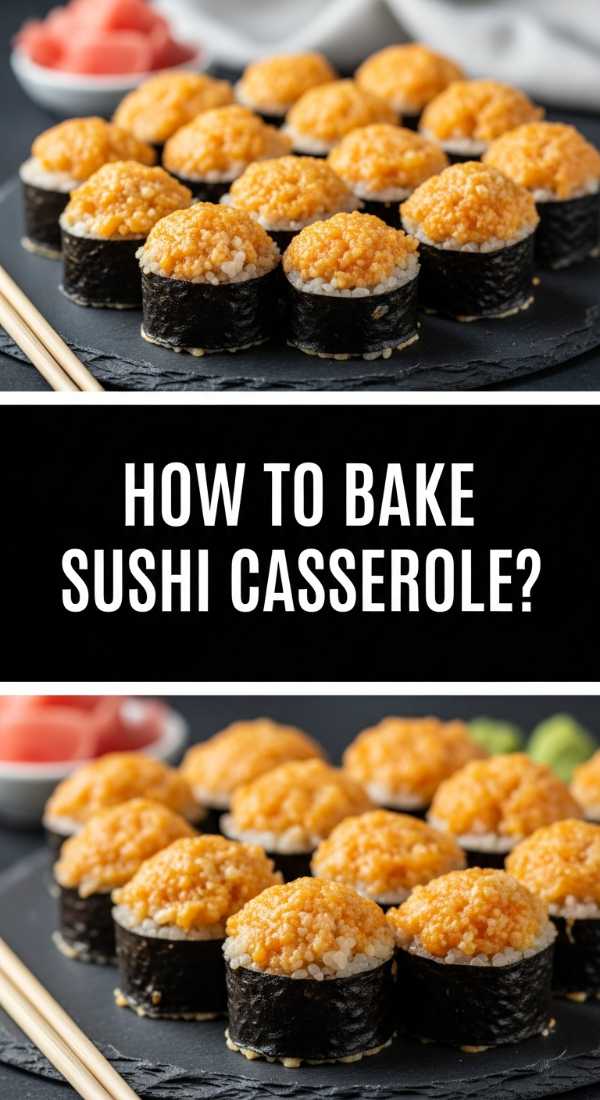
How to bake sushi casserole

Why we love this
Sushi casserole is the cozy, warm cousin of the traditional roll, offering all the flavors of a spicy tuna or California roll in a comforting, scoopable format. The smell of toasted nori and seasoned rice vinegar is iconic, but it’s the golden, bubbling top of spicy mayo and sriracha that really sets this dish apart. When you dig in, you get the creamy richness of baked seafood mixed with the slightly sweet, vinegared rice, creating a melt-in-your-mouth texture that is incredibly addictive. It’s a viral favorite because it’s surprisingly decadent while remaining incredibly easy to share and serve.
Ingredients
- Cooked short-grain sushi rice
- Rice vinegar and sugar (for seasoning)
- Imitation crab or canned tuna
- Japanese mayo (Kewpie) and Sriracha
- Furikake seasoning
- Nori sheets for serving
How to make it
- Season your warm, cooked sushi rice with a mixture of rice vinegar, sugar, and salt, folding it gently with a spatula so you don’t mash the grains, then press it into an even layer in a baking dish.
- Sprinkle a thick, even coating of furikake over the rice to provide a salty, seaweed-forward crunch between the layers.
- In a separate bowl, shred your crab or tuna and mix it with a generous amount of Japanese mayo and sriracha until it reaches a creamy, spreadable consistency with a kick of heat.
- Spread the seafood mixture over the rice layer, then drizzle extra mayo and sriracha in a zigzag pattern across the top for that professional, viral look.
- Bake at 375°F for about 15-20 minutes until the top is bubbling and just starting to brown at the edges; serve hot by scooping portions into small squares of toasted nori.
How to simmer butter chicken

Why we love this
Butter chicken is the epitome of culinary luxury, characterized by a sauce so smooth and velvety it feels like silk on the palate. The aroma is a complex tapestry of warm cinnamon, earthy cumin, and toasted fenugreek, which fills your entire home with an inviting, spicy warmth. As it simmers, the bright orange sauce thickens, and the chicken becomes so tender it practically falls apart at the touch of a fork. Pairing this with warm, buttery naan to scoop up the extra gravy is a sensory experience that defines ‘soul food’ in the best way possible.
Ingredients
- Chicken breast or thighs, cut into bite-sized pieces
- Tomato puree (passata)
- Heavy cream and unsalted butter
- Garam masala, turmeric, and cumin
- Ginger and garlic paste
- Fresh cilantro for garnish
How to make it
- Marinate the chicken in yogurt and spices for at least 30 minutes, which helps break down the proteins and ensures the meat stays juicy even after simmering.
- Sear the chicken in a hot pan with a bit of oil until golden on the outside; remove the chicken and set aside, as it will finish cooking in the sauce later.
- In the same pan, melt butter and sauté the ginger-garlic paste until fragrant, then pour in the tomato puree and spices, allowing it to simmer on low heat for 10 minutes until the oil starts to separate from the sauce.
- Stir in the heavy cream and a final knob of butter, whisking until the sauce transforms into a vibrant, uniform orange color with a glossy finish.
- Add the chicken back into the sauce and simmer for another 5-7 minutes until the chicken is cooked through and the flavors are fully married; finish with a sprinkle of fresh cilantro for a pop of color.
How to fry crispy falafel

Why we love this
Fried falafel is all about the contrast—that audible, satisfying crunch of the dark golden exterior giving way to a soft, emerald-green, herb-packed center. The aroma of frying cumin and fresh coriander is distinct and earthy, reminding you of bustling street markets. When properly seasoned, these little gems are an explosion of savory flavor, accented by the zesty bite of garlic and the floral notes of fresh parsley. They are the perfect protein for a board, offering a hearty, satisfying texture that pairs beautifully with cool, creamy tahini or yogurt dips.
Ingredients
- Dried chickpeas (soaked overnight, not canned)
- Fresh parsley and cilantro
- Garlic cloves and onion
- Cumin, coriander, and salt
- Baking soda (for fluffiness)
- Neutral oil for frying
How to make it
- Pulse the soaked (and drained) chickpeas in a food processor with the herbs, onion, and spices until the mixture looks like coarse sand; it should hold together when squeezed but not be a smooth paste.
- Transfer the mixture to a bowl, stir in a half-teaspoon of baking soda, and let it chill in the fridge for at least 30 minutes, which is the crucial step to prevent the falafel from falling apart in the oil.
- Heat about two inches of neutral oil in a heavy pot to 350°F; you can test the heat by dropping a small piece of bread in—it should sizzle and brown in about 30 seconds.
- Using wet hands or a falafel scoop, form the mixture into small balls or patties, gently dropping them into the hot oil without crowding the pan.
- Fry for 3-4 minutes, turning occasionally, until the outsides are a deep, dark brown; drain on paper towels and serve immediately while the exterior is at its crispiest.
How to steam fluffy bao

Why we love this
Steaming bao buns is like creating edible clouds; they are incredibly soft, pillowy, and have a gentle sweetness that perfectly balances savory fillings. The process of opening the steamer to a cloud of white vapor and seeing the smooth, pale dough expanded and perfect is incredibly rewarding. They have a unique, bouncy texture that is unlike any other bread, and their neutral flavor profile makes them the ultimate vessel for sticky pork belly, crunchy fried chicken, or pickled vegetables. It’s a sophisticated addition to any board that feels like a true ‘chef-y’ accomplishment.
Ingredients
- All-purpose flour
- Instant yeast and warm water
- Sugar and a pinch of salt
- Baking powder and vegetable oil
- Parchment paper squares
How to make it
- Combine the flour, yeast, sugar, and warm water in a bowl, kneading until a smooth, elastic dough forms that doesn’t stick to your hands.
- Let the dough rise in a warm, draft-free spot for about an hour, or until it has doubled in size and feels light and airy when poked.
- Punch the dough down and roll it out into a half-inch thick sheet, cutting out circles with a biscuit cutter; brush each circle with a tiny bit of oil and fold it in half over a small piece of parchment paper to create the ‘mouth.’
- Let the folded buns proof for another 30 minutes until they look slightly puffy, then place them in a bamboo steamer over boiling water.
- Steam for exactly 10 minutes on medium heat, then turn off the heat and let them sit for 5 minutes before opening the lid; this prevents the buns from collapsing or wrinkling due to a sudden temperature change.
How to char chicken skewers

Why we love this
Chicken skewers are a board favorite because they offer those irresistible charred ‘bits’ that pack so much concentrated flavor. The smell of honey and soy sauce caramelizing over a high flame is the quintessential scent of a summer BBQ, even if you’re making them in a grill pan indoors. There is a primal joy in the slight resistance of the charred exterior followed by the tender, juice-filled interior of the meat. They provide a structural element to your snack board, standing tall and inviting guests to grab one and go, making the whole dining experience feel interactive and fun.
Ingredients
- Chicken thighs, cut into cubes
- Soy sauce, honey, and sesame oil
- Grated ginger and garlic
- Wooden skewers (soaked in water)
- Sesame seeds and scallions for garnish
How to make it
- Whisk together your marinade of soy sauce, honey, ginger, and garlic, tossing the chicken cubes in the mixture and letting them sit for at least 30 minutes to absorb the sugars and salt.
- Thread the chicken tightly onto the soaked skewers; keeping the pieces close together helps the meat stay juicy while the outside chars.
- Preheat a grill pan or cast-iron skillet over medium-high heat until a drop of water flicked onto it dances and evaporates instantly.
- Place the skewers on the hot surface, pressing down slightly to ensure maximum contact; cook for 3-4 minutes per side without moving them, allowing a dark, caramelized crust to form.
- Brush the skewers with a little extra marinade during the last minute of cooking for a glossy finish, then remove from heat and rest for 2 minutes before garnishing with sesame seeds.
How to make spicy ramen

Why we love this
A bowl of spicy ramen is a multi-sensory masterpiece, from the glossy red sheen of the chili oil to the rhythmic slurping of the springy, alkaline noodles. The broth is a deep, complex lake of flavor—salty, spicy, and rich with the essence of garlic and ginger—that warms you from the chest outward. Topped with a jammy, soft-boiled egg and crisp nori, it’s a dish that looks as good as it tastes. The heat of the spice is balanced by the chew of the noodles and the creaminess of the egg yolk, making it a bold, high-impact addition to a viral food spread.
Ingredients
- Ramen noodles (fresh or high-quality dried)
- Chicken or vegetable broth
- Gochujang (Korean chili paste) or Miso
- Soy sauce and sesame oil
- Soft-boiled egg (6.5-minute egg)
- Chili oil and sliced green onions
How to make it
- In a small pot, sauté minced garlic and ginger in sesame oil until fragrant, then stir in a tablespoon of gochujang, letting it toast for a minute to deepen its smoky flavor.
- Pour in your broth and a splash of soy sauce, bringing it to a gentle simmer for 10 minutes so the aromatics can fully infuse the liquid.
- While the broth simmers, boil your ramen noodles in a separate pot according to package directions, then drain and rinse quickly with cold water to stop the cooking and preserve their ‘bounce.’
- Prepare your ‘jammy’ egg by boiling it for exactly 6.5 minutes, then immediately plunging it into an ice bath; this ensures the white is set while the yolk remains liquid gold.
- Place the noodles in a bowl, ladle the hot, spicy broth over them, and top with the halved egg, a drizzle of chili oil, and a handful of fresh green onions for a vibrant finish.
How to assemble mezze platters
[IMAGE_10]
Why we love this
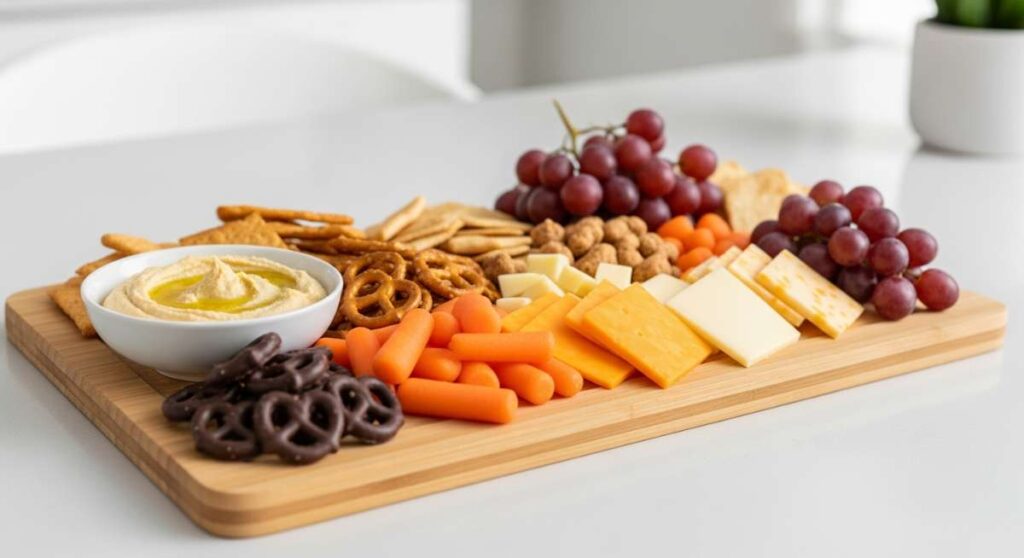
The mezze platter is the ultimate ‘Lazy-Girl’ hack because it’s as much about the art of assembly as it is about cooking. It’s a visual feast of colors: the deep purple of kalamata olives, the bright green of fresh grapes, the snowy white of feta, and the warm browns of toasted pita. The variety of textures—from the creamy dip to the crunchy nut and the soft bread—ensures that no two bites are ever the same. It’s a social way of eating that encourages lingering and conversation, making it the perfect focal point for a relaxed, aesthetic evening.
Ingredients
- Hummus, Baba Ganoush, or Labneh
- Warm pita bread or crackers
- Olives, artichoke hearts, and roasted peppers
- Fresh cucumbers, tomatoes, and grapes
- Nuts (pistachios or almonds)
- Dried apricots or dates
How to make it
- Start by placing your largest components—the bowls of dips—diagonally from each other on a large wooden board or platter to create a sense of balance.
- Surround the bowls with ‘anchor’ items like piles of folded warm pita bread or stacks of crackers, ensuring they are easily accessible for dipping.
- Fill the larger remaining gaps with your produce, like sliced cucumbers and clusters of grapes, which add height and vibrant color to the board.
- Use smaller items like olives, nuts, and dried fruits to fill in any tiny ‘holes’ or empty spaces; a truly viral board should look ‘full’ and abundant with no wood peeking through.
- Finish by drizzling a high-quality olive oil over the dips and sprinkling them with za’atar or paprika to add a professional, finished touch that ties the whole aesthetic together.
Conclusion: The Art of the Effortless Feast
Creating a viral snack board isn’t about spending hours in the kitchen; it’s about choosing a few high-impact, flavorful dishes and presenting them with love. By mixing textures, colors, and temperatures, you turn a simple meal into an experience that satisfies both your hunger and your aesthetic soul. So, grab your favorite board, pick a few of these recipes, and embrace the ‘Lazy-Girl’ philosophy—because you deserve a feast that’s as beautiful as it is delicious.