
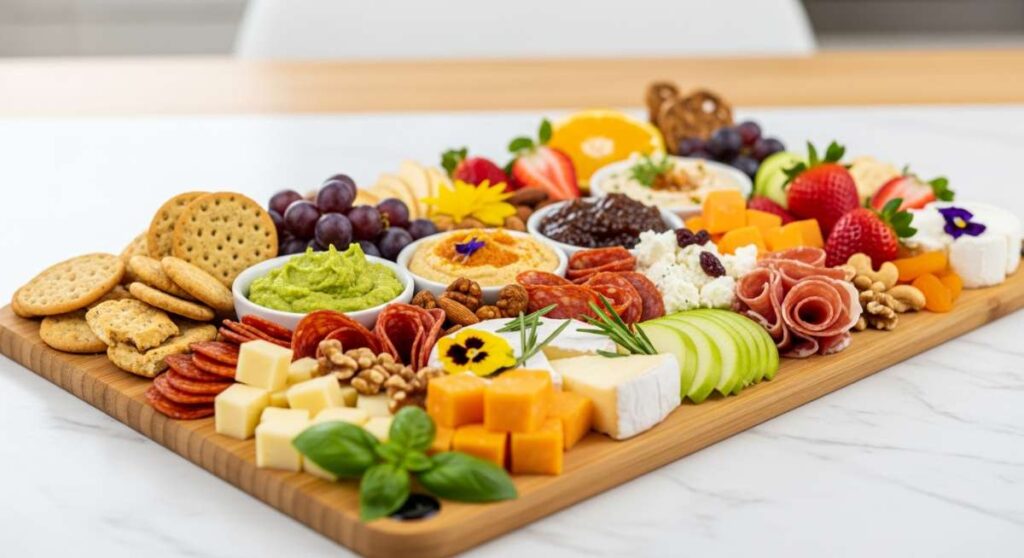
There is something inherently magical about gathering your favorite people around a table, but let’s be honest: the traditional three-course dinner can feel a bit stiff. I remember the first time I ditched the formal plates for a massive, sprawling food board; the room’s energy shifted instantly. It wasn’t just a meal anymore—it was a conversation, a shared discovery of textures and flavors that felt effortlessly chic and deeply personal.
The secret to a truly viral food board isn’t just about having one great dish; it’s about the ‘tasting table’ philosophy where every corner offers a new experience. Whether you’re craving something sweet and nostalgic or salty and charred, a well-curated board invites guests to linger longer. Today, I’m sharing the ultimate components to create that Pinterest-perfect spread that tastes even better than it looks.
How to bake feijoa crumble?

Why we love this
There is nothing quite like the intoxicating, tropical-meets-floral aroma of feijoas wafting through the kitchen on a crisp afternoon. This crumble is the ultimate comfort food, offering a beautiful contrast between the soft, jammy fruit filling that bubbles up at the edges and the golden, buttery crunch of the toasted oat topping. Each spoonful is a warm embrace, balancing the unique tang of the feijoa with a hint of cinnamon and the rich, melt-in-your-mouth texture of real butter. It is the perfect rustic addition to any gathering, especially when served warm with a dollop of thick cream.
Ingredients
- 10-12 ripe feijoas, scooped out
- 2 apples, peeled and sliced
- 1/2 cup brown sugar
- 1 tsp cinnamon
- 1 cup all-purpose flour
- 1 cup rolled oats
- 150g cold unsalted butter, cubed
- 1/2 cup shredded coconut
How to make it
- Preheat your oven to 180°C (350°F). Begin by preparing the fruit base: toss the scooped feijoa pulp and sliced apples with 2 tablespoons of brown sugar and half the cinnamon in a baking dish. This ensures the fruit macerates and creates its own thick syrup as it bakes.
- In a large mixing bowl, combine the flour, oats, remaining brown sugar, coconut, and the rest of the cinnamon. The coconut adds a subtle toasted depth that complements the feijoa perfectly.
- Add the cold, cubed butter to the dry mixture. Using your fingertips, rub the butter into the flour and oats until the mixture resembles coarse breadcrumbs with some larger pea-sized lumps left for extra texture. Do not overwork it; you want distinct bits of butter to remain cold.
- Sprinkle the crumble mixture evenly over the fruit base. Do not press it down; keeping it loose allows the heat to circulate, creating a crunchier top.
- Bake for 35-40 minutes. Look for the fruit juices bubbling vigorously at the edges and a deep golden-brown hue on the oats. Let it stand for 5 minutes before serving to allow the juices to thicken.
How to whisk perfect matcha?
Why we love this
Preparing a bowl of matcha is a meditative ritual that transforms your morning routine into a moment of pure serenity. The vibrant, emerald-green hue of the high-quality powder promises a flavor profile that is both earthy and slightly sweet, with a velvety mouthfeel that coats the palate. When whisked correctly, the surface develops a thick, frothy crema that looks like a cloud of pure energy. It’s a sensory experience that begins with the grassy scent of the dry powder and ends with a clean, focused caffeine lift that feels infinitely more refined than a standard cup of coffee.
Ingredients
- 1-2 tsp ceremonial grade matcha powder
- 2 oz hot water (approx. 80°C/175°F)
- Optional: 1 tsp maple syrup or honey
- Optional: 6 oz steamed milk of choice
How to make it
- Start by sifting your matcha powder through a fine-mesh strainer into a wide-bottomed bowl or chawan. This step is non-negotiable; matcha clumps easily, and sifting ensures a perfectly smooth, lump-free beverage.
- Heat your water to exactly 80°C (175°F). Never use boiling water, as it will scald the delicate tea leaves and result in a bitter, unpleasant taste. If you don’t have a thermometer, let boiling water sit for two minutes before pouring.
- Pour the 2 ounces of hot water over the sifted powder. Using a bamboo whisk (chasen), begin whisking in a gentle circular motion to incorporate the powder, then transition to a vigorous ‘W’ or ‘M’ motion using only your wrist, not your arm.
- Whisk for about 45-60 seconds until a thick layer of tiny, uniform bubbles forms on the surface. You are looking for a frothy foam rather than large soap-like bubbles.
- Once the foam is dense and vibrant, slowly lift the whisk from the center. If you prefer a latte, pour your steamed milk gently over the matcha base, preserving the froth on top.
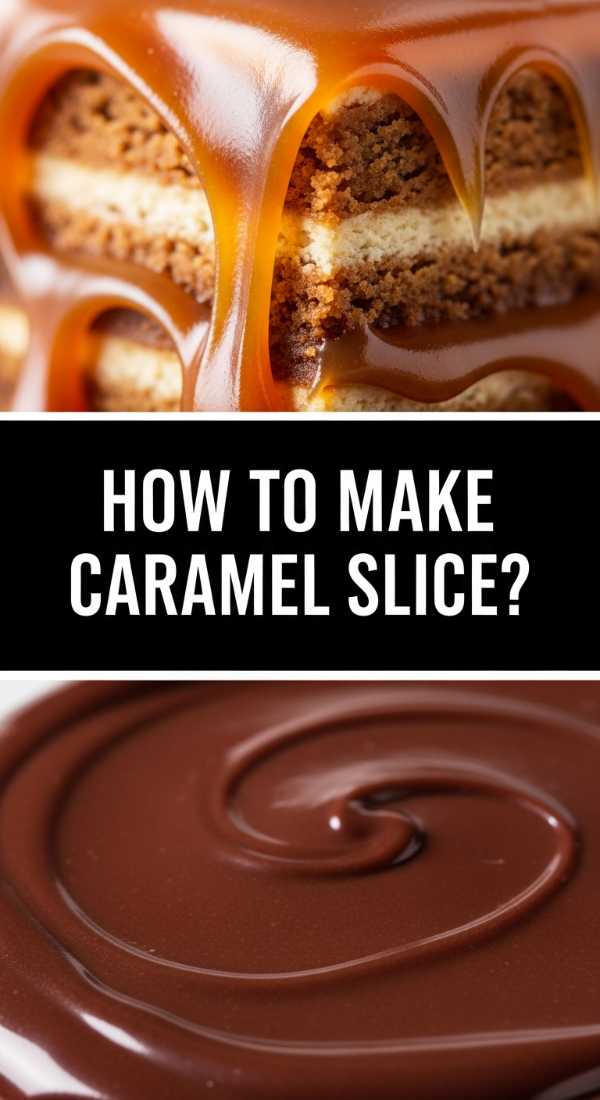
How to make caramel slice?
Why we love this
The caramel slice is the triple-threat of the dessert world, featuring a buttery shortbread base, a thick layer of gooey, rich caramel, and a snappy dark chocolate topping. Biting through the layers provides a symphony of textures: the initial ‘crack’ of the chocolate, the silkiness of the caramel, and the sandy, salt-flecked crunch of the biscuit. It’s an indulgent treat that feels nostalgic and decadent all at once, making it the undisputed star of any dessert board. The deep amber color of the caramel against the dark chocolate is visually stunning and incredibly inviting.
Ingredients
- 1 cup flour
- 1/2 cup desiccated coconut
- 1/2 cup brown sugar
- 125g melted butter
- 395g sweetened condensed milk
- 2 tbsp golden syrup
- 60g butter (for caramel)
- 200g dark chocolate
- 1 tbsp coconut oil
How to make it
- Preheat oven to 180°C (350°F) and line a square baking tin with parchment paper. Mix the flour, coconut, brown sugar, and 125g melted butter until well combined. Press this mixture firmly into the bottom of the tin to create a flat, even layer.
- Bake the base for 15 minutes or until lightly golden. While the base is baking, prepare the caramel by combining the condensed milk, golden syrup, and 60g of butter in a small saucepan over medium-low heat.
- Whisk the caramel constantly for about 8-10 minutes. This requires patience; you are looking for the mixture to thicken and turn a light golden-brown color. Do not let it boil vigorously or it will become grainy; a gentle simmer is perfect.
- Pour the hot caramel over the pre-baked base and return the tin to the oven for another 12 minutes. This sets the caramel so it won’t run when sliced. Remove and let it cool completely at room temperature.
- Melt the dark chocolate and coconut oil together in 30-second bursts in the microwave or over a double boiler. Pour the smooth chocolate over the cooled caramel layer, tilting the pan to ensure even coverage. Refrigerate for at least 3 hours before slicing with a hot knife for clean edges.
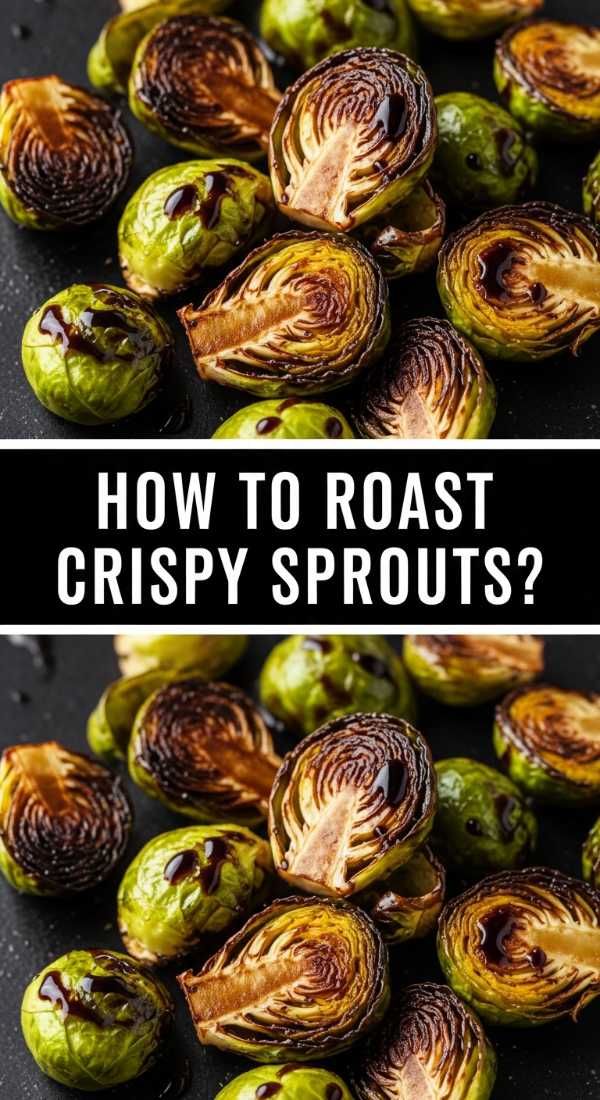
How to roast crispy sprouts?
Why we love this
If you think you don’t like Brussels sprouts, this preparation will change your mind forever. Roasting them at high heat transforms the tiny cabbages into crispy, caramelized gems with charred outer leaves that shatter like chips. The interior remains tender and nutty, especially when paired with a salty-sweet glaze that balances the natural earthiness of the vegetable. The aroma of roasting brassicas mixed with garlic and honey is savory and mouthwatering, making these the ultimate healthy-ish snack to pile high on a savory grazing board.
Ingredients
- 1 lb Brussels sprouts, halved
- 3 tbsp olive oil
- 1/2 tsp sea salt
- 1/4 tsp black pepper
- 1 tbsp balsamic glaze
- 1 tsp honey
- 1/4 cup toasted walnuts
How to make it
- Preheat your oven to 220°C (425°F). High heat is essential for achieving the crispy exterior without overcooking the center. Place a large rimmed baking sheet inside the oven as it preheats; a hot pan ensures immediate searing.
- In a large bowl, toss the halved sprouts with olive oil, salt, and pepper. Ensure every leaf is lightly coated, as the oil is what facilitates the frying-like crispness in the oven.
- Carefully remove the hot baking sheet from the oven and spread the sprouts across it. For maximum crispiness, flip every single sprout so the flat, cut side is facing down against the hot metal. This creates a deep, dark sear.
- Roast for 20-25 minutes. Do not toss them mid-way; let that bottom side caramelize undisturbed. You’ll know they are done when the outer leaves look dark brown (nearly burnt) and the centers are fork-tender.
- Immediately after removing from the oven, drizzle with the balsamic glaze and honey, then toss with toasted walnuts. The residual heat will slightly thicken the glaze, coating the sprouts in a glossy, flavorful finish.
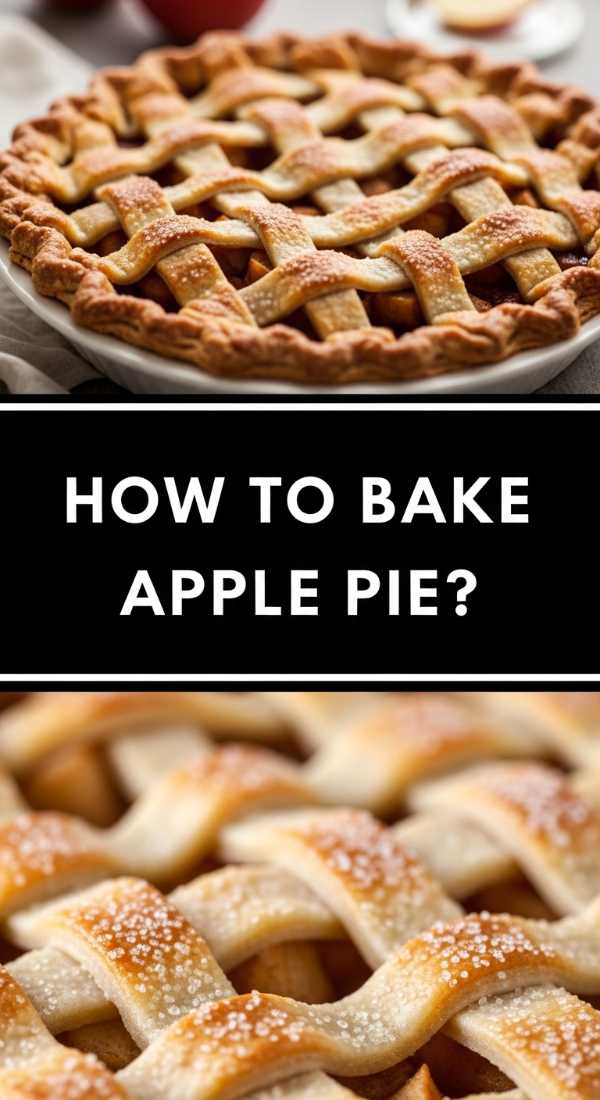
How to bake apple pie?
Why we love this
The scent of a classic apple pie baking is perhaps the most iconic culinary signal of home and comfort. It’s all about the contrast between the flaky, salt-kissed pastry crust and the tender, spice-laden apples that have collapsed into a thick, cinnamon-scented sauce. Each slice offers a warm, gooey interior framed by a buttery, golden-brown lattice that provides a satisfying crunch. It is a timeless masterpiece that appeals to every generation, evoking memories of autumn afternoons and holiday celebrations with its deep, fruity sweetness and warming nutmeg notes.
Ingredients
- 2 batches of pie crust dough (chilled)
- 6-8 Granny Smith apples, peeled and sliced
- 3/4 cup granulated sugar
- 2 tbsp all-purpose flour
- 1 tbsp cinnamon
- 1/4 tsp nutmeg
- 1 tbsp lemon juice
- 1 egg (for egg wash)
How to make it
- Preheat your oven to 200°C (400°F). Roll out one chilled disc of pie dough on a floured surface and drape it over a 9-inch pie plate. Trim the edges, leaving a 1-inch overhang. Chill the base while you prepare the filling.
- In a massive bowl, toss your sliced apples with sugar, flour, cinnamon, nutmeg, and lemon juice. Let this mixture sit for 15 minutes. This ‘maceration’ allows the apples to release their juices so the pie doesn’t end up with a ‘soupy’ bottom.
- Pile the apples into the prepared crust, mounding them slightly in the center. Avoid pouring in too much of the excess liquid from the bottom of the bowl to keep the crust crisp.
- Roll out the second disc of dough and either place it whole over the top (cutting 4-5 large vents) or cut it into strips to create a lattice. Crimp the edges of the top and bottom crust together tightly to seal in the steam.
- Brush the top with a beaten egg and a sprinkle of sugar. Bake at 200°C for 20 minutes, then reduce the heat to 175°C (350°F) and bake for another 40-50 minutes. The crust should be dark golden, and the apple juices should be bubbling through the vents like thick lava.
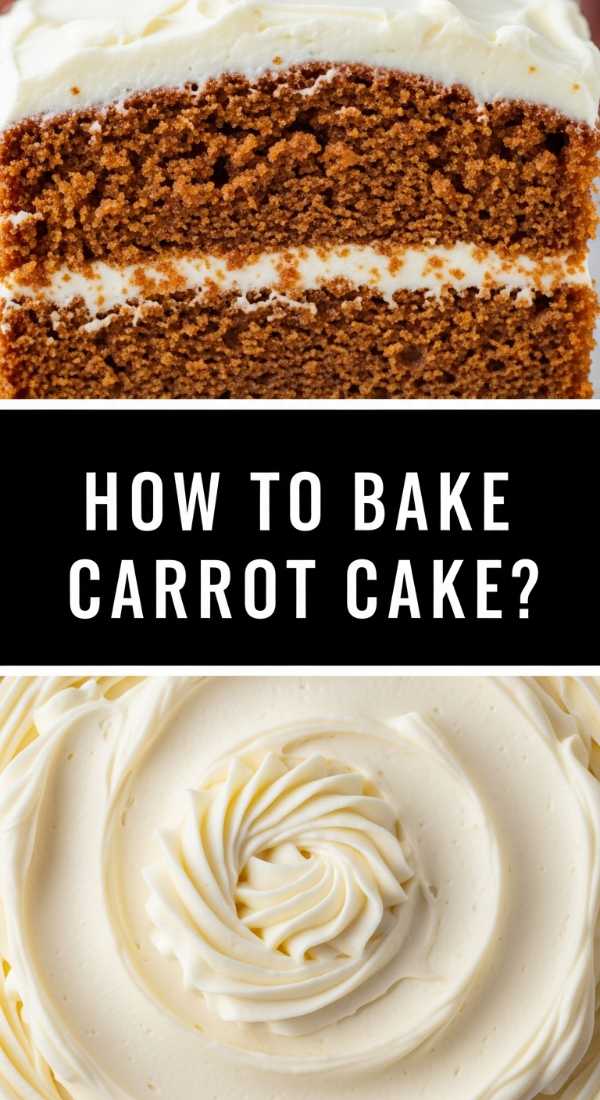
How to bake carrot cake?
Why we love this
Carrot cake is the sophisticated choice for those who love a cake that is incredibly moist, deeply spiced, and not overly sweet. The texture is a beautiful medley of finely grated carrots that melt into the crumb, crunchy toasted walnuts, and perhaps a few plump raisins for bursts of sweetness. When topped with a thick, tangy blanket of cream cheese frosting, it becomes a study in balance—spicy and cool, soft and textured. It feels wholesome yet celebratory, with a rustic charm that makes it look beautiful even when sliced haphazardly on a board.
Ingredients
- 2 cups flour
- 2 tsp baking soda
- 1 tsp salt
- 2 tsp cinnamon
- 1 1/2 cups vegetable oil
- 1 cup granulated sugar
- 1 cup brown sugar
- 4 large eggs
- 3 cups finely grated carrots
- 1 cup chopped walnuts
- For frosting: 8oz cream cheese, 1/2 cup butter, 3 cups powdered sugar, 1 tsp vanilla
How to make it
- Preheat oven to 175°C (350°F) and grease two 9-inch round cake pans. In a medium bowl, whisk together the flour, baking soda, salt, and cinnamon. This ensures the leavening agents are evenly distributed for a perfect rise.
- In a large bowl, whisk the oil and both sugars together until smooth. Add the eggs one at a time, beating well after each addition to incorporate air into the batter.
- Gently fold the dry ingredients into the wet ingredients using a spatula. Once just combined, fold in the grated carrots and walnuts. Be careful not to over-mix, as this can make the cake tough rather than tender.
- Divide the batter evenly between the pans and bake for 30-35 minutes. A toothpick inserted into the center should come out clean. This is crucial—carrot cake is moist, but you don’t want it underbaked in the middle.
- Allow the cakes to cool completely in the pans before removing. For the frosting, beat the softened cream cheese and butter until very fluffy, then gradually add powdered sugar and vanilla. Frost only once the cakes are cold to prevent the frosting from melting.
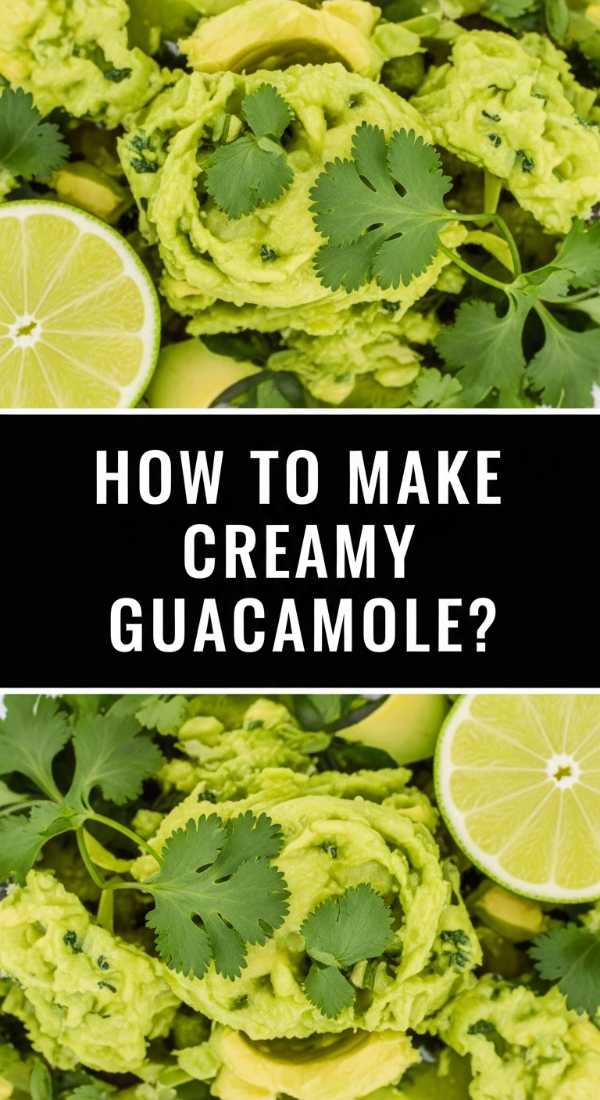
How to make creamy guacamole?

Why we love this
A bowl of fresh guacamole is the heartbeat of any savory board, providing a cool, zesty contrast to salty chips or spicy tacos. When made correctly, it is a vibrant explosion of flavors: the buttery richness of ripe avocados, the sharp bite of red onion, the citrusy punch of lime, and the fragrant herbaceousness of fresh cilantro. The texture should be a perfect balance of creamy mash and chunky pieces, creating a satisfying mouthfeel that keeps you coming back for more. It’s a clean, bright, and universally loved dip that brightens up the entire spread.
Ingredients
- 3 ripe Hass avocados
- 1/2 small red onion, finely minced
- 1 jalapeño, seeded and minced
- 2 tbsp fresh cilantro, chopped
- 1 tbsp lime juice
- 1/2 tsp sea salt
- 1/2 tsp ground cumin
How to make it
- Start by selecting perfectly ripe avocados; they should give slightly when pressed but not feel mushy. Slice them in half, remove the pits, and scoop the flesh into a large, shallow bowl.
- Using a fork or a potato masher, gently break apart the avocado. The goal is a chunky consistency, so stop mashing while there are still visible pieces of intact avocado.
- Immediately stir in the lime juice. The acid not only adds essential flavor but also acts as an antioxidant to prevent the avocado from turning brown.
- Fold in the finely minced red onion, jalapeño, and cilantro. Mincing the onion very small is key so that no one gets a large, overpowering chunk of raw onion.
- Season with salt and cumin. Taste it with a chip! This is the most important step because chips are salty; you want to ensure the guacamole has enough acid and salt to stand up to the dipper. Serve immediately for the best color and flavor.
How to bake chewy cookies?

Why we love this
The perfect chewy cookie is a masterpiece of baking science, boasting crisp, caramelized edges and a soft, slightly underbaked center that stays fudgy for days. When you pull them apart, they should stretch slightly, revealing pools of molten dark chocolate nestled within a dough that tastes deeply of brown sugar and vanilla. There is a primal satisfaction in the combination of warm dough and melting chocolate that makes these cookies the first thing to disappear from any dessert spread. They are the ultimate crowd-pleaser, providing a comforting, sugary high that feels like a hug in edible form.
Ingredients
- 1 cup softened unsalted butter
- 1 cup brown sugar (packed)
- 1/2 cup granulated sugar
- 2 large eggs
- 1 tbsp vanilla extract
- 2 1/4 cups all-purpose flour
- 1 tsp baking soda
- 1/2 tsp sea salt
- 2 cups dark chocolate chips or chunks
How to make it
- In a stand mixer, cream the softened butter and both sugars together on medium-high speed for at least 3-5 minutes. You are looking for the mixture to become pale and noticeably fluffy; this aeration creates the perfect cookie structure.
- Add the eggs one at a time, followed by the vanilla. Beat well after each addition. In a separate bowl, whisk together the flour, baking soda, and salt.
- Turn the mixer to the lowest speed and gradually add the dry ingredients. Mix only until the white streaks of flour disappear. Over-mixing at this stage develops gluten, which will make your cookies cakey instead of chewy.
- Fold in the chocolate chunks by hand. For the best flavor, chill the dough in the fridge for at least 2 hours (or overnight). This allows the flour to fully hydrate and the fats to solidify, preventing the cookies from spreading too thin.
- Scoop rounded tablespoons of dough onto a parchment-lined sheet. Bake at 175°C (350°F) for 9-11 minutes. The key is to remove them when the edges are just set and golden, but the centers still look slightly ‘wet’ and soft. They will firm up on the hot pan.
How to make street tacos?
Why we love this
Street tacos are a masterclass in the ‘perfect bite,’ combining smoky, charred proteins with the bright, acidic crunch of fresh toppings. There is something incredibly social about assembling tacos, making them the ideal interactive element for a food board. The aroma of corn tortillas warming over a flame, mixed with the sizzle of marinated meat and the sharp scent of lime and onion, creates an instant festive atmosphere. Each small taco is a punchy, handheld explosion of flavor that is satisfying without being overly heavy, allowing your guests to try multiple combinations.
Ingredients
- 1 lb flank steak or chicken thighs
- 2 tbsp soy sauce + 2 tbsp lime juice (marinade)
- 1 tsp cumin & 1 tsp chili powder
- Small corn tortillas
- 1/2 cup white onion, finely diced
- 1/2 cup fresh cilantro, chopped
- Radish slices and lime wedges for garnish
How to make it
- Marinate your meat of choice for at least 30 minutes (but ideally 4 hours). Combine the soy sauce, lime juice, cumin, and chili powder in a zip-top bag with the meat. The acid in the lime breaks down the fibers, making the meat incredibly tender.
- Heat a heavy cast-iron skillet or grill over high heat until it is smoking slightly. Sear the meat quickly to get a deep, dark crust while keeping the inside juicy. For steak, 3-4 minutes per side is usually sufficient for medium-rare.
- Let the meat rest for at least 10 minutes before slicing. This allows the juices to redistribute. Slice against the grain into very small, bite-sized cubes.
- Warm the corn tortillas directly over a gas flame for 10-15 seconds per side using tongs, or in a dry pan until they are soft and slightly charred. Keep them warm in a clean kitchen towel.
- To assemble, place a generous spoonful of meat on a double layer of tortillas (the street style way). Top with a sprinkle of raw onion, a pinch of cilantro, and a squeeze of lime. The raw onion provides a necessary sharp contrast to the rich meat.
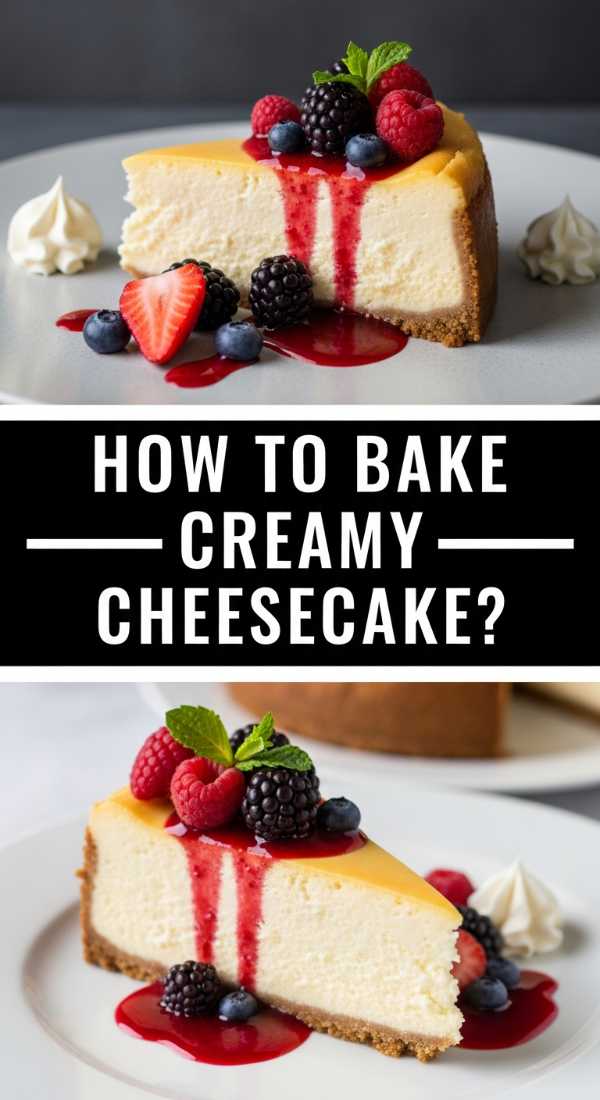
How to bake creamy cheesecake?
[IMAGE_10]
Why we love this
A truly great cheesecake is the pinnacle of dessert elegance—dense, silky-smooth, and remarkably creamy without being heavy. It has a subtle tang from the cream cheese that cuts through the richness, all supported by a buttery, spiced graham cracker crust that provides a necessary textural anchor. The visual of a pristine, crack-free cheesecake is incredibly satisfying, and the way a fork glides through the filling like room-temperature butter is pure luxury. It’s a decadent finale to any food board, especially when paired with fresh berries or a tart fruit coulis.
Ingredients
- 1.5 cups graham cracker crumbs
- 1/3 cup melted butter
- 24 oz cream cheese (3 blocks), room temperature
- 1 cup granulated sugar
- 1 cup sour cream, room temperature
- 1 tsp vanilla extract
- 3 large eggs, room temperature
How to make it
- Preheat oven to 160°C (325°F). Mix graham cracker crumbs and melted butter, then press firmly into the bottom of a 9-inch springform pan. Bake for 10 minutes, then let it cool completely. Wrap the outside of the pan in double layers of heavy-duty aluminum foil to waterproof it.
- In a large bowl, beat the room-temperature cream cheese and sugar until completely smooth and lump-free. Using room-temperature ingredients is the single most important rule for avoiding lumps.
- Add the sour cream and vanilla, mixing just until combined. Add the eggs one at a time on low speed. Do not over-beat at this stage; you want to avoid incorporating air bubbles, which cause the cheesecake to rise and then crack as it cools.
- Place the foil-wrapped pan into a larger roasting tray and pour the cheesecake batter onto the crust. Fill the roasting tray with boiling water until it reaches halfway up the side of the springform pan. This water bath (bain-marie) ensures even, gentle heat.
- Bake for 60-70 minutes until the edges are set but the center still has a slight ‘jiggle’ like Jell-O. Turn off the oven, crack the door open, and let the cheesecake cool inside for 1 hour. This slow cooling prevents cracks. Refrigerate for at least 6 hours before serving.
Conclusion: The Art of the Shared Board
Building the perfect viral food board is less about following a strict set of rules and more about embracing a spirit of abundance and variety. By combining these show-stopping recipes—from the zesty crunch of street tacos to the buttery layers of a caramel slice—you create a landscape of flavors that invites your guests to explore and enjoy. Remember, the best boards are the ones that look a little messy, feel a lot like home, and leave everyone reaching for ‘just one more bite.’ Happy hosting!
Frequently Asked Questions
Q: How do I keep the board looking fresh for a long party?
A: Keep wet items like guacamole and salsas in small bowls rather than directly on the board. Refresh the garnishes, like cilantro and lime, every hour to maintain that vibrant look.
Q: Can I make these components ahead of time?
A: Absolutely! The caramel slice, cheesecake, and cookie dough can all be made 1-2 days in advance. In fact, cheesecake usually tastes better after a night in the fridge.
Q: What’s the best way to arrange the items?
A: Start with your largest items first (like the cheesecake or the bowls of tacos). Then, fill in the gaps with smaller items like cookies, sprouts, and finally, use nuts or herbs to cover any remaining ‘bald spots’ on the board.