
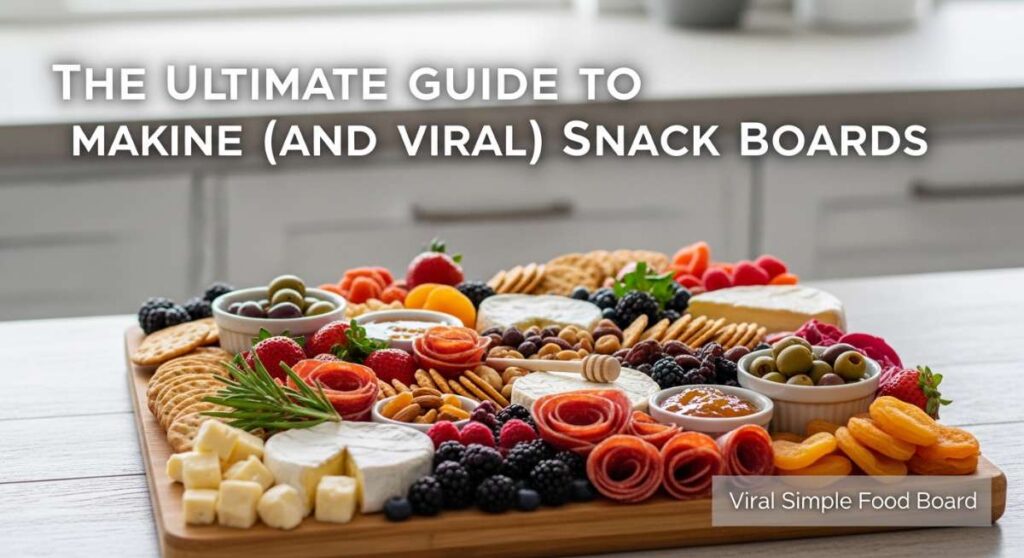
The Ultimate Guide to Making Simple (and Viral) Snack Boards
There’s something truly magical about a gathering where the food acts as the centerpiece, but not in a stiff, formal way. I remember the first time I set out a massive, wooden board piled high with perfectly seasoned meats, vibrant dips, and crusty bread—it changed my hosting game forever. It is about that effortless, ‘come as you are’ vibe that makes everyone feel instantly at home and excited to dig in. The secret to a viral snack board isn’t just about the aesthetics; it’s about providing hearty, comforting elements that people actually want to eat.
Lately, the internet has been obsessed with ‘snack boards’ that go beyond just cheese and crackers. We are talking about protein-rich boards featuring the most succulent and underrated cut: the chicken thigh. Because it stays juicy and takes on flavor so beautifully, it is the perfect star for your next viral food board creation. In this guide, I am going to show you exactly how to master the art of chicken thighs so you can build a snack board that is as delicious as it is Instagram-worthy.
How to cook chicken thighs?

Why we love this
Cooking chicken thighs is a culinary journey into the world of rich, savory flavors and unbeatable moisture. There is a deep, satisfying aroma that fills the kitchen as the fat renders down, creating a natural sauce that clings to the meat. We love this method because it is incredibly forgiving; unlike chicken breasts, the higher fat content in thighs ensures they stay tender even if you lose track of time while chatting with guests. The texture is silky and luxurious, offering a mouthfeel that balances a slightly crisp exterior with a buttery, melt-in-your-mouth center.
Ingredients
- 2 lbs bone-in, skin-on chicken thighs
- 2 tablespoons extra-virgin olive oil
- 1 tablespoon kosher salt
- 1 teaspoon cracked black pepper
- 1 teaspoon garlic powder
- Fresh thyme sprigs for garnish
How to make it
- Begin by removing the chicken from the refrigerator about 20 minutes before cooking to bring it to room temperature, which ensures even cooking throughout.
- Pat the skin extremely dry using paper towels; moisture is the enemy of a good sear and a golden finish.
- Heat a large heavy-bottomed skillet, preferably cast iron, over medium-high heat. You want the pan to be hot enough that a drop of water sizzles and evaporates instantly.
- Add the olive oil to the pan, swirling to coat the surface evenly.
- Place the chicken thighs in the pan, skin-side down. Listen for a loud, consistent sizzle. Do not crowd the pan; cook in batches if necessary to maintain the high heat.
- Press down slightly with a spatula to ensure the skin has full contact with the hot metal. Cook for 5-7 minutes without moving them until the skin is a deep, mahogany brown.
- Flip the thighs and reduce the heat to medium. Continue cooking for another 10-12 minutes until the internal temperature reaches 165°F (74°C) when checked with a digital meat thermometer.
- Remove the chicken from the pan and let it rest on a cutting board for at least 5 minutes to allow the juices to redistribute before slicing for your snack board.
How to bake chicken thighs?

Why we love this
Baking is the ultimate hands-off approach that yields a consistently elegant result for any large gathering. There is something comforting about the way the oven transforms simple ingredients into a golden-hued masterpiece while you focus on arranging the rest of your snack board. The aroma of roasted poultry and caramelized seasonings creates an inviting atmosphere that draws everyone into the kitchen. The meat becomes incredibly tender, pulling away from the bone with ease, while the edges of the skin take on a delicate, parchment-like crispness that is simply divine.
Ingredients
- 6-8 chicken thighs (bone-in or boneless)
- 3 tablespoons melted butter
- 1 tablespoon smoked paprika
- 1 teaspoon onion powder
- 1/2 teaspoon dried oregano
- Salt and pepper to taste
How to make it
- Preheat your oven to 400°F (200°C). This high temperature is crucial for ensuring the skin browns beautifully while the meat stays juicy inside.
- Line a large rimmed baking sheet with parchment paper or a silicone mat for easy cleanup and to prevent sticking.
- In a small bowl, whisk together the melted butter, paprika, onion powder, oregano, salt, and pepper until it forms a thick paste.
- Arrange the chicken thighs on the prepared baking sheet, ensuring they aren’t touching to allow air to circulate around each piece.
- Using a pastry brush or your hands, coat each thigh generously with the butter and spice mixture, making sure to get underneath the skin if using skin-on pieces.
- Place the tray on the middle rack of the oven. Bake for 25-30 minutes for boneless or 35-45 minutes for bone-in.
- Check for doneness by looking for clear juices; if the juices are pink, they need more time. The skin should look bubbly and golden.
- Switch the oven to ‘Broil’ for the last 2-3 minutes if you want an extra-deep color, but watch closely to prevent burning.
How to make crispy thighs?

Why we love this
The satisfying crunch of perfectly crispy chicken skin is a sensory experience like no other, acting as the perfect textural contrast to soft cheeses and creamy dips on a board. This method focuses on the alchemy of rendering fat, resulting in a skin that is as thin and crackly as a potato chip but packed with savory depth. The sound of the knife slicing through that golden crust is music to a host’s ears. It provides a rustic, artisanal feel to your food presentation that looks like it came straight out of a high-end bistro kitchen.
Ingredients
- 4 skin-on chicken thighs
- 1 tablespoon neutral oil (like grapeseed or canola)
- Fine sea salt
- Zest of one lemon
How to make it
- The secret to ultimate crispiness starts the night before: place the thighs on a plate uncovered in the fridge to air-dry the skin. If you don’t have time, pat them dry with multiple paper towels until the skin feels tacky.
- Season the skin side liberally with fine sea salt; the salt draws out remaining moisture and seasons the fat.
- Place a cold stainless steel or cast iron skillet on the stove. Put the chicken thighs in the cold pan, skin-side down. This “cold start” method allows the fat to render slowly and the skin to crisp up perfectly without burning.
- Turn the heat to medium. As the pan warms up, you will hear a gentle sizzle.
- As the fat renders, use a spoon to pour the hot liquid over the tops of the chicken (basting) to cook the meat through while the skin stays in contact with the pan.
- Maintain medium heat for about 12-15 minutes. Resist the urge to flip them too early; the chicken will naturally release from the pan once the skin is fully crisped.
- Once the skin is deep golden and rigid, flip once and cook for only 2-3 minutes on the flesh side to finish.
- Drain on a wire rack—not paper towels—to ensure the bottom doesn’t get soggy from steam.
How to slow cook thighs?

Why we love this
Slow cooking transforms chicken thighs into a succulent, shredded delicacy that is perfect for piling onto crostini or dipping into rich sauces. We love this because the low and slow heat breaks down the connective tissues, resulting in meat that is incredibly soft and infused with whatever aromatics you choose to include. The house fills with a rich, savory perfume that lingers for hours, signaling to everyone that a feast is on its way. It is the ultimate “set it and forget it” method that yields a sophisticated, pate-like texture that is a viral hit on any grazing board.
Ingredients
- 2 lbs boneless chicken thighs
- 1/2 cup chicken bone broth
- 3 cloves smashed garlic
- 1 bay leaf
- 1 teaspoon salt
- 1/2 teaspoon red pepper flakes
How to make it
- Place the boneless chicken thighs into the basin of your slow cooker in a single layer if possible.
- Pour the chicken bone broth over the meat; you don’t want to submerge it completely, just provide enough moisture to create a steaming environment.
- Scatter the smashed garlic cloves, bay leaf, salt, and red pepper flakes over the top of the meat.
- Cover with the lid and set the slow cooker to ‘Low’ for 6-7 hours or ‘High’ for 3-4 hours. Low is preferred for a more tender, silky texture.
- Avoid opening the lid during the process, as this releases the necessary steam and heat, adding 15-20 minutes to the cook time each time the lid is lifted.
- Once the time is up, test the chicken with two forks; it should fall apart with virtually no resistance.
- Remove the chicken to a bowl and shred it using two forks or a hand mixer on low speed for a uniform texture.
- Add a few tablespoons of the cooking liquid back into the shredded meat to keep it moist before serving on your board.
How to season chicken legs?

Why we love this
Seasoning is where you can truly express your culinary personality and match the theme of your viral snack board. We love the process of layering spices, creating a complex flavor profile that dances on the tongue with every bite. The sight of vibrant red paprika, green herbs, and golden turmeric coating the meat makes for a stunning visual display. When seasoned correctly, the chicken becomes a bridge between all the other elements on the board, pulling together the sweetness of fruits, the saltiness of olives, and the creaminess of cheeses.
Ingredients
- 6 chicken legs (drumsticks)
- 2 tablespoons avocado oil
- 1 tablespoon brown sugar
- 1 tablespoon chili powder
- 1 teaspoon cumin
- 1 teaspoon garlic salt
- 1/2 teaspoon cinnamon (the secret ingredient!)
How to make it
- Start by drying the chicken legs thoroughly with paper towels to ensure the oil and spices adhere properly rather than sliding off.
- In a large mixing bowl, combine the avocado oil with all the dry spices: brown sugar, chili powder, cumin, garlic salt, and that hint of cinnamon.
- The brown sugar is essential as it will caramelize under heat, creating a beautiful dark glaze and balancing the heat of the chili.
- Add the chicken legs to the bowl and use your hands to massage the spice paste into every nook and cranny of the meat.
- For the best flavor, let the seasoned legs sit at room temperature for about 30 minutes, allowing the salt to penetrate the meat.
- When cooking (either roasting or grilling), apply a final light sprinkle of salt from high above to ensure even distribution and a professional finish.
- Cook until the exterior is deeply colored and the sugar has formed a sticky, savory crust that clings to the skin.
How to prepare boneless thighs?

Why we love this
Boneless thighs are the workhorse of the modern snack board because they are incredibly easy for guests to eat without the fuss of bones. We love how quickly they cook and how their uniform thickness allows for consistent results every single time. The texture is juicy and substantial, providing a perfect base for slicing into bite-sized strips that can be picked up with a toothpick or tucked into a small piece of pita. They absorb marinades and rubs more intensely than bone-in cuts, ensuring that every single morsel is packed with high-impact flavor.
Ingredients
- 1.5 lbs boneless, skinless chicken thighs
- 2 tablespoons olive oil
- 1 teaspoon dried thyme
- 1/2 teaspoon onion powder
- Juice of half a lemon
- Salt and pepper
How to make it
- Trim any excess large pieces of fat from the thighs with sharp kitchen shears, but leave some, as the fat provides flavor and moisture during the quick cook process.
- Place the thighs between two sheets of plastic wrap and lightly pound the thickest parts with a meat mallet or a heavy skillet. You want them to be an even thickness (about 1/2 inch) so they cook at the same rate.
- Whisk the oil, lemon juice, thyme, onion powder, salt, and pepper in a bowl.
- Toss the flattened thighs in the mixture, ensuring both sides are well-coated.
- Heat a non-stick or cast-iron pan over medium-high heat until it begins to shimmer.
- Lay the thighs flat in the pan. Cook for about 5-6 minutes on the first side without moving them to develop a nice sear.
- Flip and cook for another 5 minutes. Because they are boneless and pounded thin, they cook much faster than bone-in pieces.
- Let them rest for 3 minutes before slicing them across the grain into thin strips for the most tender bite.
How to roast chicken thighs?

Why we love this
Roasting is the quintessential Sunday-dinner technique that brings a sense of warmth and tradition to your viral board. The high heat of the oven creates a beautiful browning effect known as the Maillard reaction, which develops complex, sweet-savory notes in the meat. We love the way the fat drippings can be used to roast accompanying vegetables or bread right on the same tray, creating a cohesive flavor profile. The result is a rustic, hearty protein that feels substantial and deeply satisfying, making your snack board feel like a full, well-rounded meal.
Ingredients
- 6 bone-in chicken thighs
- 1 lb small Yukon Gold potatoes, halved
- 3 sprigs rosemary
- 4 cloves garlic, skin on
- 3 tablespoons olive oil
- Salt and cracked pepper
How to make it
- Preheat your oven to 425°F (220°C). Roasting requires higher heat than standard baking to ensure the outside browns while the inside stays moist.
- On a large sheet pan, toss the halved potatoes and garlic cloves with 1 tablespoon of olive oil and a pinch of salt.
- Pat the chicken thighs dry and rub them with the remaining olive oil, salt, and plenty of cracked pepper.
- Nestle the chicken thighs among the potatoes on the sheet pan, skin-side up. Tuck the rosemary sprigs under the chicken pieces to infuse them with herbal notes without burning the leaves.
- Slide the pan into the oven and roast for 35-40 minutes.
- Halfway through, use a spatula to toss the potatoes so they brown evenly in the chicken fat.
- The chicken is done when the skin is crackling and golden, and the potatoes are fork-tender with crispy edges.
- Allow the whole tray to rest for 10 minutes before transferring the chicken and potatoes to your board for a rustic “tray-bake” style presentation.
How to marinate chicken thighs?

Why we love this
Marinating is like giving your chicken a spa day; it tenderizes the meat while injecting it with bright, bold flavors from the inside out. We love this method because it allows you to prep ahead of time, which is a lifesaver when you’re busy styling the rest of your snack board. The acids in the marinade, like vinegar or citrus, break down the fibers, resulting in a texture that is exceptionally succulent. When the marinated meat hits the heat, the sugars in the liquid caramelize, creating beautiful char marks and an irresistible sweet-and-savory glaze.
Ingredients
- 2 lbs chicken thighs
- 1/4 cup soy sauce
- 2 tablespoons honey
- 1 tablespoon grated ginger
- 2 cloves minced garlic
- 1 tablespoon rice vinegar
- 1 tablespoon toasted sesame oil
How to make it
- In a gallon-sized resealable bag or a shallow glass dish, combine the soy sauce, honey, ginger, garlic, vinegar, and sesame oil. Whisk until the honey is fully dissolved.
- Add the chicken thighs to the marinade. If using a bag, squeeze out as much air as possible before sealing to ensure the liquid is in constant contact with the meat.
- Place in the refrigerator for at least 30 minutes, though 4 to 6 hours is ideal for maximum flavor penetration. Avoid marinating for more than 12 hours, as the acid can start to make the meat mushy.
- Remove the chicken from the fridge 20 minutes before cooking to take the chill off.
- Drain the excess marinade, but do not pat the chicken dry; you want that flavorful moisture to create a glaze.
- Cook in a hot skillet or on a grill over medium heat. Because of the honey, the chicken will brown quickly, so watch the heat to prevent burning.
- Let the chicken rest so the sugars set into a sticky, glossy coating that looks stunning on a platter.
How to grill chicken legs?

Why we love this
Grilling brings an elemental, smoky quality to your snack board that is impossible to replicate in a kitchen. We love the charred, striped appearance of the grill marks—it’s a visual cue for deep, fire-kissed flavor. There’s a certain nostalgia to grilled chicken that makes a snack board feel like a summer party, regardless of the season. The high heat renders the fat quickly, creating a crisp exterior while the bone helps the meat stay incredibly juicy and flavorful on the inside. It’s the ultimate finger food for a casual, viral-worthy gathering.
Ingredients
- 8 chicken drumsticks
- 1/2 cup of your favorite BBQ rub or sauce
- 2 tablespoons neutral oil
- Fresh parsley for garnish
How to make it
- Clean your grill grates thoroughly and preheat the grill to medium-high heat (about 375°F to 400°F).
- Lightly coat the chicken legs in oil to prevent sticking, then generously apply your BBQ rub, pressing it into the skin.
- Place the legs on the grill grates. To avoid flare-ups from dripping fat, start them on the cooler side of the grill if using charcoal, or over a medium burner on gas.
- Close the lid and grill for 25-30 minutes, turning every 5-7 minutes. This frequent turning ensures the round legs cook evenly on all sides without burning.
- If using BBQ sauce, only brush it on during the last 5-10 minutes of cooking. The sugars in the sauce burn quickly, so you want them to just glaze and caramelize, not turn black.
- Use a meat thermometer to ensure the internal temp reaches 170°F—drumsticks benefit from a slightly higher temp than thighs to ensure the meat easily pulls away from the bone.
- Let them rest for 5 minutes before piling them onto your board with some extra sauce for dipping.
How to stew chicken thighs?

Why we love this
Stewing is the most comforting method of all, producing meat so tender it practically dissolves on the tongue. We love including a small bowl of stewed chicken on a snack board because it provides a warm, saucy element that pairs beautifully with thick slices of sourdough or focaccia. The slow simmering process allows the flavors of the liquid—whether it’s wine, broth, or tomato—to seep deep into the chicken, creating a rich, multi-dimensional taste experience. It adds an element of luxury and heartiness that elevates the board from a snack to a culinary event.
Ingredients
- 4 boneless chicken thighs, cut into 1-inch chunks
- 1 cup crushed tomatoes or heavy cream (depending on the style)
- 1 small onion, finely diced
- 1 teaspoon smoked paprika
- 1/2 cup chicken stock
- Fresh basil or parsley
How to make it
- In a heavy pot or Dutch oven, heat a splash of oil over medium heat.
- Brown the chicken chunks in batches. You aren’t looking to cook them through yet, just to get a nice golden color on the outside for flavor. Remove and set aside.
- In the same pot, sauté the diced onion until translucent and soft, about 5 minutes.
- Stir in the paprika and cook for 30 seconds until fragrant, then pour in the chicken stock and your tomatoes or cream.
- Scrape the bottom of the pot with a wooden spoon to release all the flavorful brown bits (fond).
- Add the chicken chunks back into the pot, along with any juices that collected on the plate.
- Lower the heat to a very gentle simmer. Cover and cook for 20-25 minutes.
- The chicken should be incredibly soft. If the sauce is too thin, simmer uncovered for the last 5 minutes to reduce and thicken. Serve in a beautiful ceramic bowl placed directly on your board.
Conclusion
Creating a viral snack board is all about the balance of textures, colors, and, most importantly, incredible food that brings people together. By mastering these different ways to prepare chicken thighs—from the ultra-crispy to the succulent and stewed—you are providing a protein-packed heart to your grazing spread that guests will be talking about long after the board is empty. Remember, there are no real rules! Mix and match these techniques, add some seasonal fruits, nuts, and your favorite dips, and watch your simple food board become the star of the show. Happy hosting!