

The Ultimate Guide to Making a Viral Grazing Board on a Budget
There is nothing quite like the magic of gathering friends around a table laden with beautiful, delicious food. In our fast-paced world, hosting can often feel like a stressful performance, but I’ve found that the best memories are made when we strip away the formality and embrace the ‘grazing’ lifestyle. A viral grazing board isn’t just about the aesthetics; it’s about the laughter shared over a shared dip, the clinking of glasses, and the simple joy of having a little bit of everything right at your fingertips.
The secret to a viral-worthy board that doesn’t drain your bank account is focusing on high-impact, crowd-pleasing dishes that look much more expensive than they are. By combining pantry staples with fresh, seasonal accents, you can create a centerpiece that feels lush and abundant. This guide is my love letter to easy hosting—a collection of recipes that transition seamlessly from a casual Tuesday night snack to the star of your next big social media post. Let’s dive into the art of the budget-friendly spread!
How to make rotel dip

Why we love this
There is something undeniably nostalgic about the sight of bubbling, golden cheese flecked with bright red tomatoes and spicy green chiles. The aroma is a warm hug that instantly makes any gathering feel like a celebration, filling the room with a savory, salty scent that draws everyone to the center of the table. As you dip a crunchy, salty tortilla chip into the velvety smooth mixture, the texture is pure silk, offering just enough kick to wake up your palate without overpowering the rich, creamy base. It is the ultimate social food, designed for lingering conversations and communal snacking.
Ingredients
- 16 oz processed cheese (like Velveeta), cubed
- 1 can (10 oz) Ro-Tel Diced Tomatoes and Green Chilies, undrained
- 1/2 lb ground beef or pork sausage, browned and drained
- 1/4 cup whole milk (optional, for desired consistency)
- 1 tsp taco seasoning or cumin
- Fresh cilantro for garnish
How to make it
- Begin by browning your ground beef or sausage in a skillet over medium heat. Use a wooden spoon to break the meat into small crumbles, cooking until no pink remains and it has reached a deep, caramelized brown.
- Drain the excess grease thoroughly from the meat. This step is crucial to prevent your dip from becoming oily or separated during the melting process.
- In a medium saucepan or a slow cooker set to low heat, combine the cubed cheese and the entire can of Ro-Tel (do not drain the liquid, as it provides essential flavor and moisture).
- Stir the mixture constantly if using a saucepan to prevent the cheese from scorching on the bottom. Once the cheese is about 75% melted, fold in your cooked meat and the taco seasoning.
- Continue to heat until the mixture is completely smooth and uniform in color. If the dip feels too thick, whisk in a tablespoon of milk at a time until it reaches a pourable but thick consistency.
- Transfer to a serving bowl and garnish with freshly chopped cilantro. Serve immediately while hot and gooey.
How to cook dirty spaghetti

Why we love this
Dirty spaghetti is the ultimate ‘comfort in a bowl’ dish, bringing a deep, earthy richness that feels sophisticated yet remains incredibly affordable. The sauce clings to each strand of pasta, offering a complex flavor profile of savory meats, aromatic vegetables, and a hint of spice that warms you from the inside out. When the steam rises from the plate, it carries the scent of browned garlic and herbs, creating an olfactory experience that is just as satisfying as the first bite. Its rustic appearance and hearty texture make it a standout addition to any grazing board, offering a substantial element that keeps guests full and happy.
Ingredients
- 1 lb spaghetti noodles
- 1/2 lb ground beef
- 1/4 lb chicken livers, finely minced (the secret to the ‘dirty’ flavor)
- 1 bell pepper, finely diced
- 1 medium onion, finely diced
- 3 cloves garlic, minced
- 1 tbsp Cajun seasoning
- 1 cup beef broth
- Fresh parsley for garnish
How to make it
- Bring a large pot of salted water to a rolling boil. Add the spaghetti and cook according to the package instructions until it is strictly al dente; it will finish cooking in the sauce later.
- While the pasta cooks, heat a large deep skillet over medium-high heat. Add the ground beef and minced chicken livers. Cook until deeply browned, allowing the bits to crisp slightly for added texture and flavor depth.
- Lower the heat to medium and add the diced onion, bell pepper, and garlic. Sauté for about 5-7 minutes until the vegetables have softened and the onions are translucent and fragrant.
- Sprinkle the Cajun seasoning over the meat and vegetable mixture, stirring for one minute to toast the spices and release their essential oils.
- Deglaze the pan with the beef broth, scraping up all the brown bits (fond) from the bottom of the skillet. Let the liquid simmer and reduce by about half, creating a thick, savory gravy.
- Drain the pasta, reserving a half cup of pasta water. Toss the spaghetti into the skillet with the sauce, adding a splash of pasta water if needed to help the sauce emulsify and coat every strand. Garnish with parsley and serve warm.
How to make pasta salad

Why we love this
A vibrant pasta salad is the breath of fresh air every heavy grazing board needs, acting as a bright and zesty palate cleanser between richer bites. We love the way the rotini spirals capture the tangy vinaigrette, ensuring every forkful is a burst of vinegar, herbs, and cold, crisp vegetables. The visual appeal is undeniable, with pops of cherry tomato red, cucumber green, and olive purple creating a mosaic of color that screams ‘homemade with love.’ It’s the kind of dish that tastes even better as it sits, making it the perfect make-ahead component for a stress-free hosting experience.
Ingredients
- 1 lb rotini or fusilli pasta
- 1 cup cherry tomatoes, halved
- 1 English cucumber, diced
- 1/2 red onion, finely chopped
- 1/2 cup black olives, sliced
- 1/2 cup feta cheese, crumbled
- 1/2 cup Italian dressing (homemade or store-bought)
- 1 tsp dried oregano
How to make it
- Cook the pasta in a large pot of heavily salted boiling water. To ensure the pasta stays firm when cold, cook it for exactly the time listed on the box for al dente.
- Immediately drain the pasta and rinse it under cold running water. This stops the cooking process instantly and washes away excess starch, preventing the noodles from sticking together in the salad.
- In a very large mixing bowl, combine the cooled pasta with the halved cherry tomatoes, diced cucumbers, red onion, and olives.
- Pour the Italian dressing over the mixture. Use a large spatula to fold the ingredients together gently so you don’t break the pasta spirals.
- Add the crumbled feta and dried oregano, tossing once more to distribute the cheese evenly.
- Cover the bowl and refrigerate for at least two hours before serving. This chilling time allows the pasta to absorb the flavors of the dressing. Give it one final toss before plating to redistribute the dressing that may have settled at the bottom.
How to bake spring cookies

Why we love this
Spring cookies are like a gentle awakening for the senses, featuring delicate textures and bright, floral notes that celebrate the end of winter. These cookies are prized for their soft, buttery crumb that melts on the tongue, often accompanied by the zesty fragrance of lemon or the sweet scent of vanilla bean. They look like little edible pieces of art on a board, especially when decorated with pastel icing or edible petals. Baking them fills the kitchen with a sugary, citrusy aroma that is impossible not to smile at, setting a joyful tone for any gathering.
Ingredients
- 2 1/2 cups all-purpose flour
- 1 cup unsalted butter, softened
- 1 cup granulated sugar
- 1 large egg
- 1 tsp lemon zest
- 1/2 tsp almond extract
- 1/2 tsp baking powder
- Pastel sprinkles or sanding sugar
How to make it
- Preheat your oven to 350°F (175°C) and line two large baking sheets with parchment paper to ensure an even bake and easy removal.
- In a large bowl, cream together the softened butter and granulated sugar. Use an electric mixer on medium-high speed for about 3-4 minutes until the mixture is pale, fluffy, and significantly increased in volume.
- Add the egg, lemon zest, and almond extract. Beat on low speed until just combined, being careful not to over-incorporate air at this stage.
- In a separate bowl, whisk together the flour and baking powder. Gradually add the dry ingredients to the wet ingredients, mixing by hand or on the lowest mixer setting until a soft dough forms.
- Scoop rounded tablespoons of dough and roll them into smooth balls. Place them 2 inches apart on the prepared baking sheets and gently flatten each one with the bottom of a glass dipped in sugar.
- Bake for 8-10 minutes, or until the edges are just barely golden brown. The centers should still look slightly soft. Let them cool on the pan for 5 minutes before transferring to a wire rack to cool completely.
How to make summer salads

Why we love this
Summer salads are the ultimate celebration of seasonal bounty, focusing on peak-ripeness produce that requires very little intervention to shine. We love them for their hydrating qualities—think juicy watermelon or crisp greens—and the way they balance sweetness with salty elements like goat cheese or nuts. The crunch of fresh ingredients provides a sensory contrast that is incredibly satisfying during a hot afternoon. These salads aren’t just a side dish; they are a vibrant, living part of the grazing board that brings texture and a necessary lightness to the spread.
Ingredients
- 4 cups mixed baby greens or arugula
- 2 cups cubed watermelon or fresh strawberries
- 1/4 cup red onion, thinly shaved
- 1/4 cup chopped walnuts or pecans
- 2 oz goat cheese, crumbled
- Balsamic glaze for drizzling
How to make it
- Start with the freshest greens available. If they aren’t pre-washed, wash them in cold water and use a salad spinner to dry them completely; wet greens will make the dressing slide off and result in a soggy salad.
- Place the greens in a wide, shallow bowl. This presentation style makes it easier for guests to grab a portion without all the heavy ingredients sinking to the bottom.
- Scatter the fruit (watermelon or strawberries) over the top of the greens. The key here is high-contrast colors to make the dish pop visually.
- Add the shaved red onion. To take the bite out of the onion, soak the slices in ice water for 10 minutes before adding them to the salad.
- Top with the nuts and crumbled goat cheese. The cheese should be added last so it doesn’t get smeared during tossing.
- Just before serving, drizzle the balsamic glaze in a decorative zig-zag pattern over the top. Do not toss the salad after drizzling to maintain the beautiful visual contrast.
How to grill healthy meals

Why we love this
Grilling transforms simple, lean proteins and vegetables into charred masterpieces with a smoky depth that indoor cooking simply can’t replicate. We love the way the high heat caramelizes the natural sugars in peppers and zucchini, creating a sweet and savory profile that feels indulgent while remaining light and nutritious. The sound of the sizzle and the sight of perfect grill marks add a rustic, professional touch to your grazing board components. It’s a healthy way to add ‘hearth’ to your spread, offering warm, satisfying bites that are packed with vitamins and minerals.
Ingredients
- 1 lb chicken breast or firm tofu, sliced into strips
- 2 zucchini, sliced into rounds
- 1 bunch asparagus, woody ends trimmed
- 2 tbsp olive oil
- 1 tsp garlic powder
- 1 tsp smoked paprika
- Salt and pepper to taste
How to make it
- Preheat your grill to medium-high heat (about 400°F). Ensure the grates are clean and lightly oiled to prevent sticking, which is especially important for lean proteins.
- In a large bowl, toss your protein and vegetables with olive oil, garlic powder, smoked paprika, salt, and pepper until everything is evenly coated.
- Place the protein on the hottest part of the grill. For chicken, cook for 5-6 minutes per side until the internal temperature reaches 165°F. For tofu, cook for 4 minutes per side until charred and firm.
- Arrange the vegetables on the cooler edges of the grill. Asparagus takes only 3-4 minutes, while zucchini needs about 3 minutes per side. Look for clear, dark grill marks as your cue to flip.
- Once cooked, remove everything from the grill and let the protein rest for 5 minutes. This allows the juices to redistribute, ensuring every bite is succulent.
- Slice the grilled items into bite-sized pieces and arrange them in neat rows on your board for a clean, professional look.
How to bake spring cakes

Why we love this
Spring cakes are the crowning jewel of a seasonal spread, often featuring light, airy sponges and bright citrus glazes that feel like sunshine on a plate. There is a refined elegance to a well-baked spring cake, with its tender crumb and the delicate balance of tart and sweet flavors. We love how they can be easily portioned into small squares or slices for a grazing board, allowing guests to indulge in a ‘mini’ dessert. The aroma of baking citrus and sugar is a hallmark of the season, creating an inviting atmosphere that makes every guest feel pampered.
Ingredients
- 1 1/2 cups cake flour
- 1 cup granulated sugar
- 1/2 cup unsalted butter, softened
- 2 large eggs
- 1/2 cup buttermilk
- 1 tbsp lemon juice + 1 tsp zest
- 1 tsp baking powder
- 1/2 cup powdered sugar (for glaze)
How to make it
- Preheat your oven to 325°F (165°C) and grease a 9-inch square baking pan. A lower temperature helps prevent the delicate spring cake from browning too quickly on the edges.
- Cream the butter and sugar together for 5 minutes. For a cake this light, you want to incorporate as much air as possible until the mixture looks like white clouds.
- Add the eggs one at a time, beating well after each addition to ensure the emulsion doesn’t break. Stir in the lemon juice and zest.
- Sift the cake flour and baking powder together. Alternately add the dry ingredients and the buttermilk to the butter mixture, starting and ending with the flour. Mix only until the white streaks disappear.
- Pour the batter into the pan and smooth the top. Bake for 25-30 minutes, or until a toothpick inserted in the center comes out clean or with just a few moist crumbs.
- While the cake is cooling, whisk powdered sugar with a teaspoon of lemon juice to create a thin glaze. Drizzle over the warm cake so it soaks in slightly, then let it cool completely before slicing into small, elegant squares.
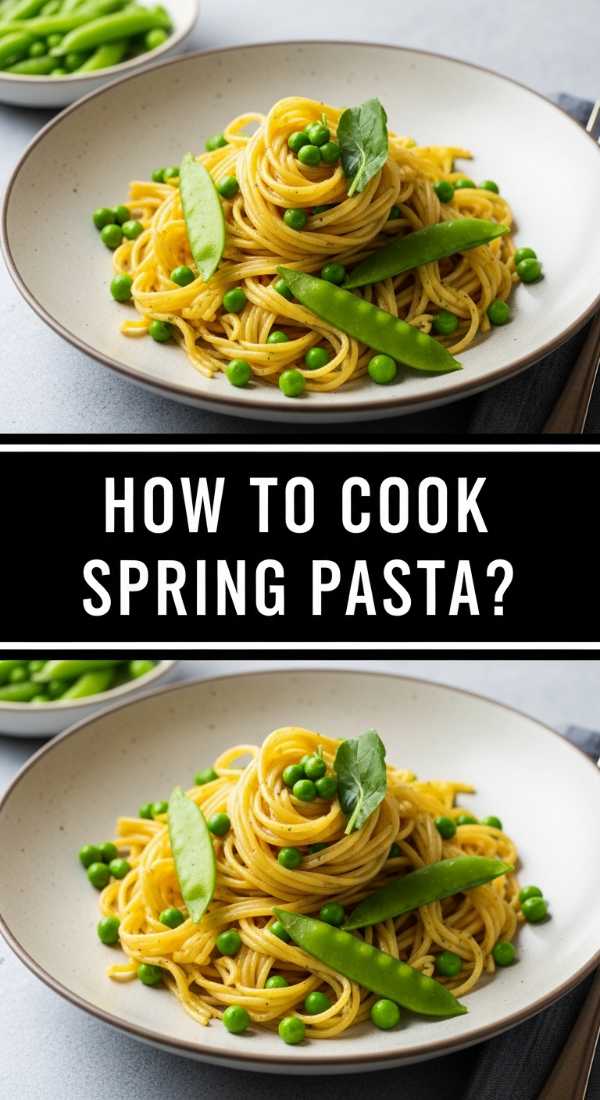
How to cook spring pasta
Why we love this
Spring pasta is all about the ‘green’—a vibrant, garden-forward dish that feels light yet satisfyingly filling. We love the combination of snap-crisp peas and tender asparagus tossed in a light, silky sauce that doesn’t mask the flavor of the vegetables. It provides a beautiful textural contrast to the other items on a grazing board, offering a smooth, buttery mouthfeel paired with the pop of fresh produce. It’s a sophisticated addition that looks stunning when garnished with fresh herbs, making the entire board feel cohesive and seasonally appropriate.
Ingredients
- 12 oz linguine or fettuccine
- 1 cup fresh peas
- 1 bunch thin asparagus, cut into 1-inch pieces
- 2 tbsp butter
- 1/2 cup heavy cream
- 1/4 cup grated Parmesan cheese
- Fresh mint or basil, torn
How to make it
- Boil a large pot of water and add a generous amount of salt. Cook your pasta until it is about 2 minutes away from being done.
- During those last 2 minutes of pasta cooking, drop the peas and asparagus pieces directly into the boiling pasta water. This blanches the vegetables perfectly without needing an extra pot.
- Reserve 1 cup of the starchy pasta water, then drain the pasta and vegetables together.
- In the same pot (now empty), melt the butter over medium heat. Whisk in the heavy cream and half of the Parmesan cheese. Bring to a very gentle simmer—do not let it boil vigorously or the cream may separate.
- Add the pasta and vegetables back into the pot. Toss vigorously, adding the reserved pasta water a little at a time until the sauce becomes glossy and coats every strand of pasta.
- Remove from heat, fold in the remaining Parmesan and the fresh herbs. Serve in small individual ramekins on your board for easy grabbing.
How to make steamed dumplings

Why we love this
Steamed dumplings are the ultimate ‘treasure chest’ food, featuring a delicate, translucent wrapper that gives way to a savory, juicy interior. We love the ritual of dipping these pillowy morsels into a tangy sauce, and they add a fantastic international flair to any grazing spread. The texture is unique—soft and slightly chewy on the outside with a burst of flavor on the inside. They are visually intriguing and always the first thing to disappear, as they are perfectly bite-sized and incredibly addictive.
Ingredients
- 1 pack pre-made dumpling wrappers
- 1/2 lb ground pork or finely chopped shrimp
- 1 cup shredded cabbage
- 2 green onions, minced
- 1 tbsp soy sauce
- 1 tsp sesame oil
- 1 tsp grated ginger
How to make it
- In a large bowl, mix the ground meat, cabbage, green onions, soy sauce, sesame oil, and ginger. Use your hands to mix thoroughly until the filling is slightly tacky and well-combined.
- Lay a dumpling wrapper on a clean surface. Place a teaspoon of filling in the center—do not overfill, or the dumpling will burst during steaming.
- Wet the edges of the wrapper with a dip of water on your finger. Fold the wrapper in half and pleat the edges to seal, pressing firmly to ensure no air pockets remain.
- Prepare a steamer basket by lining it with parchment paper or cabbage leaves to prevent sticking. Arrange the dumplings in the basket, making sure they do not touch each other.
- Bring an inch of water to a boil in a wok or pot that fits your steamer. Place the steamer over the boiling water, cover tightly, and steam for 8-10 minutes.
- The wrappers should look translucent when finished. Let them rest for 2 minutes before removing from the steamer to prevent tearing. Serve with a side of soy-ginger dipping sauce.
How to use sourdough discard

Why we love this
Using sourdough discard is a beautiful lesson in culinary resourcefulness, turning something that would otherwise be wasted into a tangy, flavorful component of your board. We love the distinct, fermented depth it adds to crackers or flatbreads, offering a sophisticated sour note that pairs perfectly with creamy cheeses and cured meats. The texture is often wonderfully crisp yet sturdy, making it the ideal vessel for heavy dips. It adds an artisanal, ‘from-scratch’ feel to your grazing board that never fails to impress guests who appreciate the art of bread making.
Ingredients
- 1 cup sourdough discard (unfed)
- 1 cup all-purpose flour
- 1/4 cup olive oil
- 1 tsp sea salt
- 2 tsp dried herbs (like rosemary or thyme)
- Additional sea salt for topping
How to make it
- In a medium bowl, combine the sourdough discard, flour, olive oil, salt, and dried herbs. Mix until a shaggy dough forms, then knead it gently on a floured surface for about 1 minute until it becomes smooth.
- Wrap the dough in plastic and let it rest at room temperature for at least 30 minutes. This relaxes the gluten, making it much easier to roll out thinly.
- Preheat your oven to 350°F (175°C). Divide the dough into two pieces.
- On a piece of parchment paper, roll the dough out as thin as possible—ideally about 1/16th of an inch. The thinner the dough, the crispier the final cracker will be.
- Lightly brush the top with a little more olive oil and sprinkle with sea salt. Use a pizza cutter to score the dough into squares or diamonds.
- Slide the parchment onto a baking sheet and bake for 15-20 minutes, or until the crackers are a deep golden brown and feel firm to the touch. Let them cool completely to reach maximum crispness before breaking them along the score lines.
Creating the Perfect Budget Spread
Now that you have these incredible recipes in your arsenal, the key to the viral grazing board is the assembly. Start by placing your largest bowls (like the Rotel dip and the summer salad) on the board first to create anchor points. Fill in the gaps with your proteins, then use the cookies and crackers to create flowing lines across the board. Don’t be afraid to let things touch—the beauty of a grazing board is the abundance! Remember, the best host is the one who is actually present, so use these make-ahead tips to ensure you’re enjoying the party just as much as your guests.
Frequently Asked Questions
How do I keep the grazing board food fresh?
Keep your board in a cool area away from direct sunlight. For perishable items like the Rotel dip or pasta dishes, only put out small portions at a time and replenish from the kitchen to keep everything at the proper temperature. Metal or marble boards can also help keep cold items chilled longer.
Can I make these recipes in advance?
Absolutely! Most of these recipes, like the pasta salad, spring cookies, and sourdough crackers, can be made a day in advance. The hot items like the dumplings and grilled meats are best prepared just before serving, but you can prep all the ingredients (chopping, marinating) the night before to save time.