

The Ultimate Guide to Creating a Viral Food Board on a Budget
There is something undeniably magical about gathering around a beautifully arranged food board, isn’t there? It’s more than just a meal; it’s a centerpiece for conversation, a canvas for creativity, and a way to make even the simplest weeknight feel like a grand celebration. I remember the first time I set out a massive spread of roasted vegetables for a girl’s night—everyone’s eyes lit up, and within minutes, the photos were all over Instagram. The best part? It didn’t cost a fortune. You don’t need expensive charcuterie or rare cheeses to go viral; you just need the humble, earthy goodness of perfectly roasted produce.
Creating a ‘Viral Simple Food Board’ is all about texture, color, and that irresistible ‘wow’ factor that comes from caramelization. In this guide, I’m sharing my absolute favorite ways to transform budget-friendly vegetables into a show-stopping feast. We’re going to dive deep into the art of roasting—from the crispest broccoli you’ve ever tasted to vibrant rainbow medleys that look like a work of art. Grab your sheet pans and let’s get cooking!
10 Best Roasted Vegetable Recipes (Step-by-Step Guide)
Why we love this
This collection is the backbone of any successful food board because it celebrates the sheer variety of nature’s candy. There is a primal satisfaction in biting into a carrot that has been roasted until its edges are charred and sweet, or a potato that is fluffy on the inside but shatters like glass on the outside. The aroma of rosemary and thyme wafting through your kitchen creates an atmosphere of warmth and home, making these recipes feel like a hug on a plate. It’s the ultimate way to eat the rainbow while keeping your grocery bill impressively low.
Ingredients
- 2 lbs Mixed Root Vegetables (carrots, parsnips, sweet potatoes)
- 1 lb Brussels Sprouts, halved
- 1 Red Onion, wedged
- 4 tbsp Extra Virgin Olive Oil
- 2 tbsp Fresh Rosemary, minced
- 1 tbsp Sea Salt
- 1 tsp Black Pepper
- Optional: Balsamic glaze for drizzling
How to make it
- Preheat your oven to 425°F (220°C). This high heat is crucial for achieving that golden-brown caramelization without turning the vegetables into mush.
- Prepare your vegetables by cutting them into uniform 1-inch pieces. This ensures everything cooks at the same rate; if the pieces are uneven, some will burn while others remain raw.
- In a large mixing bowl, toss the vegetables with olive oil, rosemary, salt, and pepper until every surface is glistening. Don’t be afraid to use your hands to ensure even coating.
- Spread the vegetables in a single layer across two large baking sheets. Crowding the pan is the enemy of roasting—if the vegetables are too close, they will steam instead of roast.
- Slide the pans into the oven and roast for 35-45 minutes. Halfway through, use a wide spatula to flip the vegetables, which helps develop a crust on all sides.
- Look for visual cues: the edges should be dark brown (not black), and a fork should easily pierce the thickest part of the root vegetables.
- Remove from the oven and let them rest for 5 minutes to firm up before arranging them on your board.
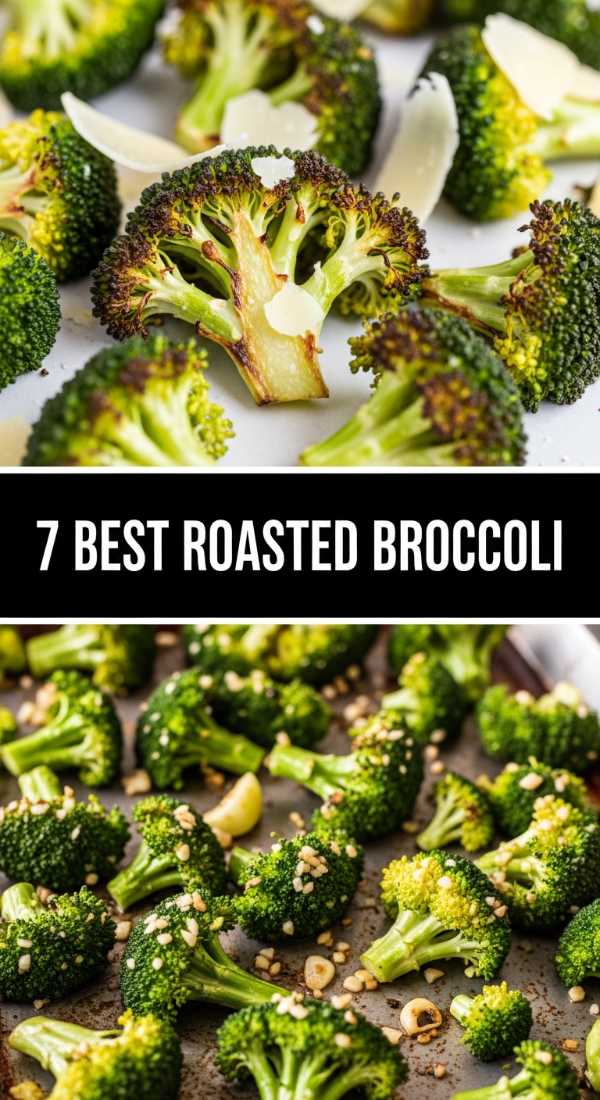
7 Ways to Roast Broccoli You’ll Love (Step-by-Step Guide)

Why we love this
Broccoli is often relegated to a boring side dish, but when roasted correctly, it transforms into something truly addictive. The tiny florets act like sponges, soaking up garlic-infused oil and getting wonderfully crispy, almost like vegetable popcorn. The contrast between the tender stems and the charred, nutty tops provides a sensory experience that keeps people coming back for just ‘one more piece.’ It’s the perfect budget-friendly filler for your food board that adds both height and a deep, forest-green aesthetic.
Ingredients
- 3 large heads of Broccoli, cut into florets
- 3 tbsp Avocado Oil (higher smoke point)
- 4 cloves Garlic, thinly sliced
- 1 tsp Red Pepper Flakes
- Zest of 1 Lemon
- 1/4 cup Grated Parmesan Cheese
- Kosher Salt to taste
How to make it
- Ensure your broccoli florets are completely dry. Any lingering moisture from washing will create steam and prevent the edges from crisping up.
- Preheat the oven to 400°F (200°C). While a higher heat works for root veg, 400°F allows the garlic and broccoli tops to brown without burning too quickly.
- In a bowl, whisk together the oil, sliced garlic, and red pepper flakes. Toss the florets in this mixture until the ‘trees’ are well-saturated.
- Place the broccoli on a parchment-lined sheet pan, ensuring the cut flat sides of the florets are facing down against the hot pan for maximum browning.
- Roast for 20-25 minutes. You are looking for the tips of the florets to look toasted and the stems to be bright green but tender.
- Immediately upon removing from the oven, sprinkle with lemon zest and parmesan cheese. The residual heat will melt the cheese and release the lemon oils.
- Serve warm or at room temperature as a pile of ‘crispy trees’ on your viral board.
5 Best Roasted Vegetable Soups (Step-by-Step Guide)
Why we love this
Adding a small bowl of concentrated roasted vegetable soup to your food board adds a layer of sophistication and a dipping element that guests adore. These soups are incredibly creamy without needing much dairy, thanks to the starches in the roasted vegetables. The deep, smoky undertones from the oven roasting provide a complexity that you simply cannot get from boiling vegetables in broth. It feels luxurious, velvety on the tongue, and smells like a professional bistro kitchen right in your own home.
Ingredients
- 1 lb Roasted Butternut Squash or Tomatoes
- 1 Head of Garlic, roasted
- 1 White Onion, quartered and roasted
- 2 cups Vegetable Broth (low sodium)
- 1/2 cup Heavy Cream or Coconut Milk
- 1 tsp Smoked Paprika
- Salt and Pepper to taste
How to make it
- Start by roasting your base vegetable (squash, tomatoes, or peppers) along with the onion and a whole head of garlic (top sliced off, wrapped in foil) at 400°F for 45 minutes.
- Once softened and slightly charred, squeeze the roasted garlic cloves out of their skins into a high-speed blender.
- Add the roasted vegetables and onion to the blender, discarding any tough skins (like from the squash).
- Pour in half of the vegetable broth and the smoked paprika. Blend on high until completely smooth and emulsified.
- Transfer the mixture to a pot over medium heat and stir in the remaining broth and cream until you reach your desired consistency.
- Simmer for 10 minutes to allow the flavors to marry. Taste and adjust seasoning with salt and pepper.
- Pour into small ramekins or a hollowed-out bread bowl to place in the center of your food board.
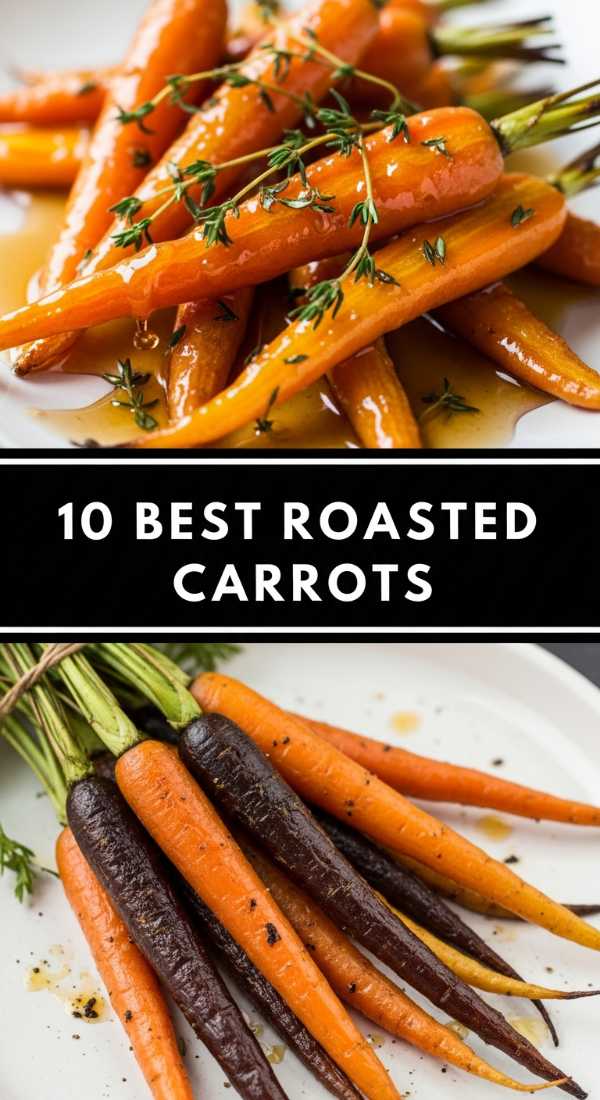
10 Easy Honey Roasted Carrots (Step-by-Step Guide)

Why we love this
Honey roasted carrots are the ‘jewelry’ of your food board—bright, glossy, and visually stunning. The honey creates a sticky glaze that traps the heat and enhances the natural sugars of the carrots, resulting in a side dish that tastes almost like candy but remains firmly savory. The slight crunch of the carrot against the soft, syrupy exterior is a delight, and the vibrant orange hue pops beautifully against a dark wooden board or a slate platter.
Ingredients
- 1 lb Rainbow Carrots (with tops if possible)
- 2 tbsp Liquid Honey
- 2 tbsp Melted Butter
- 1 tsp Ground Cumin
- 1/2 tsp Cinnamon
- Fresh Parsley, chopped for garnish
- Maldon Sea Salt
How to make it
- Preheat your oven to 400°F (200°C). Scrub the carrots clean but leave the skins on for a rustic look and extra nutrients.
- If the carrots are thick, slice them lengthwise so they cook evenly; if they are thin, leave them whole for a more dramatic presentation.
- In a small jar, shake together the honey, melted butter, cumin, and cinnamon until combined.
- Lay the carrots on a baking sheet and pour the glaze over them, using a pastry brush to ensure every inch is covered.
- Roast for 25-30 minutes. Every 10 minutes, open the oven and shake the pan to redistribute the glaze and prevent the honey from burning.
- The carrots are done when they are tender and have developed dark, caramelized spots on the underside.
- Transfer to your board and finish with a sprinkle of flaky Maldon salt and fresh parsley for a professional, viral-ready finish.
7 Secrets to Crispy Roasted Broccoli (Step-by-Step Guide)

Why we love this
This is for the texture lovers—those who live for the ‘crunch.’ These secrets elevate broccoli from a standard side to a crave-worthy snack that rivals potato chips. When you master the art of the ‘crisp,’ you’re creating a sensory experience that involves the sound of the bite and the deep, toasted flavor of the brassica. It’s a game-changer for food boards because it provides a sturdy structure that doesn’t go limp, maintaining its integrity even as it sits out for guests to graze on.
Ingredients
- 2 heads Broccoli, cut into small, even florets
- 3 tbsp Cornstarch
- 1/4 cup Olive Oil
- 1 tsp Garlic Powder
- 1/2 tsp Onion Powder
- Salt and Pepper
How to make it
- Secret #1: Dry the broccoli overnight in the fridge if possible, or use a salad spinner and then pat dry with paper towels. Any water equals steam.
- Secret #2: The Cornstarch. In a large bag or bowl, toss the dry broccoli with cornstarch until a very thin, dusty coating appears. This absorbs surface moisture and creates a ‘batter’ with the oil.
- Secret #3: High Heat. Set your oven to 425°F (220°C). You need intense heat to crisp the cornstarch layer.
- Secret #4: Don’t crowd. Use two pans if necessary. Each floret needs its own ‘breathing room’ for air circulation.
- Secret #5: Pre-heat the pan. Put your empty baking sheet in the oven for 5 minutes before adding the broccoli. The sizzle when it hits the pan is essential.
- Roast for 18-22 minutes, flipping only once. You want the bottom to be almost black-brown for the best flavor.
- Secret #6: The Cooling Rack. If not serving immediately, let them cool on a wire rack so air circulates underneath, preventing them from getting soggy on the bottom.
10 Best Sheet Pan Veggies (Step-by-Step Guide)

Why we love this
Sheet pan roasting is the ultimate ‘lazy girl’ hack for a viral food board, but the results look anything but lazy. This method allows you to cook a massive volume of food simultaneously, creating a beautiful ‘quilt’ of colors and textures. We love the way the juices from the peppers mingle with the oils from the zucchini, creating a natural sauce that coats everything on the pan. It’s efficient, virtually mess-free, and yields a rustic, farmhouse aesthetic that is currently dominating lifestyle feeds.
Ingredients
- 1 Zucchini, sliced
- 1 Yellow Squash, sliced
- 1 Red Bell Pepper, chopped
- 1 Green Bell Pepper, chopped
- 8 oz Mushrooms, halved
- 1 cup Cherry Tomatoes
- 3 tbsp Italian Seasoning
- 4 tbsp Olive Oil
How to make it
- Preheat oven to 400°F. Line a rimmed sheet pan with parchment paper to make cleanup a breeze.
- Group your vegetables by ‘density.’ Place the mushrooms and peppers on one side, and the zucchini and squash on the other, as mushrooms may release more liquid.
- Drizzle the olive oil generously over all the vegetables and sprinkle with the Italian seasoning, ensuring even distribution.
- Toss the cherry tomatoes in last; you want them to stay whole until they ‘burst’ in the oven.
- Roast for 25 minutes. At the 15-minute mark, use a spatula to toss everything together, allowing the tomato juices to coat the other veggies.
- Continue roasting until the zucchini edges are brown and the tomatoes have shriveled and concentrated in flavor.
- Slide the entire contents of the sheet pan onto your board, keeping the natural ‘mound’ shape for a bountiful look.
5 Healthy Roasted Vegetable Sides (Step-by-Step Guide)
Why we love this
For those looking to keep their food board light and nutrient-dense, these healthy sides are a dream come true. By focusing on minimal oils and emphasizing fresh herbs and acids like lemon or vinegar, you highlight the clean, crisp flavors of the produce. The aroma is fresh and herbaceous rather than heavy, making it a perfect accompaniment to a glass of chilled white wine. These sides feel ‘spa-like’—refined, elegant, and incredibly satisfying without being weighed down by heavy fats.
Ingredients
- 1 lb Asparagus, trimmed
- 1 lb Green Beans, snapped
- 2 tbsp Extra Virgin Olive Oil
- Juice of 1 Lime
- 1/4 cup Slivered Almonds
- 1 tbsp Fresh Mint, torn
- Sea Salt
How to make it
- Preheat your oven to 425°F. High and fast is the key for green vegetables to maintain their vibrant color.
- Arrange asparagus and green beans on a baking sheet. Try to keep them in a single layer to avoid ‘stewing.’
- Drizzle with just enough olive oil to coat—about 2 tablespoons is plenty for 2 pounds of greens.
- Roast for 10-12 minutes. You want ‘blistered’ green beans, meaning they have small dark spots but are still firm to the bite (al dente).
- While roasting, toast the slivered almonds in a dry pan on the stove for 2 minutes until fragrant.
- Remove the veggies from the oven and immediately toss with lime juice and sea salt. The acid brightens the green color significantly.
- Top with the toasted almonds and fresh mint just before serving to add a crunch and a cooling finish.
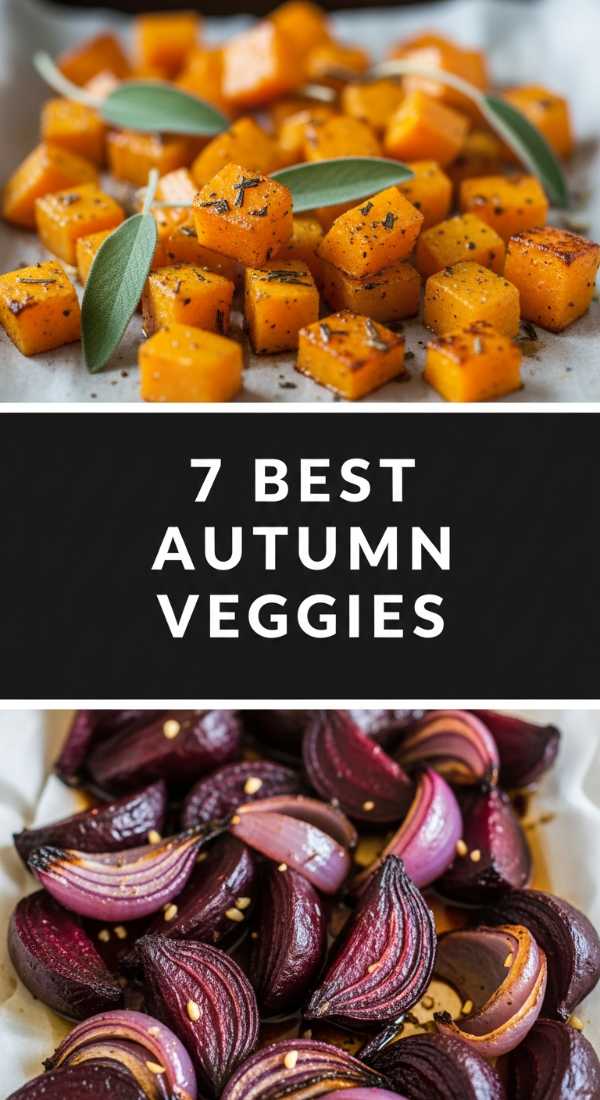
7 Best Autumn Roasted Vegetables (Step-by-Step Guide)
Why we love this
When the leaves start to turn, our food boards should reflect that cozy, earthy transition. Autumn roasting is all about the deep, musky scents of sage and nutmeg paired with the dense, creamy textures of squash and beets. There is a specific kind of comfort found in a roasted beet—its earthiness mellowed by the heat into something sweet and sophisticated. These vegetables bring a moody, rich color palette to your board—deep purples, burnt oranges, and creamy whites—that perfectly capture the essence of the season.
Ingredients
- 2 large Beets, peeled and cubed
- 1 Acorn Squash, sliced into rings
- 1 lb Brussels Sprouts
- 3 tbsp Maple Syrup
- 2 tbsp Balsamic Vinegar
- 3 sprigs Fresh Sage
- 1/2 cup Toasted Walnuts
How to make it
- Preheat the oven to 375°F (190°C). A slightly lower temperature is better for beets and squash to ensure they cook through without the sugars in the maple syrup burning.
- Toss the beets in a separate small bowl with oil first, as their juice will stain everything else pink if mixed too early.
- Lay the squash rings and Brussels sprouts on a baking sheet. Drizzle with a mix of maple syrup and balsamic vinegar.
- Place the beets in their own corner or on a separate small pan to preserve the color of the other vegetables.
- Tuck fresh sage leaves among the vegetables. As they roast, they become crisp and infuse the oil with a woodsy flavor.
- Roast for 40-50 minutes, turning once. The squash should be caramelized on the edges and the beets should be tender when pierced.
- Combine all on the board and sprinkle with walnuts for an added layer of earthy crunch.
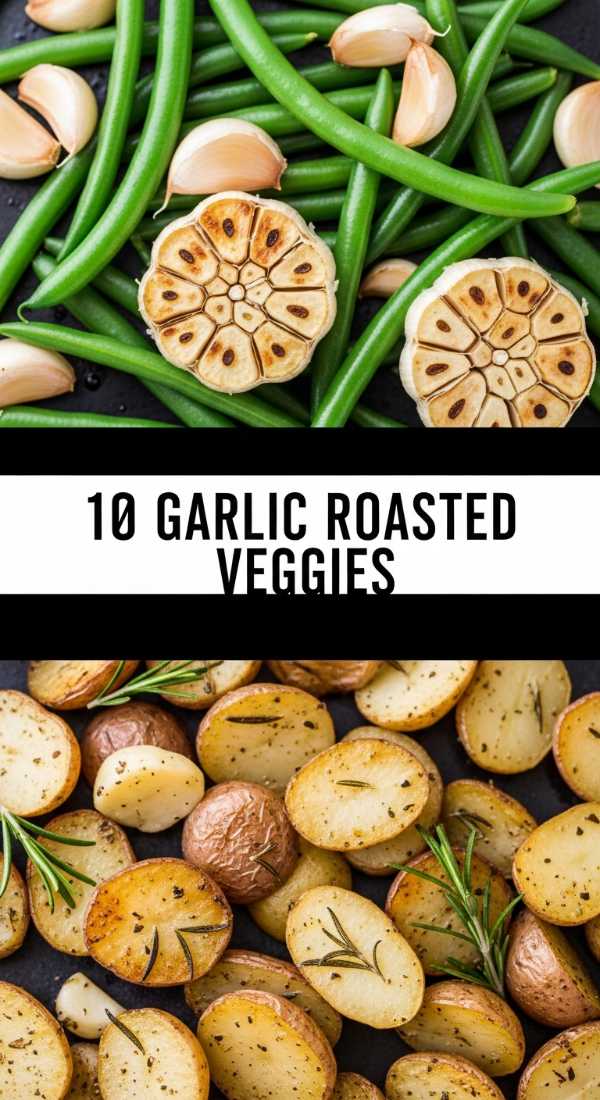
10 Garlic Roasted Vegetable Ideas (Step-by-Step Guide)
Why we love this
Garlic is the ‘secret sauce’ of the roasting world. When garlic is roasted, it loses its sharp bite and becomes buttery, mellow, and almost sweet. This recipe collection is for the bold flavor seekers. The smell of garlic roasting in the oven is famously mouth-watering, and it acts as a unifying thread that ties disparate vegetables together on a board. It creates a savory ‘umami’ depth that makes even the most basic cauliflower or potato feel like a gourmet experience.
Ingredients
- 1 lb Cauliflower florets
- 1 lb Red Potatoes, quartered
- 6-8 cloves Garlic, smashed
- 1/4 cup Olive Oil
- 1 tbsp Dried Oregano
- 1 tsp Red Pepper Flakes
- Fresh Chives for garnish
How to make it
- Preheat oven to 400°F. Smash the garlic cloves with the side of a knife but keep them whole; this prevents them from burning while still infusing the oil.
- In a large bowl, whisk the olive oil with oregano and red pepper flakes. Add the smashed garlic and let it sit for 5 minutes to infuse.
- Toss the cauliflower and potatoes in the garlic oil until thoroughly coated.
- Spread on a baking sheet. Make sure the garlic cloves are tucked under or between the vegetables so they don’t char too quickly.
- Roast for 30-35 minutes. The potatoes need the most time to get that ‘glassy’ outer crust.
- Halfway through, stir the vegetables to ensure the garlic oil is being redistributed.
- Serve the roasted garlic cloves right along with the vegetables on the board—they are spreadable and delicious on a piece of crusty bread!
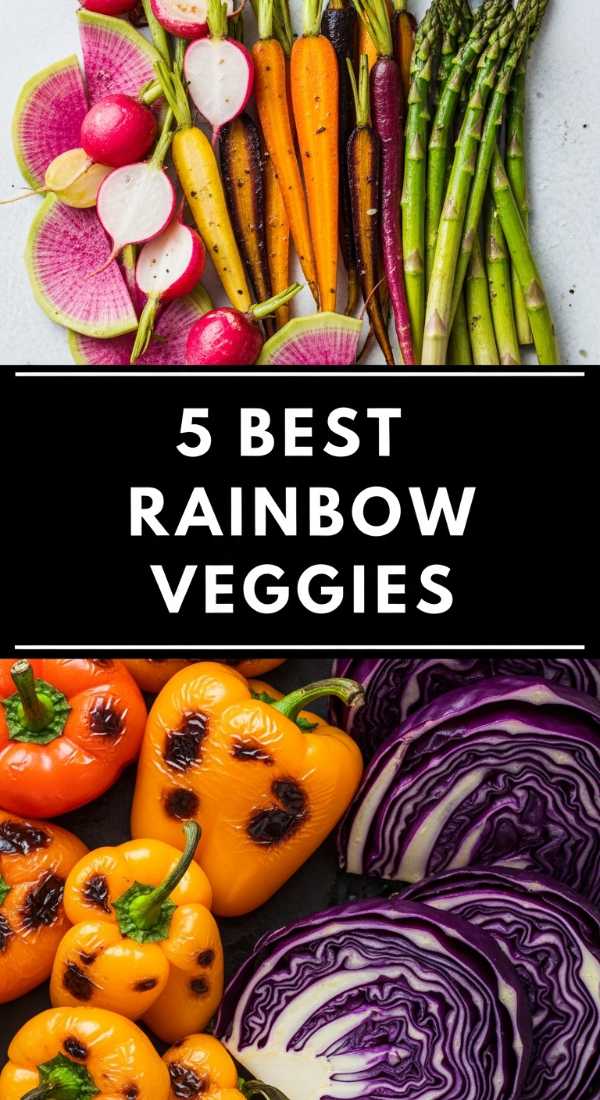
5 Best Rainbow Roasted Medleys (Step-by-Step Guide)
[IMAGE_10]
Why we love this
The finale of any viral food board is the ‘Rainbow Medley.’ This is where aesthetics meet nutrition in a explosion of color. We love this approach because it’s visually arresting—it practically begs to be photographed. The variety of textures, from the snap of a pepper to the creaminess of a purple potato, ensures that every bite is a different experience. It’s a celebration of abundance and the best way to show that ‘budget’ food can look like a million bucks when presented with care and intention.
Ingredients
- Purple: Red Onion and Purple Potatoes
- Red: Red Bell Peppers and Cherry Tomatoes
- Orange: Sweet Potatoes or Carrots
- Yellow: Yellow Squash or Corn cobettes
- Green: Zucchini or Broccoli
- Olive Oil, Sea Salt, and Cracked Pepper
How to make it
- Preheat oven to 400°F. The key here is the ‘prep by color.’ Keep your vegetables in separate bowls as you chop them.
- Season each color group with oil, salt, and pepper separately.
- On a very large sheet pan (or two), arrange the vegetables in the order of the rainbow: Purple, Red, Orange, Yellow, Green.
- Roast for 30-40 minutes. Because of the varying densities, you may need to remove the peppers or zucchini 10 minutes earlier than the potatoes.
- Be vigilant! Check the ‘softer’ veggies frequently to ensure they don’t overcook while the root veggies finish.
- To assemble the board, maintain the rainbow gradient. This ‘ombre’ effect is what makes the board go viral.
- Finish with a light spray of olive oil for shine and a final dusting of flaky salt to catch the light in your photos.
Conclusion: Your Board, Your Rules
Creating a viral food board isn’t about following a strict set of rules; it’s about embracing the beauty of simple, seasonal ingredients and sharing them with the people you love. Whether you’re hosting a big party or just making a Tuesday night feel special, these roasted vegetable techniques will ensure your spread is the talk of the table. Remember, the ‘viral’ part comes from the heart you put into the presentation. So, grab a board, start roasting, and don’t forget to snap a photo before everyone digs in!