

The Ultimate Guide to Achieving a Pinterest-Perfect Home Aesthetic
Have you ever spent hours scrolling through your feed, sighing at those perfectly sun-drenched corners and wishing your home felt like a curated sanctuary? I know that feeling all too well. There’s a certain magic in walking through your front door and being greeted by a space that doesn’t just look like a magazine cover, but feels like a warm, intentional hug. It’s about more than just furniture; it’s about the soul of the home—the way the light hits a linen throw or the earthy scent of a freshly mulched garden bed in the morning mist.
Creating a viral-worthy home aesthetic is actually much more attainable than the polished photos suggest. It’s about finding that sweet spot between functional living and artistic expression. Whether you’re dreaming of a whimsical apartment retreat or a nostalgic ‘Grandma-core’ vibe, the secret lies in the details. In this guide, we’re diving deep into the most coveted home trends of the season, giving you the exact blueprints to transform every inch of your space into a masterpiece of comfort and style.
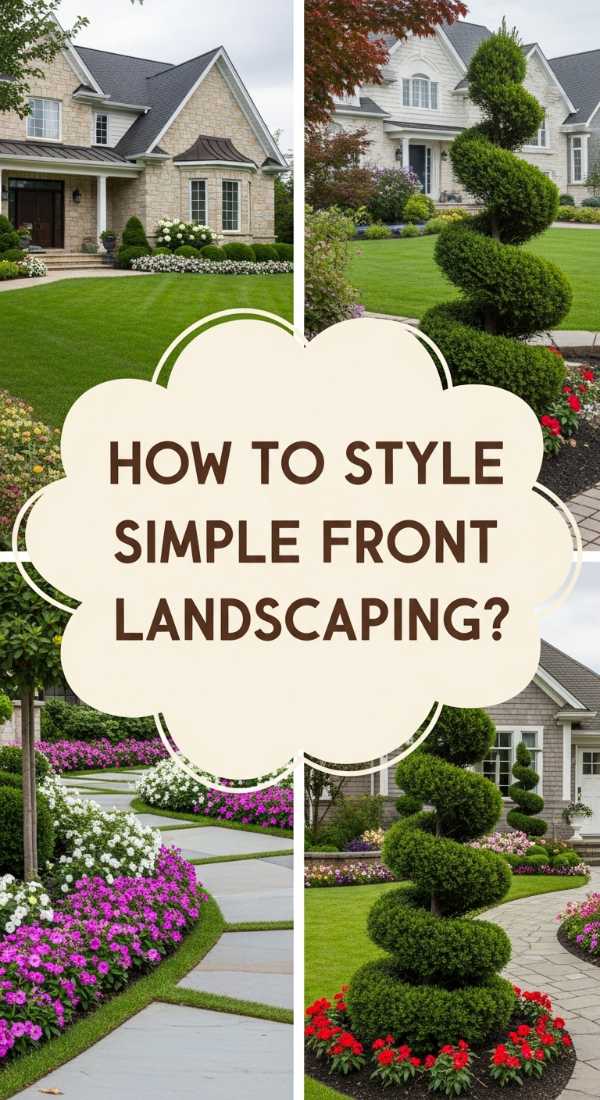
How to Design Simple Landscaping for a Dreamy Front Yard
Why we love this
There is nothing quite like the sensory explosion of a well-manicured front yard. Imagine the crisp, clean scent of cedar mulch mingling with the sweet, heady fragrance of blooming hydrangeas as you walk up your path. The visual texture of soft, velvety green grass against the rugged, cool surface of natural stone edging creates a balanced harmony that feels both grounded and ethereal. It’s the ultimate welcome home, offering a serene transition from the chaotic outside world into your personal private oasis.
Essential Elements:
- Hardwood or cedar mulch for a rich, dark contrast.
- A mix of perennial shrubs like Boxwoods or Hydrangeas.
- Natural stone or brick border edging.
- Solar-powered warm LED path lights.
- Low-maintenance ground cover like Creeping Thyme.
How to make it
- Begin by sketching a curved bed design using a garden hose to mark the lines; curves feel more organic and high-end than harsh straight lines.
- Remove the grass within your marked area using a sharp spade, ensuring you dig deep enough to remove the roots, typically about 3 inches down.
- Install your edging material—if using stone, dig a shallow trench so the stones sit halfway in the ground for stability and a professional, ‘sunken’ look.
- Amend the soil with organic compost, tilling it gently to a depth of 6 inches to ensure your new plants have nutrient-rich ‘food’ to thrive.
- Position your largest plants (the ‘anchors’) first, keeping them at least 2 feet from the house foundation to allow for air circulation and growth.
- Fill in the gaps with smaller perennials, then spread a 3-inch layer of mulch across the entire bed, being careful not to pile it against the plant stems (the ‘volcano’ mistake).
- Water deeply immediately after planting and set your solar lights at 3-foot intervals along the path for that magical evening glow.
How to Style an Office Desk Setup for a Creative Work Cubicle

Why we love this
Your workspace shouldn’t just be a place of labor; it should be a tactile wonderland that sparks innovation. Picture the smooth, cool touch of a ceramic mug against your palm and the soft, rhythmic click of a mechanical keyboard nestled on a vegan leather desk mat. The aroma of a nearby eucalyptus candle cleanses the air, while a splash of green from a small succulent brings a breath of life to the digital landscape. It’s a sensory cocktail designed to keep your focus sharp and your spirit inspired.
Essential Elements:
- A high-quality oversized desk mat (felt or leather).
- Adjustable warm-toned task lighting.
- Desktop organizers in acrylic or natural wood.
- A small, low-maintenance indoor plant.
- Personalized touches like vintage postcards or framed quotes.
How to make it
- Clear everything off your desk and wipe the surface with a microfiber cloth; starting with a literal ‘blank slate’ is essential for spatial visualization.
- Place your monitor at eye level using a riser; choose a riser with a drawer or shelf underneath to hide unsightly cords and small stationery.
- Layer your desk mat in the center, ensuring it’s perfectly parallel to the desk edge to create a structured visual frame for your keyboard and mouse.
- Position your lamp on the non-dominant hand side (left for right-handers) to prevent shadows while you’re writing or sketching.
- Group small items like pens and paperclips into trays or jars; odd-numbered groupings (sets of three) are more aesthetically pleasing to the eye.
- Add a ‘life’ element like a Pothos or Snake plant in the corner to break up the hard lines of the technology.
- Finish by tucking all cables into a cable management box or using adhesive clips under the desk to maintain that ‘floating’ wireless look.
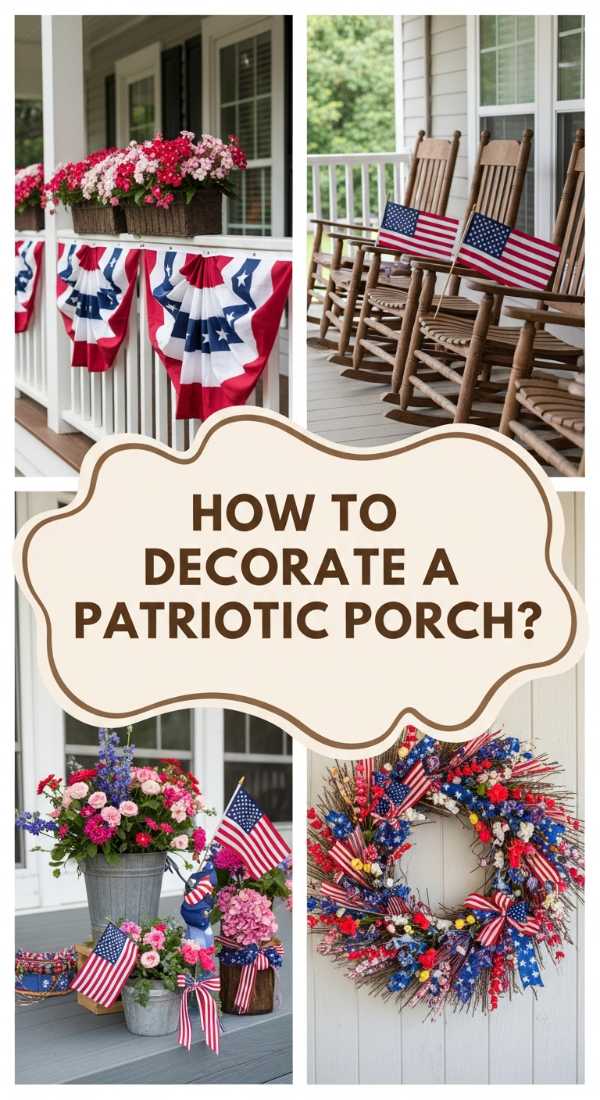
How to Create a Patriotic Front Porch for Summer Celebration
Why we love this
This aesthetic captures the very essence of a nostalgic American summer. It feels like the cool condensation on a glass of iced tea and the rhythmic creak of a wicker rocking chair. The visual impact of vibrant red geraniums against crisp white railings creates a classic Americana palette that feels celebratory yet deeply cozy. You can almost smell the charcoal grills and hear the distant laughter of a neighborhood parade just by looking at the perfectly draped bunting and the soft flutter of the stars and stripes in the warm July breeze.
Essential Elements:
- Tea-stained or bright cotton American flags.
- Red geraniums or petunias in white ceramic pots.
- Burlap or striped outdoor throw pillows.
- Woven wicker or wooden rocking chairs.
- Navy blue outdoor rugs or doormats.
How to make it
- Start by deep-cleaning the porch surface and railings; a pressure washer on a low setting works wonders to make white paint pop.
- Secure traditional pleated fans or bunting to the railing using zip ties hidden behind the folds for a secure, professional drape.
- Flank your front door with two large, symmetrical planters—fill the bottom with empty plastic bottles to save on heavy soil and improve drainage.
- Plant your red flowers in the center (the ‘thriller’), add white Alyssum around the edges (the ‘filler’), and let blue Lobelia trail over the sides (the ‘spiller’).
- Hang a large flag at a 45-degree angle from a porch pillar, ensuring it is positioned high enough that it doesn’t touch the floor or any furniture.
- Arrange your seating area with navy and white striped pillows, ensuring the fabrics are UV-rated to prevent fading in the harsh summer sun.
- Add a final touch with a natural coir doormat layered over a larger blue plaid rug for that high-end ‘layered’ look.
How to Achieve a Whimsical Apartment Aesthetic for Cozy Living

Why we love this
The whimsical aesthetic is all about embracing the magical and the unexpected. It’s the feeling of soft, oversized knits against your skin and the warm, golden glimmer of fairy lights reflecting off vintage glassware. There’s a delightful aroma of dried lavender and old book pages that seems to permeate the air. It’s a space that doesn’t take itself too seriously, where mismatched textures and dreamy colors come together to create a sanctuary that feels like it’s tucked away in a storybook forest rather than a city apartment.
Essential Elements:
- Sheer, billowy floor-to-ceiling curtains.
- Warm-toned ‘fairy’ or ‘twinkle’ lights.
- A variety of velvet and faux fur textures.
- Vintage-inspired gold mirrors.
- Plenty of hanging vines and air plants.
How to make it
- Hang your curtain rods 6 inches higher than the window frame and let the fabric ‘puddle’ slightly on the floor to create an ethereal, high-ceiling illusion.
- Layer your lighting—avoid the ‘big light’ (overhead) and instead use 3-4 different sources of warm lamps and string lights at different heights.
- Create a ‘gallery wall’ with mismatched frames found at thrift stores; paint them all different pastel shades or keep them gold for a more cohesive whimsical look.
- Use Command hooks to drape string lights across the ceiling or behind sheer fabric for a soft, diffused ‘glow’ effect.
- Incorporate ‘living’ decor by hanging macrame plant hangers near windows, choosing trailing plants like String of Pearls for a waterfall effect.
- Mix and match furniture styles—a modern velvet sofa paired with a vintage wooden trunk used as a coffee table adds instant character.
- Add a final sensory layer with a reed diffuser in a light floral or earthy scent to tie the ‘forest’ theme together.
How to Build Cheap Pool Deck Ideas for Backyard Fun

Why we love this
A backyard pool area should feel like a private resort without the five-star price tag. Imagine the warm, sun-soaked scent of pine wood and the refreshing splash of cool water against a backdrop of glowing lanterns. The texture of smooth, sanded wood under your bare feet and the vibrant colors of tropical-patterned towels create a vacation-at-home vibe. It’s about creating a space where the afternoons stretch out lazily and the only thing on the agenda is soaking up the sun in style.
Essential Elements:
- Pressure-treated pine or reclaimed wood pallets.
- Outdoor-rated weather sealant or stain.
- Galvanized deck screws and heavy-duty brackets.
- String lights with shatterproof bulbs.
- Large outdoor floor cushions and bean bags.
How to make it
- Level the ground around your pool area using a rake and a layer of leveling sand; this is crucial to ensure your deck doesn’t wobble or warp.
- Construct a simple frame using 2×4 pressure-treated lumber, spacing your joists 16 inches apart for maximum structural integrity.
- If using pallets, ensure they are HT (Heat Treated) and not chemically treated; sand them down thoroughly with 80-grit then 120-grit sandpaper to prevent splinters.
- Secure your decking boards to the frame using two screws at every joist intersection, leaving a 1/8-inch gap between boards for drainage and expansion.
- Apply a high-quality, slip-resistant outdoor stain or sealer; apply two thin coats with a roller, allowing 24 hours of drying time between each.
- Edge the deck with potted tropical plants or large river rocks to hide the wooden frame and create a more integrated, ‘built-in’ appearance.
- Install a few solar-powered deck lights into the corners of the wood to make the space safe and inviting for night swims.
How to Curate a Vintage Grandma House Aesthetic for Nostalgic Vibes

Why we love this
The ‘Grandmacore’ aesthetic is a love letter to the past, filled with the comforting scent of vanilla extract and the intricate texture of handmade lace doilies. It’s a visual feast of floral prints, porcelain tea sets, and well-loved wooden furniture that tells a story. This style feels like a slow Sunday afternoon—quiet, intentional, and deeply rooted in domestic bliss. It’s the warmth of a quilted blanket and the delicate chime of a grandfather clock, bringing a sense of timeless peace to a modern world.
Essential Elements:
- Floral wallpaper or peel-and-stick patterns.
- Crocheted throws and lace tablecloths.
- Vintage porcelain or mismatched china.
- Antique-style wooden picture frames.
- Pressed flowers and botanical illustrations.
How to make it
- Start by visiting local estate sales or thrift stores to find ‘anchor’ pieces like a spindle-back chair or a glass-front china cabinet.
- Layer your textiles—place a lace doily under a lamp, and drape a chunky, hand-knitted quilt over the back of a neutral-colored armchair.
- Create a ‘tea station’ on a side table using a vintage tray, a floral teapot, and mismatched cups to encourage the ‘slow living’ ritual.
- Apply floral wallpaper to a single accent wall or even the back panels of a bookshelf to provide a romantic, vintage backdrop.
- Frame botanical prints or even pieces of vintage fabric in ornate wooden frames and hang them in a tight, symmetrical grid.
- Incorporate ‘heirloom’ scents like rose, lavender, or baked cinnamon through candles or dried potpourri bowls.
- Replace modern plastic containers with glass jars and ceramic crocks for kitchen storage to keep the aesthetic consistent throughout the home.
How to Plant Hippie Garden Ideas for a Boho Decor Sanctuary

Why we love this
A hippie garden is a wild, untamed celebration of nature’s diversity. It’s the earthy, spicy aroma of damp soil and wild sage, accompanied by the gentle, metallic tinkling of brass wind chimes. The visual texture is a riot of color—bright sunflowers nodding in the breeze next to the silvery-green leaves of eucalyptus. It’s a space where you can walk barefoot on moss and feel a deep connection to the earth, a boho sanctuary that encourages meditation, creativity, and a free-spirited lifestyle.
Essential Elements:
- Wildflower seed mixes (native species).
- Recycled containers like old tires or colorful boots.
- Crystal suncatchers and beaded wind chimes.
- Hammocks or floor cushions for seating.
- Natural stone pathways and mosaic accents.
- Designate an area for ‘controlled chaos’ where you skip the traditional rows and instead scatter a high-quality mix of native wildflower seeds.
- Rake the soil lightly before sowing, then walk over the area to ensure ‘seed-to-soil’ contact—this mimics the natural trampling of animals.
- Incorporate ‘upcycled’ planters; drill drainage holes into old colorful colanders or vintage crates to give the garden a lived-in, bohemian feel.
- Hang crystal prisms from tree branches or shepherd hooks; they will catch the afternoon sun and cast ‘rainbows’ across your greenery.
- Construct a simple path using flat river stones or mismatched Moroccan tiles set into a bed of fine gravel or pea stone.
- Set up a relaxation zone with a weather-resistant hammock or a low wooden platform covered in outdoor pillows and patterned rugs.
- Add a water element, like a simple solar-powered fountain in a ceramic bowl, to introduce the soothing sound of trickling water to your sanctuary.
- Peel-and-stick (removable) wallpaper for easy updates.
- High-contrast patterns (citrus, tropical, or nautical).
- Squeegee or smoothing tool for application.
- Utility knife with fresh blades for precision.
- Neutral furniture to balance the bold walls.
- Measure your wall twice and order 10-15% extra to account for ‘pattern matching’—this is the most common mistake for beginners.
- Thoroughly clean the wall with a 1:1 mix of water and isopropyl alcohol to remove any oils that might prevent the adhesive from sticking.
- Start from the top-left corner of the wall; peel back only 6 inches of the backing paper at a time to maintain control and prevent sticking to itself.
- Use a felt-tipped squeegee to smooth the paper from the center outward to the edges, pushing any air bubbles toward the nearest exit point.
- When you reach the next panel, focus entirely on matching the pattern at eye level first, then work your way up and down for a seamless look.
- Use a metal straight-edge and a brand-new craft blade to trim the excess at the ceiling and baseboards; a dull blade will tear the paper rather than slice it.
- Wipe down the finished wall with a dry cloth to set the adhesive and admire the instant, bright transformation of your space.
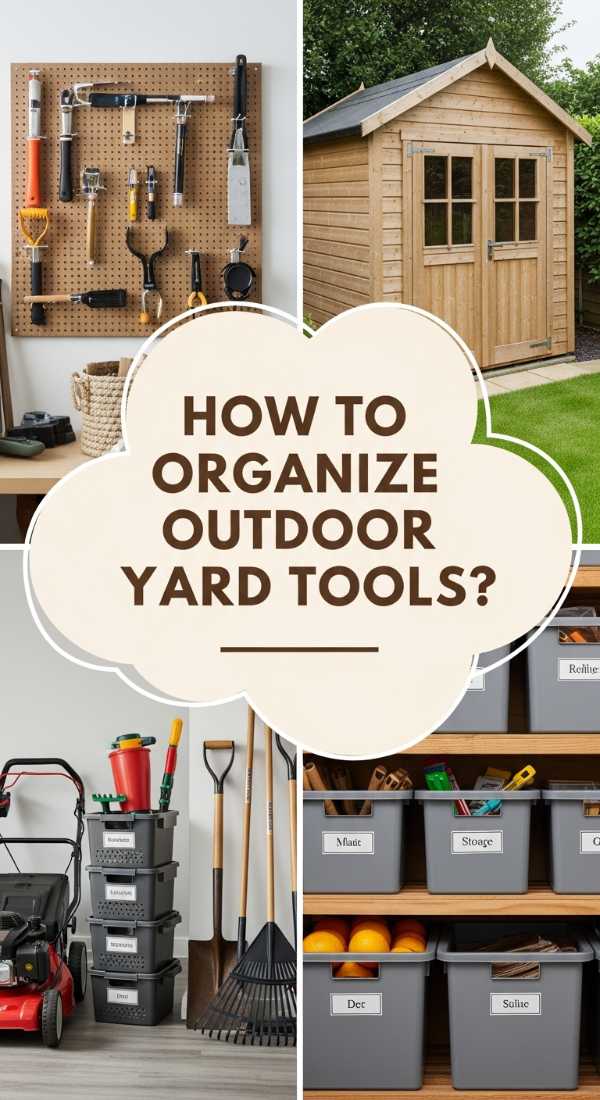
- Heavy-duty pegboards or slat-walls.
- Magnetic tool strips for small metal items.
- Wall-mounted racks for long-handled tools.
- Clear plastic bins for seeds and gloves.
- A small potting bench or foldable work surface.
- Empty your current storage space completely and sort tools into ‘keep’, ‘repair’, and ‘donate’ piles; clean the ‘keep’ items with a wire brush.
- Install your pegboard using spacers (small wooden blocks) behind it so the hooks have room to lock into the holes without hitting the wall.
- Trace the outline of your most-used tools on the pegboard with a permanent marker; this ‘shadow board’ technique ensures you always know where things go back.
- Mount a magnetic strip at chest height for easy access to small pruners, snips, and trowels—this keeps them off the counter and prevents rust.
- Use vertical wall racks with rubberized grips to hang shovels and rakes with the heads facing up; this prevents them from falling and hitting you.
- Label clear bins for specific items like ‘Irrigation Parts’, ‘Seeds’, and ‘Fertilizer’ using a label maker for a clean, professional finish.
- Place a bag of sand mixed with a little mineral oil in a bucket; plunging your metal tools into it after use cleans and coats them to prevent rust.
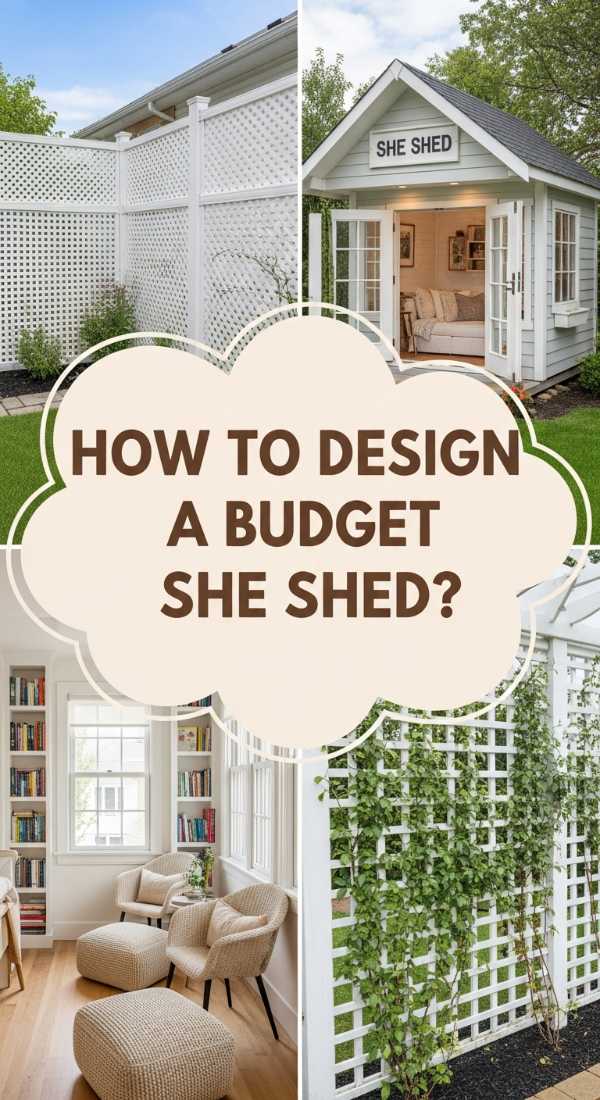
- White vinyl lattice panels (low maintenance).
- 4×4 pressure-treated posts for the frame.
- U-channel molding for clean lattice edges.
- Corrugated polycarbonate roofing (clear or tinted).
- Outdoor string lights and comfortable seating.
- Dig four post holes (at least 2 feet deep) to create a square or rectangular footprint; set the 4×4 posts in quick-set concrete and check for level.
- Build a simple roof frame using 2x4s and attach the corrugated roofing sheets with specialized screws that include rubber washers to prevent leaks.
- Measure the distance between your posts and cut the vinyl lattice panels to size using a circular saw with a fine-toothed blade.
- Slide the lattice into vinyl U-channels before attaching them to the posts; this hides the raw edges and allows the lattice to expand and contract in the sun.
- Screw the U-channels directly into the wooden posts, ensuring the lattice is taut and even.
- Paint the wooden frame white to match the vinyl lattice for a seamless, high-end ‘all-white’ garden look.
- Install a simple screen door or leave one side open as an entryway, then decorate with climbing plants like Clematis to slowly ‘knit’ the shed into the landscape.
How to make it
How to Choose Summer Themed Wallpaper for Bright Seasonal Energy

Why we love this
Summer-themed wallpaper acts as permanent sunshine for your walls. Imagine the zest of citrus prints or the lush, waxy texture of tropical palm leaves brightening up a dark hallway. The visual energy is immediate—it’s like the smell of fresh lemon zest and the feeling of a crisp linen shirt. It transforms a room from a static space into a vibrant environment that feels perpetually ready for a garden party. It’s the easiest way to inject high-impact personality and a sense of joy into your home’s architecture.
Essential Elements:
How to make it
How to Organize Yard Tool Storage Ideas for a Tidy Garden
Why we love this
There is a profound sense of peace that comes from a perfectly organized tool shed. It’s the metallic clink of a shovel meeting its magnetic rack and the organized visual of wooden handles lined up like soldiers. The air smells of clean metal and dry sawdust, a testament to hard work and future projects. Having a dedicated spot for every trowel and rake doesn’t just look Pinterest-perfect; it removes the friction from your gardening routine, making the act of tending to your plants feel like a graceful dance rather than a chore.
Essential Elements:
How to make it
How to Assemble Cheap She Shed Ideas Using Vinyl Lattice Panels
Why we love this
The vinyl lattice she shed is the ultimate budget-friendly retreat. It feels like a semi-private hideaway where the breeze can still find you, carrying the scent of jasmine or climbing roses. The texture of the white lattice creates a beautiful play of light and shadow, reminiscent of an English tea garden. It’s a space that feels airy and light, providing a dedicated zone for reading, painting, or simply enjoying a glass of wine while the sun sets. It’s affordable luxury that uses simple materials to create a high-end architectural focal point.
Essential Elements:
How to make it
Conclusion: Your Aesthetic Journey Starts Now
Transforming your home into a Pinterest-perfect sanctuary isn’t about having an unlimited budget; it’s about having a vision and the patience to execute it step by step. From the nostalgic charm of a vintage-inspired living room to the practical beauty of an organized garden shed, every project we’ve explored today is designed to make your daily life feel a little more intentional and a lot more beautiful. Remember, the best homes aren’t just built—they are curated over time with love, creativity, and a touch of DIY magic. So, pick one project, grab your tools, and start creating the home you’ve always dreamed of.