

The Ultimate Cheat Sheet for a Viral (and Simple) Food Board
There is something undeniably magical about a table filled with colors, textures, and tastes that invite everyone to dig in without ceremony. We’ve all seen those stunning, viral food boards on social media—the ones that look like a work of art but somehow feel completely approachable. I used to think hosting meant hours of individual plating, but once I discovered the art of the ‘themed board,’ my hosting game changed forever. It’s about the joy of sharing, the ease of preparation, and that warm, fuzzy feeling of watching your favorite people hover over a spread of deliciousness.
Today, I’m pulling back the curtain on my ultimate cheat sheet. We are going beyond just cheese and crackers; we are talking about a full lifestyle spread that transitions from the light, floral notes of spring to the sun-drenched flavors of summer. Whether you are hosting a brunch, a patio dinner, or just want to treat yourself to a beautiful meal, these components are designed to be photogenic, simple, and absolutely mouth-watering.
How to bake spring cakes?

Why we love this
There is nothing quite like the aroma of a light, citrus-infused spring cake wafting through a sunlit kitchen. These cakes are the epitome of elegance, featuring a crumb that is airy and tender, almost like a cloud, while the zest of lemon or orange provides a bright, refreshing zing that cuts through the sweetness. When you take that first bite, you experience the delicate balance of a buttery base paired with a silky glaze that melts instantly on the tongue, making it the perfect centerpiece for a mid-afternoon garden party or a quiet Sunday morning treat.
Ingredients
- 2 cups all-purpose flour
- 1 1/2 cups granulated sugar
- 1/2 cup unsalted butter, softened
- 3 large eggs, room temperature
- 1 cup buttermilk
- 2 tsp baking powder
- 1 tbsp lemon zest
- 1 tsp vanilla extract
- Pinch of salt
How to make it
- Preheat your oven to 350°F (175°C) and generously grease a 9-inch round cake pan or a decorative Bundt pan to ensure a clean release.
- In a large mixing bowl, cream together the softened butter and granulated sugar using a hand mixer or stand mixer on medium-high speed for at least 3-5 minutes until the mixture is pale and fluffy.
- Add the eggs one at a time, beating well after each addition to ensure the fats and proteins emulsify properly, then stir in the vanilla extract and fresh lemon zest.
- In a separate bowl, whisk together the flour, baking powder, and salt to aerate the dry ingredients and remove any clumps.
- Gradually alternate adding the dry ingredients and the buttermilk to the wet mixture, starting and ending with the flour; mix on low speed just until combined to avoid overworking the gluten, which keeps the cake tender.
- Pour the batter into the prepared pan, smoothing the top with a spatula, and bake for 30-35 minutes or until a toothpick inserted into the center comes out clean with just a few moist crumbs.
- Allow the cake to cool in the pan for 10 minutes before inverting it onto a wire rack to cool completely before applying any glaze or floral decorations.
How to make spring dinners?
Why we love this
Spring dinners should feel like a transition from the heavy stews of winter to the vibrancy of the new season, and nothing achieves this better than a sheet-pan salmon and asparagus feast. The salmon becomes buttery and flaky under the heat, its natural oils mingling with the snap of fresh, green asparagus spears that have been roasted until they are just tender with charred, crispy tips. The scent of roasted garlic and fresh dill fills the air, creating a sensory experience that feels both indulgent and incredibly nourishing, perfect for those long, lengthening evenings.
Ingredients
- 2 large salmon fillets
- 1 bunch fresh asparagus, trimmed
- 2 tbsp olive oil
- 1 lemon, sliced into rounds
- 3 cloves garlic, minced
- Fresh dill and parsley
- Salt and cracked black pepper
How to make it
- Line a large rimmed baking sheet with parchment paper and preheat your oven to 400°F (200°C), which is the sweet spot for searing the salmon while keeping the inside moist.
- Pat the salmon fillets completely dry with a paper towel—this is a pro tip to ensure the skin gets crispy rather than soggy.
- Place the salmon and the trimmed asparagus on the baking sheet, ensuring they aren’t overcrowded so the heat can circulate evenly.
- Drizzle everything with high-quality olive oil and rub the minced garlic, salt, and pepper into the flesh of the fish and over the vegetables.
- Top the salmon with lemon slices to infuse it with acidity and moisture during the roasting process.
- Roast for 12-15 minutes; you’ll know the salmon is done when it flakes easily with a fork and reaches an internal temperature of 145°F, while the asparagus should remain bright green and slightly firm.
- Finish with a generous sprinkle of fresh herbs and an extra squeeze of lemon juice before serving directly from the pan for that rustic, home-cooked feel.
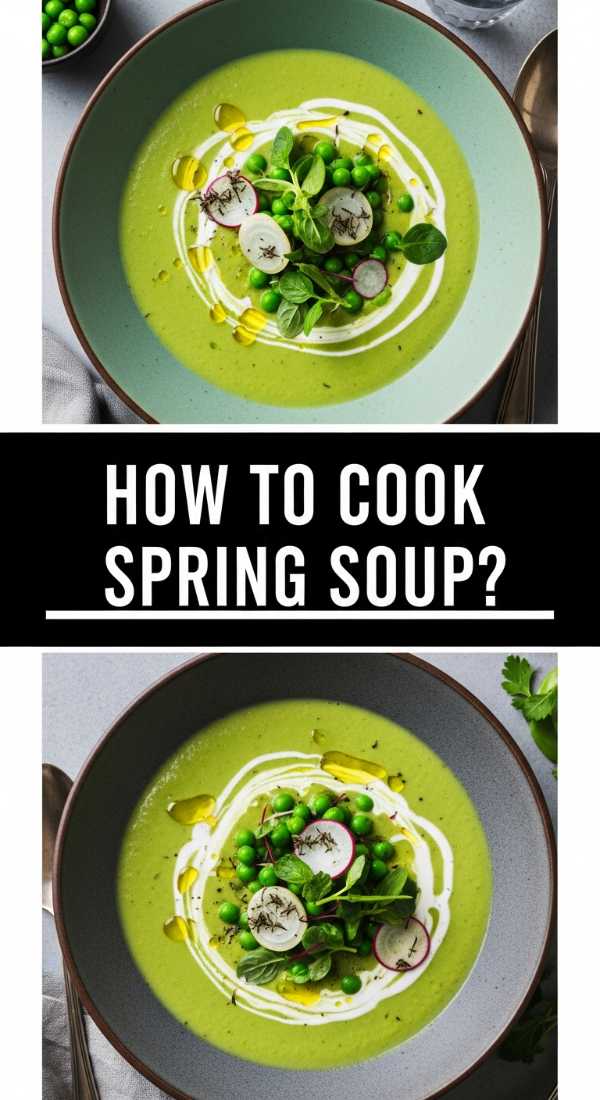
How to cook spring soup?

Why we love this
A true spring soup is a celebration of the color green, offering a velvety texture that feels luxurious without the need for heavy creams. Imagine the sweet, earthy scent of fresh peas and leeks simmering in a light broth, topped with a swirl of cool crème fraîche and a sprig of mint. Each spoonful is a burst of freshness, providing a comforting warmth for those lingering chilly spring days while remaining light enough to keep you feeling energized and refreshed, like a garden in a bowl.
Ingredients
- 4 cups fresh or frozen peas
- 2 large leeks, white and light green parts only, sliced
- 1 quart vegetable broth
- 2 tbsp butter
- 1/2 cup fresh mint leaves
- Salt and white pepper
- Crème fraîche for garnish
How to make it
- Melt the butter in a heavy-bottomed pot or Dutch oven over medium heat, then add the sliced leeks and a pinch of salt.
- Sauté the leeks slowly for about 8-10 minutes until they are soft and translucent, but be careful not to brown them, as we want to maintain the soup’s vibrant green color.
- Pour in the vegetable broth and bring the mixture to a gentle boil, then turn the heat down to a simmer.
- Add the peas to the broth and cook for only 3-5 minutes—just long enough to make them tender but not so long that they turn olive-drab; keeping them bright is the key to a viral-worthy soup.
- Remove the pot from the heat and stir in the fresh mint leaves, which will wilt and release their aromatic oils into the liquid.
- Use an immersion blender to puree the soup until it is completely smooth and velvety; if you want an extra-fine texture, you can pass it through a fine-mesh sieve.
- Season with salt and a dash of white pepper, then ladle into bowls and garnish with a decorative swirl of crème fraîche and a few extra peas.
How to make rotel dip?

Why we love this
Rotel dip is the ultimate crowd-pleaser that brings a sense of nostalgia and pure, cheesy joy to any food board. There is something deeply satisfying about the sight of molten, golden cheese swirled with spicy tomatoes and savory meat, all waiting for a salty tortilla chip to dive in. The aroma is bold and zesty, promising a kick of heat followed by the creamy, smooth finish of melted cheese, making it the focal point of any casual gathering where people just want to relax and snack.
Ingredients
- 1 lb ground beef or sausage
- 16 oz Velveeta or similar melting cheese, cubed
- 1 can (10 oz) RoTel Diced Tomatoes and Green Chilies
- 1/2 tsp taco seasoning
- Fresh cilantro for garnish
- Tortilla chips for serving
How to make it
- In a large skillet over medium-high heat, brown the ground beef or sausage until it is fully cooked and no pink remains, breaking it into small crumbles with a wooden spoon.
- Drain the excess fat from the skillet thoroughly to ensure the dip doesn’t become oily or separated.
- Reduce the heat to low and add the cubed cheese to the skillet; it’s important to cut the cheese into small, uniform pieces so they melt evenly without burning.
- Pour in the entire can of RoTel tomatoes, including the liquid, which provides the necessary moisture and acidity to create a smooth sauce.
- Stir constantly with a spatula as the cheese melts, incorporating the meat and tomatoes until the mixture is thick, glossy, and perfectly combined.
- Sprinkle in the taco seasoning for an extra layer of smoky flavor and continue to stir until the dip is piping hot.
- Transfer the dip to a warm serving bowl or a small slow cooker to keep it at a dip-able consistency, and top with fresh cilantro for a pop of color.
How to toss summer salads?

Why we love this
Summer salads are all about the contrast of temperatures and textures—think cold, crisp greens meeting the sweetness of sun-ripened berries and the crunch of toasted nuts. A well-tossed summer salad is a visual masterpiece on a food board, offering a kaleidoscope of colors that hint at the complex flavors within. The scent of a tangy balsamic vinaigrette hitting fresh spinach leaves is instantly appetizing, promising a bite that is sweet, salty, and acidic all at once, cooling you down on even the hottest July afternoon.
Ingredients
- 6 cups baby spinach or mixed greens
- 1 cup fresh strawberries, sliced
- 1/2 cup blueberries
- 1/4 cup goat cheese or feta, crumbled
- 1/4 cup toasted pecans or walnuts
- Balsamic glaze or vinaigrette
How to make it
- Start with very cold, dry greens; if they are even slightly damp, the dressing won’t stick, and the salad will become soggy.
- Place the greens in a large, wide bowl that allows for plenty of movement when tossing—overcrowding is the enemy of a well-dressed salad.
- Add the sliced strawberries and blueberries, scattering them evenly so they don’t all sink to the bottom of the bowl.
- Prepare your dressing by whisking together olive oil, balsamic vinegar, a touch of honey, and salt until it is fully emulsified and thick.
- Drizzle the dressing around the edges of the bowl rather than directly onto the leaves, then use large salad tongs or your hands to gently lift and turn the greens until every leaf is lightly coated.
- Top the salad with the crumbled cheese and toasted nuts after tossing to ensure they stay on top and provide a beautiful, textural contrast.
- Serve immediately to maintain the crunch of the nuts and the structural integrity of the greens.
How to cook dirty spaghetti?

Why we love this
Dirty spaghetti is the soulful, deep-flavored cousin of your standard pasta dish, characterized by a rich, savory meat sauce that clings to every strand of noodle. The ‘dirty’ aspect comes from the finely minced aromatics and browned meats that create a complex, umami-packed coating rather than a thin, watery sauce. The aroma is intoxicating—garlic, onions, and bell peppers sautéing in fat—creating a rustic dish that feels hearty, comforting, and perfect for a shared board where everyone can twirl their forks into a communal pile of deliciousness.
Ingredients
- 1 lb spaghetti noodles
- 1 lb ground beef or pork
- 1 onion, finely diced
- 1 green bell pepper, finely diced
- 2 celery stalks, finely diced
- 3 cloves garlic, minced
- 2 tbsp tomato paste
- 1 tsp smoked paprika
- Salt and black pepper
How to make it
- Bring a large pot of heavily salted water to a rolling boil and cook the spaghetti until it is just slightly under ‘al dente,’ as it will finish cooking in the sauce later.
- While the pasta cooks, heat a large pan over medium heat and brown the meat, breaking it into very fine pieces—the finer the meat, the ‘dirtier’ and more cohesive the sauce will be.
- Remove the meat from the pan, leaving the rendered fat, and add the diced onion, bell pepper, and celery (the ‘holy trinity’ of flavor).
- Sauté the vegetables for 8-10 minutes until they are soft and have picked up the browned bits (fond) from the bottom of the pan.
- Stir in the garlic and tomato paste, cooking for 2 minutes until the paste turns a deep rust color and smells sweet rather than raw.
- Add the meat back into the pan along with a ladle of the starchy pasta water, stirring to create a thick, ‘dirty’ sauce that coats the back of a spoon.
- Toss the spaghetti directly into the pan, coating every strand thoroughly, and let it simmer for 60 seconds so the pasta absorbs the flavors before serving.
How to bake spring cookies?

Why we love this
Spring cookies are a delight for the senses, often featuring buttery shortbread or sugar cookie bases that crumble perfectly before melting away. We love decorating these with pastel-colored royal icing or even pressing edible dried flowers into the dough for a viral, botanical aesthetic. The scent of vanilla and almond extract filling the house is the ultimate comfort, while the finished cookies look like tiny pieces of art that add a touch of whimsy and sweetness to any lifestyle board spread.
Ingredients
- 2 1/2 cups all-purpose flour
- 1 cup unsalted butter, softened
- 1 cup granulated sugar
- 1 egg
- 1 1/2 tsp vanilla extract
- 1/2 tsp almond extract
- 1/2 tsp baking powder
- Pinch of salt
How to make it
- Cream the softened butter and sugar together for 3-5 minutes until the mixture is light and airy, which ensures a cookie that isn’t too dense.
- Add the egg, vanilla, and almond extract, beating until fully incorporated and the mixture looks like smooth silk.
- In a separate bowl, whisk the flour, baking powder, and salt, then slowly add it to the wet ingredients on low speed; stop as soon as the dough pulls away from the sides of the bowl.
- Divide the dough into two discs, wrap in plastic, and chill in the refrigerator for at least 1 hour—this is crucial for preventing the cookies from spreading and losing their shape in the oven.
- Roll the chilled dough out on a floured surface to 1/4 inch thickness and use your favorite spring-themed cutters (flowers, butterflies, or simple circles).
- Bake at 350°F (175°C) for 8-10 minutes; you want to pull them out just before the edges turn golden to keep them soft and tender.
- Let the cookies cool completely on a wire rack before icing or adding edible decorations to prevent the designs from melting.
How to grill healthy meals?
![]()
Why we love this
Grilling is the ultimate summer ritual, and healthy grilled meals prove that you don’t need heavy sauces to achieve incredible flavor. There is something primal and satisfying about the sizzle of lean proteins and vibrant vegetables hitting a hot grate, resulting in those beautiful char marks that signify deep, smoky flavor. The aroma of charred bell peppers and marinated chicken breast is the quintessential scent of summer, offering a meal that is light, high in protein, and visually stunning when lined up on a serving platter.
Ingredients
- 1 lb chicken breast or firm tofu, cubed
- 2 bell peppers, cut into chunks
- 1 red onion, cut into wedges
- 1 zucchini, sliced into rounds
- 3 tbsp olive oil
- 2 tbsp lemon juice
- 2 tsp dried oregano and garlic powder
How to make it
- Prepare a marinade by whisking the olive oil, lemon juice, oregano, garlic powder, salt, and pepper in a large bowl.
- Toss your protein and vegetables in the marinade, ensuring every piece is well-coated, and let it sit for at least 30 minutes in the fridge to allow the flavors to penetrate.
- Preheat your grill to medium-high heat (about 400°F) and lightly oil the grates using a folded paper towel dipped in oil held with tongs.
- Thread the protein and vegetables onto skewers, alternating colors for a vibrant look—if using wooden skewers, be sure to soak them in water for 30 minutes beforehand to prevent burning.
- Place the skewers on the grill and close the lid; cook for 5-7 minutes per side.
- Look for clear grill marks and ensure the chicken reaches an internal temperature of 165°F (74°C); the vegetables should be tender but still have a slight bite.
- Remove from the grill and let the meat rest for 5 minutes before serving to keep the juices locked inside.
How to mix pink sprite?
Why we love this
Pink Sprite is the ultimate viral ‘mocktail’ that looks like a sunset in a glass and tastes like pure summer joy. It’s effervescent, crisp, and has just the right amount of fruity sweetness to be incredibly refreshing without being cloying. The way the bubbles dance around the ice cubes and the pink hue glows in the light makes it an essential addition to any photogenic food board, providing a non-alcoholic option that feels just as fancy and celebratory as a cocktail.
Ingredients
- 1 can (12 oz) Sprite or lemon-lime soda, chilled
- 2 tbsp grenadine or maraschino cherry juice
- 1 tsp lime juice
- Fresh raspberries or cherries for garnish
- Plenty of ice
How to make it
- Start with a tall glass or a decorative jar and fill it to the very brim with ice; more ice actually keeps the drink colder longer and prevents the soda from going flat too quickly.
- Pour the chilled Sprite over the ice, leaving about an inch of space at the top of the glass for the ‘pink’ layer.
- Add the fresh lime juice; the acidity balances the sweetness of the soda and the syrup we are about to add.
- Slowly pour the grenadine or cherry juice over the back of a spoon into the glass; this technique allows the syrup to settle beautifully at the bottom, creating an ombre effect.
- Use a long stirrer to gently swirl the drink just once or twice—you want to integrate the flavor without losing the beautiful color gradient.
- Top with a handful of fresh raspberries or a couple of maraschino cherries for that viral, high-end look.
- Serve immediately with a straw so your guests can enjoy the refreshing fizz while it’s at its peak.
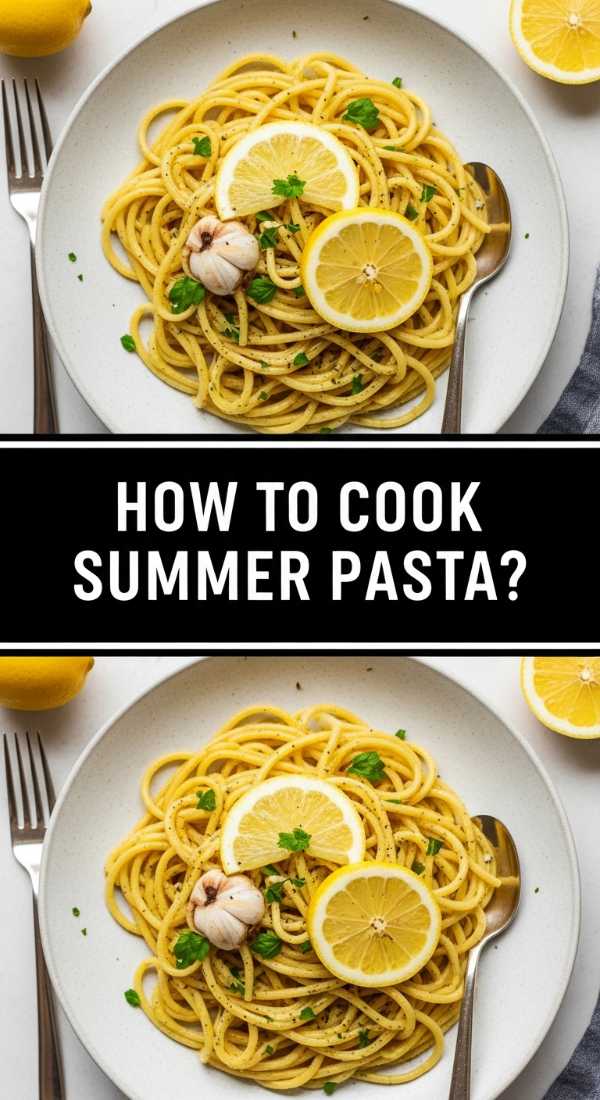
How to cook summer pasta?
[IMAGE_10]
Why we love this
Summer pasta is the antithesis of heavy, wintery bakes; it is light, fast, and relies on the natural juices of ripe vegetables to create a sauce. Imagine the smell of fresh basil being torn over warm noodles, and the way cherry tomatoes burst under the heat of a pan to release their sweet, tangy liquid. It’s a dish that feels effortless and sophisticated, capturing the essence of al fresco dining where the ingredients are so good they don’t need to be hidden under layers of cheese.
Ingredients
- 12 oz linguine or spaghetti
- 2 cups cherry tomatoes, halved
- 1/4 cup extra virgin olive oil
- 4 cloves garlic, thinly sliced
- 1/2 cup fresh basil leaves, torn
- 1/2 cup grated Parmesan cheese
- Red pepper flakes (optional)
How to make it
- Boil your pasta in salted water until it is al dente; before draining, reserve exactly one cup of the starchy pasta water—this is the ‘liquid gold’ that makes the sauce silky.
- In a large skillet, heat the olive oil over medium-low heat and add the thinly sliced garlic; cook slowly for 2-3 minutes until the garlic is golden and the oil is fragrant.
- Add the halved cherry tomatoes and a pinch of salt to the skillet; turn the heat up to medium and cook for 5-7 minutes until the tomatoes begin to soften and release their juices.
- Use the back of a wooden spoon to gently press down on some of the tomatoes to help them ‘burst’ and create a chunky sauce.
- Add a splash of the reserved pasta water to the skillet, stirring to emulsify the water with the garlic oil and tomato juices.
- Transfer the pasta directly into the skillet and toss vigorously, adding more pasta water as needed until the noodles are glossy and well-coated.
- Turn off the heat and stir in the fresh basil and Parmesan cheese, allowing the residual heat to melt the cheese slightly before serving.
The Art of the Simple Board
Creating a viral food board isn’t about perfection; it’s about the intention behind the ingredients. By mixing these spring and summer staples, you create a tapestry of flavors that celebrate the seasons and the joy of being together. Remember, the best boards are the ones that get messy because people are actually enjoying them. So, grab your biggest platter, pick a few of these recipes, and start building your own masterpiece. Happy hosting!